
The default design of the WooCommerce shop page is not up to the mark. It follows the default archive.php template in the WordPress theme.
Now there are 6.3 million WooCommerce websites currently online. Also, 5,300 WooCommerce websites currently sell over 20,000 products.
Not all of these websites are successful. Now, to climb the ladder of success, you need to have a proper WooCommerce shop page.
As mentioned earlier, you have very little customization options with WooCommerce themes. It is nearly impossible to create a proper WooCommerce shop page with that level of customization!
We are here with the solution.
There are two ways to create and/or customize a WooCommerce Shop Page template. The first way is to create a shop template using a plugin like ProductX WooCommerce Blocks.
Or you can create a WooCommerce shop page template programmatically.
Unfortunately, it is harder of the 2 options we will show you. First of all, it requires extensive coding knowledge. Second, the chances of failure are high – it may cause your site to break.
Let’s start with the harder process:
How to Customize WooCommerce Shop Page template Programmatically
To create a shop page template in WooCommerce programmatically, you need 2 things:
- You need a good understanding of programming
- You need a proper understanding of the WordPress page hierarchy
If you have these two things, and you want to keep your site plugin-free, then you are welcome to follow the method mentioned below:
Step-1. Create a Child Theme
As you are going to play with the current theme of your site (the default 2023 WordPress theme), we recommended you create a child theme and customize it instead of the main theme.
This allows you to keep the customizations of your parent theme. And even if there’s a new update to the theme, you will not loose the customizations. In short, it is a safe way to create the WooCommerce shop template.
So, let’s create the child theme and add a shop page template.
First of all, you have to create a new folder in the path of your theme files (wp-content/themes/) and give it a name. It will be your child theme folder. w
Open the folder and create a text file and paste the following code.
Theme Name:Storefront Child Theme
Theme URI:https://www.wpxpo.com/
Description:A Storefront child theme
Author:WPXPO
Author URI:https://www.wpxpo.com
Template:storefront
Version:1.0.0
Text Domain:storefrontchild
Now create another text file, name it functions.php and paste the code below.
/* enqueue scripts and style from parent theme */

function storefront_styles() {
    wp_enqueue_style( 'child-style', get_stylesheet_uri(),
    array( 'twenty-twenty-one-style' ), wp_get_theme()->get('Version') );
}
add_action( 'wp_enqueue_scripts', 'storefront_styles');
That’s all.
Now when you go to Appearance → Themes of your WordPress site and you should see the two versions of themes – Storefront and Storefront Child.
Step-2. Create a WooCommerce Shop Page Template
Now that, you have created the child theme, it’s time to create a shop page template.
For that, go to the cPanel of your site and open the child theme file. Create a file and name it archive-product.php which will be the shop page template.
Step-3. Customize the WooCommerce shop page template
The template is empty. So, if you browse the shop page, you will find it is empty.
There are 2 things you can do here:
You can either create the template by writing your own code. Or you can just copy the codes from the single-page template and paste it to the new template.
If you view the page now, it will seem broken to you.
But don’t worry. Use the code below to fix this issue.
<?php echo do_shortcode (‘[products limit="6" columns="2"]’) ?>
To properly implement this code:
- Start editing the template (archive-product.php).
- Replace the code with the given code snippet.
After replacing the codes refresh the shop page. See how it looks.
You will see that the products are displayed in an organized way according to the code.
You can also increase the number of products and columns by replacing the value of the product limits and columns.
You see the problem here right?
If you are a beginner and wish to take your business online, there is little chance that you will be able to use the steps successfully. You may have to hire a professional to do it for you.
Also, if you are doing it alone, then the chances of you failing are very high. And there is the matter of your time, as it may take a while to adjust yourself to the process.
It’s you you need to consider the next section that shows the way to use a WordPress plugin. Using a WooCommerce WordPress plugin in contrast to writing code for the shop page is easier.
How to Create and Customize WooCommerce Shop Page Template using ProductX
Let’s say you are not a developer. Also, you don’t know how to code and don’t want to get into it.
This next method shows you the easy way on how to customize WooCommerce shop page.
In this method, you need to use the ProductX Gutenberg WooCommerce Blocks plugin (Or you can also look for a WooCommerce development company)
ProductX offers an exclusive WooCommerce Builder addon to create custom Product Archives, shop, and single product pages.
Follow the steps below to create a WooCommerce custom shop page template.
Now there are 2 ways to add a custom WooCommerce shop page template. You can use a premade template or create the shop page manually. But, in both cases, you need to install and activate the plugin.
Install and Activate the ProductX WooCommerce Plugin
ProductX is now WowStore! We’re very excited to bring you this experience, packed with exciting features. Please note that the features, blocks, starter packs, etc. all work the same. If you have used ProductX, you’ll feel right at home with WowStore.
If you want to use the WooCommerce Builder addon you need to install the ProductX plugin to your WooCommerce site. For that:
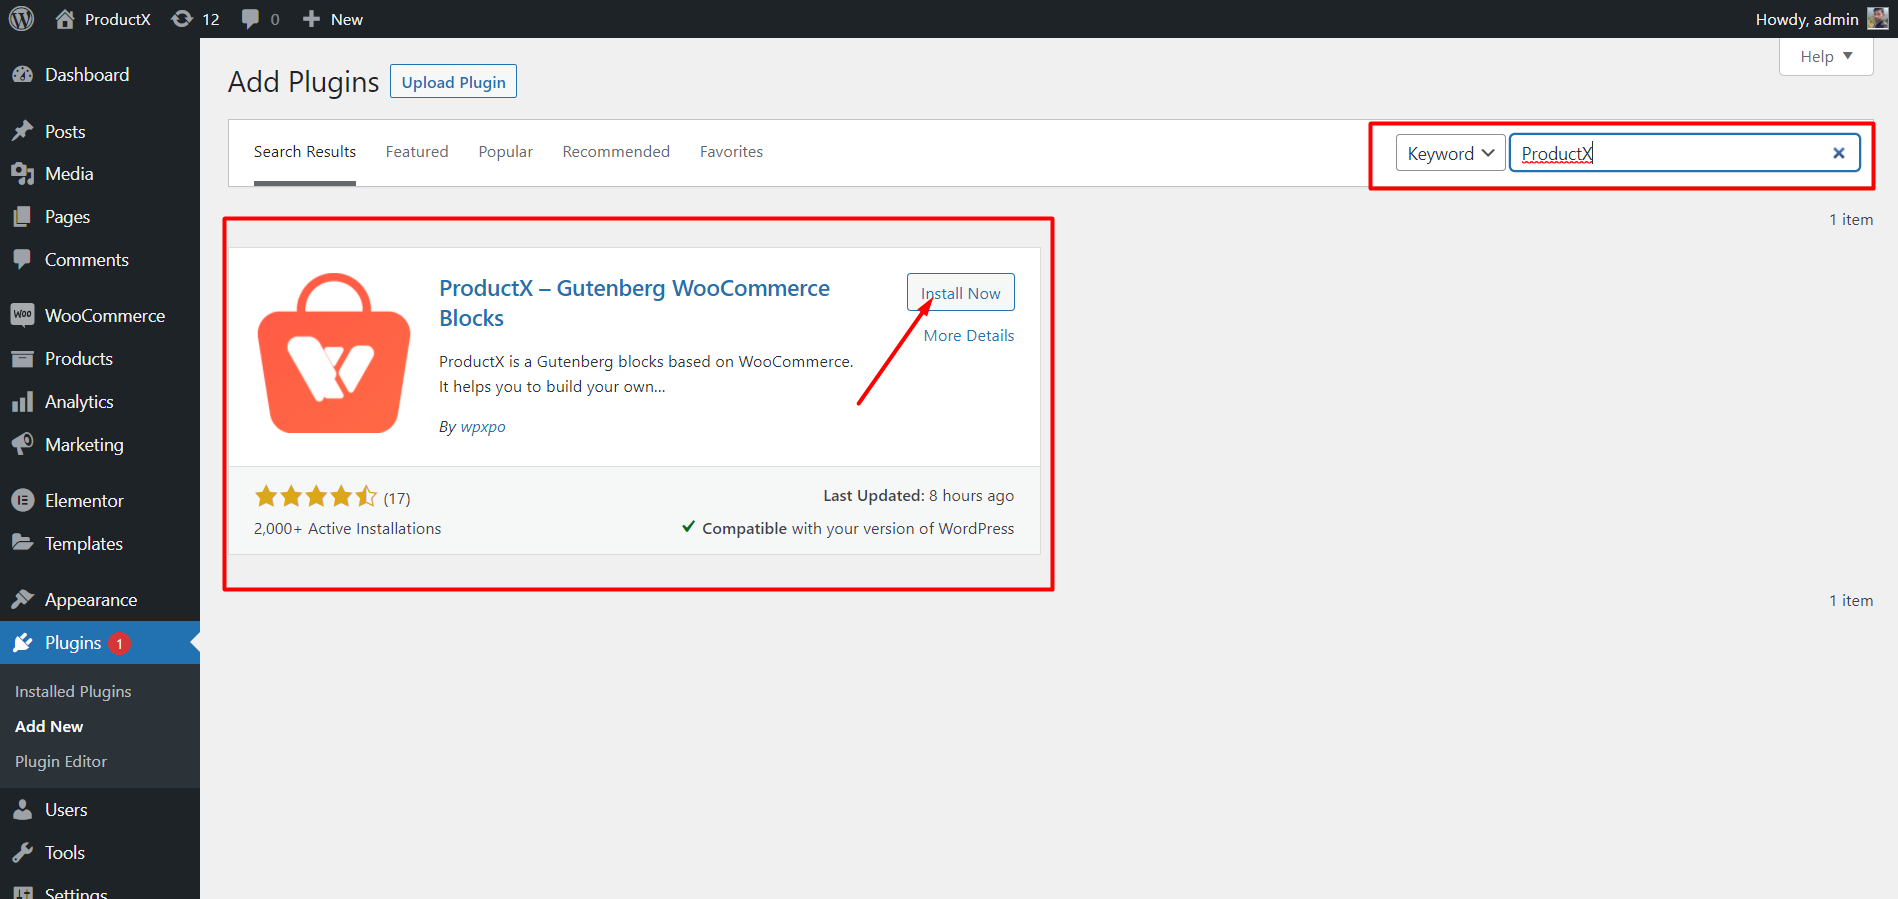
- Go to the Plugin Section and click on the Add New button
- Search for the ProductX plugin
- Install and Activate the plugin.
👉 Get ProductX Pro to unlock all conversation-focused features and skyrocket your sales!
Now that we installed the plugin, we can choose between the two choices we have. Let’s explore them one-by-one.
Enable the WooCommerce Builder Addon
In this step, we are going to use the WooCommerce builder to create a custom shop page template. To do this, you need to do the following:
To enable it:
- Go to the All Addons section from the ProductX setting panel.
- Enable the WooCommerce builder addon.
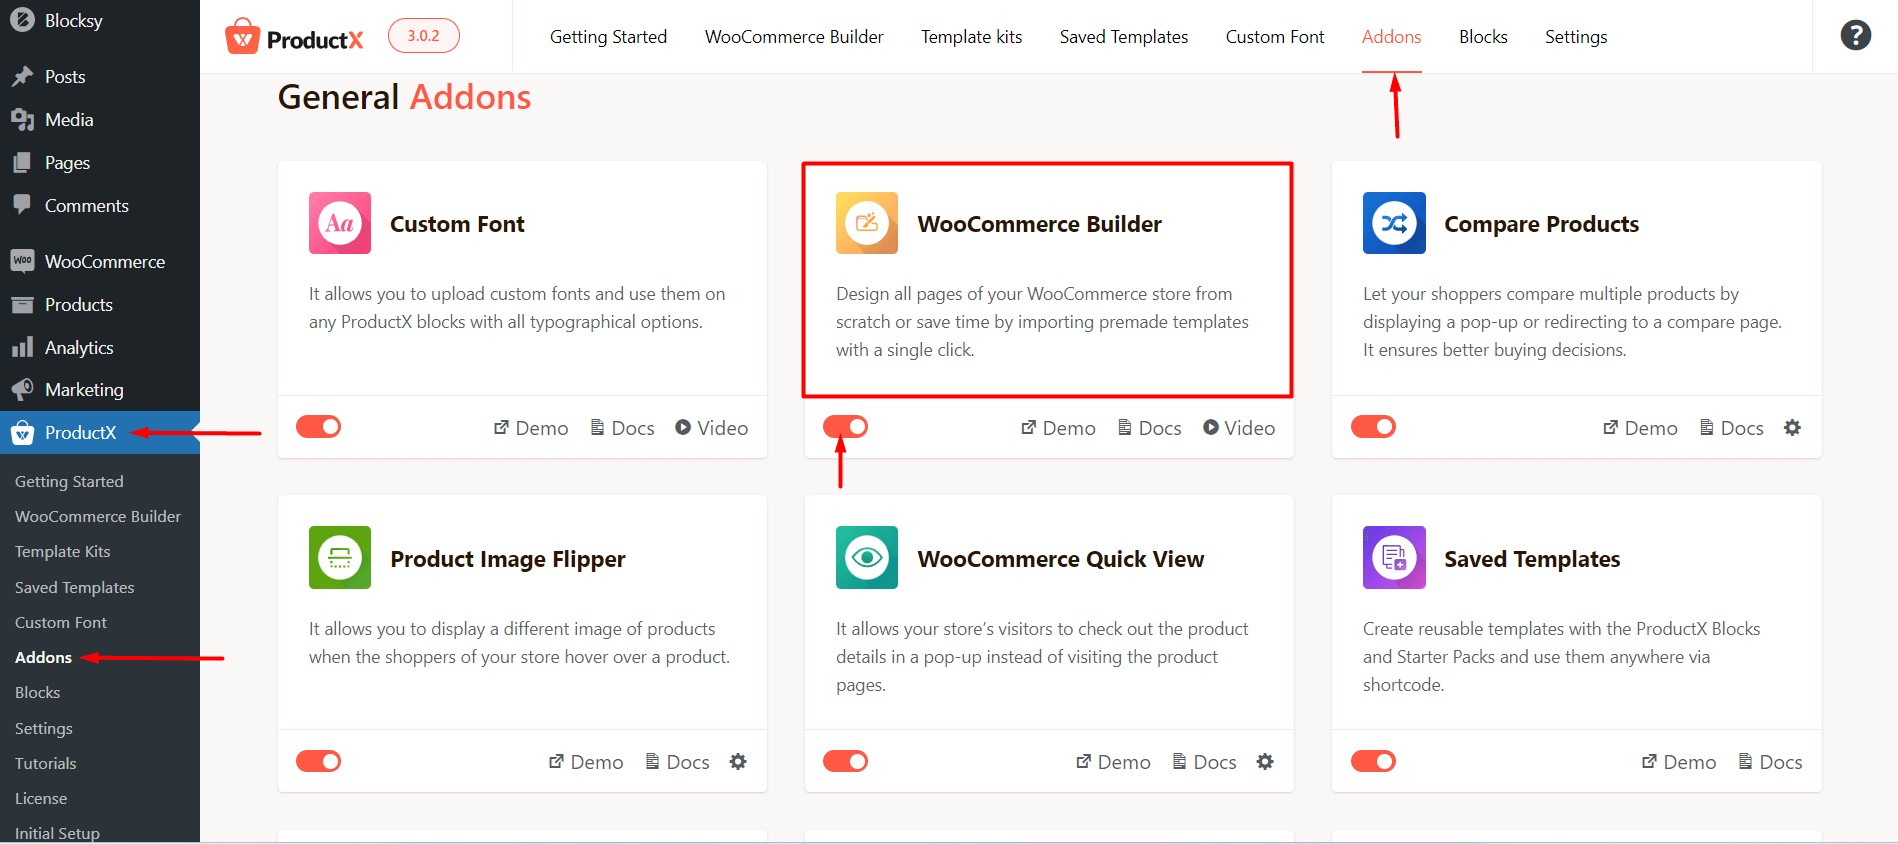
After you enable the builder, you will see the WooCommerce builder pop-up within the ProductX setting panel. Once you click on it, you will be taken to the All Templates page.
If you are a new user, then you will see the builder prompting you to create a new template. However, you can simply click on Shop. Here, you will have two choices. The first one is to create the shop page with a pre-made template. And the second option is to create a shop page from scratch.
Use the WooCommerce Builder to Create a WooCommerce Shop Template
All you have to do here is:
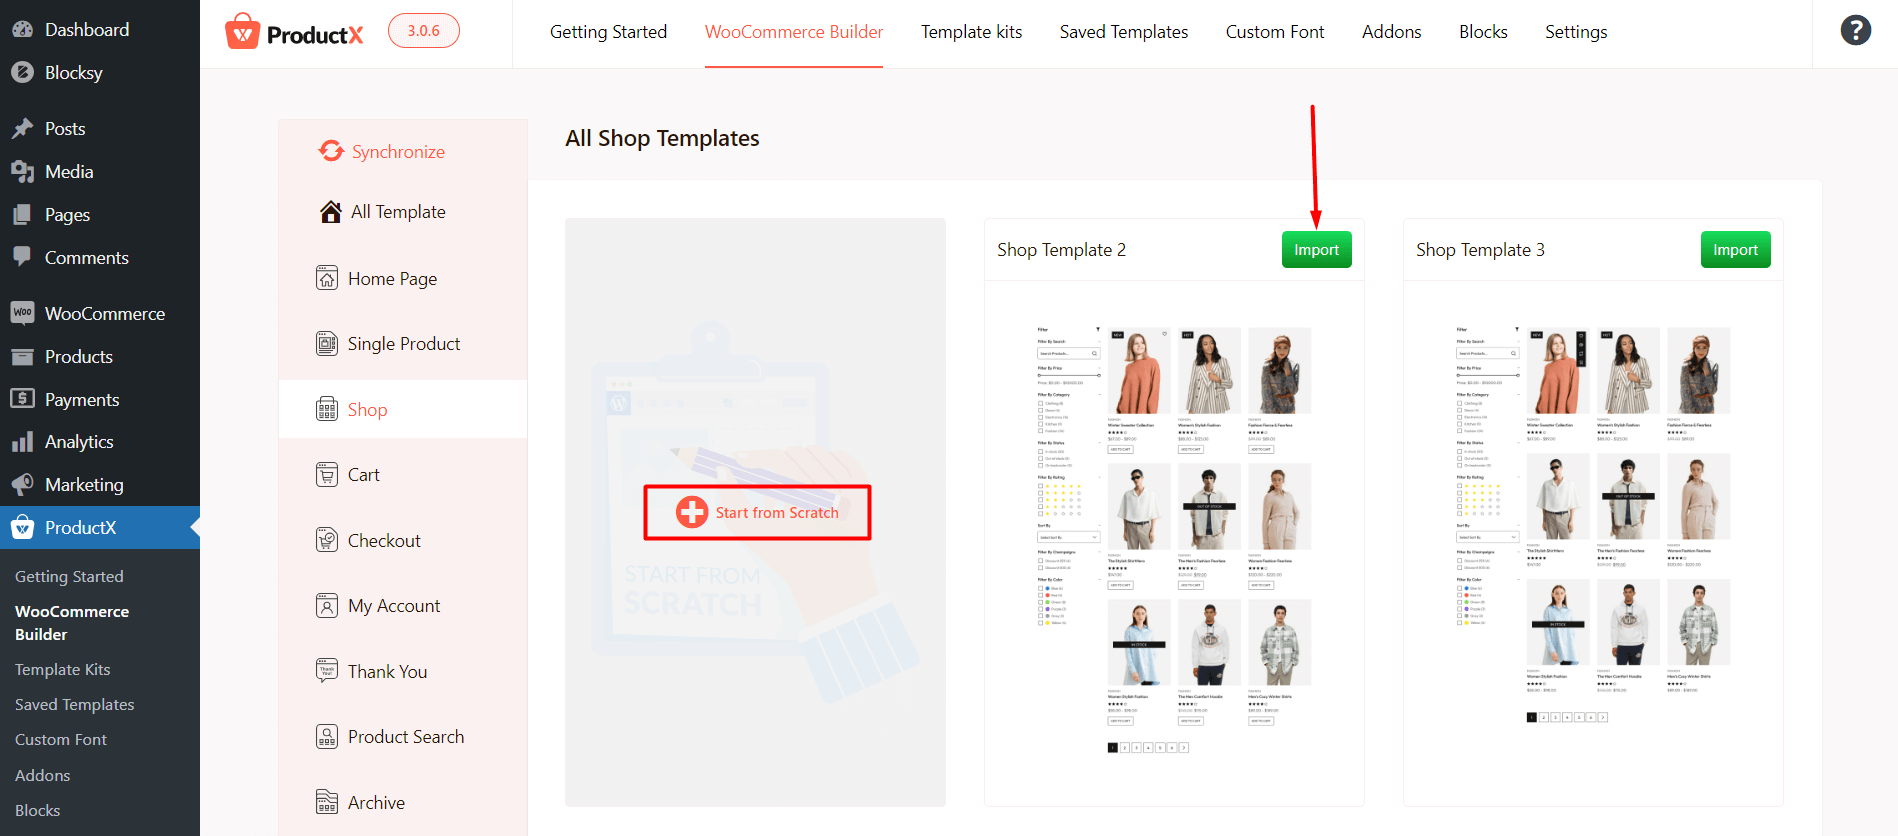
Select a Template of Your Choice and Import it
Choose a pre-made shop page template and click on the import button. Once the design is imported, you will land on the editor page.
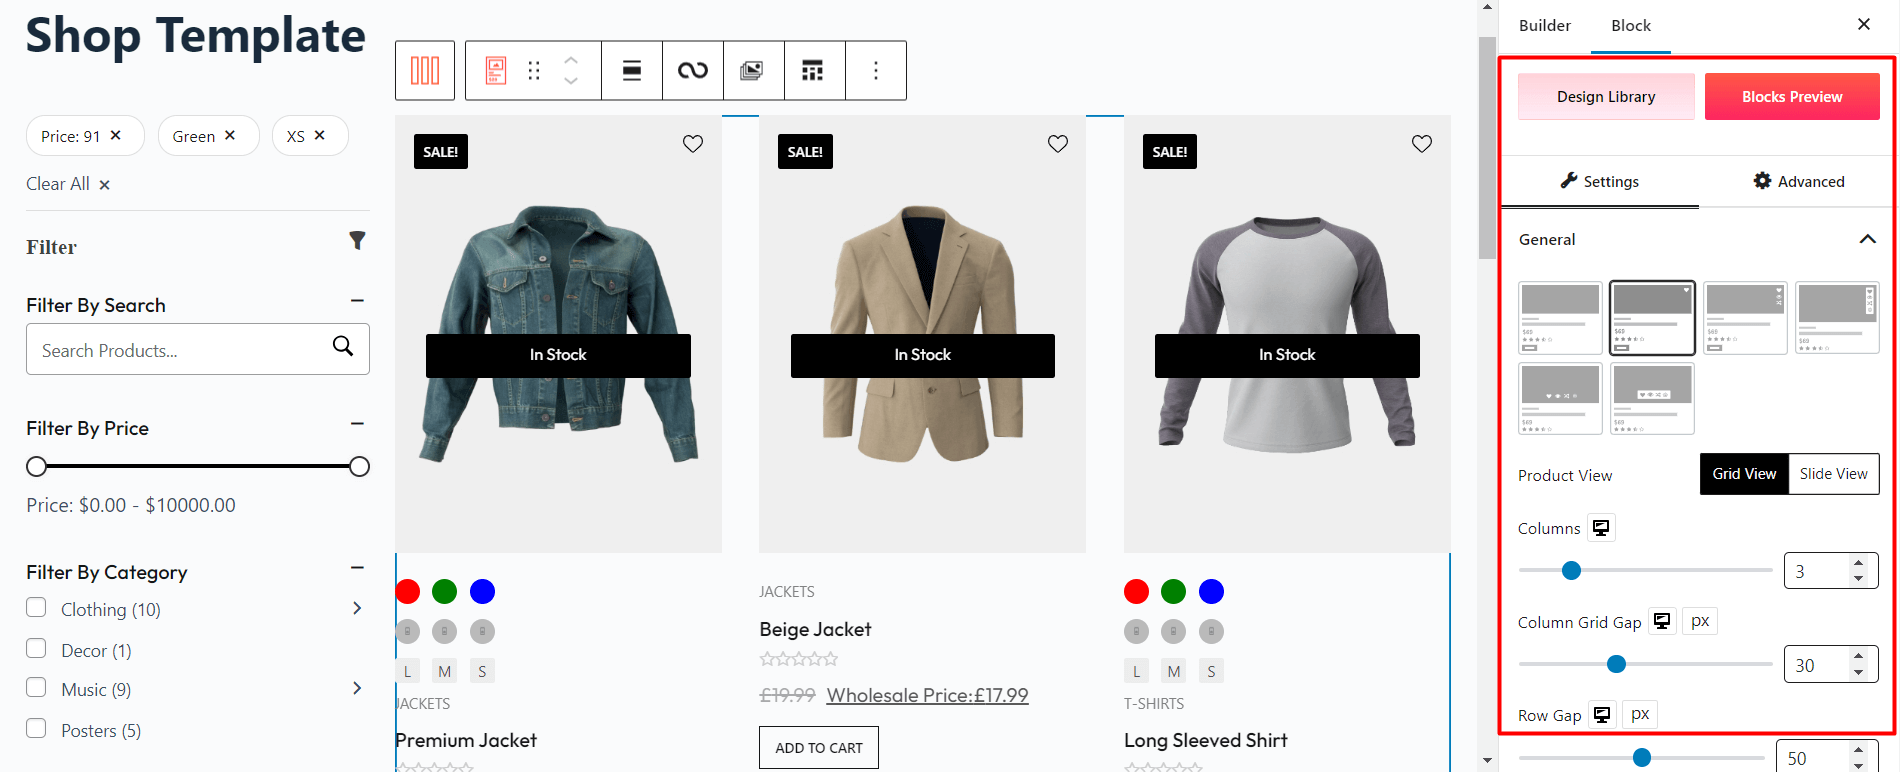
Make Changes to the Template Parts
All you have to do is click on the template part and the settings panel will appear to the right. You can change various design properties as per your choice.
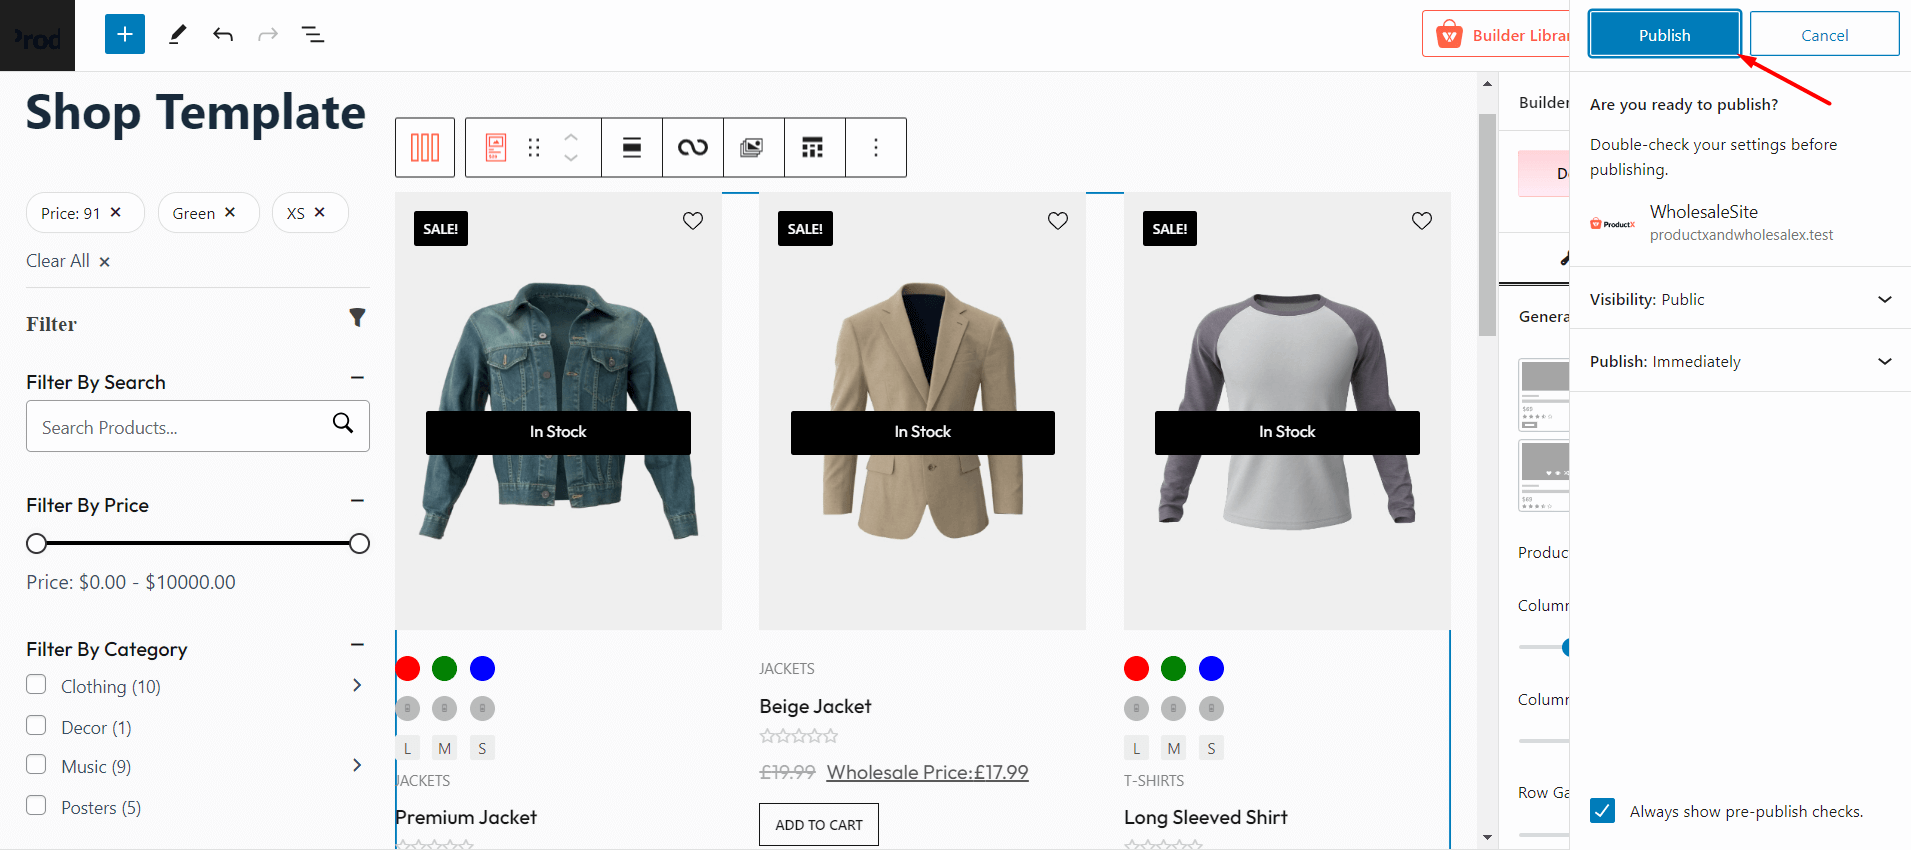
Publish the Page Template
Finally, once you are done with the customizations, you can simply publish the page. If you go to visit the store section of your WooCommerce site, you will be able to see the design.
So, if you are using a pre-made template, you need to follow the 3 things:
- Choose a design and import the template
- Customize the blocks in the editor
- Publish and save the page template
And your shop page is ready!
If you are still sceptic about the power of the builder , you can look at the video:
In the next phase, we will discuss how to create a custom WooCommerce shop page using the ProductX blocks.
Create a new WooCommerce Shop Template from Scratch
To build a WooCommerce shop page from scratch, you need to do the following:
- Go to ProductX > WooCommerce builder from your WordPress dashboard.
- Select “Shop” from the menu on the left.
- Click on “Start from Scratch”
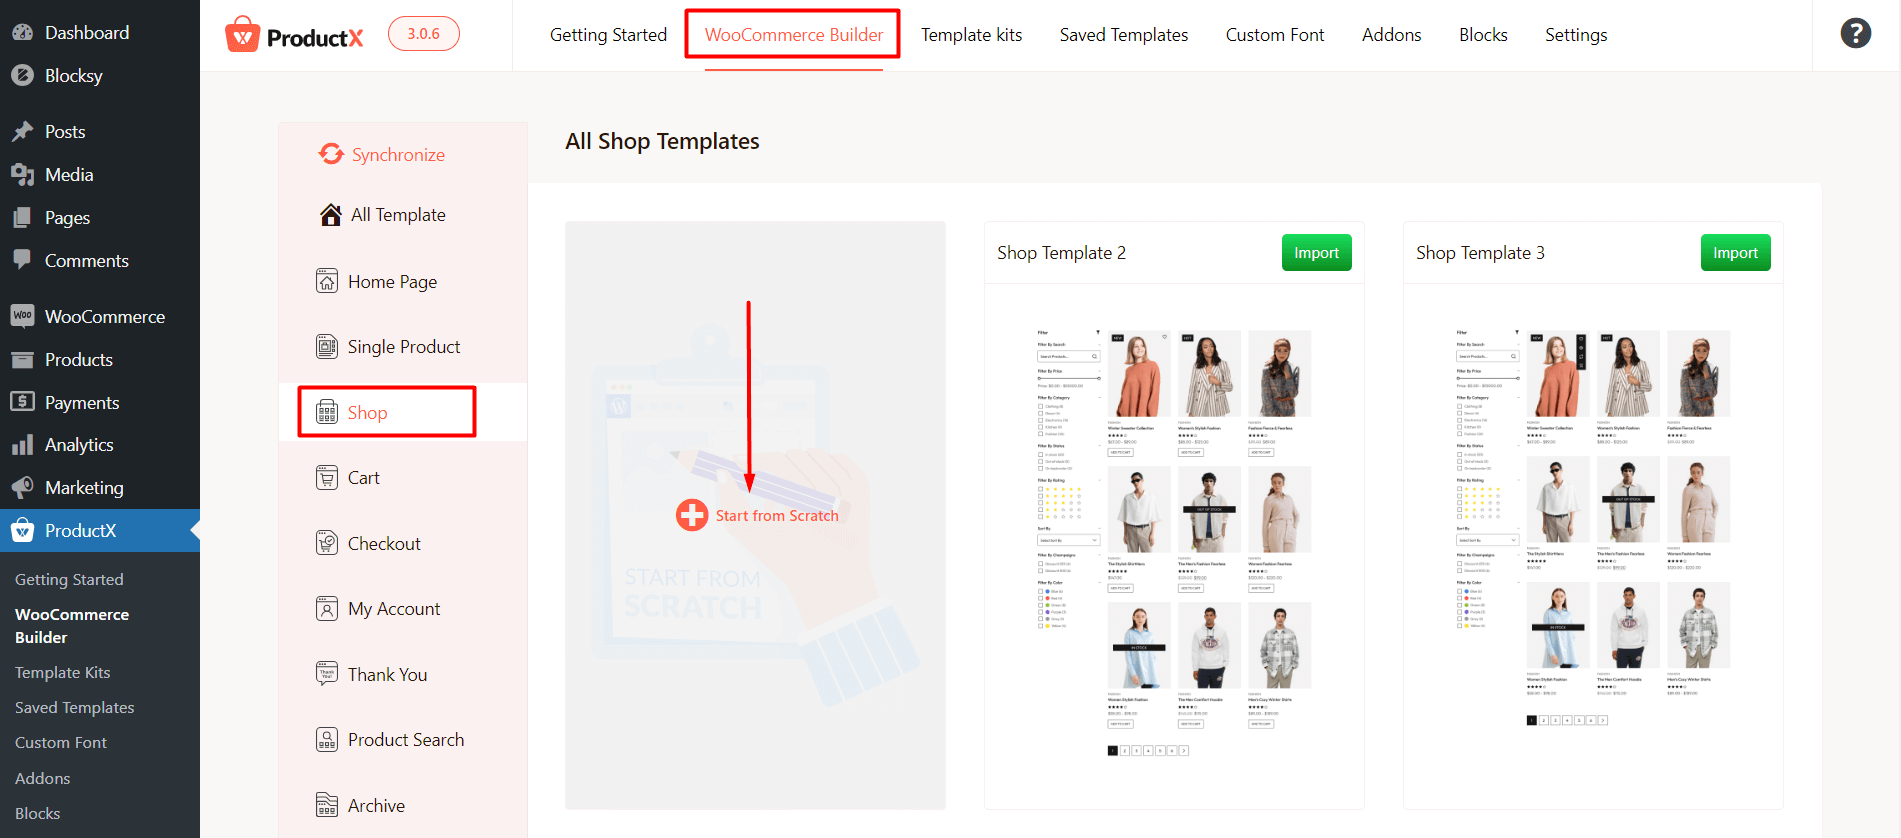
Once you do this, you need will be taken to the Shop template editor. Here, you can use the dedicated shop page blocks to create a custom Shop page.
Create and Customize WooCommerce Shop Page Template using Product Blocks
At this stage, you’re probably wondering how can you create and customize a WooCommerce custom shop page template?
For that, you can import any of the available Product Blocks. There’s more than 15+ blocks you can use to create shop page template.
ProductX offers multiple types of Products Blocks including Product Grids, Lists, Category Grids, and Product Sliders to showcase the products of your WooCommerce store.
Now let’s customize the shop page – starting with placing the ProductX WooCommerce blocks.
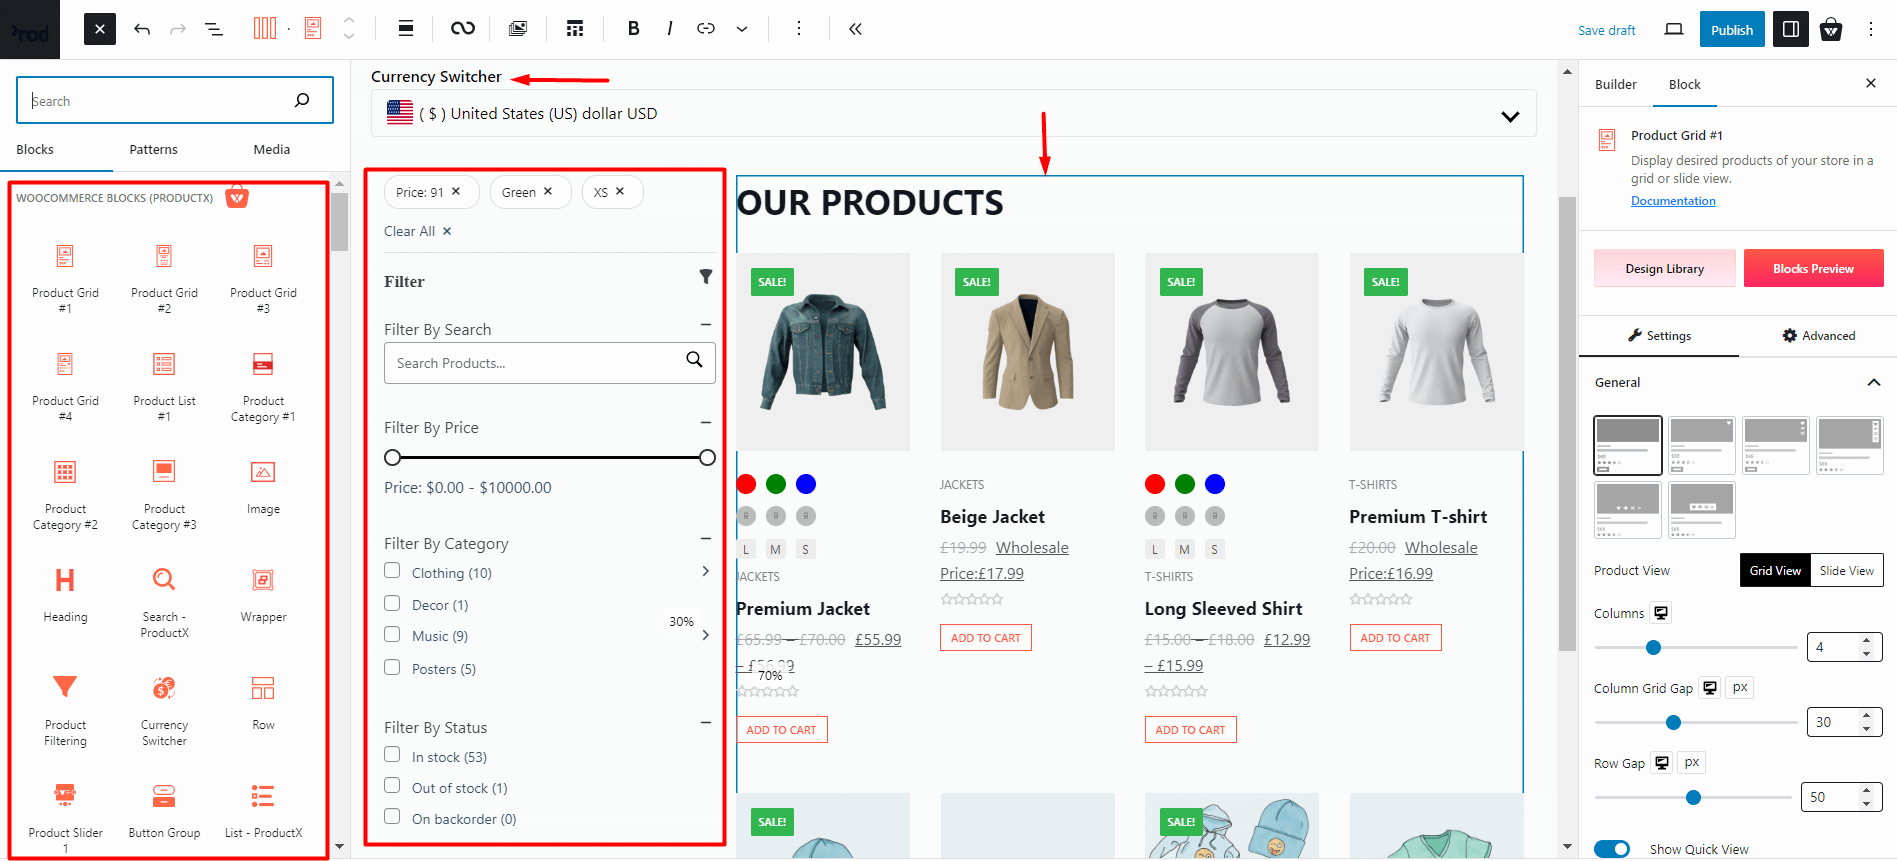
Importing the Product Blocks
Importing a Product block is very simple. You can do it in 2 ways:
- You can use the “+” icon to the top left. It will bring up a list of the blocks to create a shop template. You can search for the blocks you need and add them to the template.
- Another way of bringing the product blocks in the editor page is to use the forward slash (“/”) . Type the forward slash and write the name of the block. The block will appear on the page.
Here’s the plan before we begin:
We want a row with the product filter and a product grid block. Also, we want a currency switcher at the top to help users go through products and find pricing in their own currency.
Lets bring all these blocks to the page:
After importing a block, you can also customize it using the settings section. With each block, you get custom settings and block patterns. For example, if you want to flip or change a product image on hover, you can easily do so with image flipper settings in the product blocks.
In terms of block patterns, you can select and use any one of them easily (you can preview these patterns if you click on them).
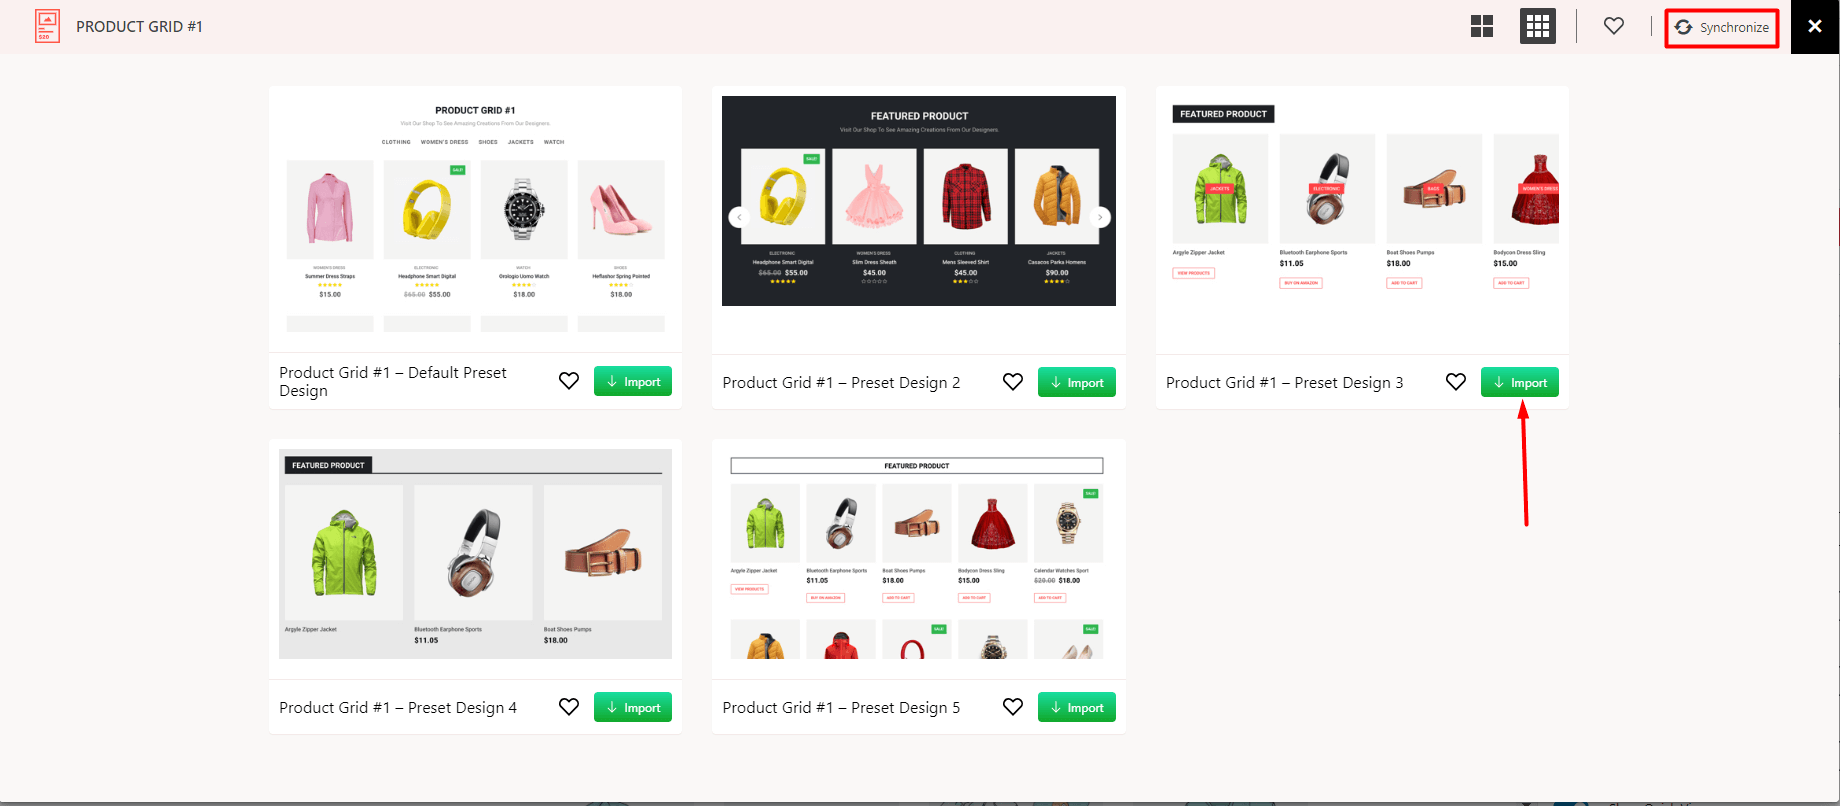
See the “Synchronization” button. It helps you to get access to new designs once they are available. If you update ProductX, make sure to click on the synchronization button and get access to new patterns (if they are released, of course).
Working with the Explore Product Sort Feature (Product Query)
One of the great things about ProductX is the “Product Sort” feature. It is an advanced product query builder that allows users to showcase particular products for a particular product block.
This gives you the opportunity to offer a tailored experience to your visitors.
One of the uses of the “Product Sort” feature is the number of products and product sorting depending on multiple criteria such as, most viewed, most sold, most rated, random, etc.
To sort products:
- Click on the product block in the shop editor
- The settings will appear on the right. If not, click on the icon marked in the image to reveal the settings.
- Now, go to the “Product Sort” tab. If you click on the arrow, the settings will open up.
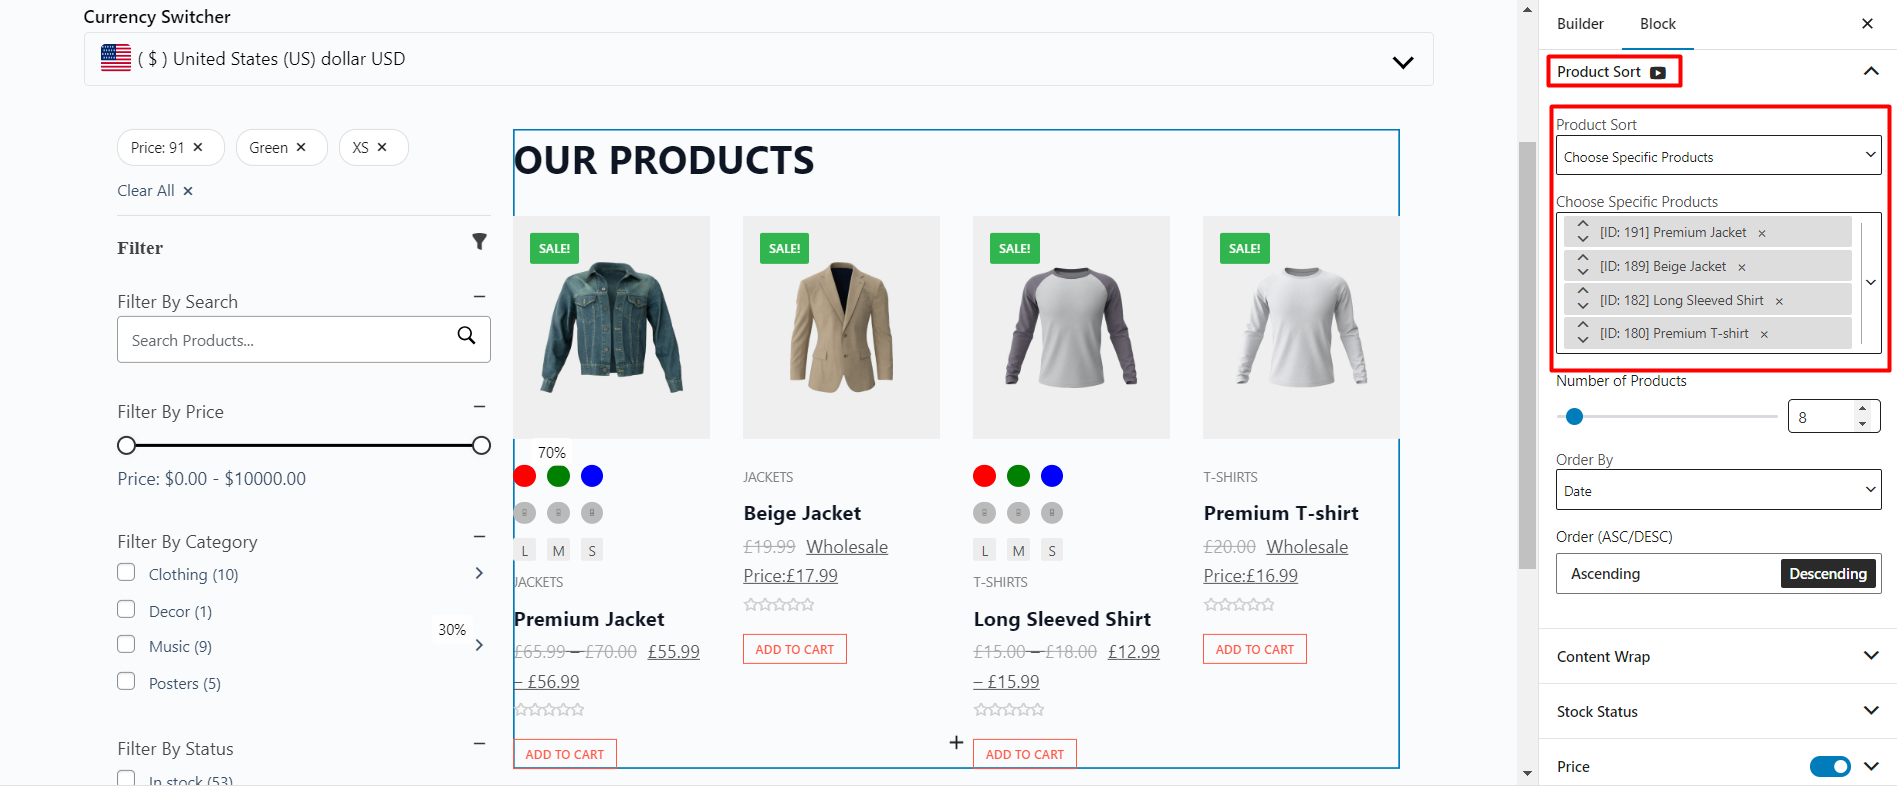
You can do a lot of things with the advanced product query feature. For example, if you wanted to show specific products, you can select “Choose Specific Products” from the dropdown and select the specific products. Pretty cool if you ask me!
Exploring the Capabilities of the Advanced Filter
ProductX introduced a new product filter that works with the product blocks. Now the question is:
Why is a product filter necessary in eCommerce?
The purpose of a product filter is to help users find the products of their choice. For example, if a user is looking for a t-shirt within a specific price range, the filter will help to find the product in that specific price range.
Our filter helps you to achieve the exact same thing. It allows users to look for specific products within a store.
How does the Product Filter work with Product Blocks?
Once you add a product filter to the page, you need to:
- Access the product filter settings
- In the settings, there is a section called the “Grid”
- Here, you need to choose the product block you used to showcase the product (You can get the name if you click on the block you are using in the page).
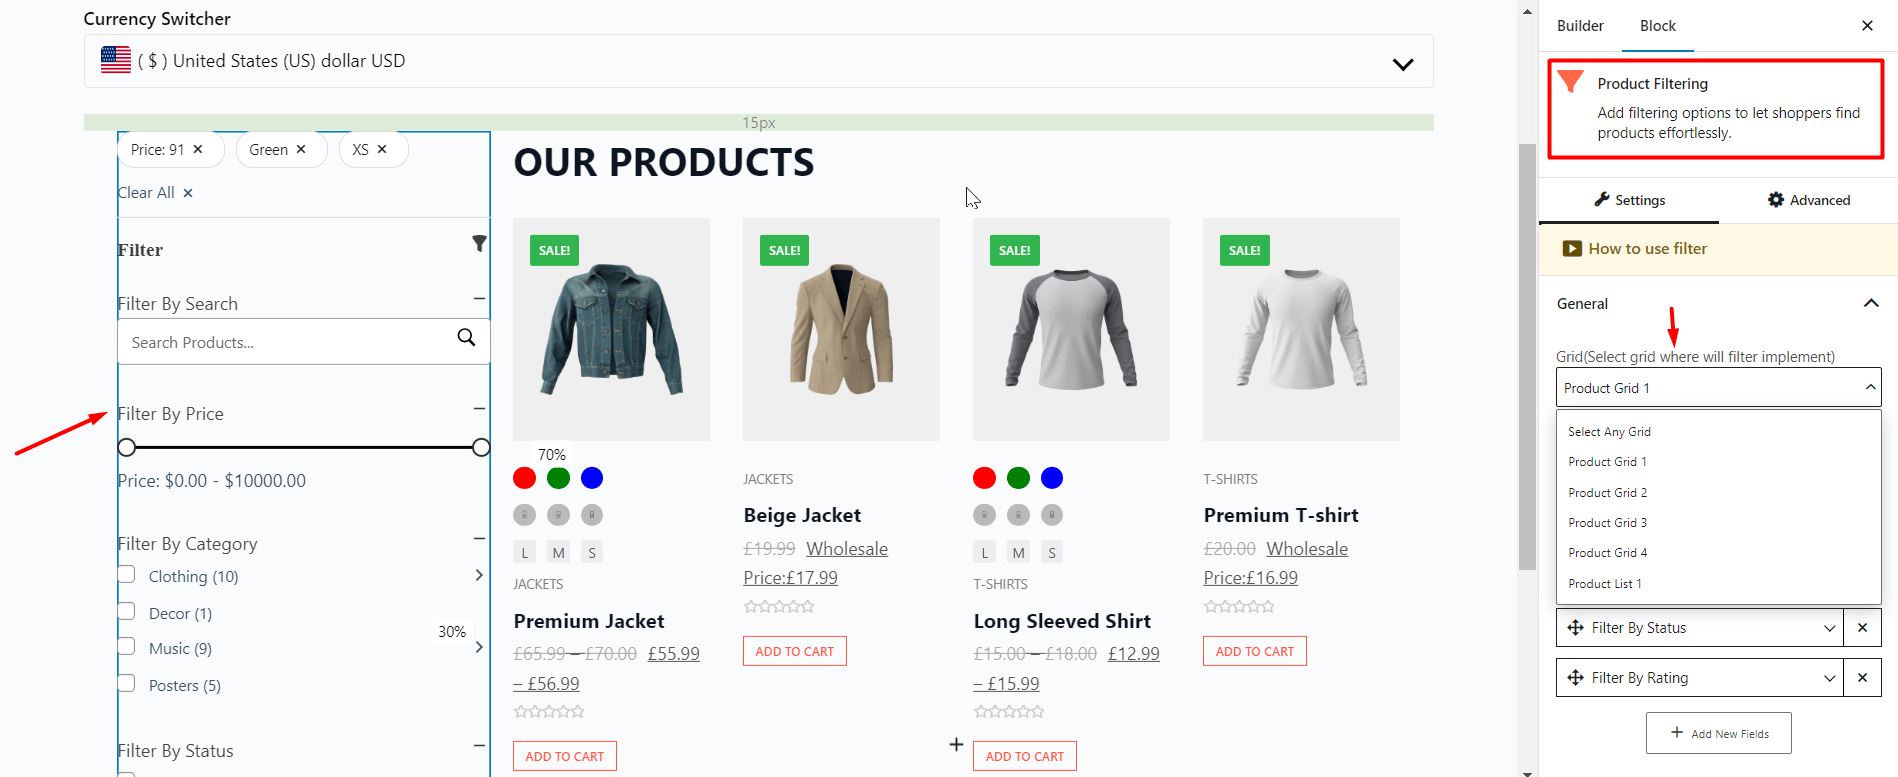
Finally, if you save or publish the page, users will be able to use the product filter correctly.
Adding Pagination to the Shop Page
ProductX offers ajax-powered WooCommerce pagination. This allows users to easily navigate through the shop page without any hassle. Buyers can load more products and navigate to the different product sections.
In the WooCommerce editor, you will find the option to add pagination to the product block. To enable navigation:
- Click on the block you are using on the editor.
- Scroll down and locate the pagination settings.

Now you can do a lot with the pagination settings. However, the settings may seem confusing to you. So, you can read the following post to learn how to effectively add pagination:
2 ways to add WooCommerce pagination
It’s a great starting point and will help you make sense of the settings.
Adding Variation Swatches to Products
Before doing this, here’s a thought:
Why do you need to add variation swatches to your products?
For example, if you’re looking add variations to your products (like different colors and/or sizes of clothes), you can easily do so with the variation swatches. It enables you to create swatches based on different product attributes.
So, how do you add variation swatches to your products in the shop page.
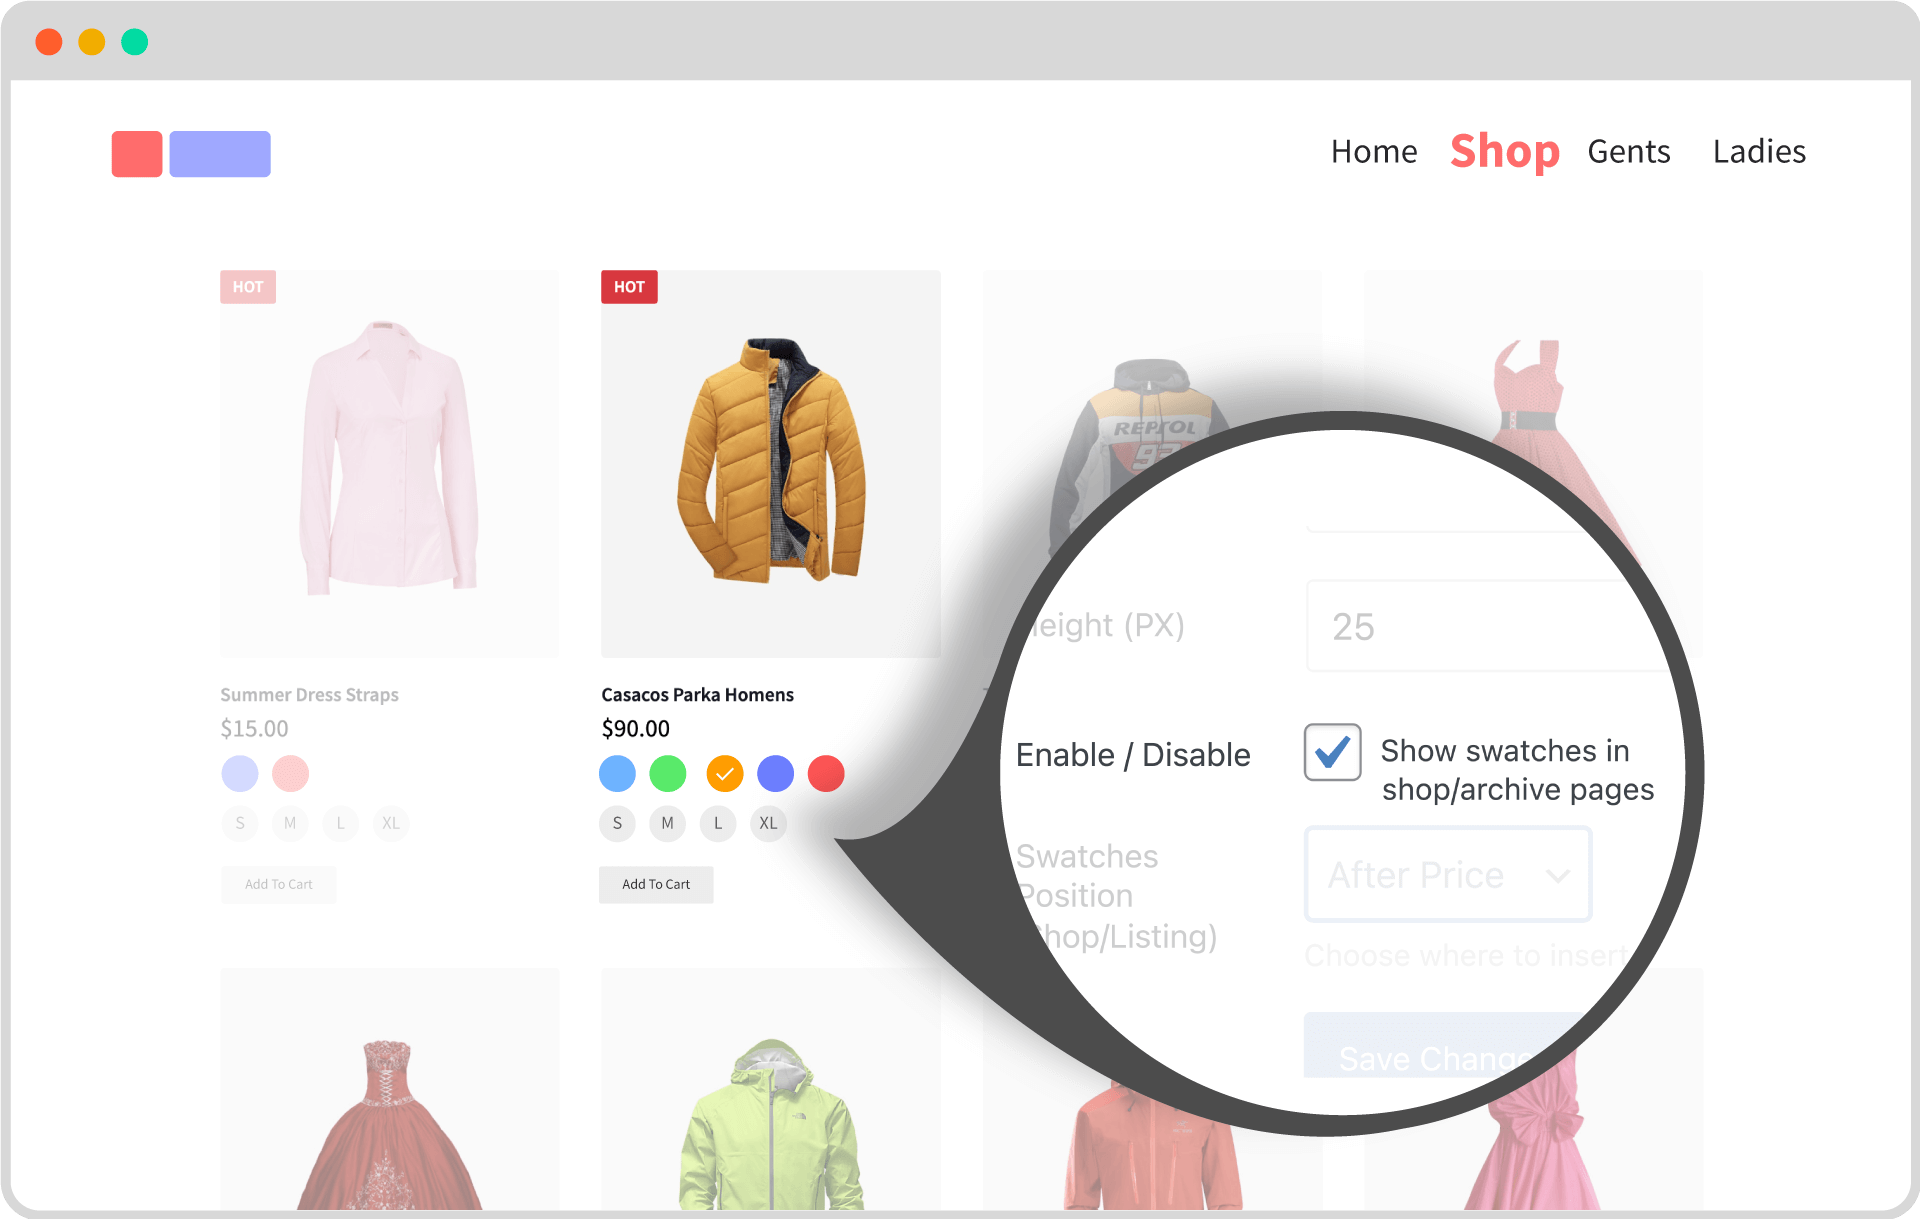
The short answer is:
- Go to ProductX > Addons from your WordPress dashboard.
- Search for “WooCommerce Variation Swatches” in the list.
- Enable the addon
Once you enable it, you will be able to add variations to your products. Now explaining the feature in it’s entirety is out of the scope. However, you should take a look at the in-depth documentation for variation swatches to learn and use this feature.
Benefits of ProductX to create WooCommerce Shop Page Template
All in one Solution: The ProductX Gutenberg WooCommerce Builder is an all-in-one solution to create a customized WooCommerce shop. So, if you use it to create a Shop page template, you will get the privilege of creating other pages as well.
It offers all the required features one can need for an online store. So you can eliminate 5-7 plugins that only offer 1 or 2 specific functionalities. This can help save server resources and help with site loading speeds.
No Coding Knowledge: As I have mentioned earlier, You don’t need to write codes if you’re using the ProductX plugin. No matter, whether you want to create templates for a Shop page, or Single Product pages, everything is easy to do and offers extensive customization options.
Conversation Rate: All the features and Pro Addons of the ProductX plugin are finely crafted for increasing the conversion rate. However, you need to use them effectively to ensure a better customer experience.
Gutenberg Ready: The default Gutenberg editor is already competing with popular page builders like Elementor, Divi, Oxygen, etc. Recently, they have introduced the full site editing capabilities of the Twenty Twenty-Two theme.
So, being Gutenberg-ready is a big advantage for ProductX users. Because many big players of WordPress are already saying, Gutenberg is the future of WordPress.
Average Order Value: Average order value refers to the average spending amount of every purchase. It directly impacts the total revenue of eCommerce sites. That’s, why all online store owners always try to increase it. ProductX can help you with that!
Regular Update: The ProductX team provides updates with bug and error fixes on a regular basis. Unlike other Idle plugins, you can expect regular feature updates from ProductX.
Ideal Structure of a WooCommerce Shop Page
The ideal structure of a WooCommerce website should have the following:
- The ideal structure should have a proper header section. Adding a currency switcher within the header can help users from other continents.
- A product filter is a must for a shop page. Users will want to look for specific products. The filter will help them to search for the specific items they’re looking for.
- Adding the quick view and product compare features is a must. Users like to view and compare items against other products. This gives them a sense of security.
- Enabling variation swatches is very important. Otherwise, users will not know whether or not you have the right product for them (For example, if you are running a clothing store and don’t have the sizes of a trousers listed, users may not feel comfortable buying something from you).
- Finally, a proper footer section can help the user navigate to the particular section of a website if they need it. You can include important guides about shopping at your store in this section.
Fortunately, ProductX can help you with all these issues. As a matter of fact, if you want to run banner promotions, the banner maker can help you with that as well.
And yes, there are pre-made templates for you to choose from – most of the templates have offer the ideal shop structure. It’s all about giving the users a wholesome experience.
Frequently Asked Questions
What is a WooCommerce Shop Builder?
The answer to this question is a bit broad.
A WooCommerce shop builder isn’t just a “shop” builder. In reality, it means a WooCommerce store builder. You build a complete store with the particular builder. Fortunately, ProductX offers this functionality. You can use it to build all the necessary product pages a shop has, including the archive pages. It helps you to customize WooCommerce shop page with ease.
How do I setup a WooCommerce Shop Easily?
We answered this question in detail. If you choose ProductX, all you need to do is import a template and make a couple of changes you like. Or, if you want to build a store from scratch, you can do so as well with the built-in product blocks. It’s the easiest way possible.
How do I Style a Shop Page in WooCommerce?
To update a shop page in WooCommerce, you need to:
- Go to WooCommerce Builder > Shop from the ProductX setting.
- Edit the WooCommerce shop template by clicking on the Edit button of the template
- Choose a product block and make changes to the design properties
- Save the page
Follow these steps and you will be able to style the Woo shop page to your liking.
What is the WooCommerce Shop Shortcode?
Again, we would like you to direct your attention to the ProductX shortcode addon. It’s a powerful feature that allows you to create custom shop designs and use them as shortcodes to use on different pages. It can be a great way to A/B test WooCommerce shop template designs. Also, you can use the shortcodes with various builders as well.
Conclusion
That’s all about creating and customizing WooCommerce Shop Page Template.
Hopefully, you now know why using a standalone WooCommerce plugin is a proper use of your time and resources. However, we want to know what you think?
Would you be interested in using a plugin? Or do you prefer to code a custom shop page?
Sound off in the comments down below.
👉 Get ProductX Pro to unlock all conversation-focused features and skyrocket your sales!