If you’re running an online store powered by WordPress, chances are you’re using WooCommerce to manage your inventory. According to data, the total count of WooCommerce stores is 4,495,457 in 2023 (globally).
So, if you’re trying to open an online/ecommerce store, WooCommerce can be your go-to solution. But before doing that, you need to understand what types of products you can sell in the WooCommerce store. This will help you understand which product you can add in the store.
Today, I’ll walk you through:
- Different WooCommerce product types (Default + custom).
- Steps to add products in your store.
- What plugin you can use to display your products perfectly.
I’ll tell you about all the nitty-gritty details, so you’ll have a complete idea of how WooCommerce product types work. Let’s get started and unlock the full potential of WooCommerce!
What are different WooCommerce Product Types?
When you add a new product in your WooCommerce store, you need to define its product type. Each type of product has some definitive characteristics. And that’s why it’s important to know about all the different WooCommerce product types.
Currently WooCommerce provides 6 types of product types. Which are:
- Simple
- Virtual
- Downloadable
- Grouped
- External/Affiliate
- Variable
But, you can use plugins to unlock a few custom product types. I’ll also explain them to you. But first let me start with the default ones!
Default WooCommerce Product Types
If you don’t have any plugins installed (except WooCommerce), you’ll see 4 types of product options in the “Product Data” dropdown. But there’s 2 more, and most people tend to overlook them. Don’t worry because I’ll explain all of them today!
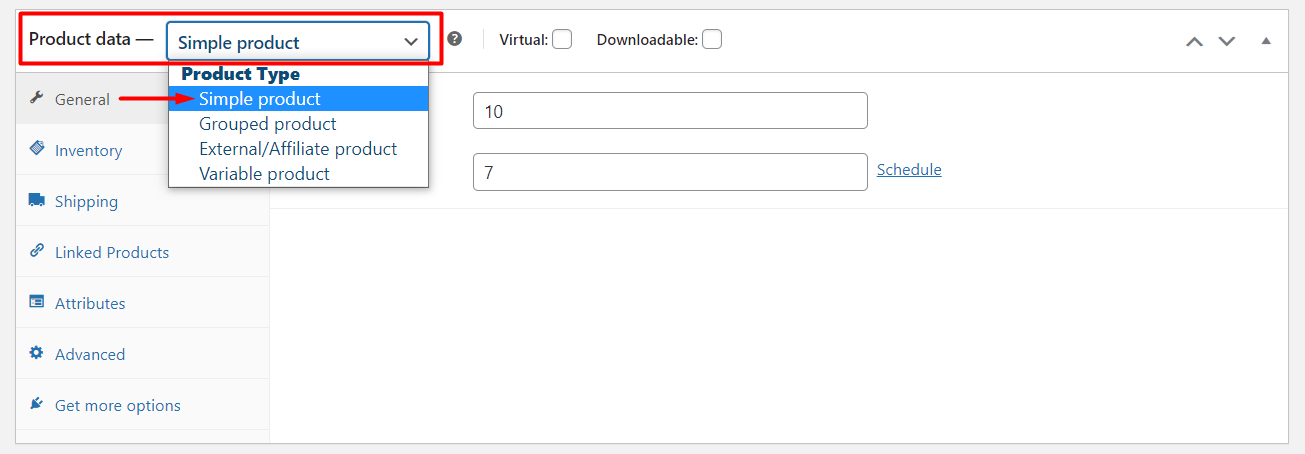
Simple Product
This is the most common and straightforward product type in WooCommerce.
Most people think this represents a physical item which can be sold individually. But let me tell you it can be virtual and even downloadable too! You’ll find a checkbox to select the product as virtual and/or downloadable.
When you select this product type you’ll see some sections to add relevant information for a product. In each section there are fields to add information about a product. Let me give a short rundown for each section.
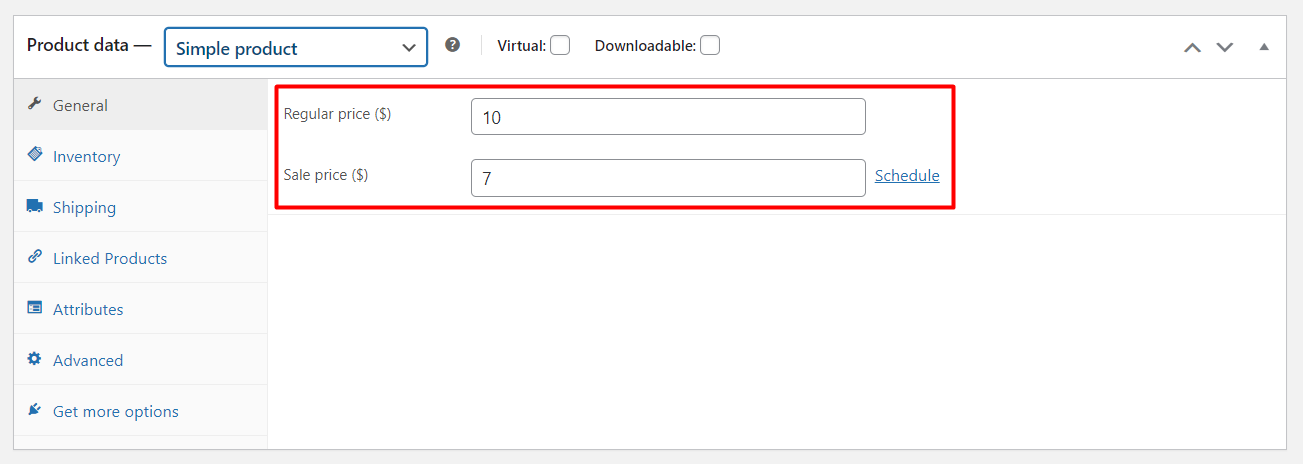
General
This is a primary section, as you’ll find fields to add prices for a product. You can set both regular price and sale price so, you won’t have any issues when you’re giving a product on a sale.
Also, you can adjust the tax options for this product. The options might seem a bit complicated, but let me clear the confusion. The tax status dropdown has 3 options.
- Taxable: Selecting this will make the product taxable while purchasing.
- Shipping only: This option will enable the tax only on shipping cost.
- None: Selecting None will make the product free from tax.
There’s also the option to select tax class from the dropdown.
- Standard rate: This is the default tax rate for products.
- Reduced rate: Some products may qualify for a reduced tax rate.
- Zero rate: This option will exempt the tax of a product.
Now let’s move into the next section.
Inventory
Here you’ll find fields to add SKU (stock keeping unit), which is an identifier for a certain product. If you want to track the stock quantity of a product, there’s an option to enable “Stock Management.”
Stocks status lets you display the current status of a product based on “in stock”, “out of stock” and “on backorder.” You can also limit the purchase for products. All you have to do is, mark the checkbox for the “Sold individually” option. And this will let customers buy a product only 1 time per order.
Shipping
The shipping section is for the shipping related options. You can add weight, dimensions and shipping class from here. But, you must create a shipping class from WooCommerce settings beforehand, otherwise you won’t see any available shipping classes to select. You’ll find the settings in this path: WooCommerce > Settings > Shipping > Shipping classes.
Linked Products
If you want to upsell or cross sell products, you have to select product(s) from this section.
Advanced
This section will let you select some advanced options for a product. If you want to send a custom note to a customer after purchase, you can fill out the Purchase Note field.
Menu order is for customizing the ordering position of the products in your store. Here, 0 is the topmost priority, but if you have multiple products with a menu order of 0, the products with the same menu order will sort alphabetically.
And, last but not the least, you can enable reviews for a product by marking the adjacent checkbox.
That’s all the options you’ll get for a product by default. You can unlock more options by using a plugin.
Note: Most product types have some particular options to differentiate from each other. But you’ll find some options exactly similar.
How to Add Simple Products in a WooCommerce Store?
Here’s how to add simple products in your WooCommerce store:
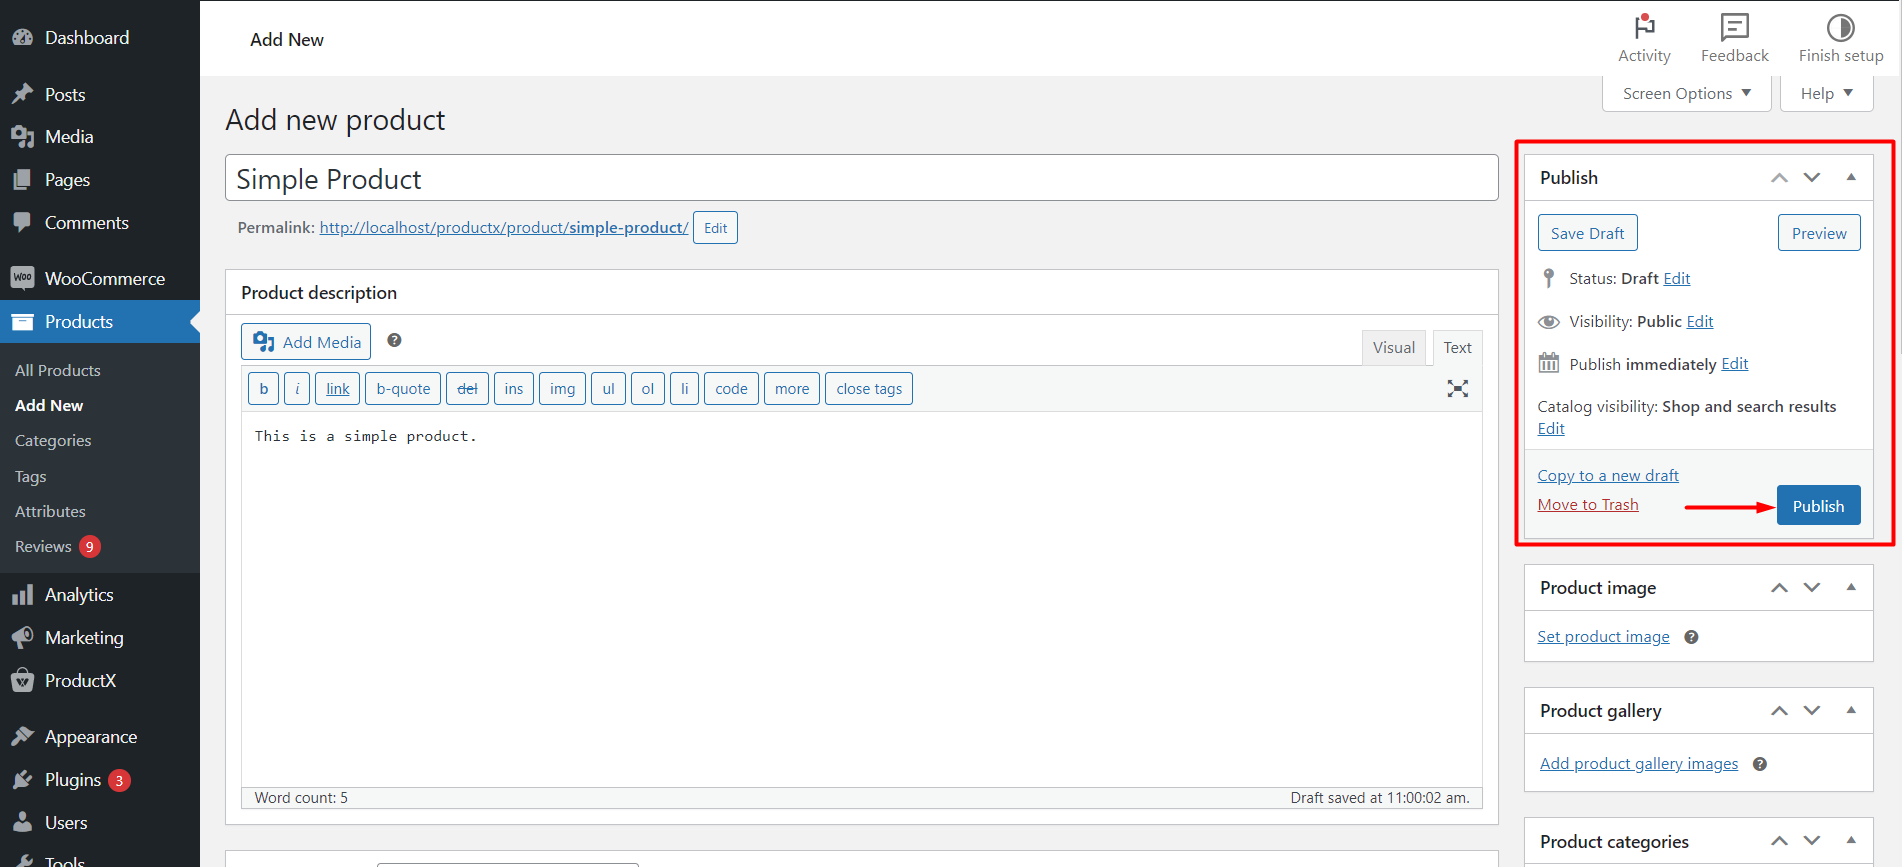
Step 1: Navigate to the WooCommerce menu and click on “Products.” Click on the “Add New” button to create a new product.
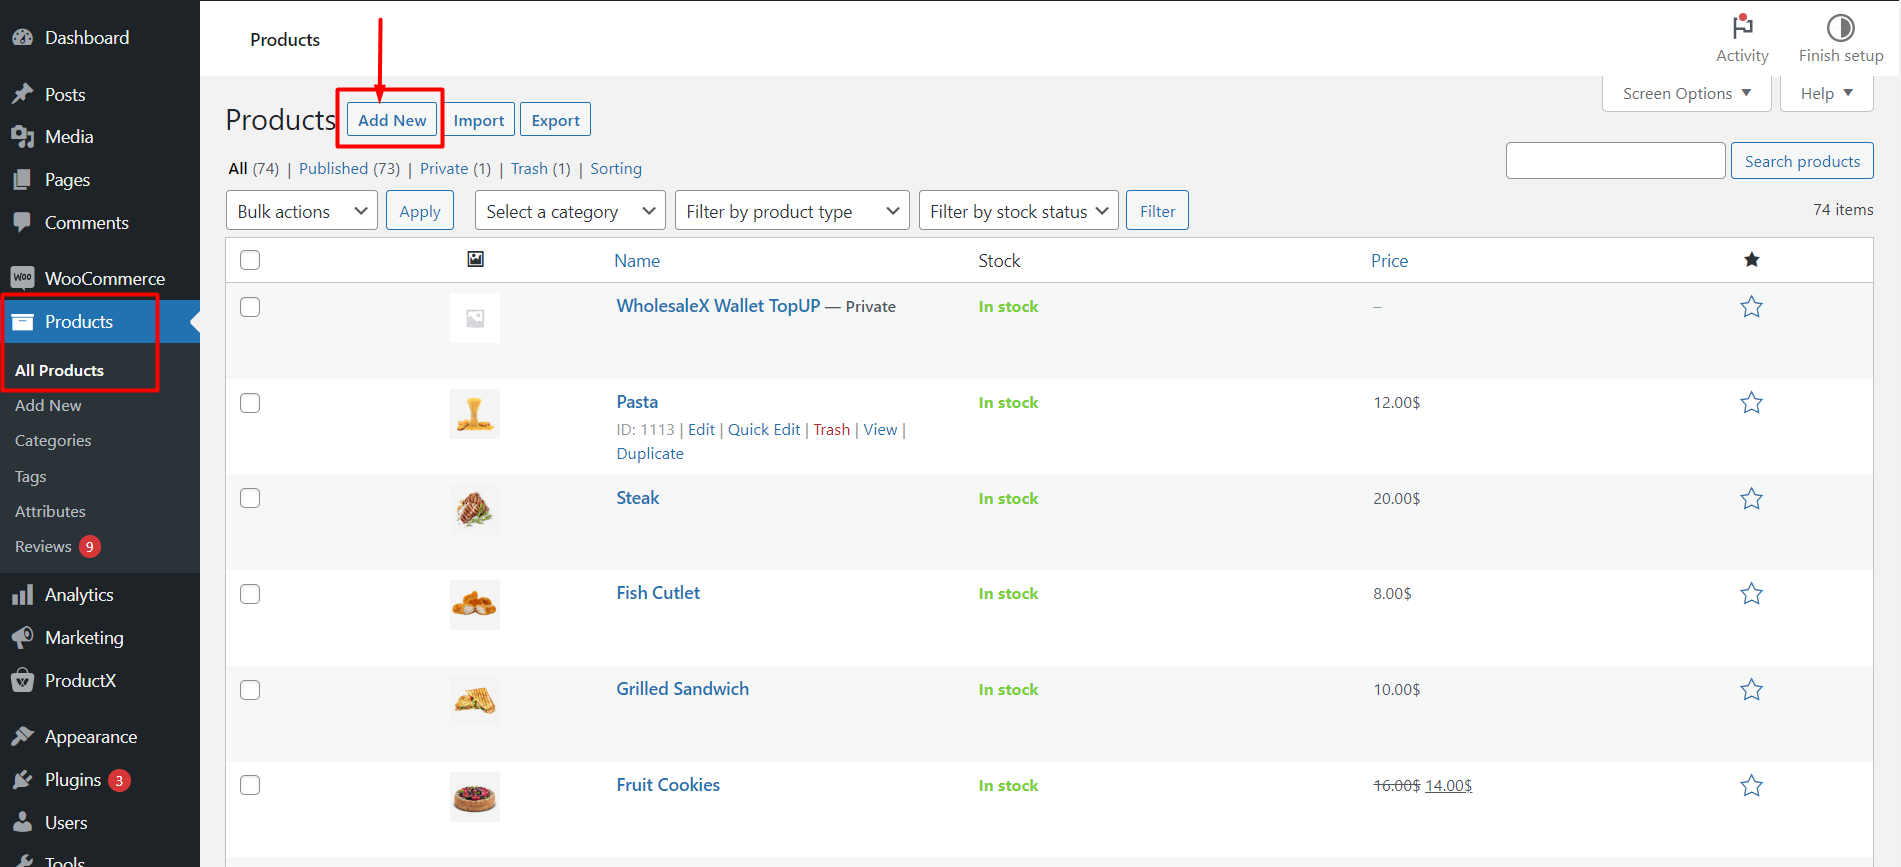
Step 2: Enter the product name, description, and other relevant details in the provided fields.

Step 3: Scroll to the “Product Data” section and select “Simple product” from the dropdown menu.
Step 4: Set the product’s regular price in the “General” settings. You can also add a sale price if required.
Step 5: Manage the inventory settings by specifying the SKU (Stock Keeping Unit) and tracking the stock quantity.
Step 6: Once you’ve filled in all the necessary details, click on the “Publish” button to make your simple product live on your WooCommerce store.
Virtual Product
A virtual product is a type of product that does not exist physically and does not require shipping. It can be a digital item or a service. Virtual products do not have attributes like size or weight, as they are not applicable.
How to Add Virtual Products in a WooCommerce Store?
Here’s how to add virtual products:
Step 1: Scroll to the “Product Data” section and choose “Virtual product” from the product type dropdown menu.
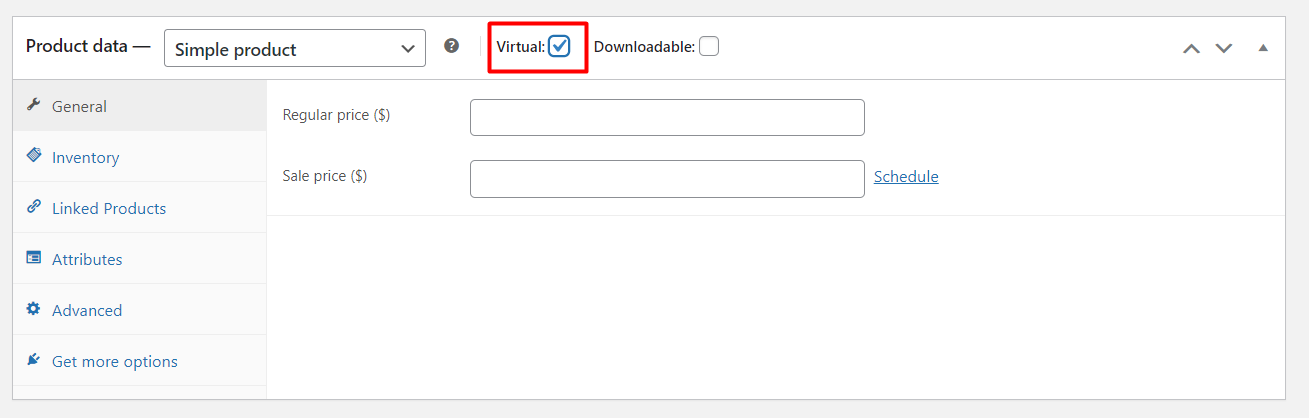
Step 2: Set the virtual product’s price, SKU, and other relevant information.
Downloadable Product
Downloadable products are digital items that customers can download after purchase. These products can include e-books, software, music files, or other downloadable content. You can set download limits and expiration dates for these products.
How to Add Downloadable Products in a WooCommerce Store?
Here’s how to add downloadable products:
Step 1: Scroll to the “Product Data” section and choose “Downloadable product” from the product type dropdown menu.
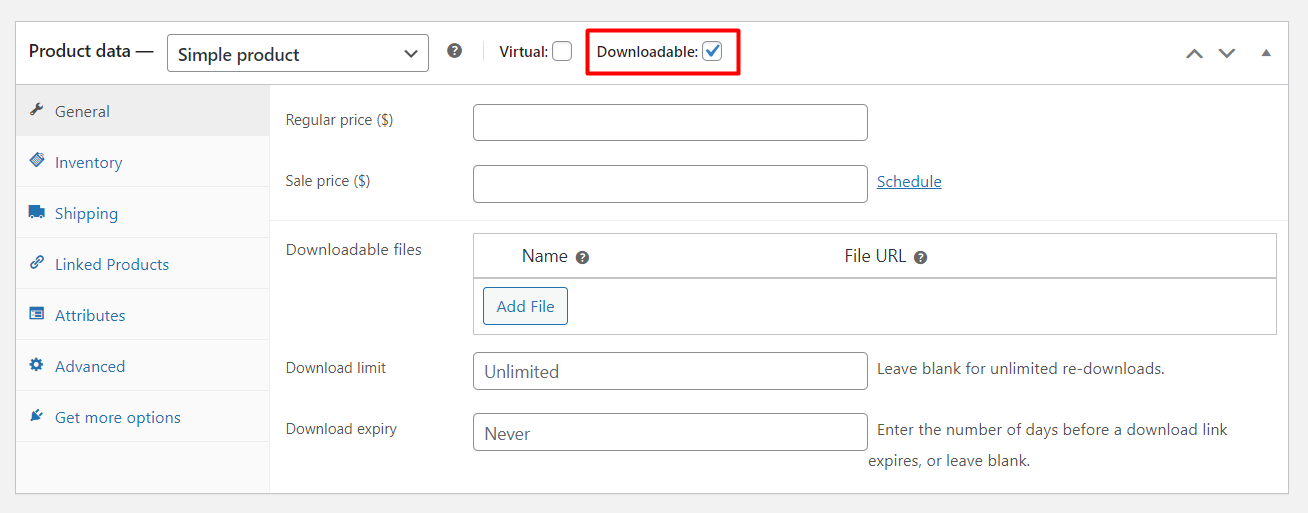
Step 2: Click on the “Add file” button to upload the file associated with the product. You can provide a file URL or upload the file directly.
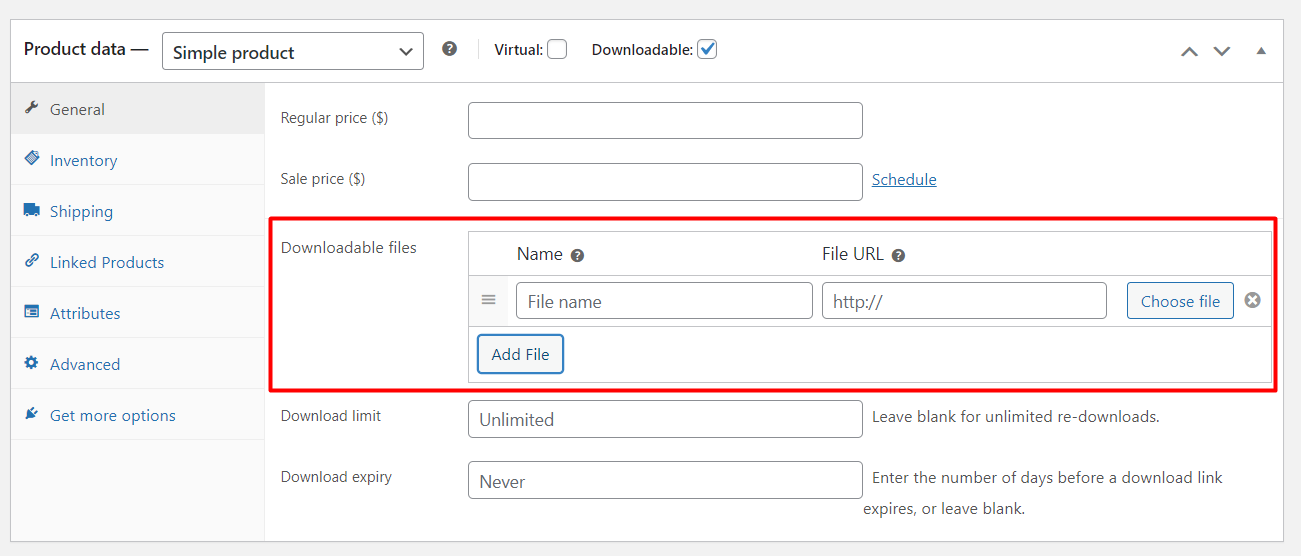
You must remember that the Virtual and downloadable product types can only be set to simple products.
NOTE: Do not forget to add required and additional information for all of your products. And click publish to add the product in your store.
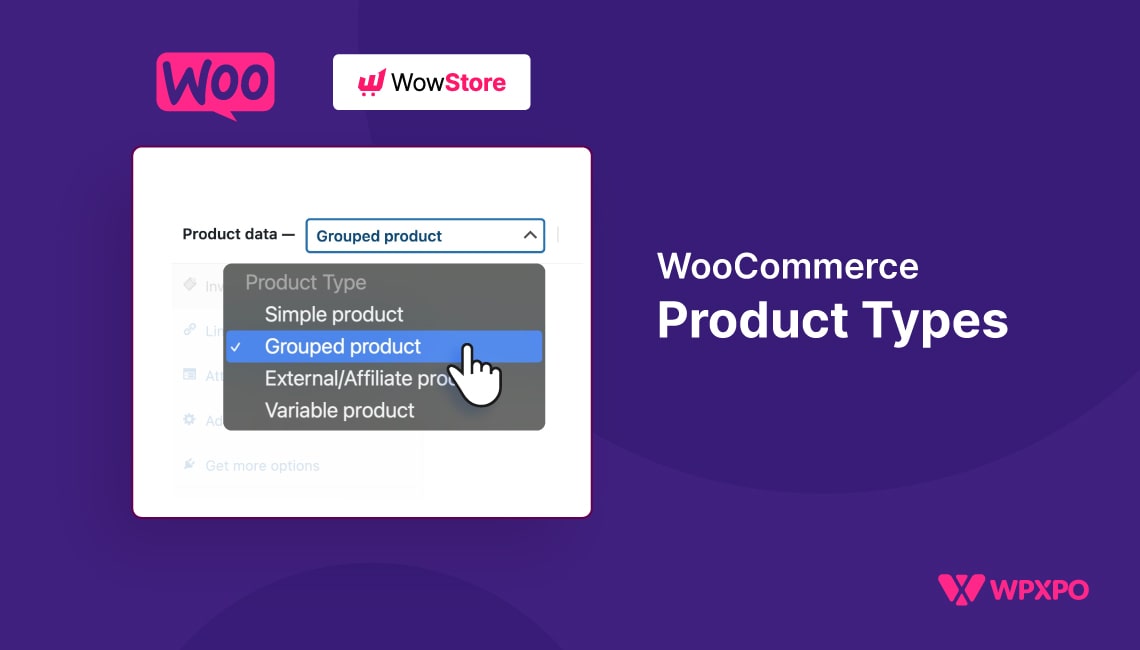
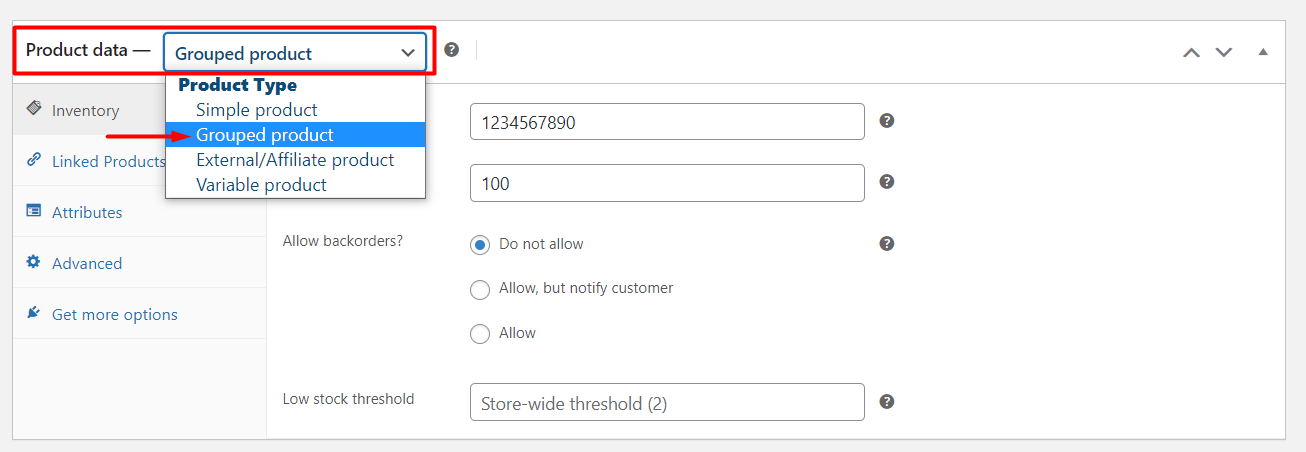
Grouped Product
WooCommerce grouped products are a combination of one or more products that you can buy together as a single product. Let me give you an example to help you understand better.
Suppose, you sell outdoor and camping equipment. Now, you want to add a few items to make it a camping gear set and sell it as a bundle. Instead of bothering customers to add each item individually, you can create a grouped product that includes all the essential gears.
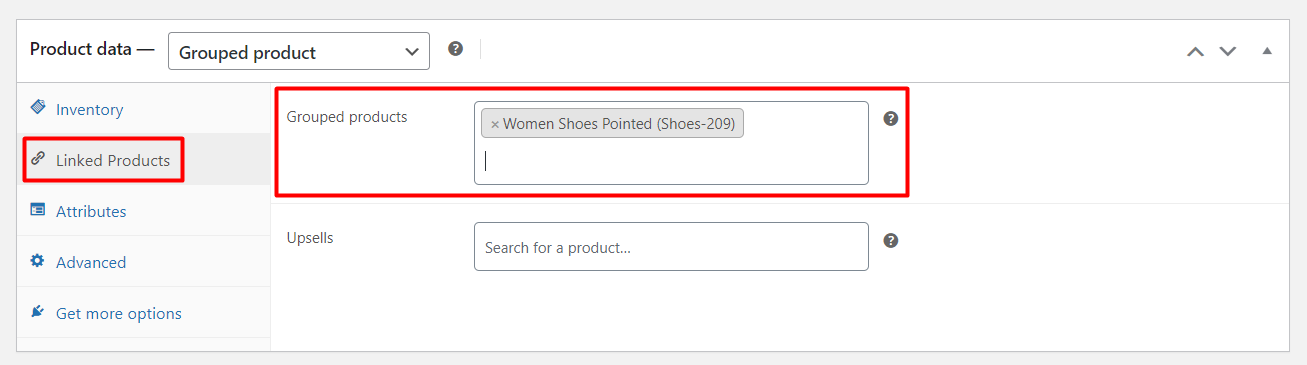
The sections are similar to the simple products, so I’m not repeating them again. The change you’ll find is in the “Linked Product” section. Here, instead of the cross-sell option, you’ll see the “Grouped product” option. So, you can choose and add products here to make a product group.
How to Add Grouped Products in a WooCommerce Store?
Here’s how to add grouped products:
Step 1: Scroll to the “Product Data” section and select “Grouped product” from the dropdown menu.
Step 2: To add child products to the grouped product, you must create simple products first. If you’ve already created them, proceed to the next step.
Step 3: In the “Linked Products” section, you’ll find a text field labeled “Grouped products.” Add the names of the associated child products.
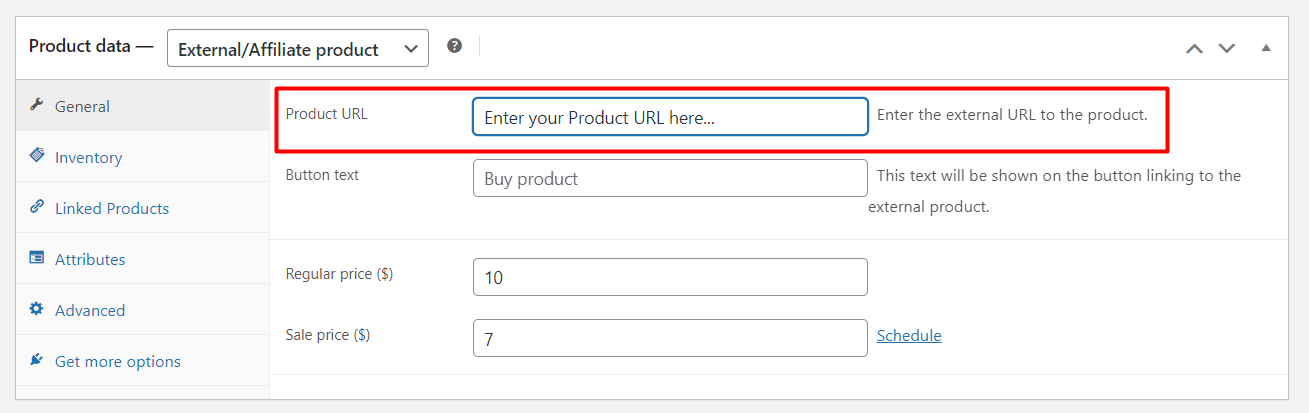
External/Affiliate Product
External/affiliate products are sold by another company, but you can promote them on your WooCommerce store. When customers click the Buy now (or relevant) button for that product it will redirect to the company’s website that sells the book. This is a common strategy for affiliate marketing using WooCommerce stores.
Let me give you an example. Imagine you own an online bookstore that primarily sells physical books. But you want to expand your product offerings by including eBooks from Amazon. Instead of managing eBooks on your own site, you can use the WooCommerce external/affiliate product feature to link to Amazon. So, when people buy that eBook, they will buy it from Amazon. And you will get an affiliate commission from Amazon for selling the product.
Setting up this product is similar to the earlier ones. The only change you will notice is in the General section. You will see 2 extra options:
- Product URL: Here you need to add the link to the product.
- Button Text: You can change the default button text for external/affiliate products here.
All the other settings are similar so you won’t have any trouble!
How to Add External/Affiliate Products in a WooCommerce Store?
Here’s how to add external/affiliate products:
Step 1: Scroll to the “Product Data” section and select “External/Affiliate product” from the dropdown menu.

Step 2 :In the “General” section, enter the URL of the external seller or the affiliate product you are promoting. Optionally, you can customize the button text on your store’s product page.
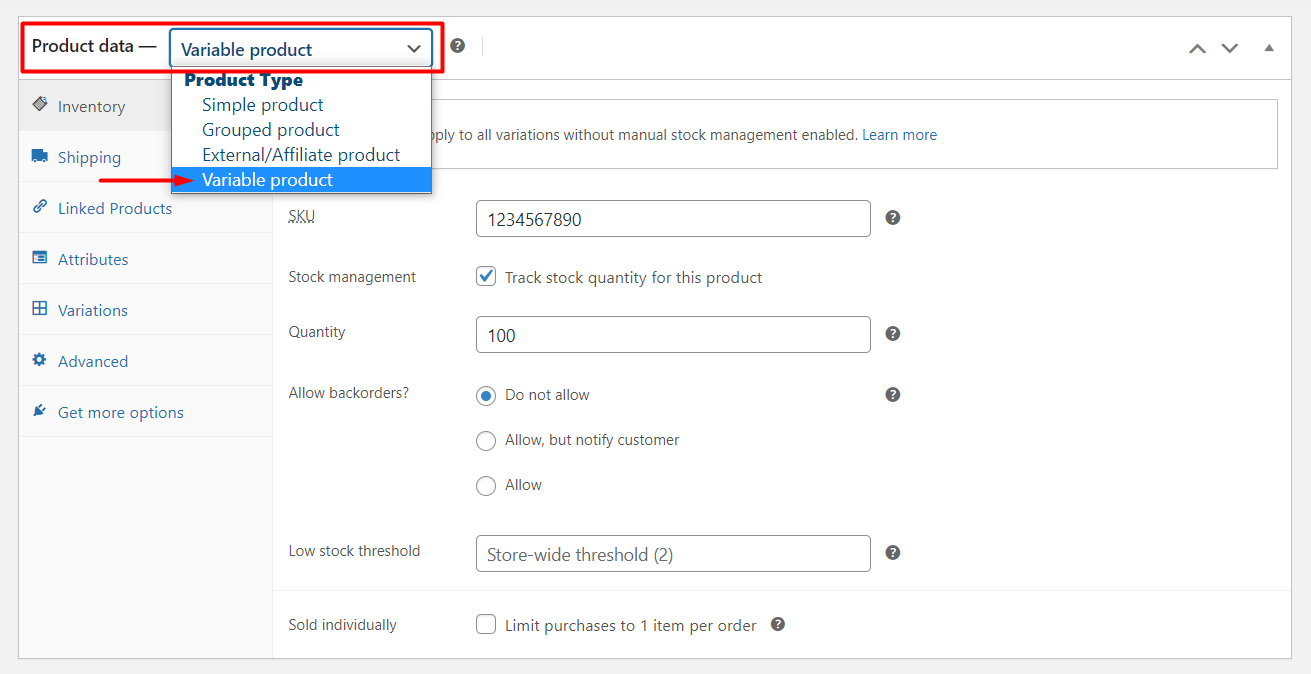
Variable Product
Variable product types let you offer a set of variations on a product like color, size, etc. You can control the prices, stocks, images, and more for each variation.
For example, you run an online clothing store. One of your popular products is custom T-shirts. Customers can choose their T-shirts by choosing different options, such as size, color, and fabric type. You can only do that with the variable product type in WooCommerce.
All the other settings are the same. But, here you have 2 specific sections I need to tell you about.
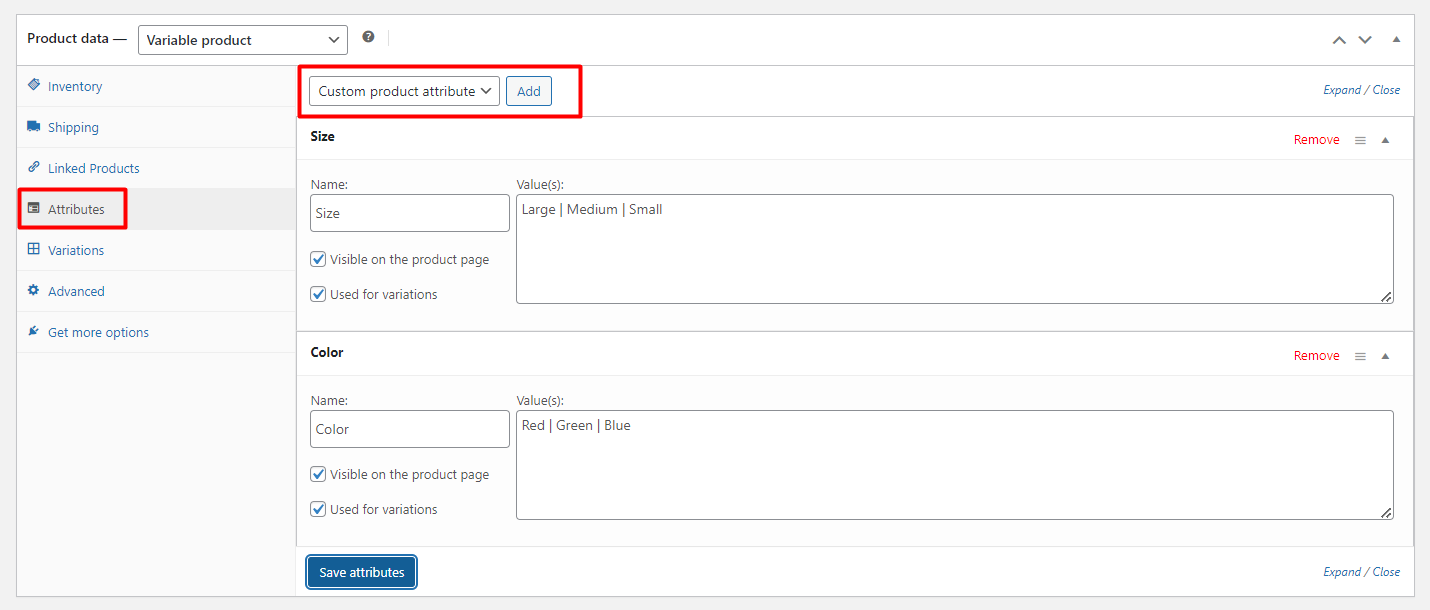
Attributes
Some products might have different sizes, colors, or other attributes. And you don’t want to sell each product variation separately in your store. So, you have to add attributes to a single product, so customers can choose variations from the single product page.
In the attribute section, you can add attributes and their values for your products. And don’t forget to mark the “Visible on the product page” and “Used for variation” boxes when creating attributes. Otherwise, you can’t create variations and they won’t display on the product page.
Variation
This is the section where you can create variations based on attributes. You have the option to generate variations automatically based on the attributes you add, or you can do that manually.
You get the option to add following information on each variation.
- Image
- SKU
- Price (Regular / Sale)
- Gallery source
- Stock status
- Description
- Shipping class
- Tax Class
Do fill out the necessary data, so you won’t have any hassles to display and sell variable products in your store.
How to Add Variable Products in a WooCommerce Store?
Here’s how to add variable products:
Step 1: Scroll to the “Product Data” section and select “Variable product” from the dropdown menu.
Step 2: In the “Attributes” section, click on “add new” and then the “Custom product attribute” dropdown and select the desired attribute for your variable product (e.g., size or color). Click on the “Add” button to apply the attribute.
Step 3: In the “Variations” section, choose how you want to create variations. You can either generate all possible variations at once or add them manually.
- To generate all variations simultaneously, select “Create variations from all attributes” and click the “Go” button.
- To add variations manually, click on the “Add Variation” button and specify the attributes for each variation.
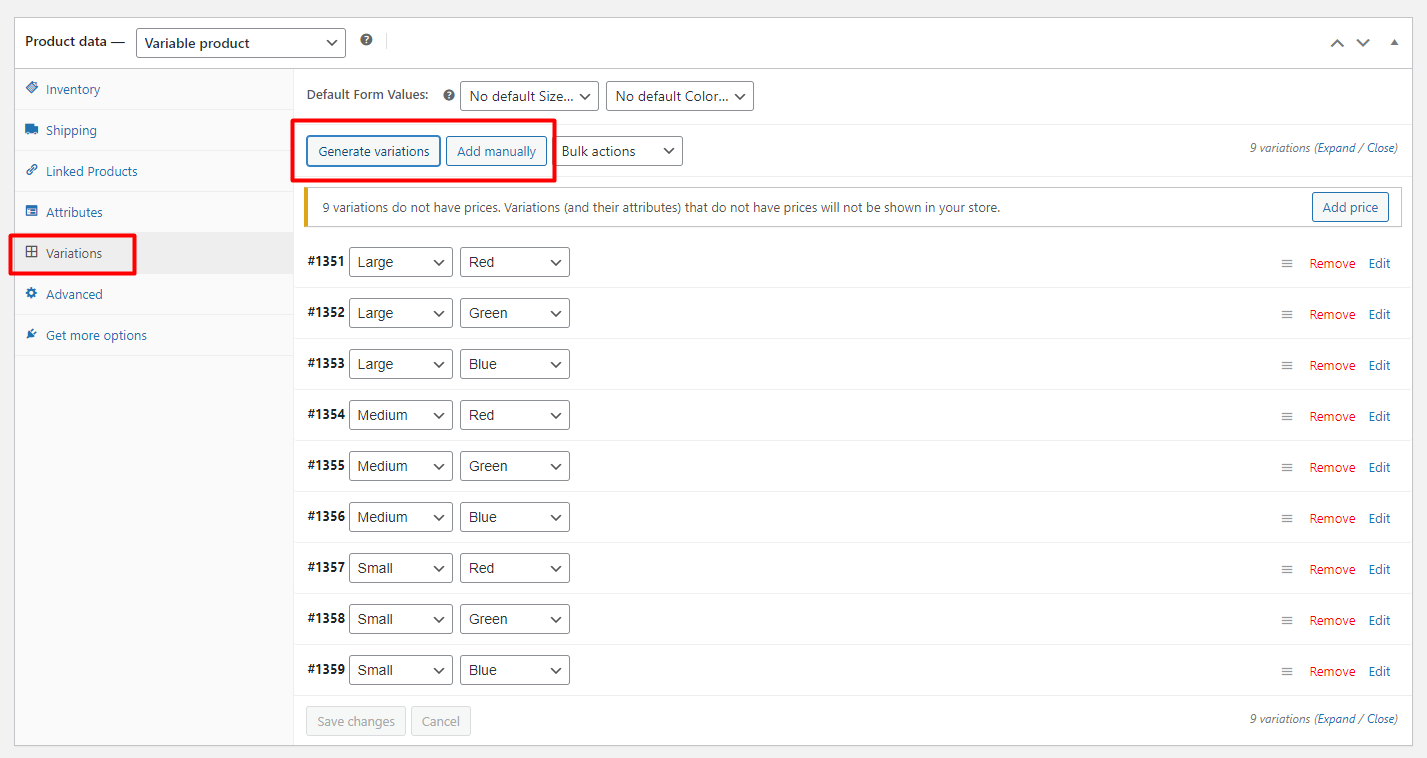
Step 4: For each variation, set the specific details such as price, SKU, stock status, and other relevant information.
NOTE: Do not forget to add required and additional information for your products. Afterward, click Publish to add the product to your store.
Custom WooCommerce Product Types
In addition to the default product types, you can also create custom product types using specific plugins. These plugins tailor the product type according to your specific requirements.
Subscription Based Products
WooCommerce Subscriptions allows you to create subscription products, such as simple subscriptions and variable subscriptions. You can set up recurring payment options and effectively manage subscription products.
Bookable Products
With WooCommerce Bookings, you can create bookable products in your store. Customers can choose from available time slots for booking, making it ideal for rentals, accommodation bookings, appointments, and events.
Membership Based Products
WooCommerce Memberships enables you to sell memberships as a product type. You can provide restricted access to different membership levels and combine memberships with subscriptions for added features like recurring payments.
Bundled Products
With WooCommerce Product Bundles, you can create bundled products in your store. You can include various product types in a bundle, except for grouped and external products. Bundled products are an excellent strategy for upselling.
Auction Based Products
Auctions for WooCommerce introduces the auction product type, allowing you to feature auctions in your store. For each auction, you can set specifications such as start and end times, bid increments, and more.
How to Add Products in Multiple Categories?
If you want to add a product in multiple categories, you can do that easily in your WooCommerce store. When you add a new product (also you can do this by editing an existing product) you get the option to select “Product Categories.”
In this section, you will have all available categories to select from. But remember, you have to create categories from WooCommerce settings. You can simply select single or multiple categories by checking the category box(es). And, once you’re done selecting, publish/update it to add products in multiple categories.
How to Display Products in a WooCommerce Store?
I know after adding a product, you need to display it perfectly in your WooCommerce store. And, the next thing you’ll do is search “How to display my products in my WooCommerce store?”
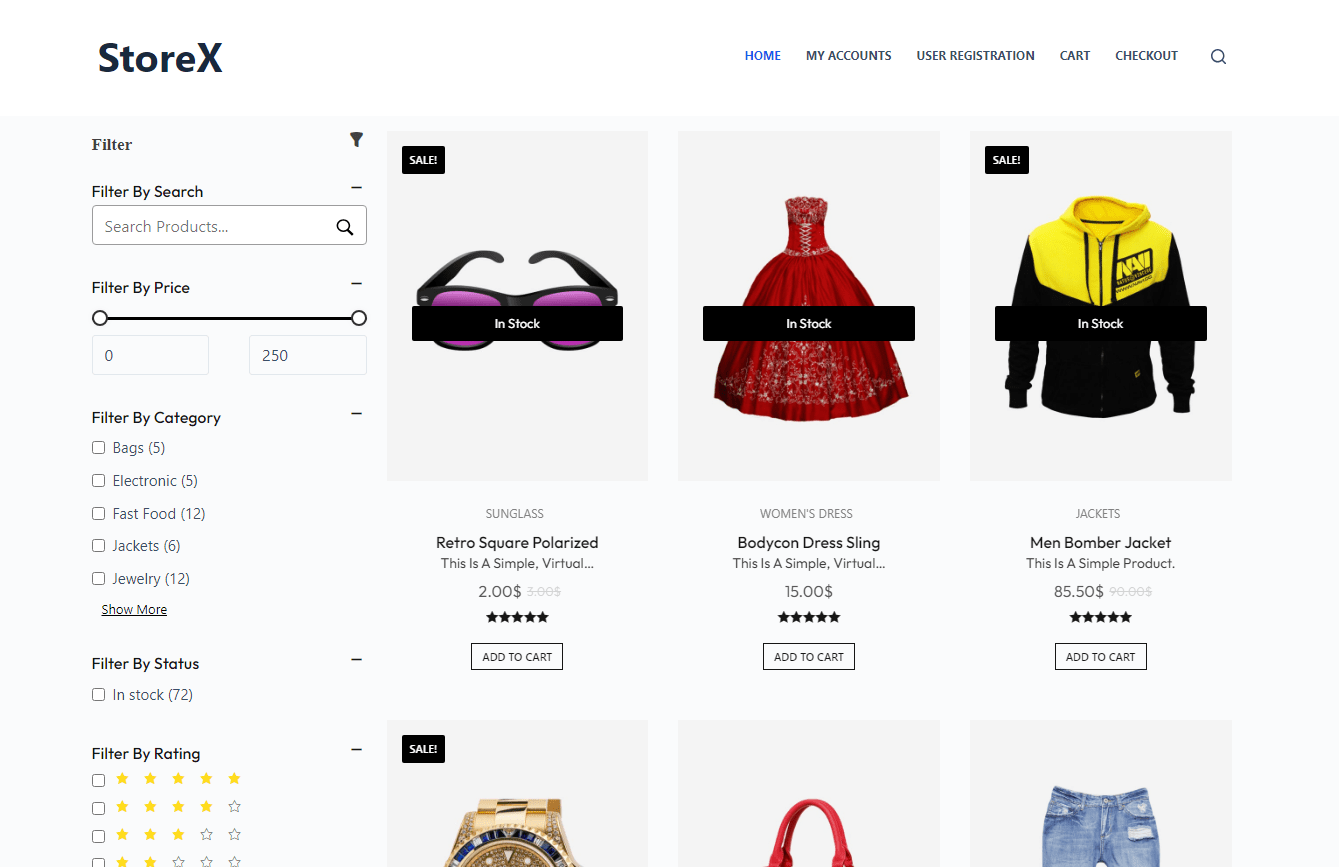
So, I have a plugin called ProductX for you. It’s a WooCommerce builder, which lets you create different store pages in a few clicks.
ProductX is now WowStore! We’re very excited to bring you this experience, packed with unique features. Please note that the features, blocks, starter packs, etc. all work the same. If you have used ProductX, you’ll feel right at home with WowStore.
Check out this awesome shop page I created with ProductX.
Resources you’ll love
- How to Add Featured Products in WordPress
- How to Add WooCommerce Product Carousel
- Introducing New & Advanced ProductX Query Builder for Effortless Product Sorting
- Gutenberg WooCommerce Builder for ProductX: Redesign Your Full Store Dynamically
- How to Add WooCommerce Product Search: A Guide to Enhance Shopping Experience
Conclusion
Today, I told you about the different WooCommerce product types and how you can add them in your WooCommerce store. Remember, Each product type caters to different needs. So, you have to be precise when selecting a product type. Don’t forget to add a proper description to your products and beautiful images.
With this comprehensive understanding of WooCommerce product types, you’re all set to create your WooCommerce store! Unlock the full potential of your online store and provide a seamless shopping experience for your customers.
FAQs
What is a simple product and variable product in WooCommerce?
In WooCommerce, a simple product is a standalone item with a fixed price and no variations. It’s used for selling products without options or choices.
On the other hand, a variable product allows you to offer different variations of a base product, such as different sizes or colors. Each variation can have its own price and attributes.
How to select a product type in WooCommerce?
Go to “Products” in your WooCommerce dashboard. Click on “Add Product” or edit an existing product. In the “Product Data” section, select your desired product option from the dropdown menu.
Is there a limit to the number of products I can add to my WooCommerce store?
No, there is no limit. WooCommerce allows you to add unlimited products to your store. You can add as many products as you need to run your online store.


