
Want to know about WooCommerce Product Variations?
In this complete guide, you can easily understand what is WooCommerce Product Variations and how to create variable products with desired variations. And, don’t forget to style product variations with the Variations Swatches.
But before going to the in-depth explanations, you should know about what are WooCommerce variable products and variations.
What are WooCommerce Variable Products?
The WooCommerce Variable Products refers to those products for which the store owners can add multiple attributes for a product. There are multiple variations that you can add to a certain product. Size and Colors are the most used variations that you can add to your desired products. Not only that, all the variables can have their product images, price, and stock.
What are WooCommerce Product Attributes?
Product Attributes refers to the term by which we can configure WooCommerce variable products. The Product Attributes include Size, Color, and Images. For these attributes, we can set multiple values. For example, the values of size attributes would be Small, Medium, and Large.
What are WooCommerce Product Variations?
The WooCommerce variable products may have multiple product attributes. So if we use two or more attributes together for a single product that is called product variations. For example, a T-shirt that we are selling may have multiple colors and sizes. So we have to make variations with these attributes to let the shoppers choose their desired size and color of the T-shirt.
How to Setup a WooCommerce Variable product with multiple Variations
Now that, you know all the essential things about WooCommerce variable products, it’s time to guide you through creating available products from scratch. Fort that you follow the below steps:
Create and Configure Product Attribute
The first and most important aspect of creating or variable product is to create product attributes. There are two ways to create attributes, we can either create global attributes or product level attributes.
The global attributes will be available for all products. On the other hand, the product level attributes are for specific products. That means if you create attributes you create from the product level will be available for that product only.
I will explain both of the ways so that you can decide and create by following the way you want.
Create Global Attribute: To create a global attribute you can follow the below steps:
- Click on the Attributes tab of the Products section
- Type the name of the attribute
- Type the name of the slug (optional)
- Click on the check box of Enable archives (optional)
- Click on the Save button
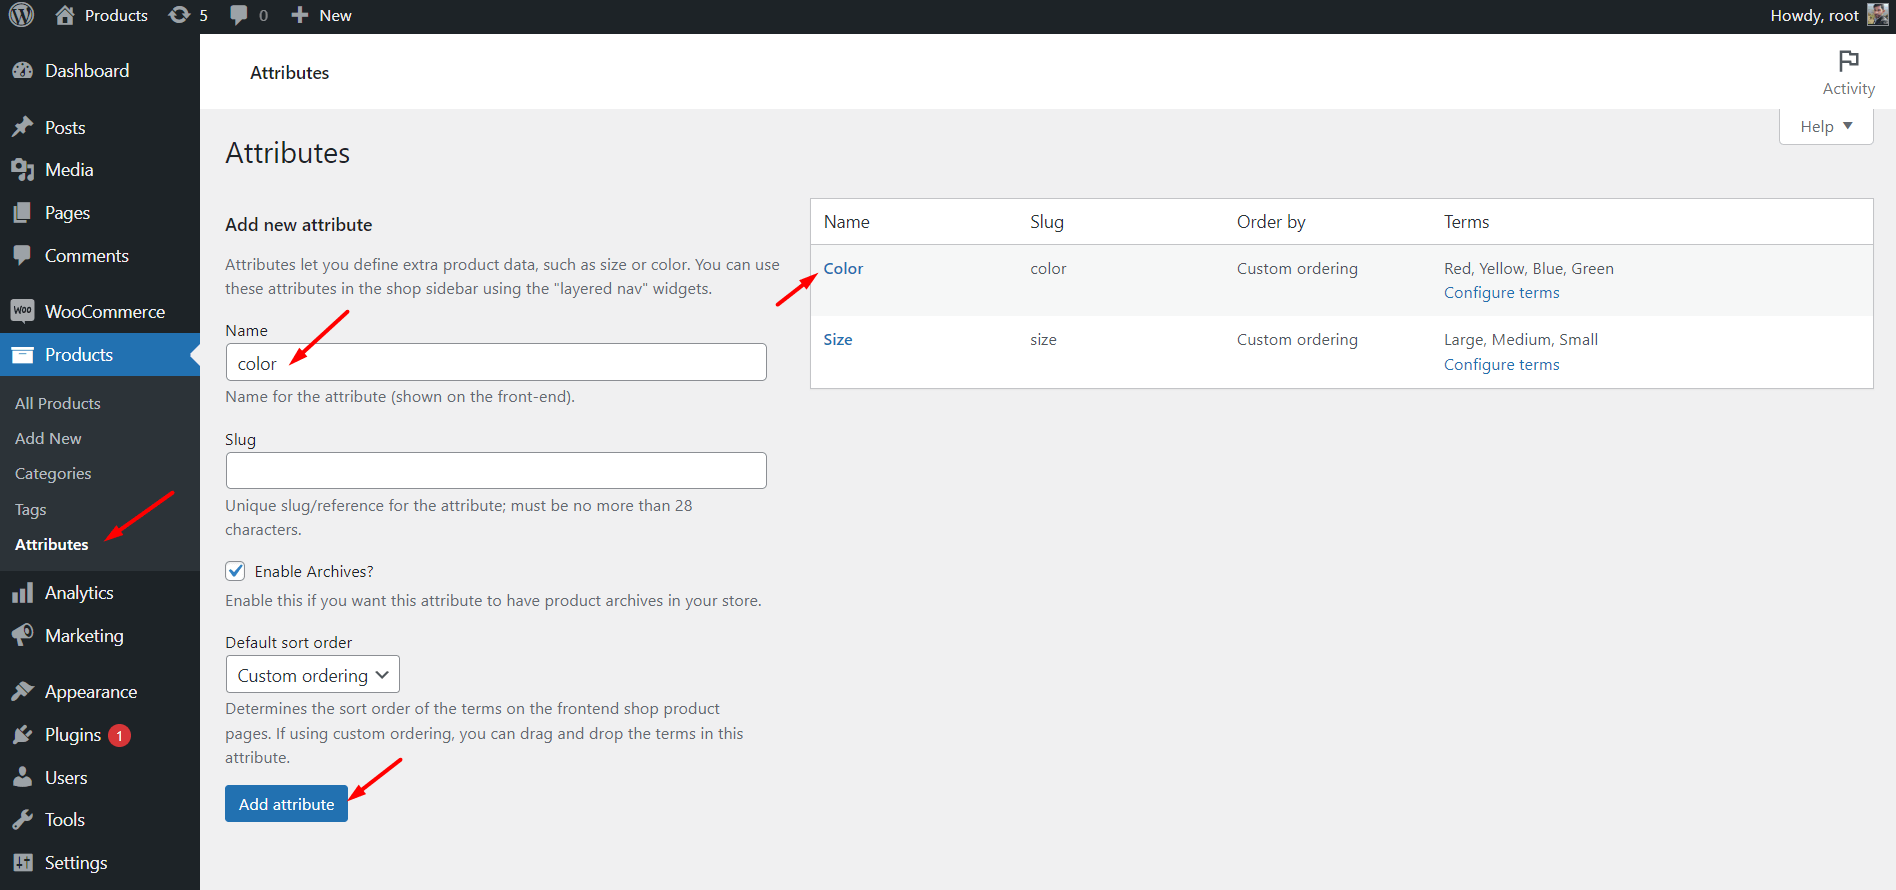
After creating a global attribute, you must configure it with the values. For example, if you create a size attribute you also need to add available sizes, right?
To configure an attribute follow the below steps:
- Click on the configure button
- Add desired value name
- Add slug name and description (optional)
- Click on the add new button
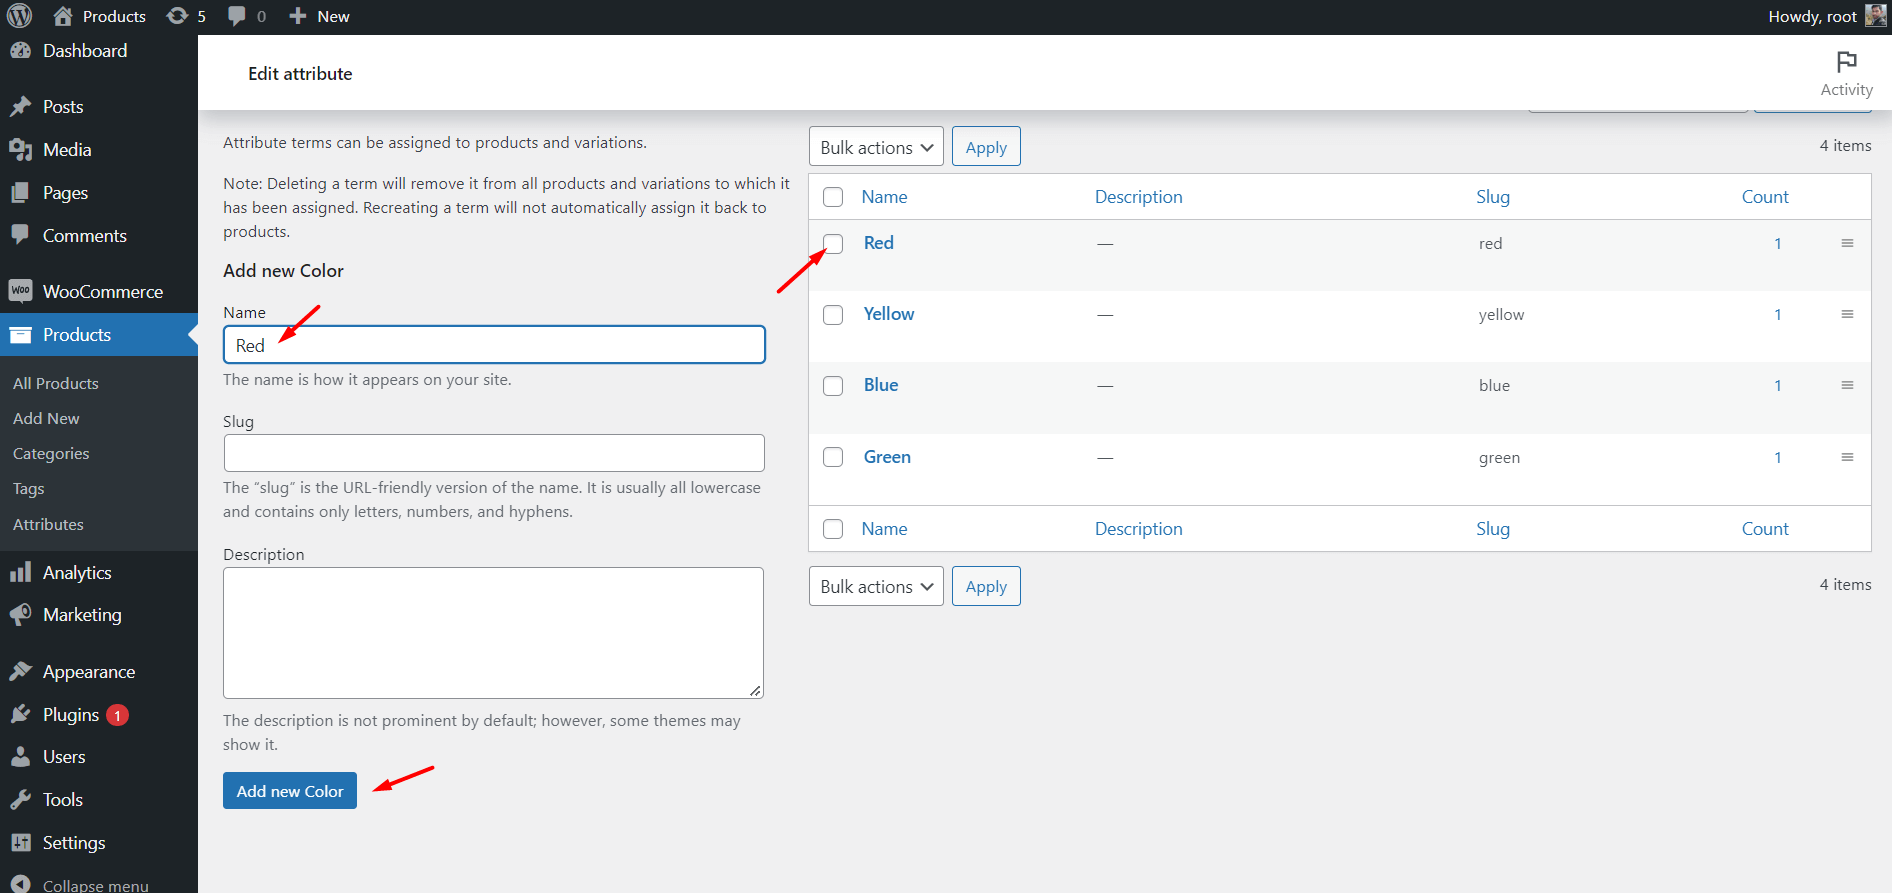
That’s all the value you want to create will be available on the right side. In the same way, you can add your all desired attribute values.
Create Product Level Attribute: Now it’s time to discuss the product level attribute creation. You can create them while creating variable products. Here’s how:
- Click on the Attributes tab
- Select Custom Attribute and click on the “Add” button
- Type the name of the attributes
- Add attributes values
- Make it available for product page and variations
That’s all, now you can create variable products with desired variations.
Create a Variable products
Now that, you have learned both of the ways to create attributes and cobfiquring as well. It’s time to create variable products. The process may be confusing if you are doing it for the first time. Dont worry just follows the below steps and you will be able to create variable products effortlessly.
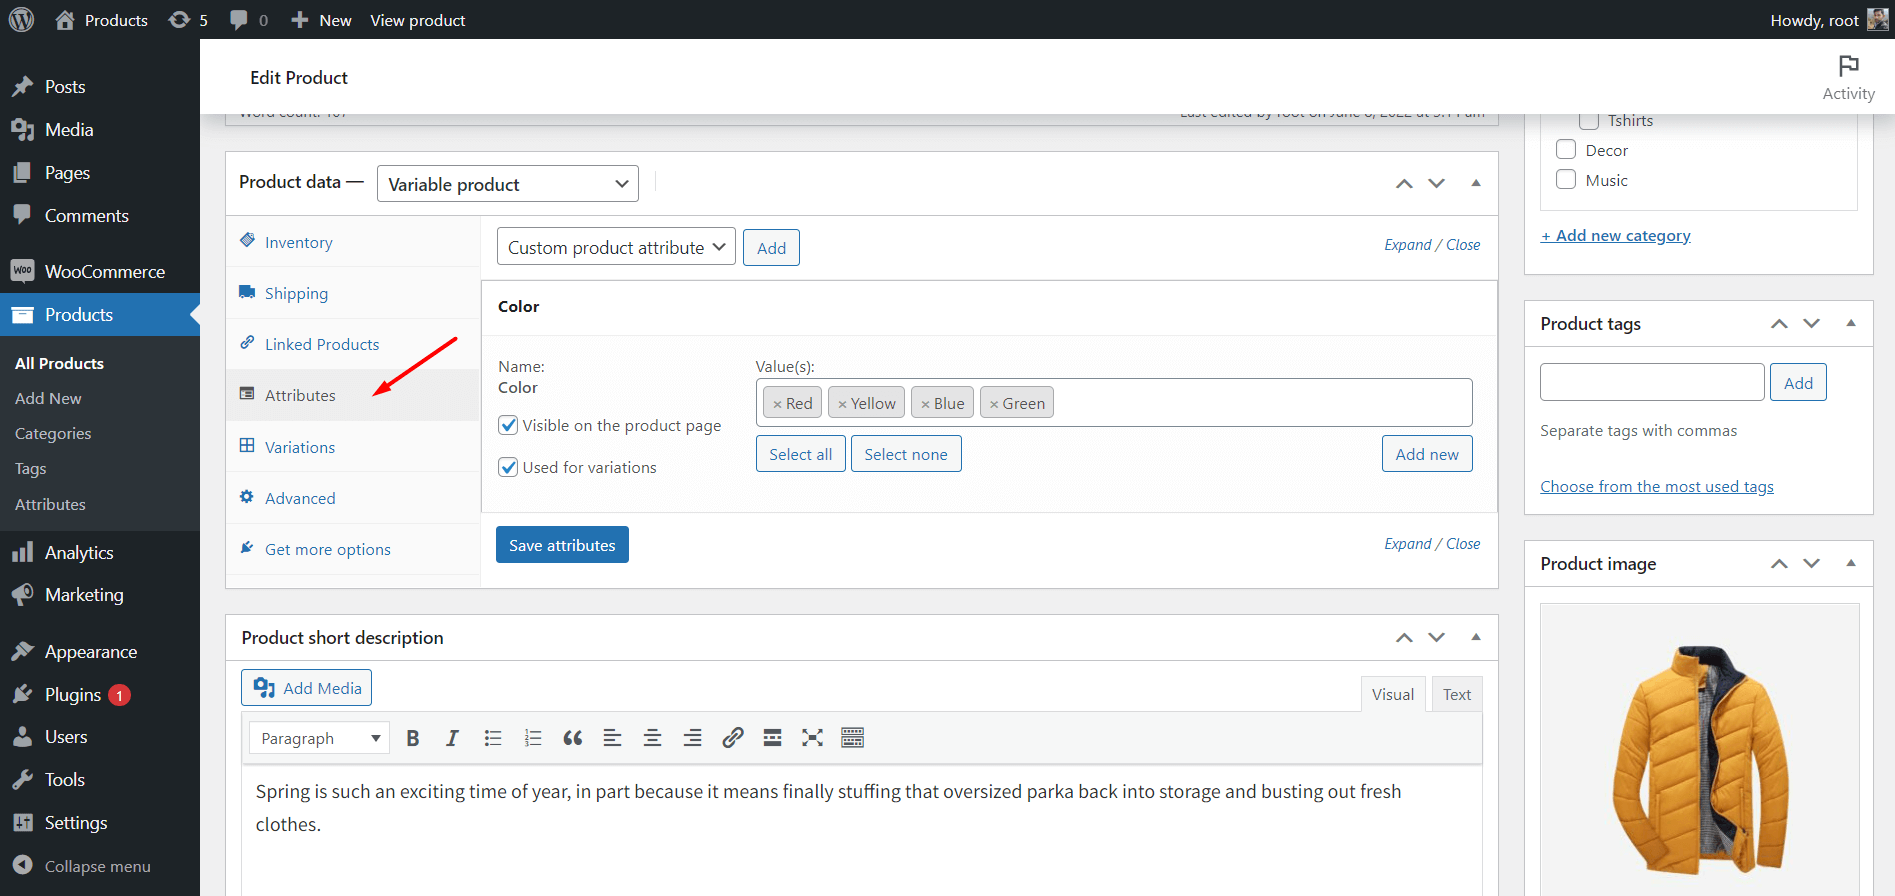
Make Attributes Available for Variations
As I have mentioned that you have to make attributes available for variations, you can skip this step if you want to create the attributes at the product level. But things are a bit different for the global attribute.
To make global attributes available for the variations you can follow the below steps:
- Click on attributes while creating a variable product
- Select desired global attribute from the dropdown
- Select desired values or click on the “select all” button
- Make it available for the product page and variations
Create variations from all attributes
After making the desired attributes available for the variations it’s time to create variations with all attributes. For that:
- Click on the variation tab
- Select the option of creating variations from all attributes from the drop-down
- Click on the go button
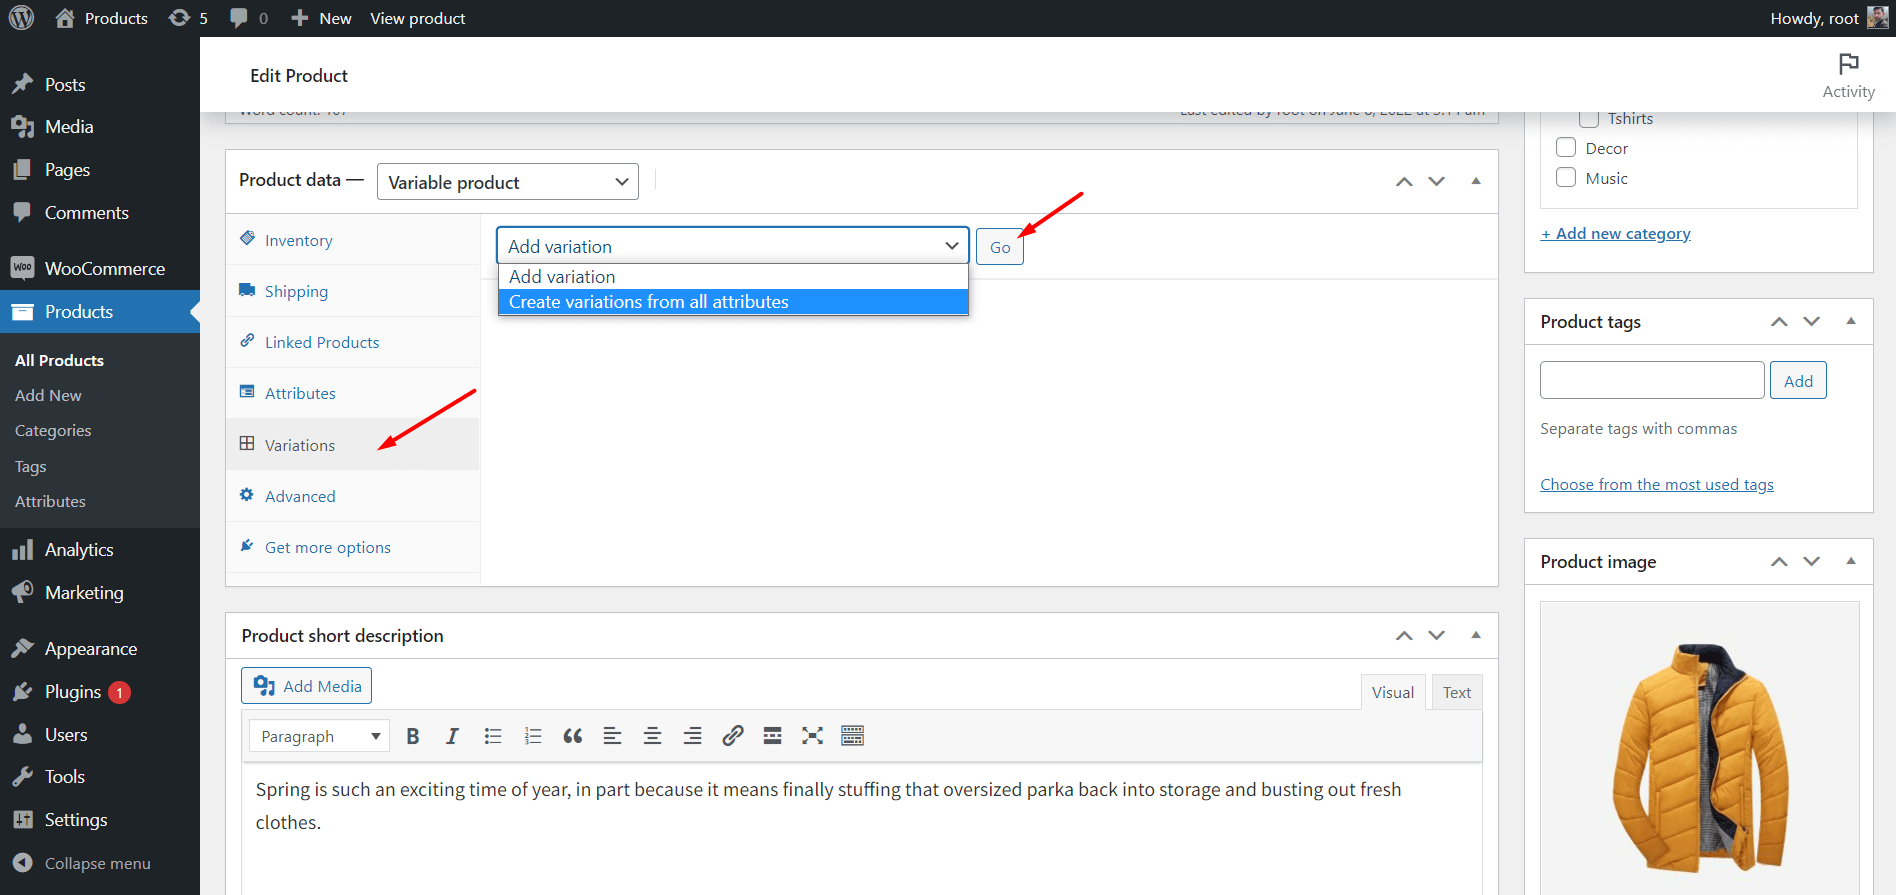
Now, WooCommerce will create all possible variations with the combinations. Later, you configure them with desired price, image, and stock.
Note: Different variations may have different images, prices, and stock. However, you add the same price for all available variations.
Configure Variations
While configuring the variations you have to expand all the variations options and add required values. However, as I have mentioned earlier you can add the same price for all the variations of the. For that:
- Click on the dropdown again after making the variation
- Select the option of “Set Regular Prices”
- Click on the go button
- Add the desired price
- Click on the ok button
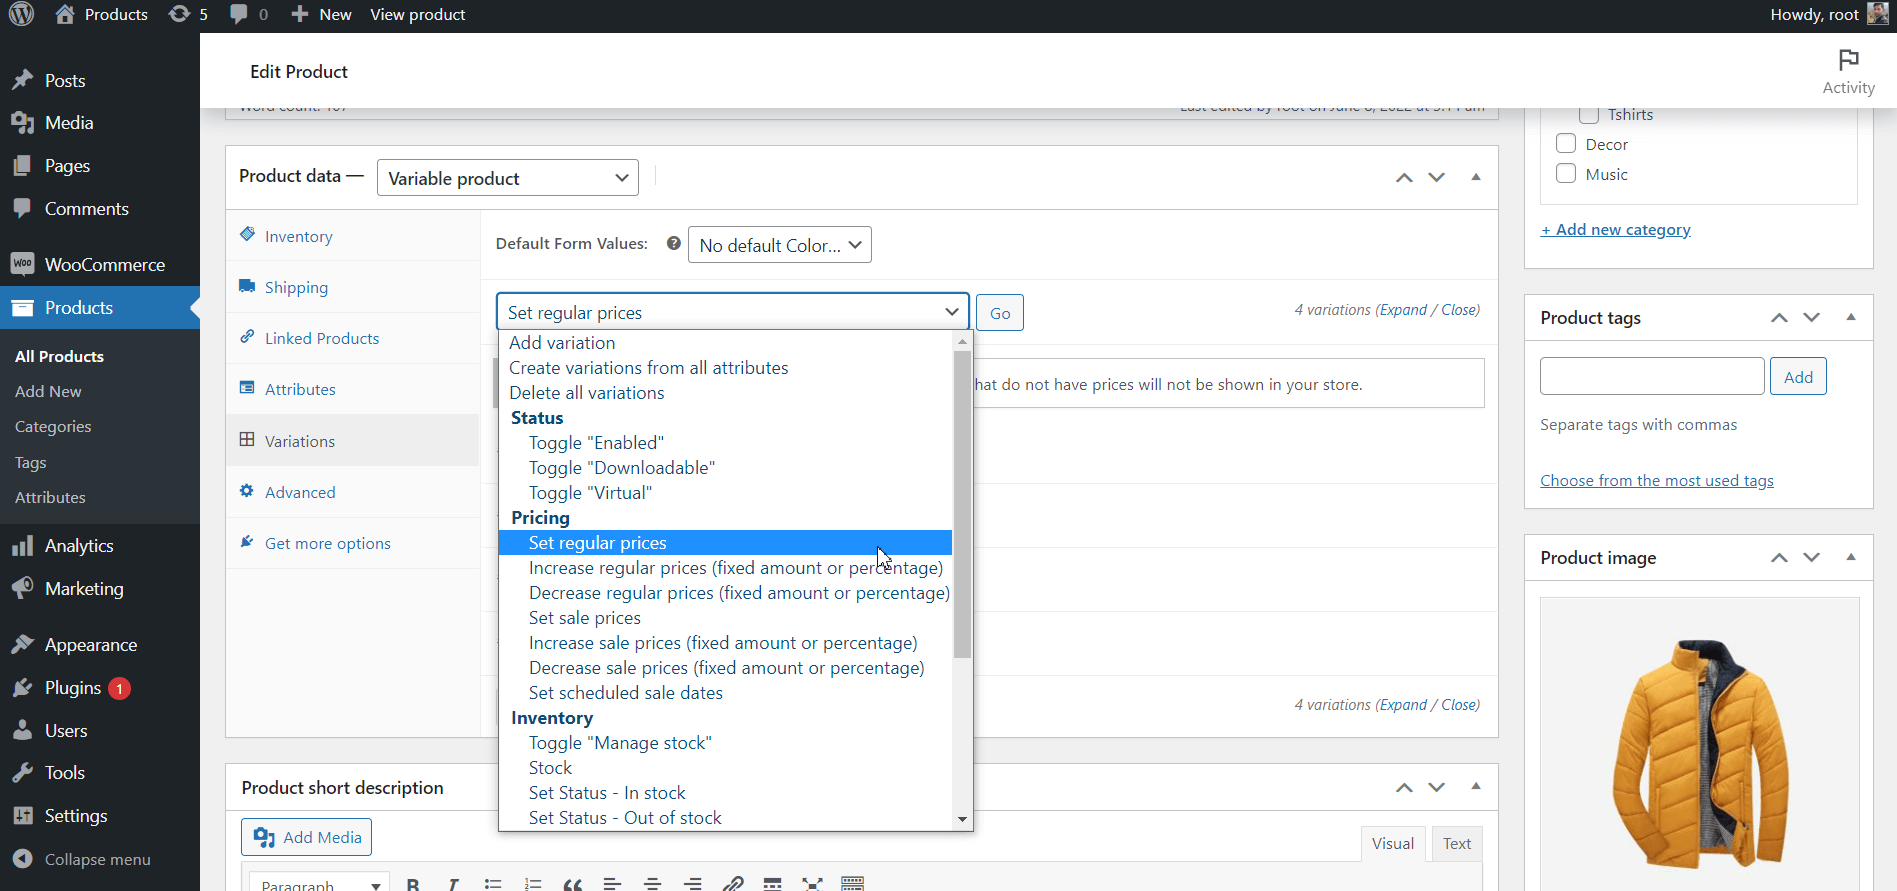
Now all the variations will be having the same price. After properly configuring the variable product click on the save changes button and publish the posts. After now, you can view the front end of the product page.
How to Setup WooCommerce Product Various with Different Prices
As I have mentioned, you can also set different prices, images, and stock for each of the variations here’s how you can do that:
- Go to the variation tab
- Expand all variations
- Add Desired prices, images, and stock
- Click on the save changes
- Publish or update the product
That’s all, your product variations are now available at different prices. So that, when the shoppers select their desired variations of a product, they will see the exact price for that variation.
How to Style WooCommerce Product Variations
The default presentation of the WooCommerce variable products is good but not the best. You would be amazed to know that, 22% of the top 1 million eCommerce sites are made with WooCommerce. But that doesnt mean that the default WooCommerce was enough for them to make a beautiful and conversion-focused site.
It would take them to hire developers or purchase premium themes and plugins to make their WooCommerce visually appealing and conversion-focused.
So why dont you also try to make your site more appealing by using a companion plugin for WooCommerce?
You probably thinking about which plugin you should choose. Well, there are numerous plugins available in WordPress to expand the existing functionality of WooCommerce. However, it is recommended to choose an all-in-one plugin instead of multiple plugins and plugins for different features. Because using multiple plugins on a WordPress site is not recommended at all.
It may ruin your site by making it slower than before.
ProductX Gutenberg WooCommerce plugin is one of the best companions for WooCommerce. It comes with Product Blocks, Starter Packs (Premade Template), essential features, and add-ons.
ProductX is now WowStore! We’re very excited to bring you this experience, packed with exciting features. Please note that the features, blocks, starter packs, etc. all work the same. If you have used ProductX, you’ll feel right at home with WowStore.
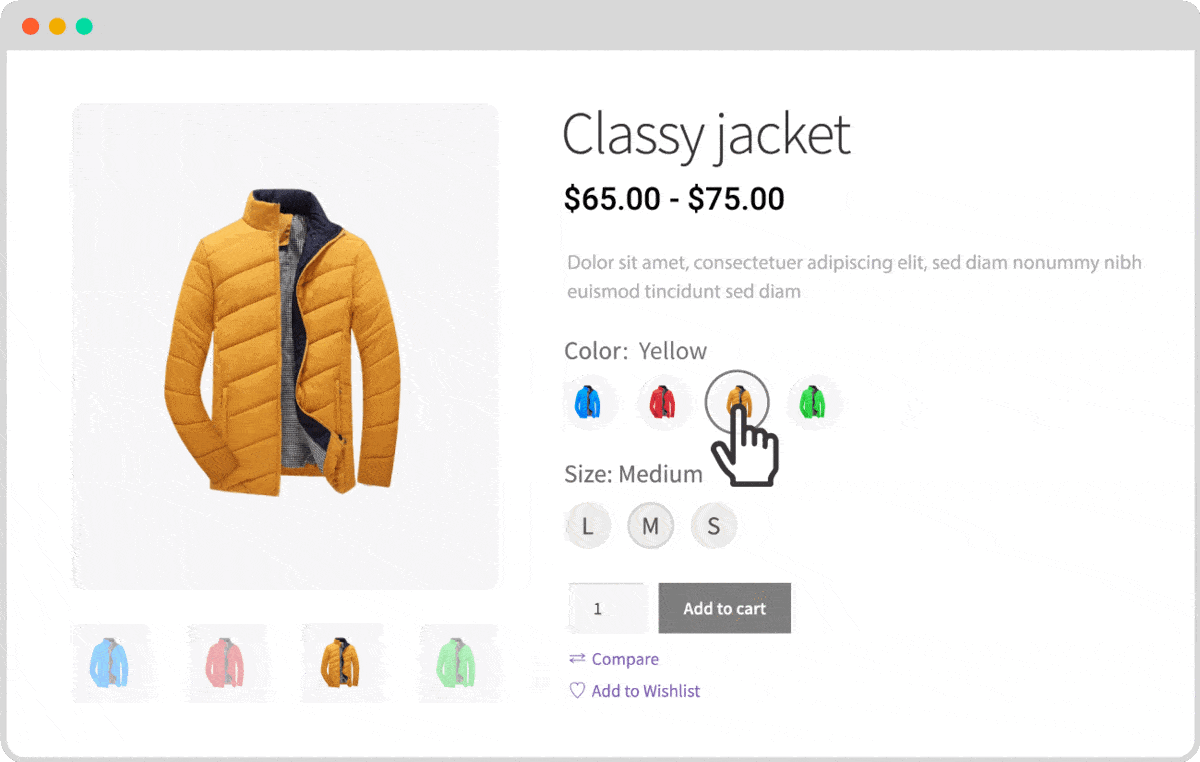
The Variation Swatches is one of the best addons of ProductX. By which you can make product variations visually appealing.
Below are the available ways of styling the product variations using the variation swatches addon.
Convert Dropdown to Swatches: First of all, you convert the default WooCommerce variation style to beautiful Swatches. As you already know, the default product variations of WooCommerce come with drop-down selection options. The options may be the name of the colors and sizes. But with the addons, you can convert them to desired colors and labels instead of the names of the colors and sizes.
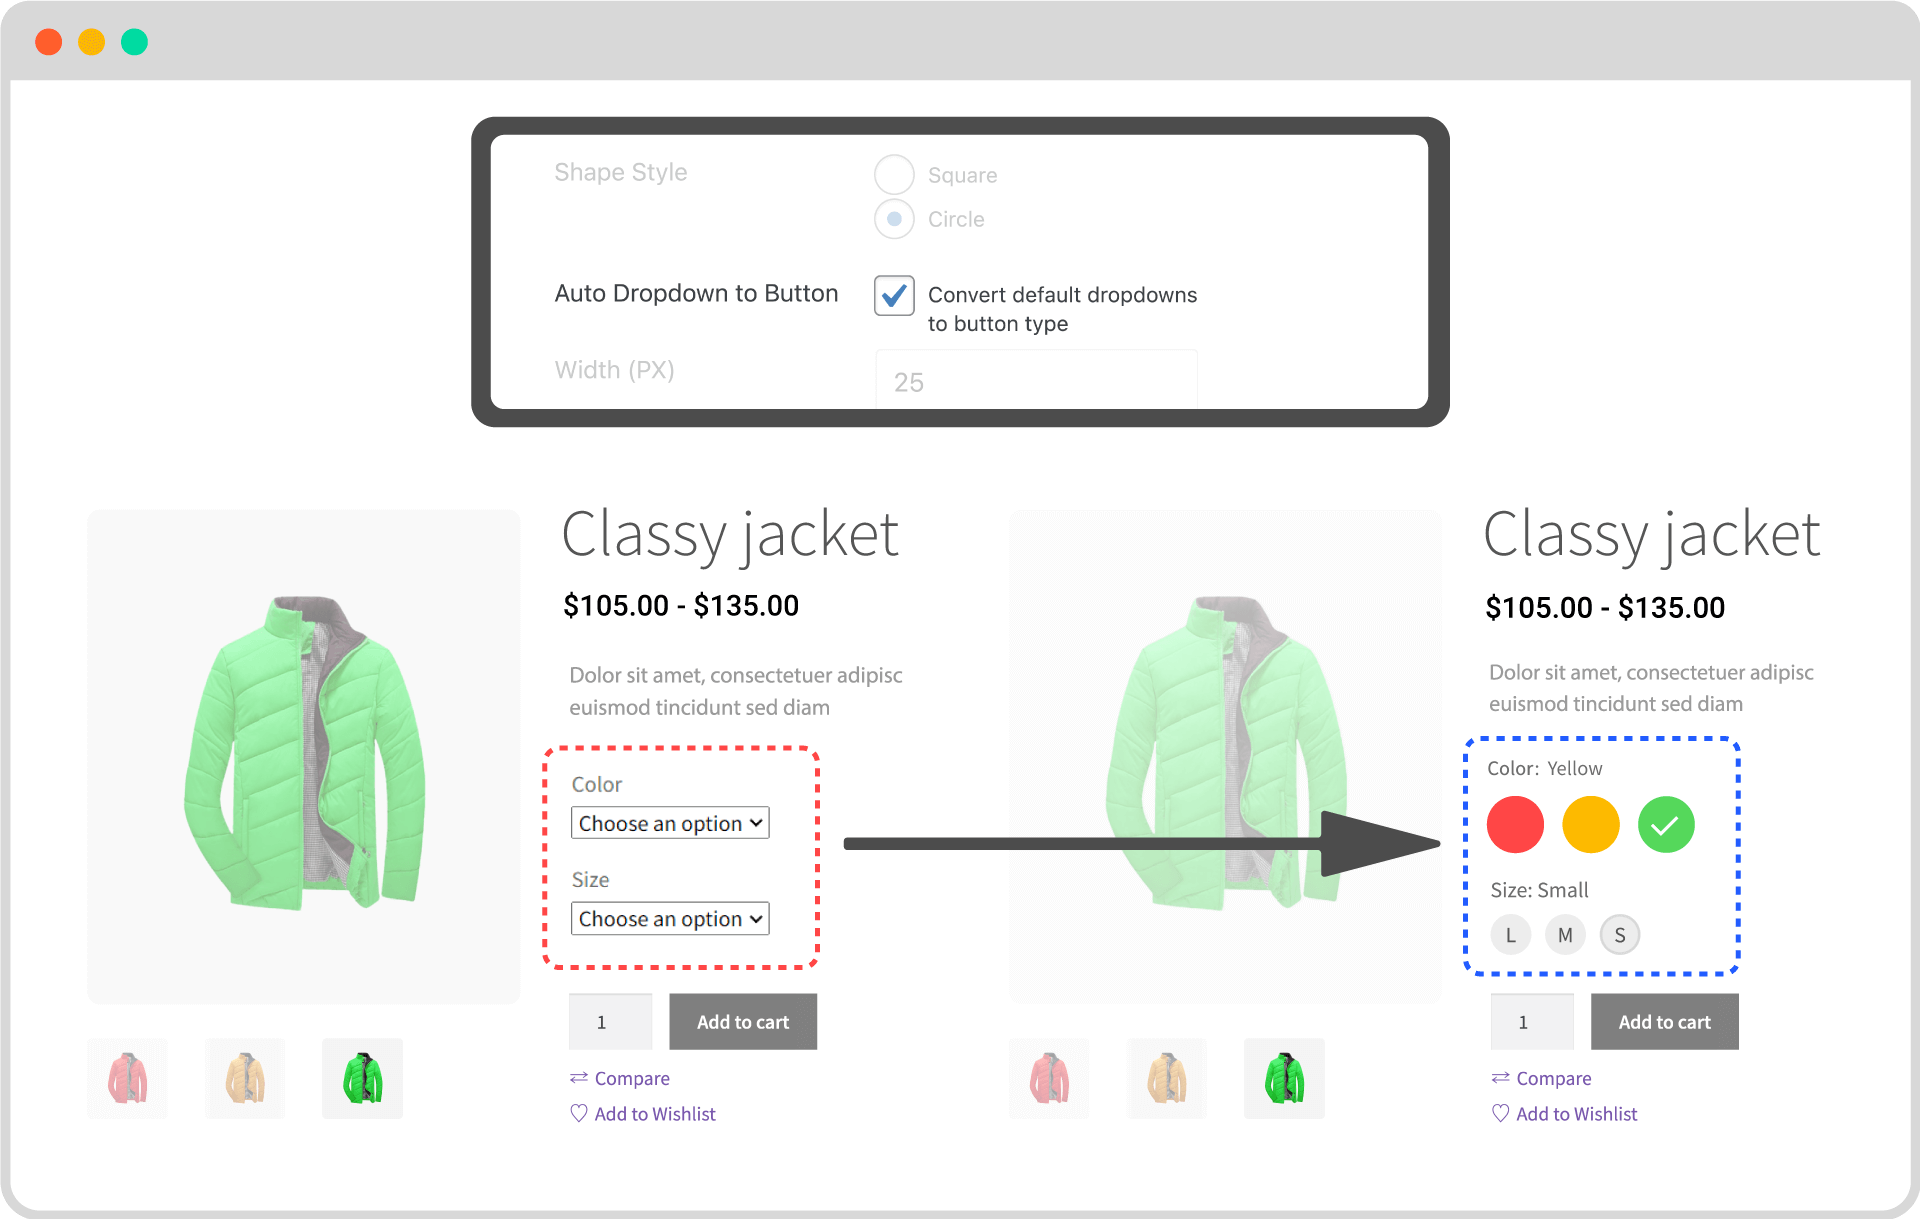
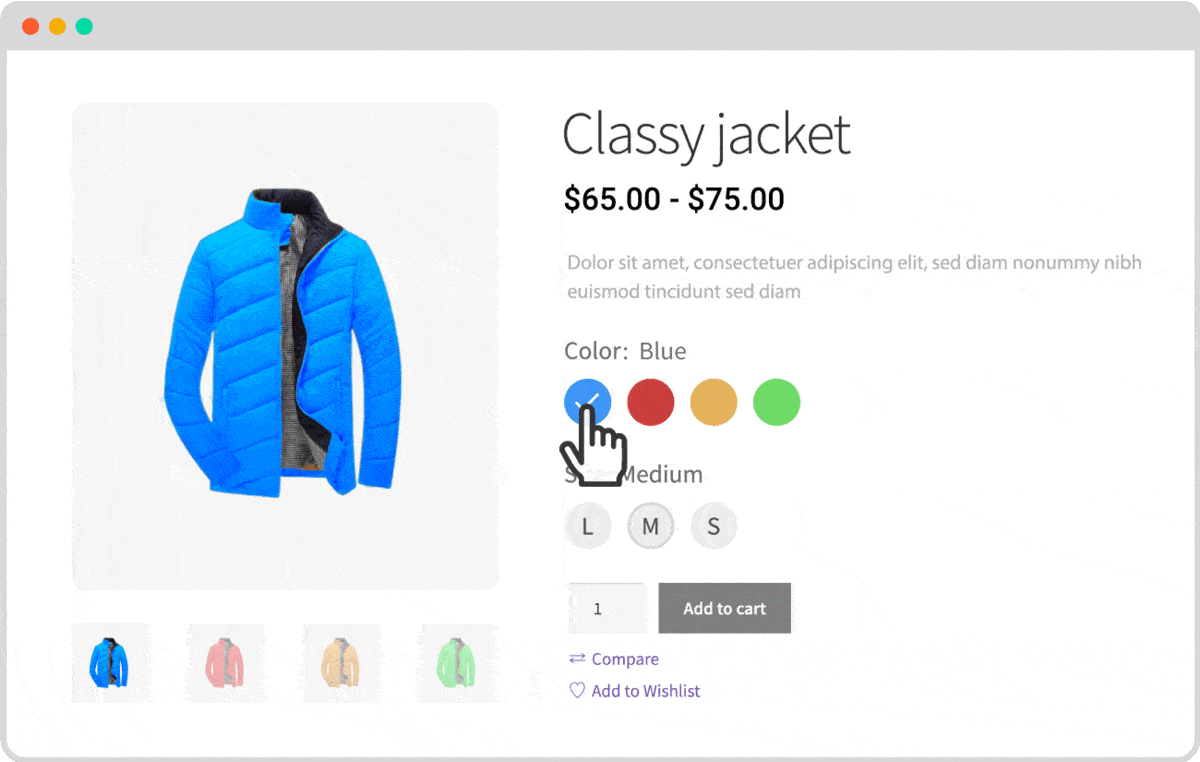
Create Color Swatches: Once you start using the Swatches addon of ProductX, you can get more options while creating and configuring global attributes. It lets you select desired colors as the values of the color attribute. So that, the colors will be displayed in place of the color names.
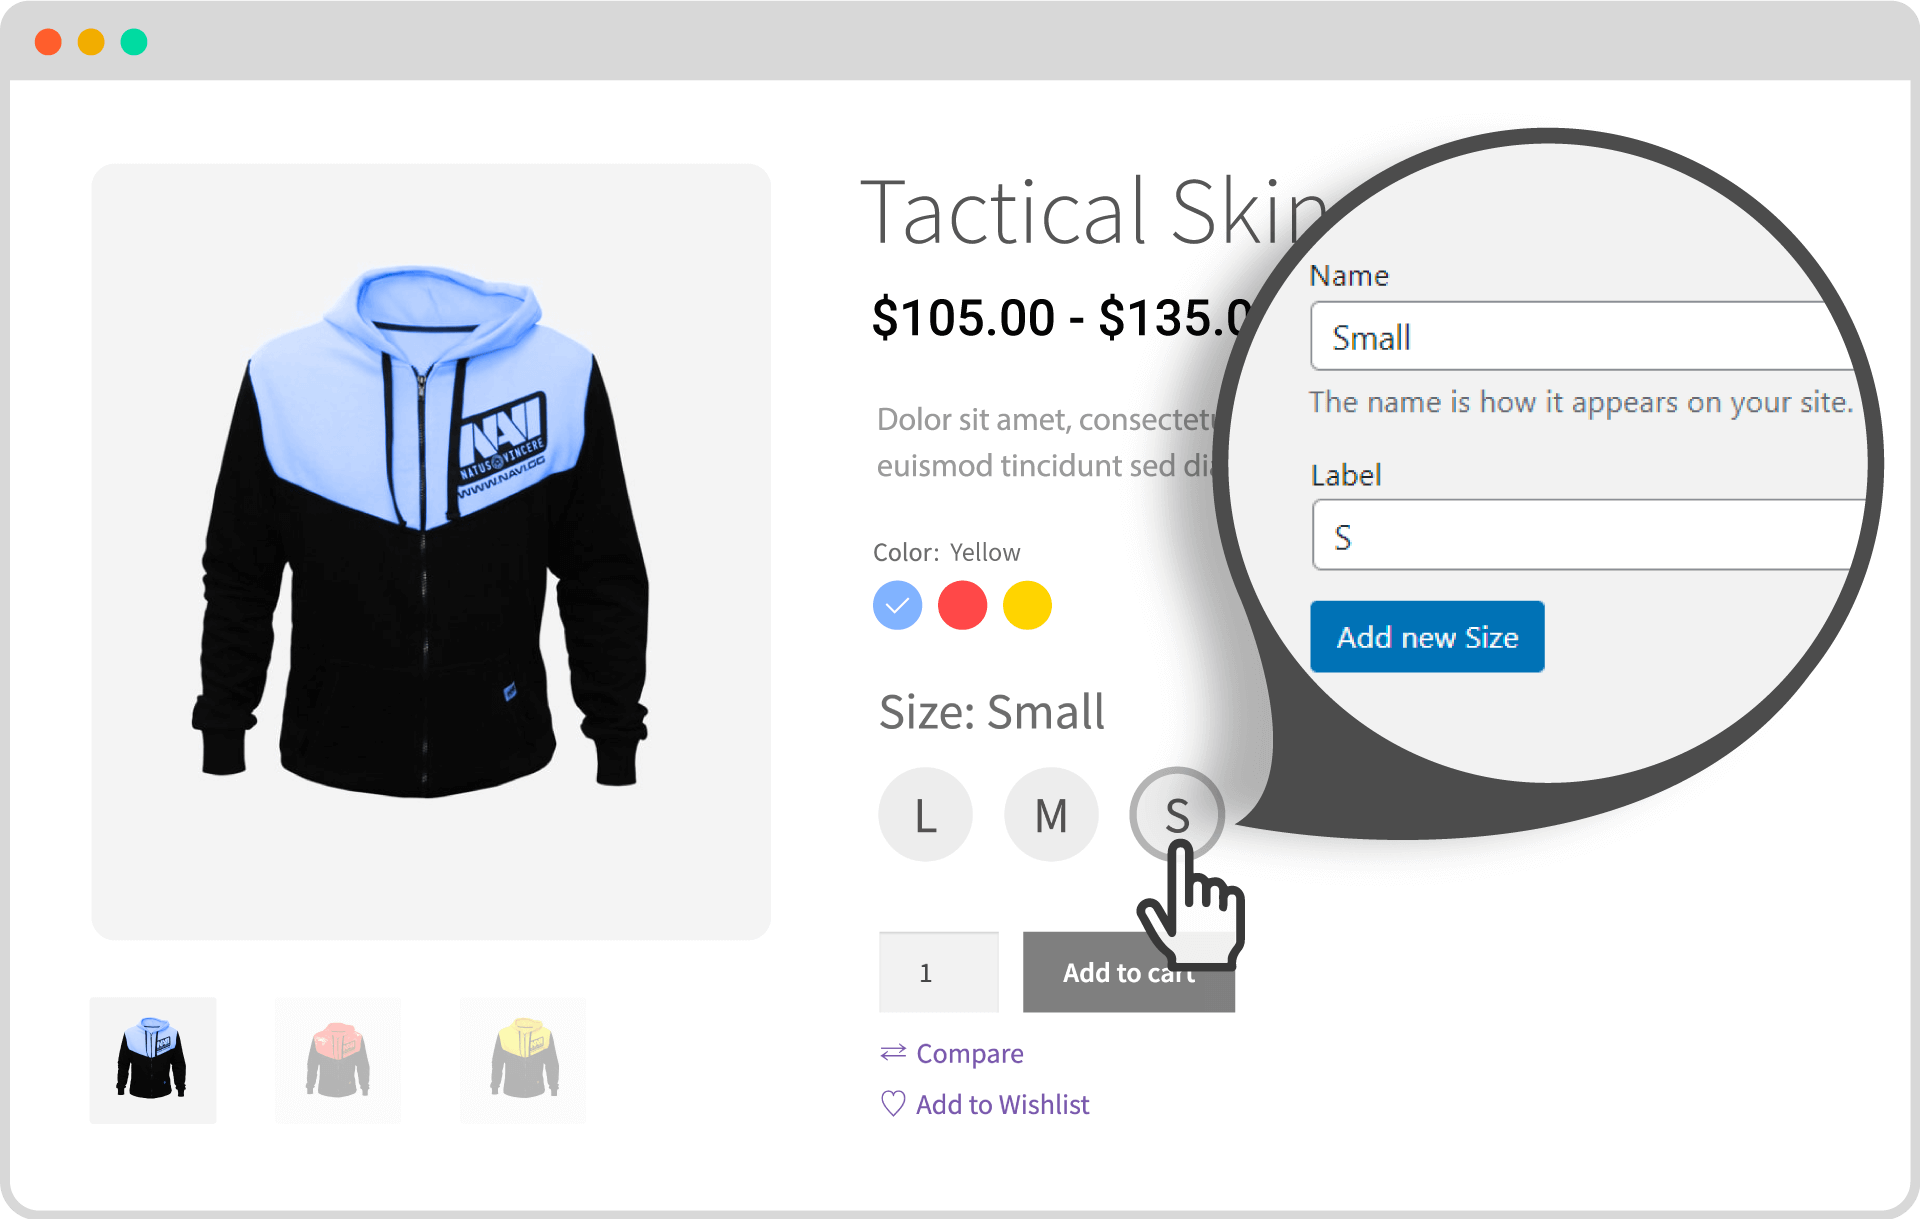
Create Label Swatches: You can also display labels instead of the name of the sizes while creating and configuring the size attribute. For example, when you add a size attribute as Medium you will also get an option to add a label as M or whatever you want.
Create Image Swatches: You would be amazed to know that, you can also display the product images as variations of a product. For that, you just need to set the image as a type of the color attribute type. And then you will be able to assign desired images with the color names.
Learn More: WooCommerce Variation Swatches
Conclusion
That’s all about the WooCommerce Product Variations and how you can style them. Now can start creating variable products and style them with variation swatches. Feel free to comment below, if you face any difficulties.

