Using the WooCommerce plugin to create eCommerce sites is increasing day by day. With the help of this free plugin, WordPress users can create their desired online store effortlessly. However, the WooCommerce store owners always try to expand the functionalities and make their online store users friendly.
But, in this blog post, I am going to only discuss the Variation Swatches Addon for ProductX. It helps to make the variable products more appealing and user-friendly. However, ProductX also offers multiple add-ons and numerous features.
Before going into an in-depth explanation, I would like to talk about the variable products and swatches.
What is a Variable Product?
Variable Products refer to those products that have multiple variations, including color, size, and price. For example, you may have variations which can be colors, sizes, and different prices and stock.
So, as the store owners, we don’t want to create different product pages for the same products. Here’s where the variable products come into the action. While creating variable products, we can add colors, sizes, different prices, stock, and even images of the variations.
So that the shoppers can choose their desired size and color for the product that they would like to purchase, if the store owners set different prices for different variations, the shoppers will see the exact price after selecting the desired variations.
What are WooCommerce Variation Swatches
Variation Swathes are the buttons of variations that include colors, labels, sizes, and images of variable products. It is a modern way of displaying variable products in front of the shoppers to make the variation selection process easier for them.
So with the help of the Variation Swatches features, online store Owners can easily create attributes with the visual presentation of the variations that include colors, images, and labels instead of the names of the colors and sizes.
Why Use the Variation Swatches
Now that I have explained the variable products and variation swatches, I would like to state the reasons behind using the Variation Swatches.
As we use anything for getting some benefits from that, it’s also the same for the Variations swatches that we should use these features for getting some benefits from it.
So, you may want to know the benefits of it. Although it has multiple benefits, I would like to explain the major benefits that would make you start using this feature on your site.
Drop Down into Swatches: First of all, the dropdown variation selection options will be converted to the Swatches button so that the shoppers can see the available variations of the products at a glance without clicking on the dropdown.
Display Colors and Labels: The default WooCommerce variable products display the names of the colors and sizes. But with the swatches features, we can display desired colors and labels increasing the names of the colors and sizes.
Display Images: We can also display product images as the Swatches button instead of colors. However, not all plugins have this feature. Keep reading the blog posts to find out which plugin has all of these features.
Better User Experience: Last but not least, the Variation Swatches help us to ensure a better user experience for potential customers.
Introducing the Variation Swatches Addon for ProductX
ProductX is a complete WooCommerce solution for finely crafting online stores. It has numerous features and multiple useful add-ons. And, WooCommerce Variation Swatches is a great addition for the ProductX users.
It allows you to convert dropdown selection options of the variations into the Swatches button. However, you can also create different types of Swatches from scratch using the addon. Currently, it offers to create Colors, Labels, and Images Swatches. Continue reading the blog posts and learn more about them.
ProductX is now WowStore! We’re very excited to bring you this experience, packed with exciting features. Please note that the features, blocks, starter packs, etc. all work the same. If you have used ProductX, you’ll feel right at home with WowStore.
You can also display the Swatches to Shop, Archive, and all Single Product Pages. Doesn’t matter whether these are default or custom-created with the exclusive WooCommerce builder addon of ProductX.
Like all other add-ons, it also has its dedicated setting section. From where, we can turn on the tooltip, increase or decrease the sizes of the swatches, and turn on the tooltip.
Start using the Variable Swatches Addon.
To start using the Variation Swatches addon, you just need to install the ProductX plugin to your site. You can install it from the plugin directory of WordPress. Then you have to turn on the addon. For that:
- Navigate to ProductX
- Click on the Addons section
- Turn on the Variation Swatches Addon; that’s all
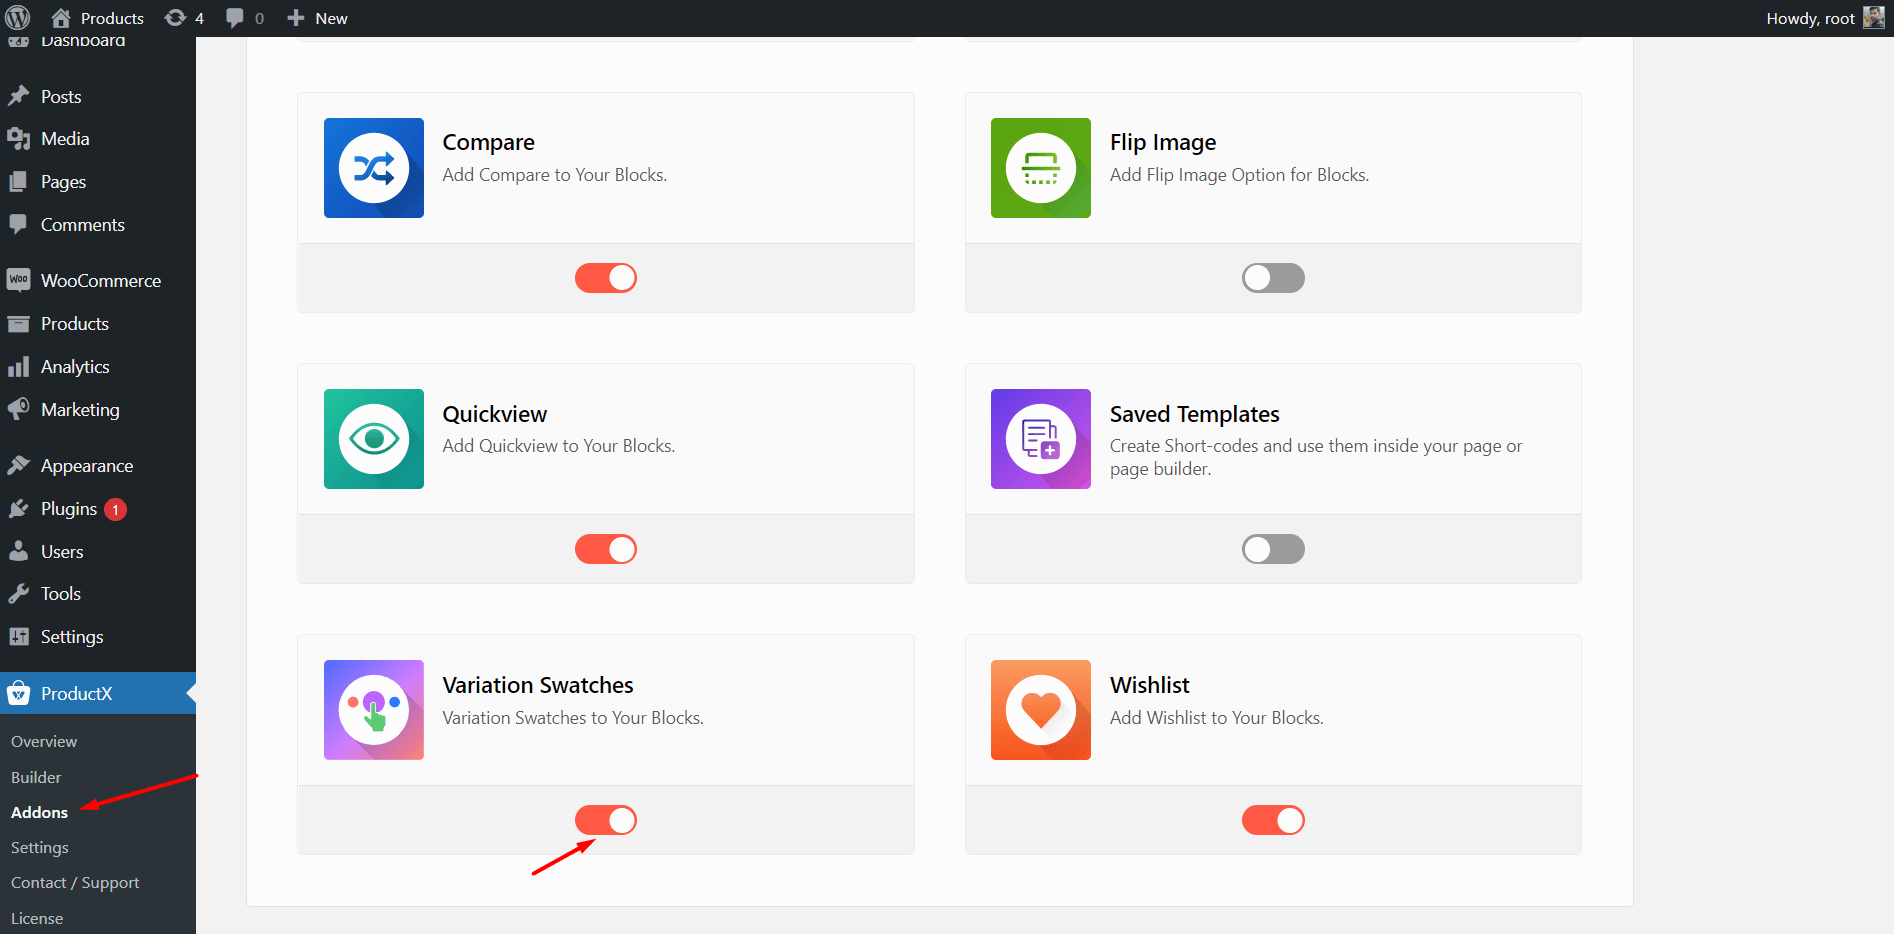
Now you can start using the addon to give a better look at the variable products of your WooCommerce store.
Convert Dropdowns to Swatches
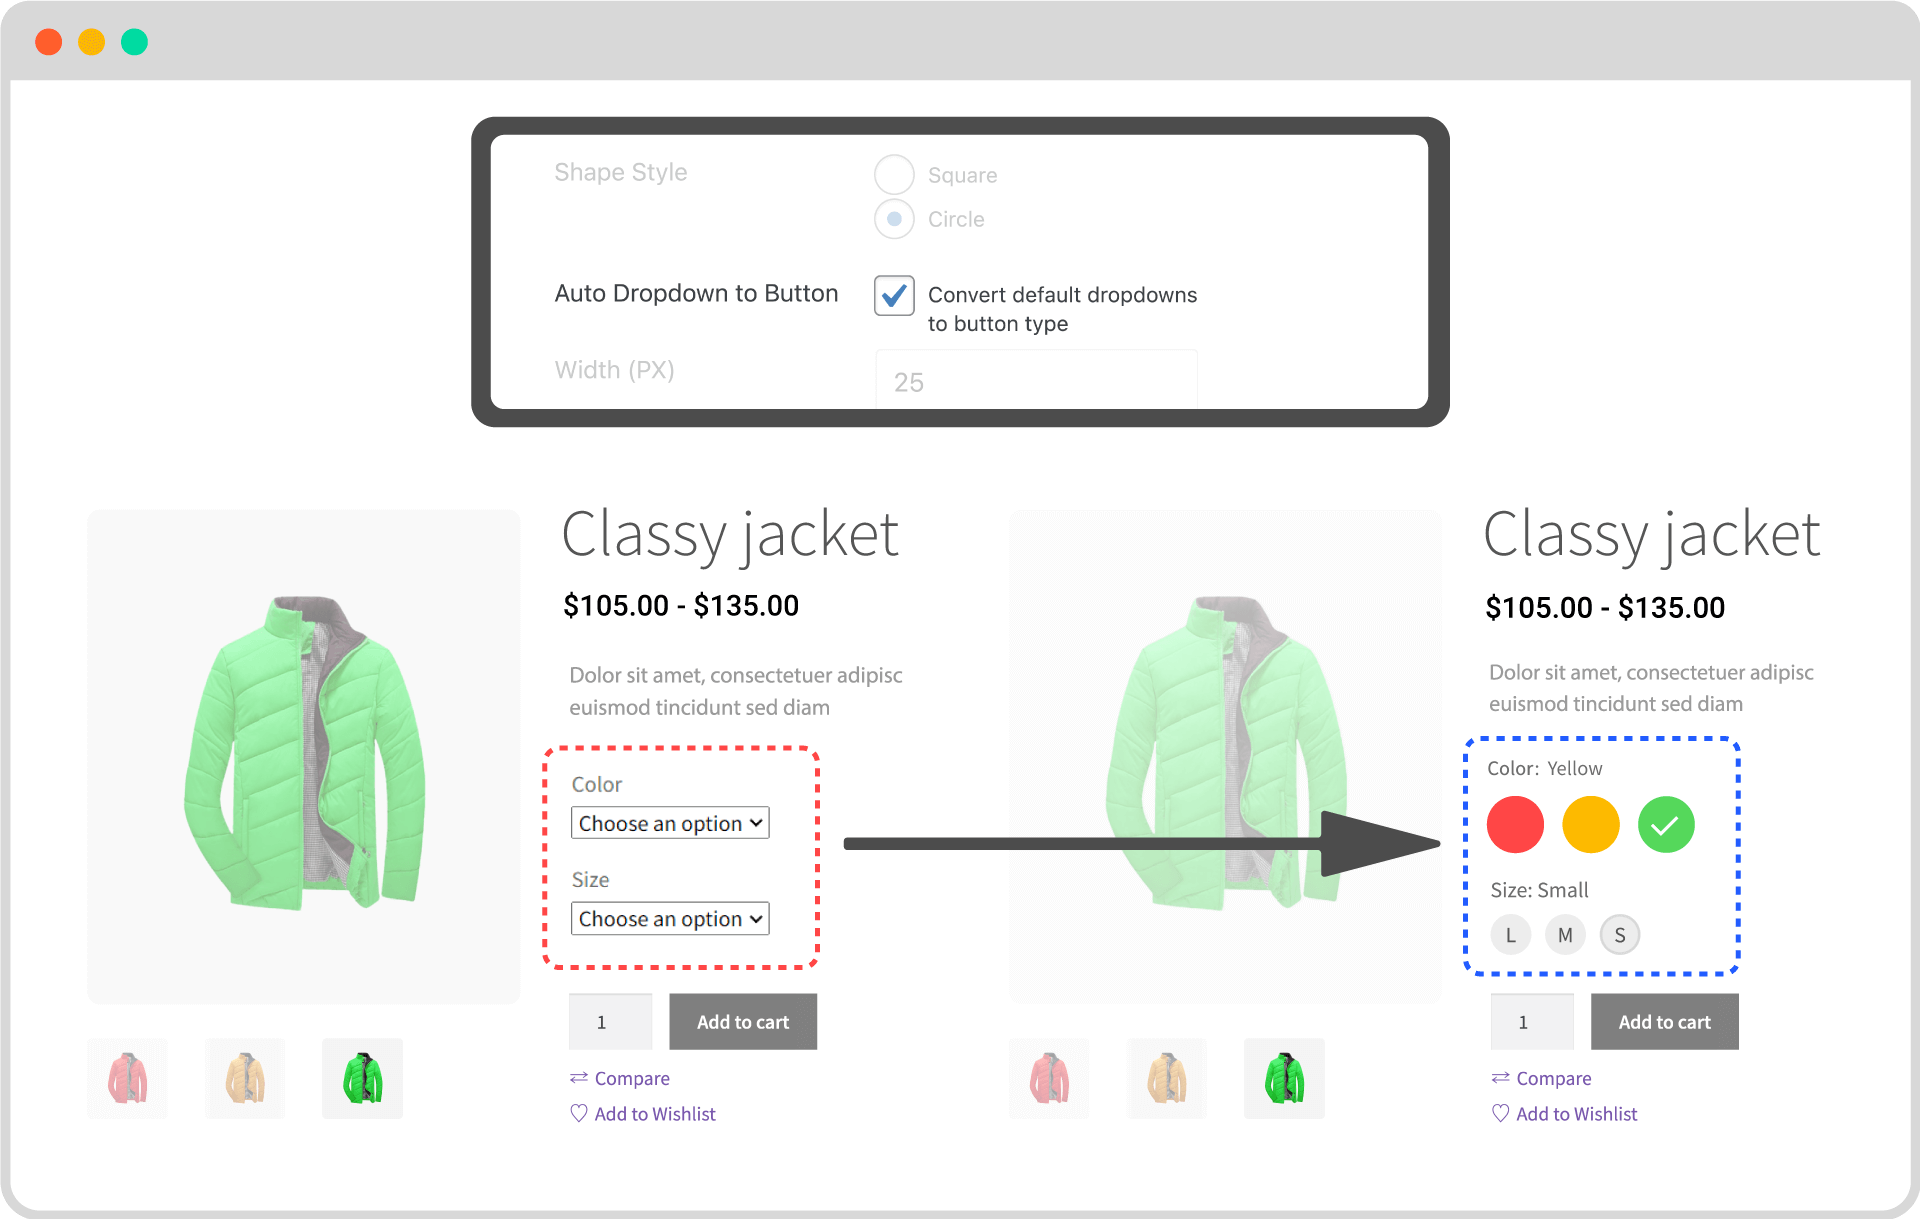
Now it’s time to start using the Swatches addon. First of all, we should convert the existing variable products into beautiful Swatches. For that, we need to go to the setting section and click on the check box “Convert Dropdown to Swatches.” Now when you go to an existing variable product, you will see that the dropdowns are converted to a button.
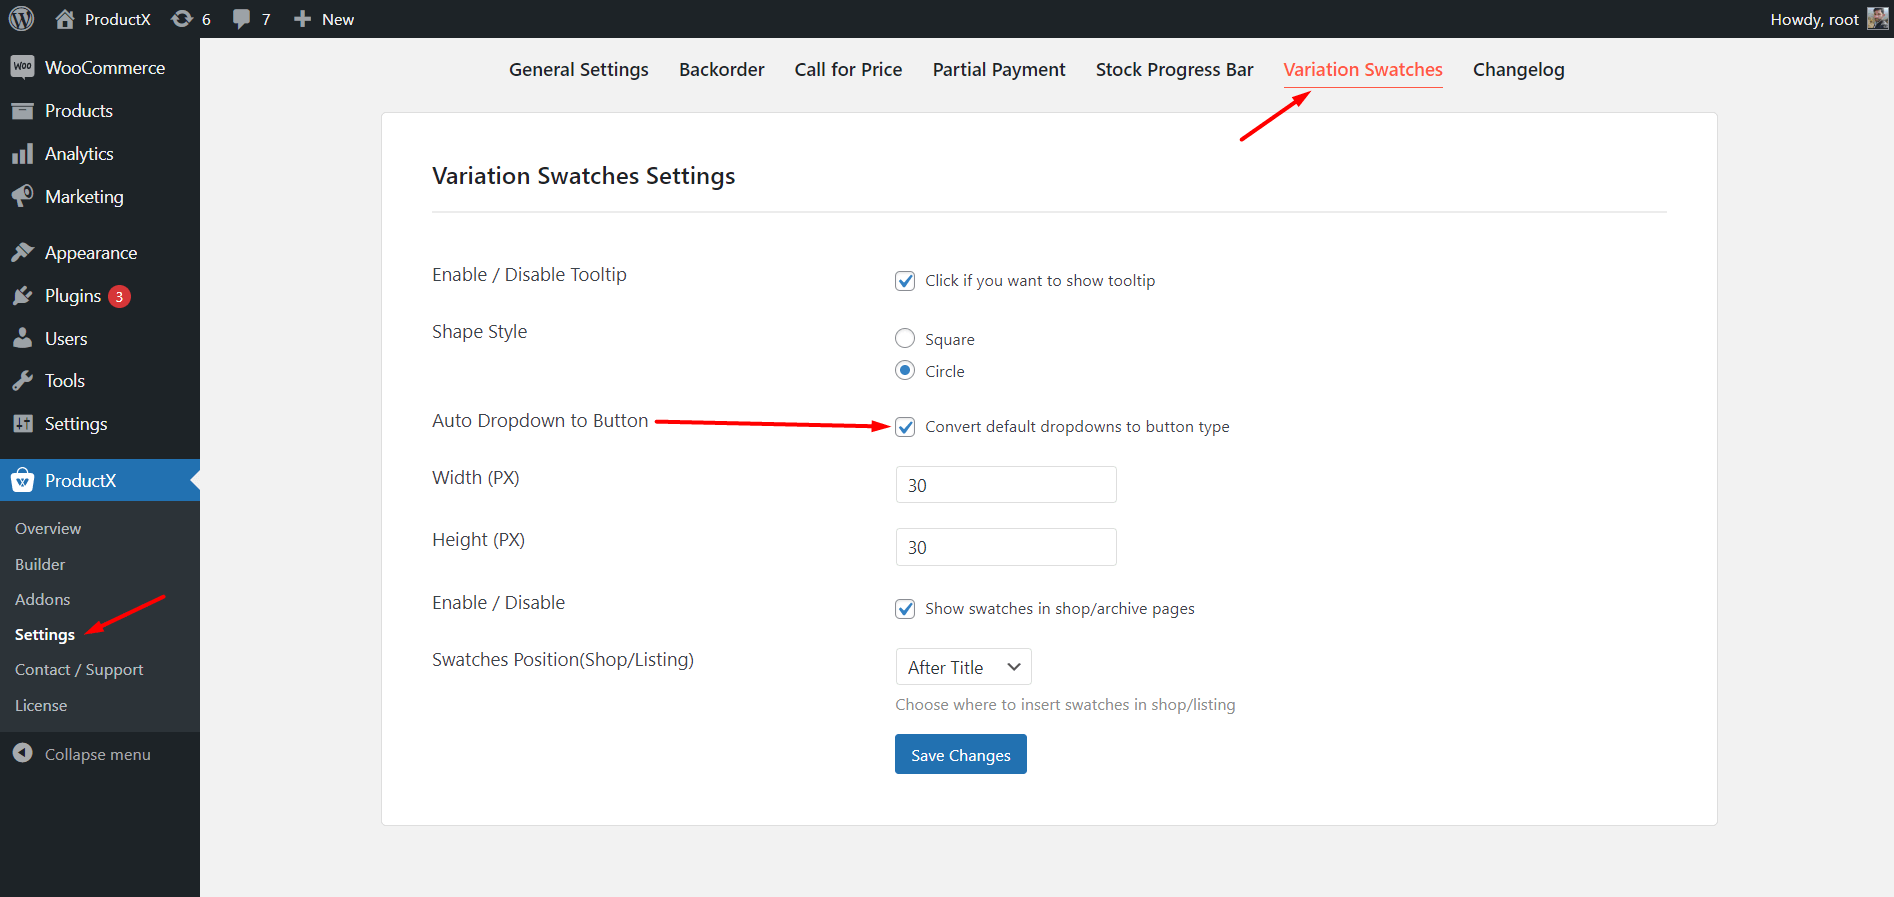
However, it does not show the colors; it only shows the names of the colors. This is because the colors are not assigned with the names. Don’t we do that effortlessly?
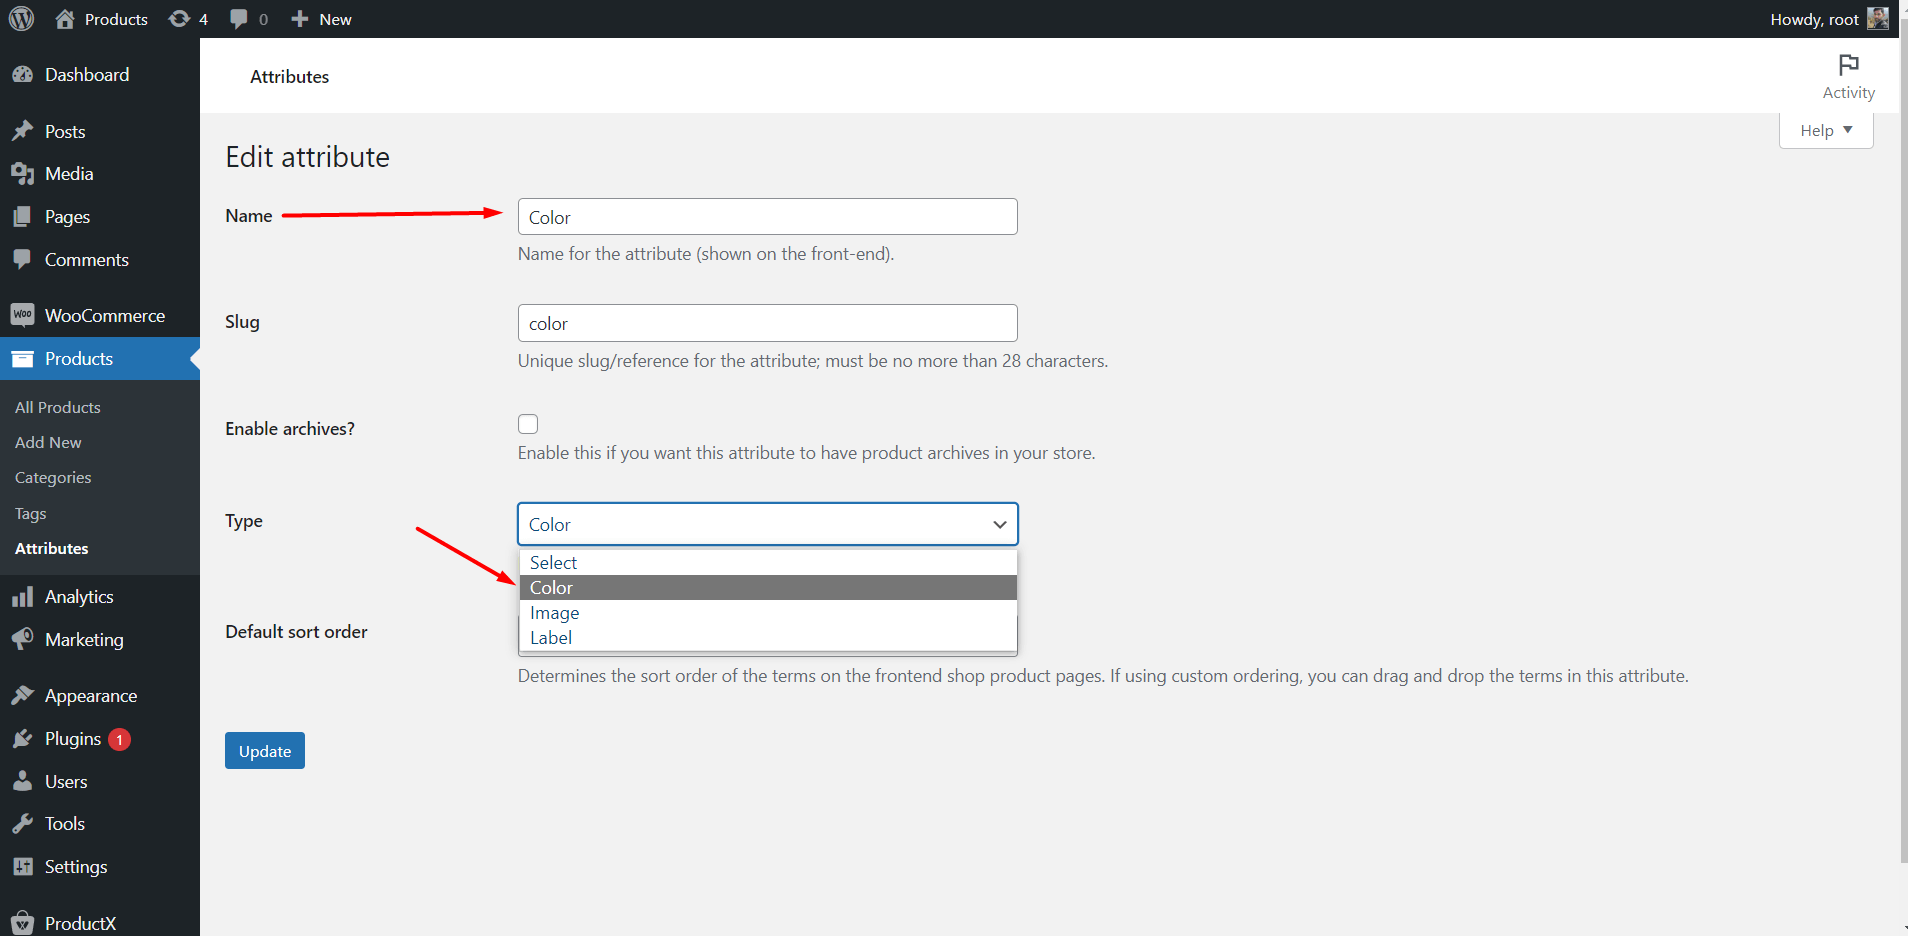
- Go to the Product Attribute Section.
- Change Attribute type to color.
- And Assign desired colors as the values.
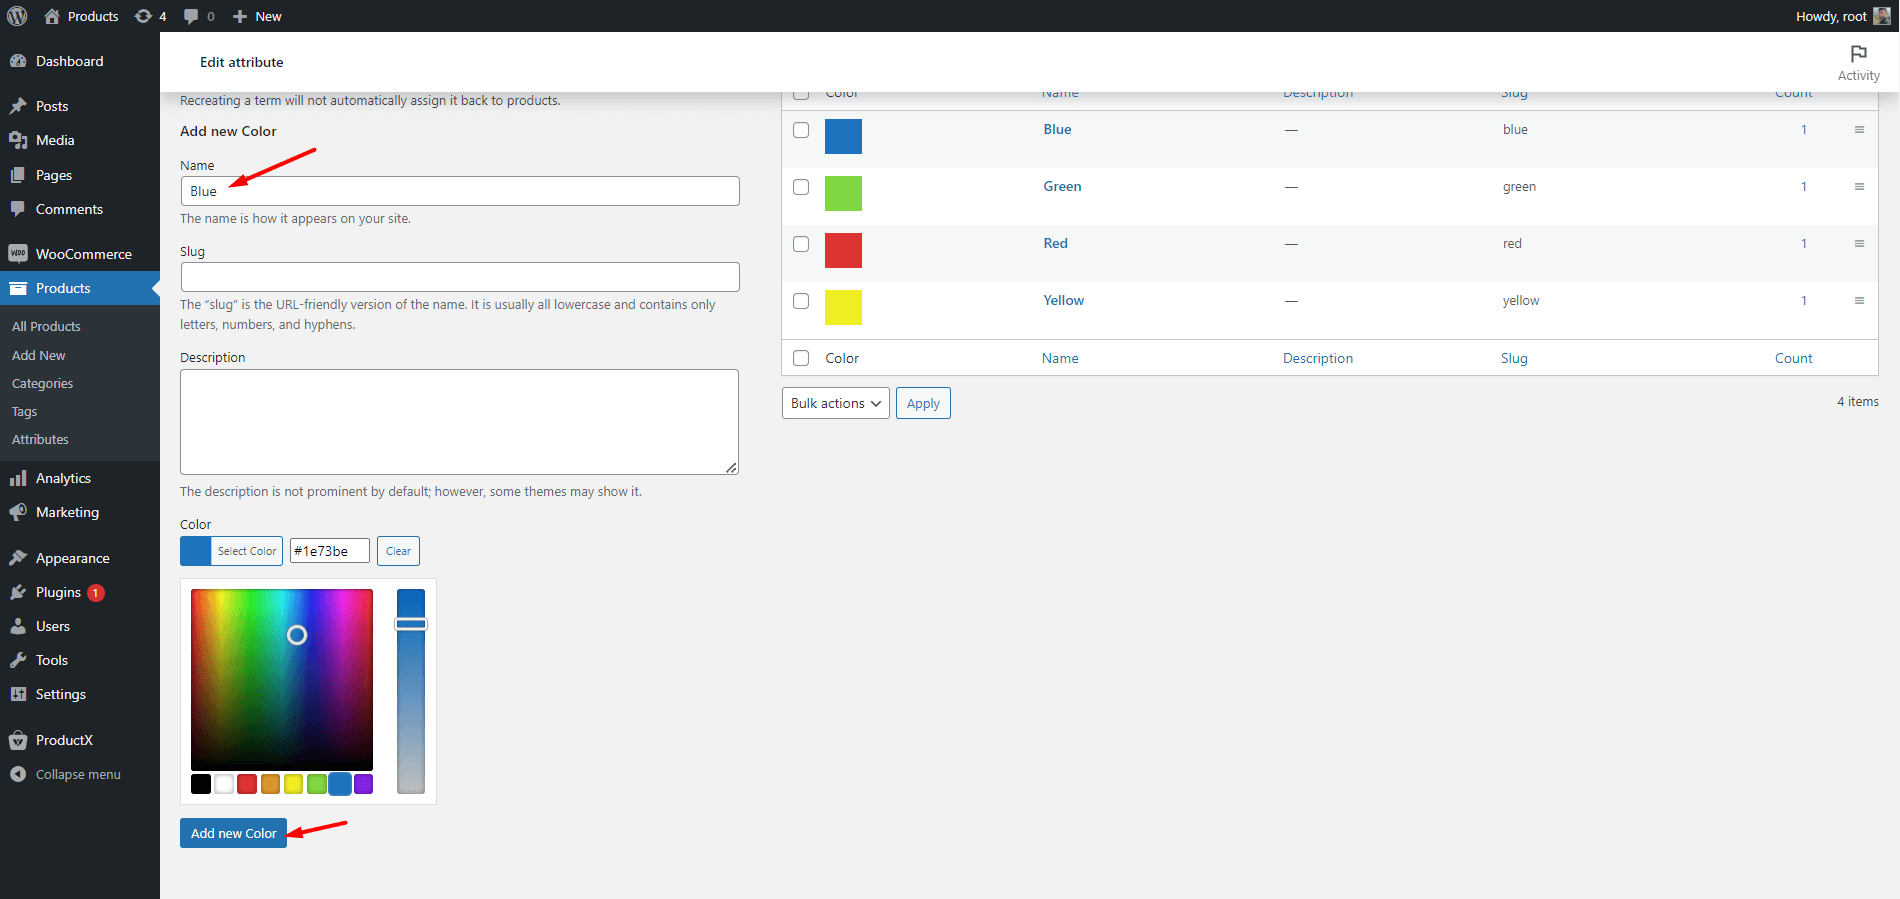
Now, go to the product page, and you will see that the colors you have assigned are displayed on the page. In the same way, you can also display labels instead of sizes. For that, you have set the type of the size attribute as the label and assigned labels as the attribute values. For example, if you add size as Small, the for it would be “S.”
Create Swatches with Color and Size Attributes
Now, let me guide you through creating Swatches with Colors and Size attributes from scratch. First of all, we have to make sure that all the attributes are properly created and configured.
You can create new attributes or just change the type and configure the existing attributes. So, we have to create and configure and Color Attribute and a Size Attribute. Then we have to configure them with the desired values.
After completing the configurations of the attributes, we have to properly add them to our desired variable products.
While editing a variable product, click on the Attributes section select an attribute from the dropdown, and select all values. The values are available because we have added those to the global attribute section.
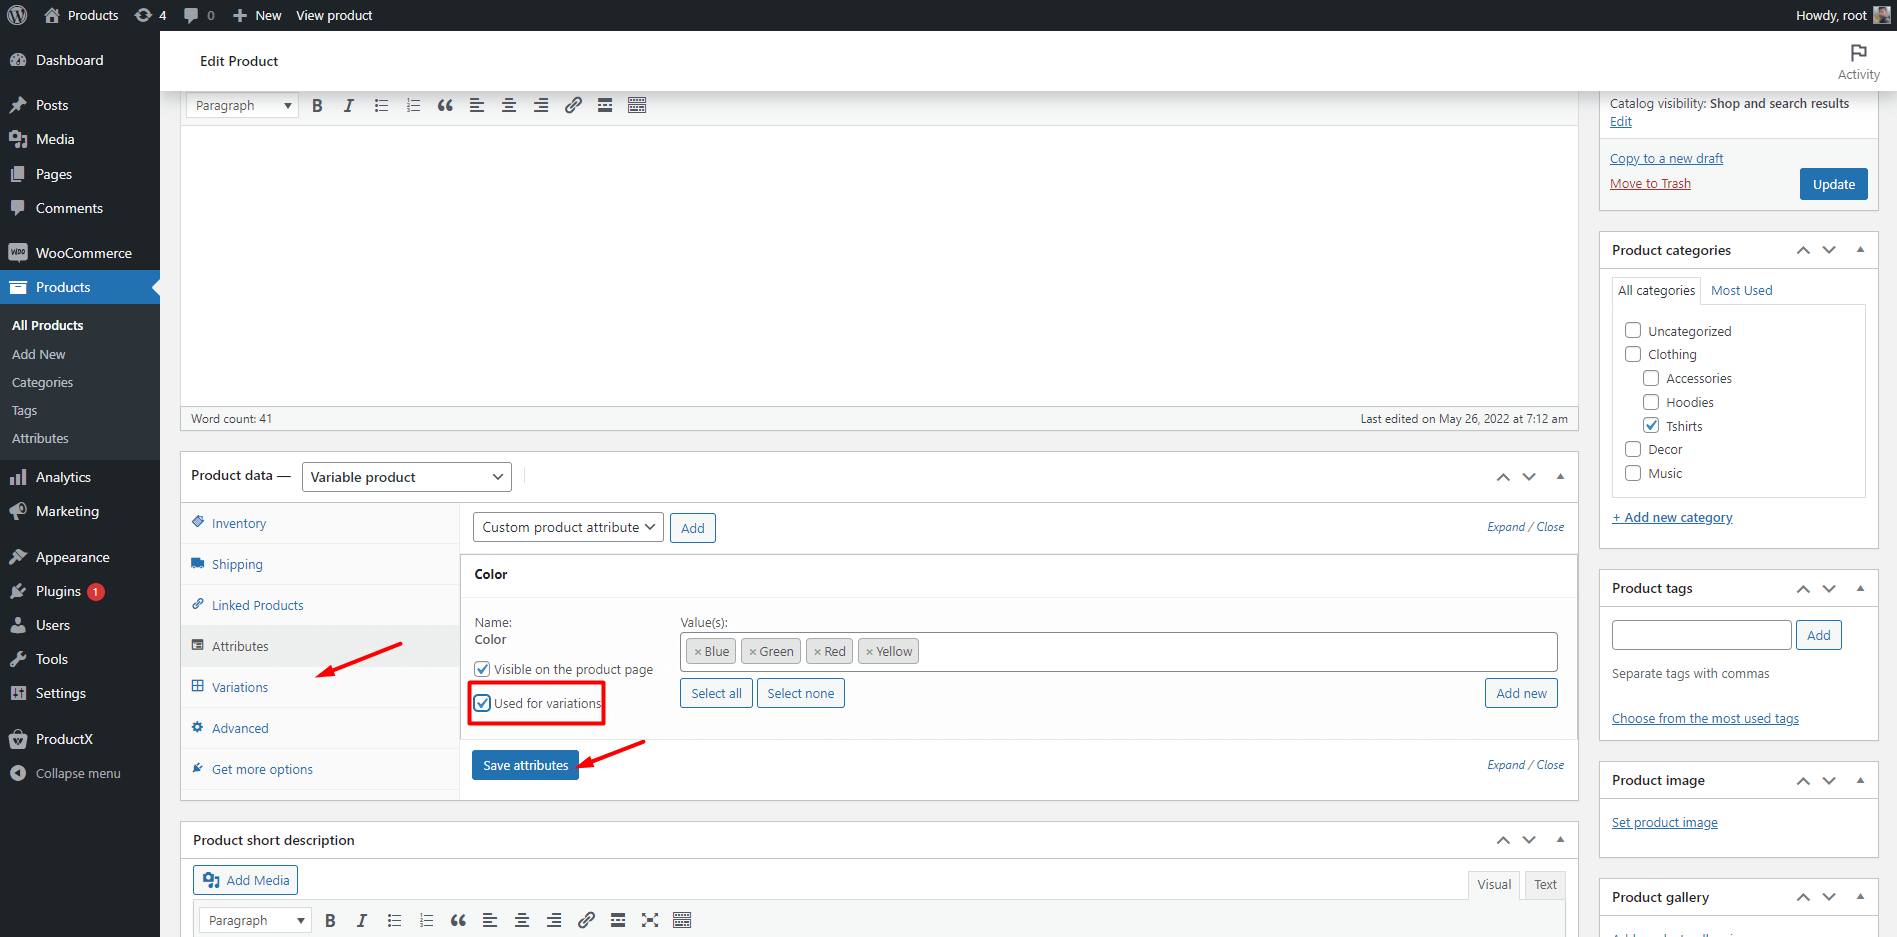
Like the same, we have to add both of the attributes with their values. But don’t forget to click on the available variation checkbox.
Now, go to the Variations section and click on the option “Create Variations with All Attributes.” Wait a bit; WooCommerce will automatically configure the variations.
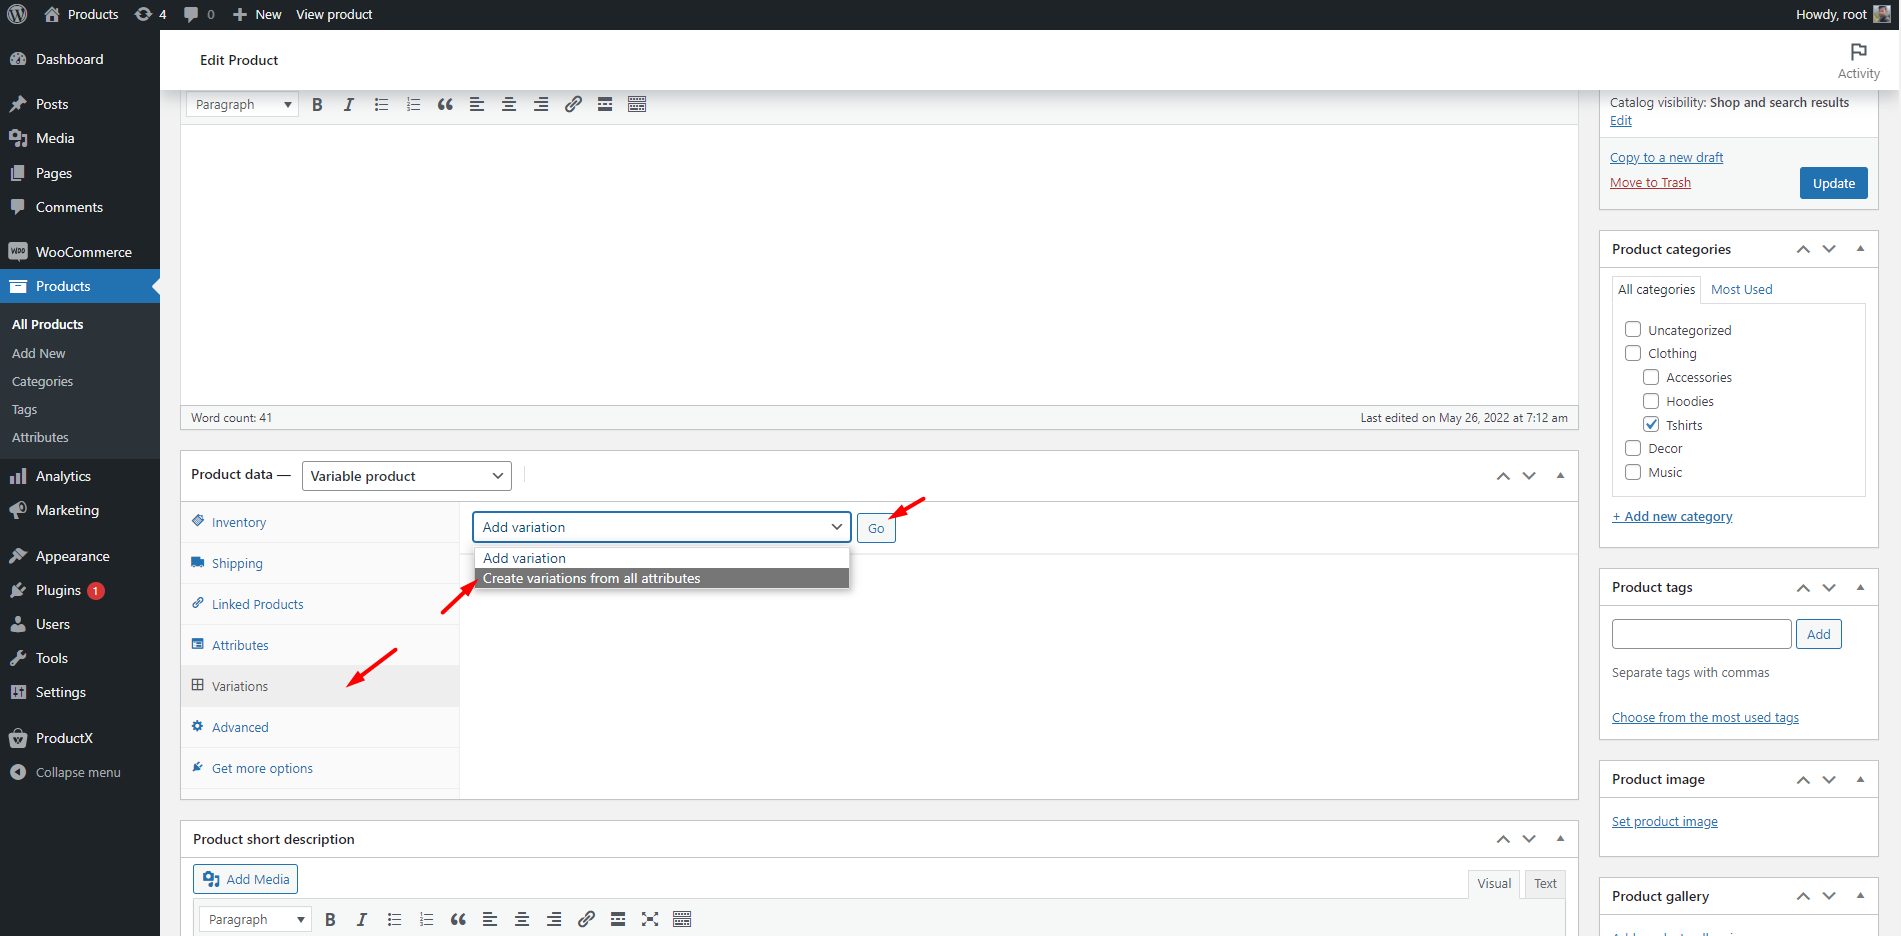
Then you have to manually add the product images and prices. Make your match the product images with the colors. So when the shoppers click on a color, they will see the product image that matches the selected color.
If you want to add different prices for different variations, you have to add them manually. However, if you want to add the same price for all of the variations, you do that at once. For that, click on the dropdown from where you have configured the variations select the option of “Set Regular Prices,” and then click on the go button.
After clicking on the go button, you can add your desired price, and it will be added to all variations.
That’s all now. You can click on the save button and check how it looks at the front end.
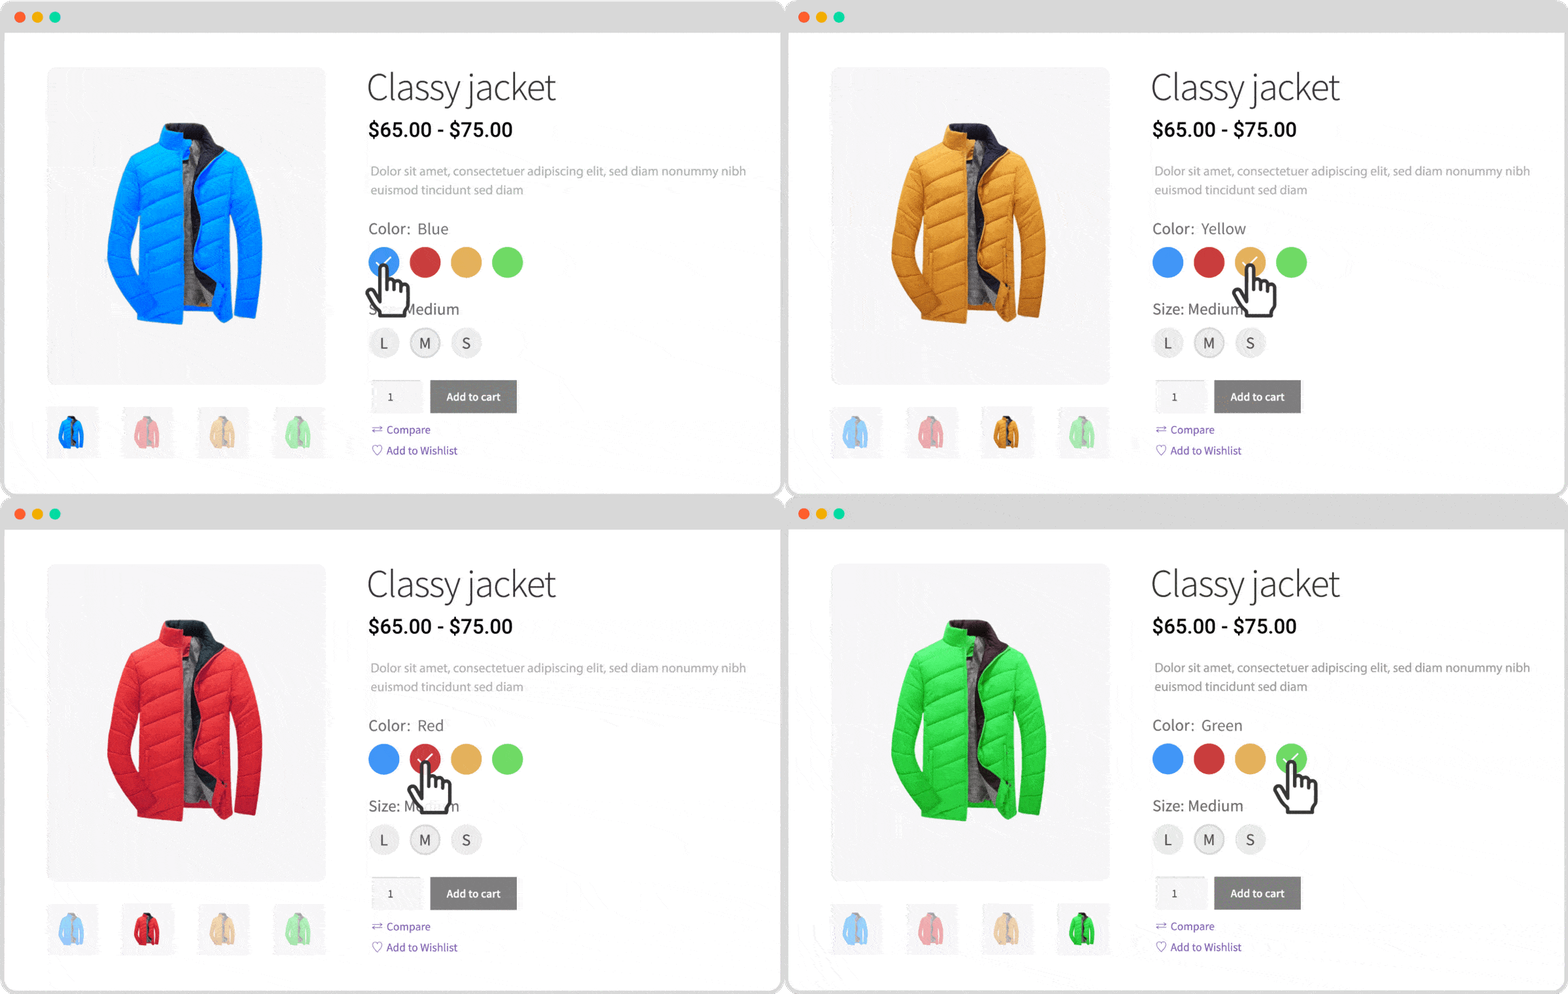
Create Image Swatches
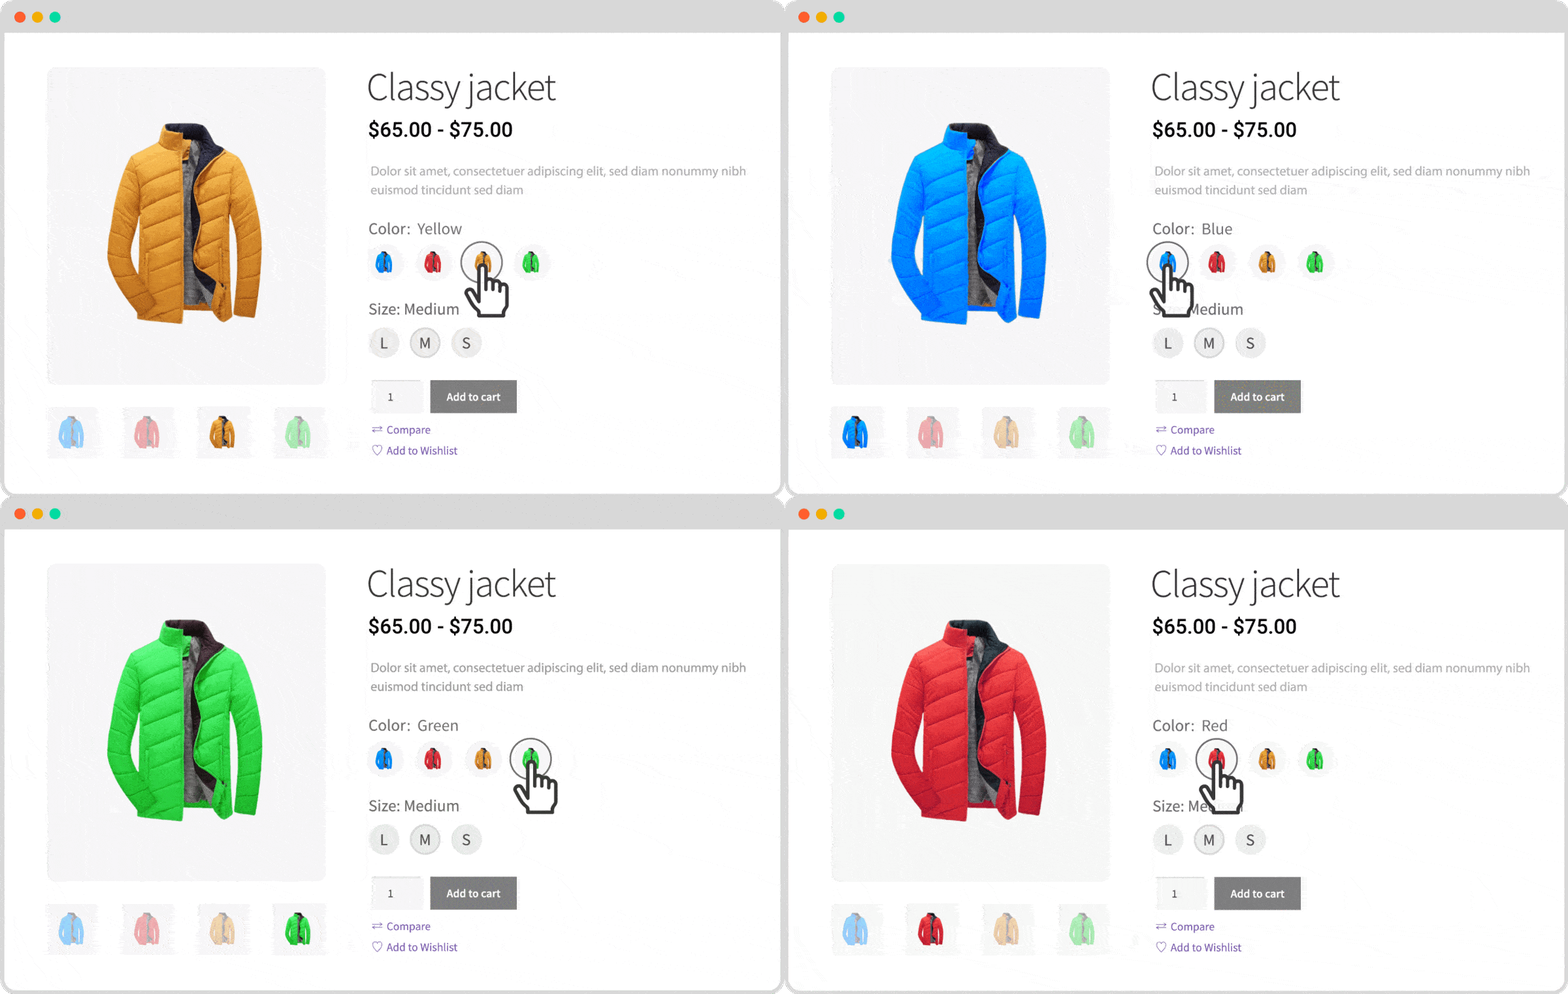
If you are not satisfied with the color swatches, you can create image swatches instead of colors. For that, go to the product attribute. Then change the Color Attribute type to Image and assign images instead of colors. Later the process is the same. You add the attribute value to any product. However, if you manage image Swathes from a global attribute, you have to add numerous images for multiple products to the attribute. So What to? Don’t worry. ProductX also has a solution for it.
You can manage the image swatches from the product level as well. First of all, go to the Swatches setting and click on the check box for “Product Image in Swatch.”
Now you will be able to add the images from the product level in the same way as adding images for configuring color swatches. But this, there will image as variations on the product instead of the product colors.
Conclusion
That’s all about the WooCommerce Variation Swatches addon for ProductX. Now you can start using the addon and create beautiful swatches. If you face any difficulties while creating variation swatches feel free to comment below.


