Ever had products that just make sense together, but you don’t know an easy way to show that?
A clothing store owner is selling every kind of fashion wear for men. But instead of selling them individually, he made a group of a black blazer, white shirt, trousers, and maybe a pair of shoes. This is called Grouped Product.
There are multiple effective ways to create such a grouped product in WooCommerce. But the question is, how do we create a grouped product in WooCommerce effortlessly?
To do that, just follow the steps below:
- Create individual products for grouped products
- Add a new product to include them in a group
- Fill in all the required fields for the grouped product
- Change the product type from simple to grouped product
- Link those individual products to this grouped product
- Publish the new grouped product
We will show you a step-by-step guide to make a grouped product. Moreover, you can learn the differences between grouped products and cross-selling products, it’s benefits, and a bonus section for you.
So without any further ado, let’s start.
🛒 What is a Grouped Product in WooCommerce?
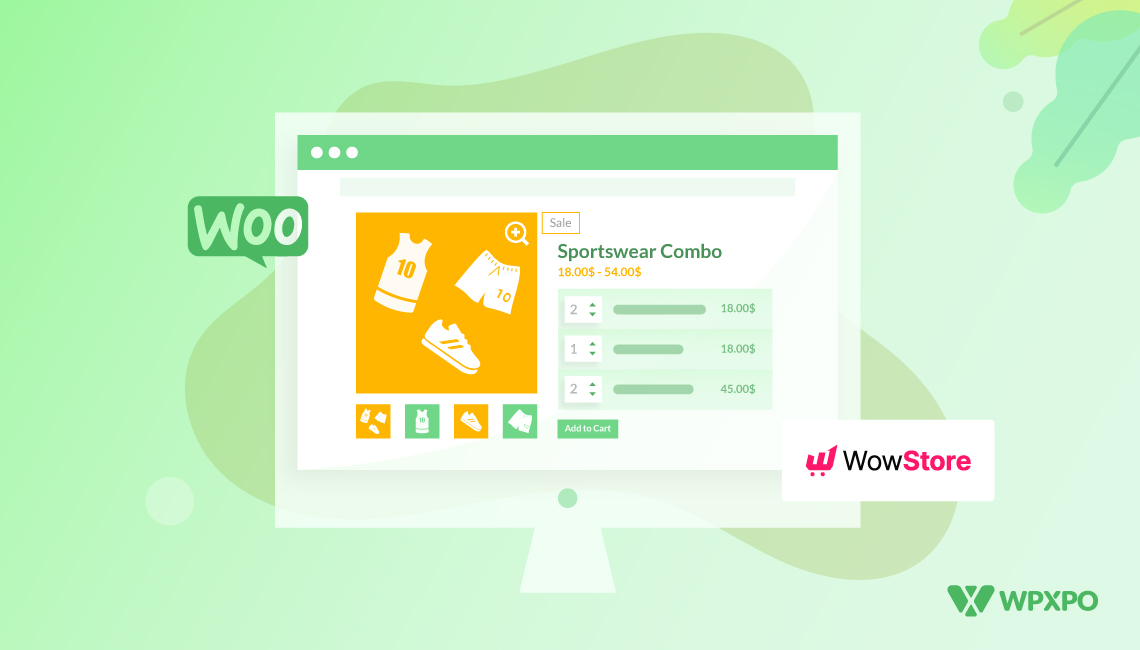
Grouped Product is a type of product in WooCommerce, in which the store owners can showcase multiple closely related products together on a single product page.
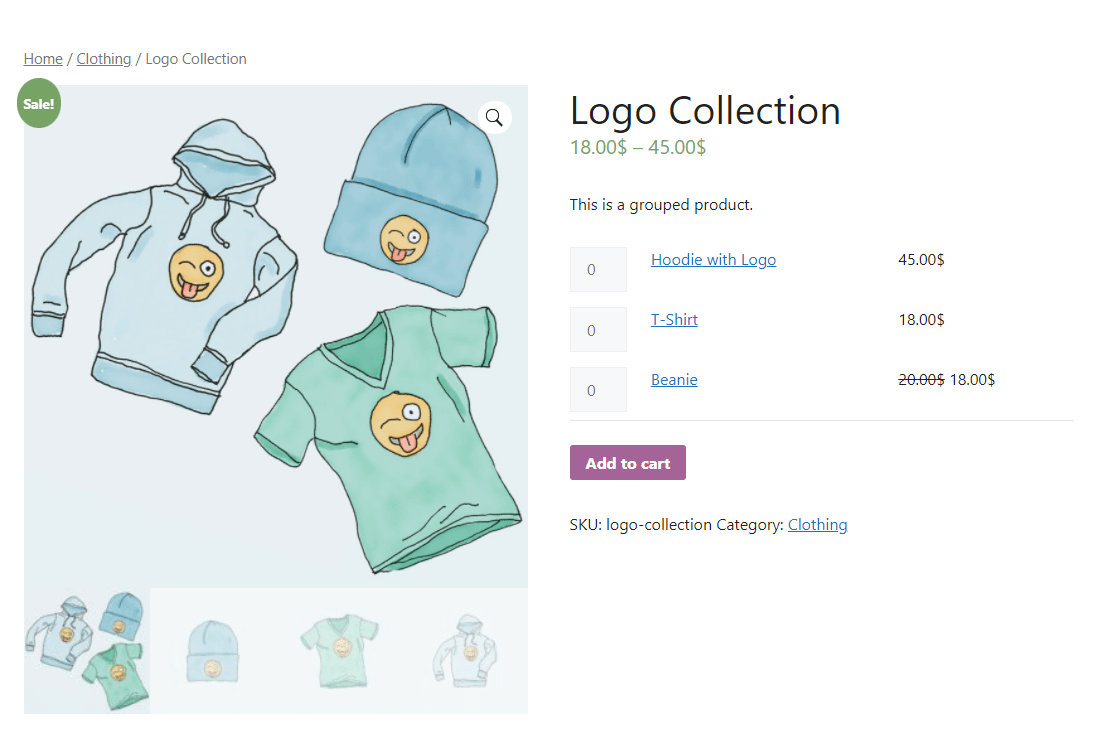
So, the shoppers will see a set of products of their choice instead of a single product. For example, if you’re looking for a T-shirt, there will be a set of T-shirts, pants, and a cap together.
Grouped products also display add-to-cart buttons along with quantity selection for each product. So that the shoppers can buy any or all of the products together.
Why Add Grouped Products in WooCommerce?
If you haven’t added any grouped products to your WooCommerce store yet, you might be wondering, “Do I really need them?” Fair question.
Here’s why grouped products are a beneficial move:
✅ Better Shopping Experience
Grouped products let your customers decide what they want. Instead of forcing them into a bundle, you’re giving them options. Maybe they want the desk and the chair, or just the lamp. It’s flexible, and that kind of freedom usually leads to happier customers.
💰 Higher Average Order Value
When related products are shown together, shoppers are more likely to add more than one to their cart. It’s a simple nudge that says, “Hey, you might also need this.” And just like that, your order value goes up — without being pushy.
📦 Clean and Organized Product Pages
Grouped products also help keep your catalog tidy. Instead of having scattered links to similar items all over the place, you’re organizing them under one parent product. It makes browsing easier and keeps your product pages looking clean and intentional.
When I was buying my first laptop, I browsed for additional products that I would need with the laptop. The grouped products in several stores helped me to evaluate and decide what I actually want that would be useful for me.
🛠️ How to Create Grouped Products in WooCommerce (Step by Step)
Creating a grouped product in WooCommerce is just as easy as creating any other simple products. You just need to link them together in addition. Let’s go through the step-by-step guide.
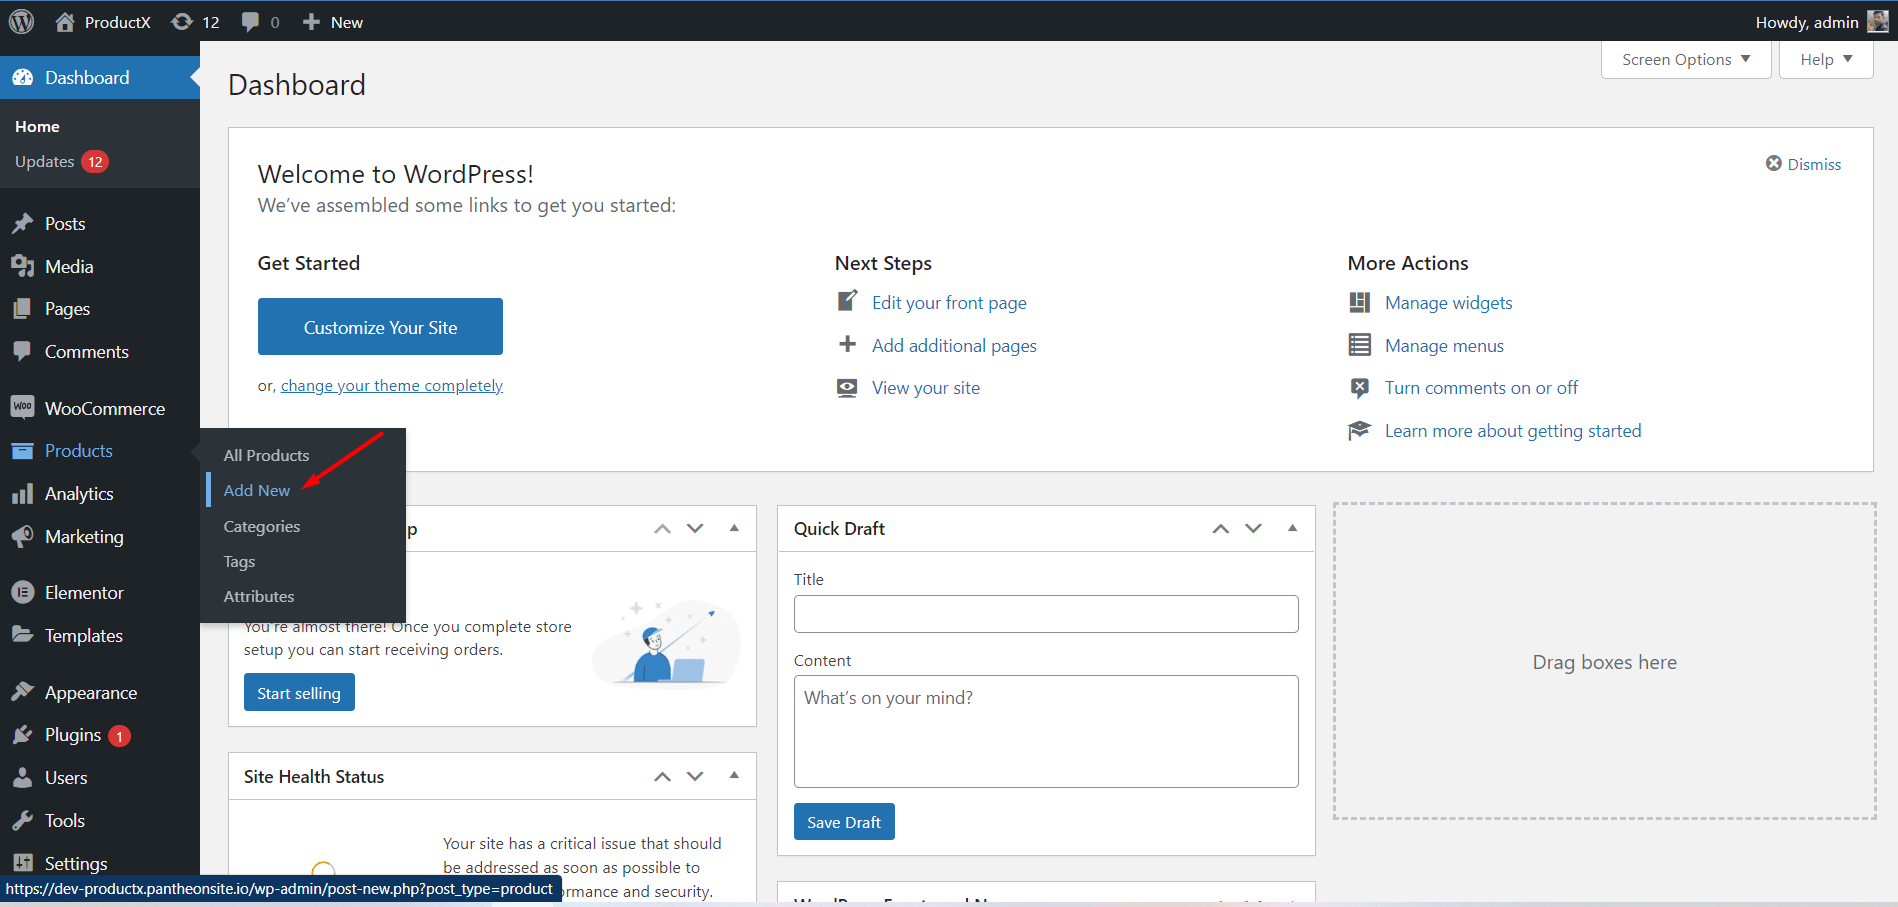
Step 1: Create Individual Products
First of all, decide which products you want to showcase to a group. If the products are not added to your store, you need to create all of them individually with all the required information.
After adding all the individual products, you have to create a new product. Here, we will group all of them.
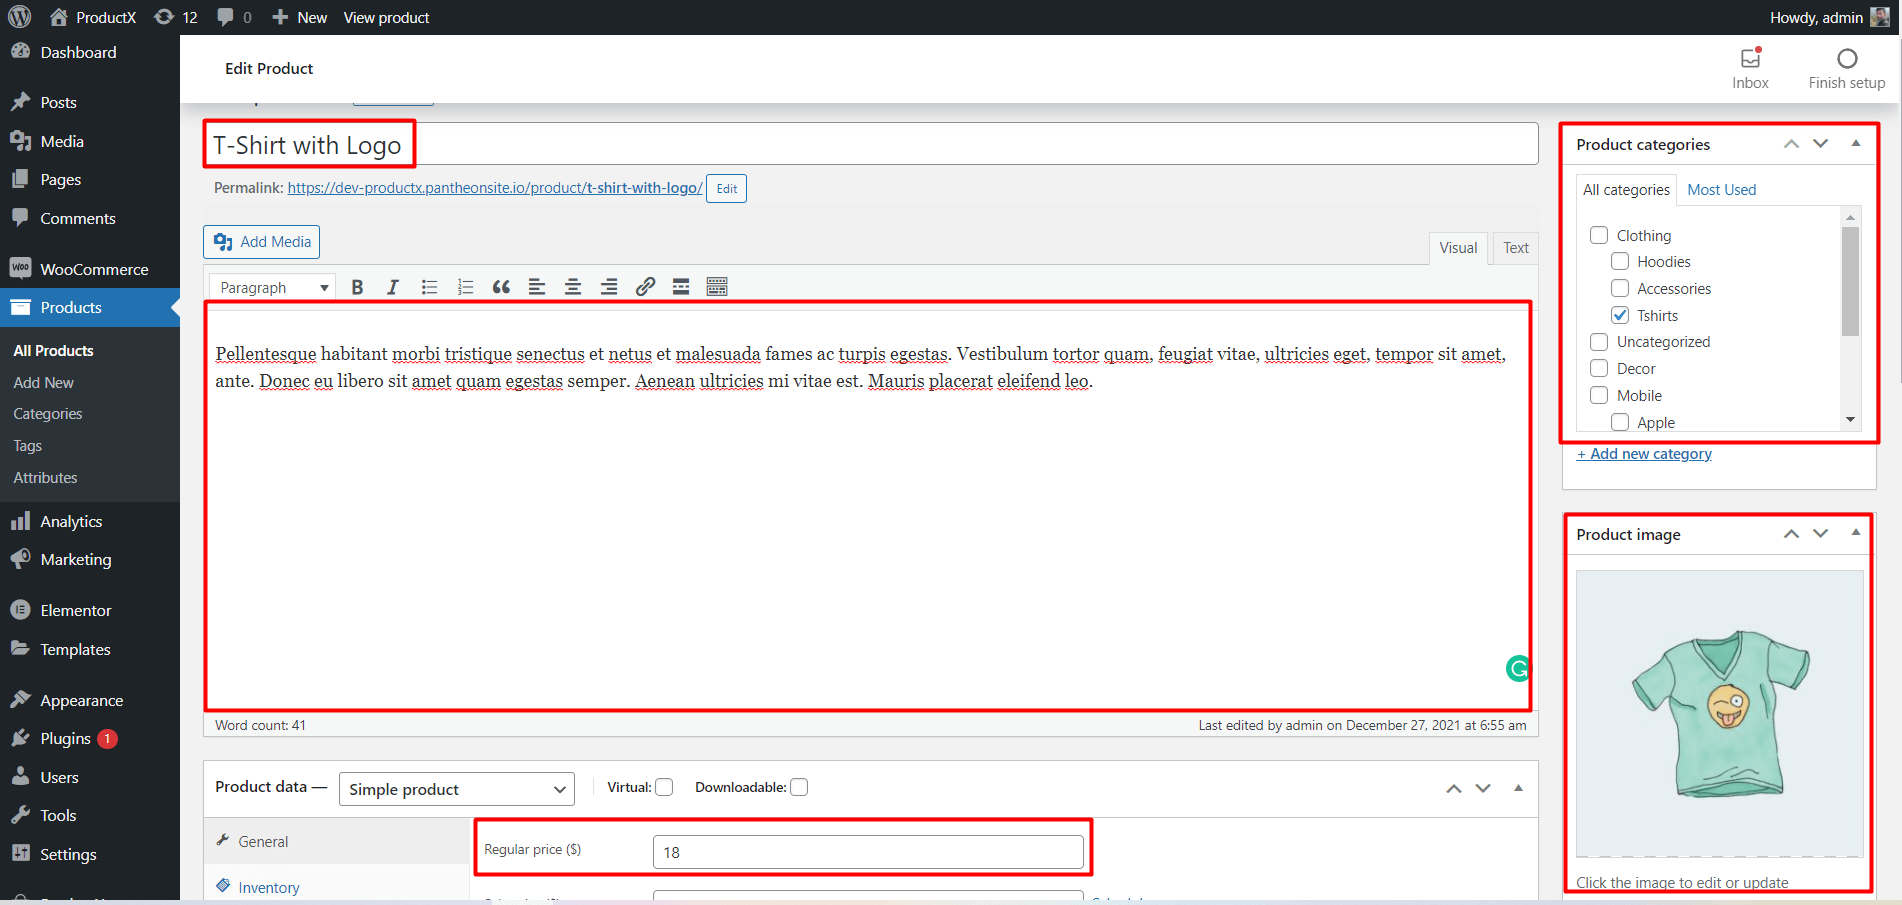
Step 2: Fill in all Required Fields
Now you need to fill up all the required fields with respective information, which includes product title, description/short description, category, image, and gallery images, etc.
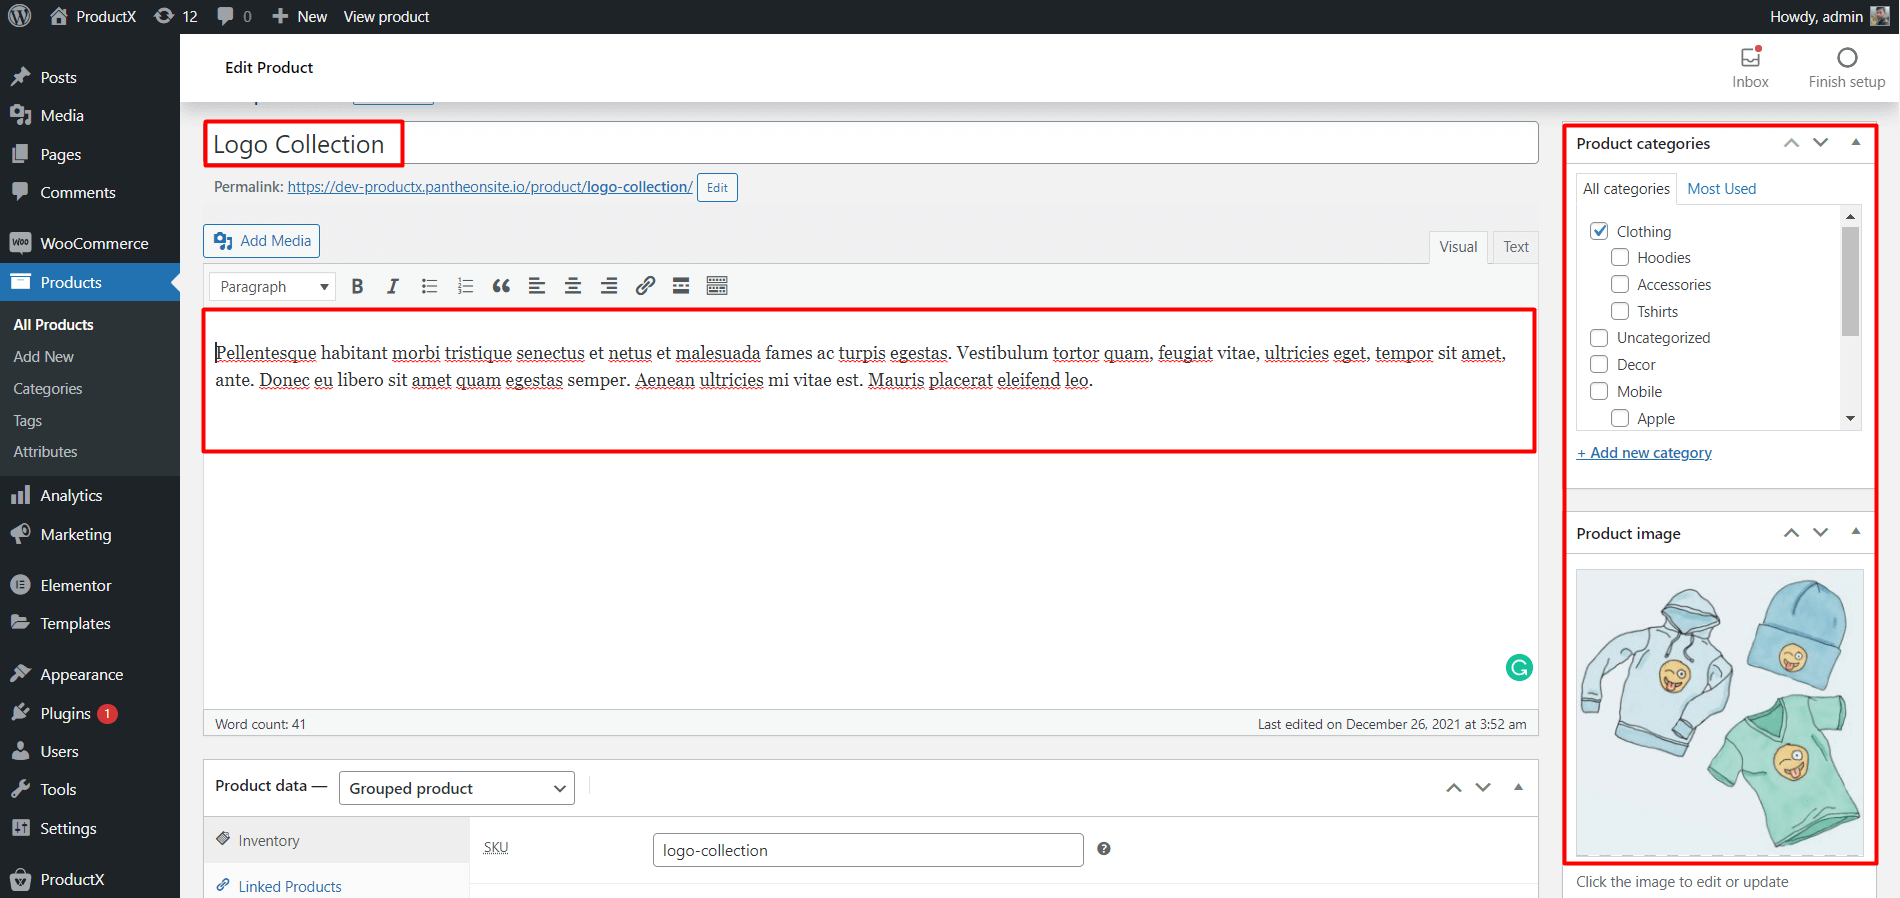
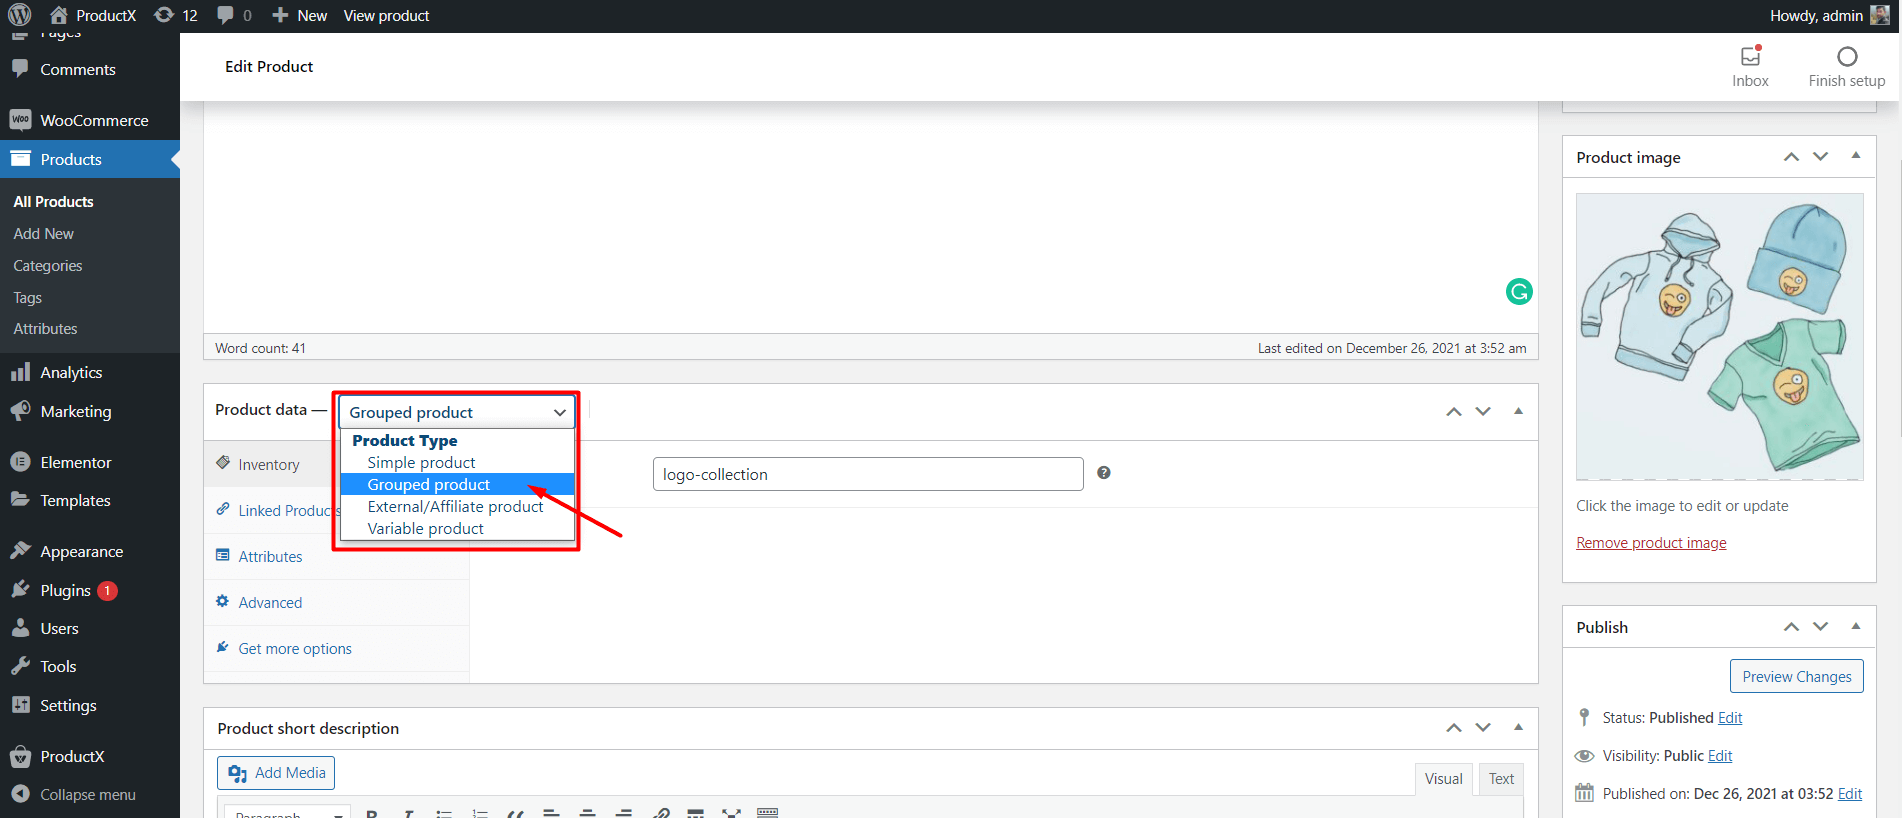
Step 3: Change Product Type
It’s the main part. Change the type of the product page from Simple to Grouped. Go to the product data section and click on the dropdown. Select Grouped product.
Step 4: Link the desired products to Grouped Products
After changing the type of the product, you have to add your desired or newly created products as grouped.
To do that, click on Linked Products and add the desired products in the Grouped Products field.
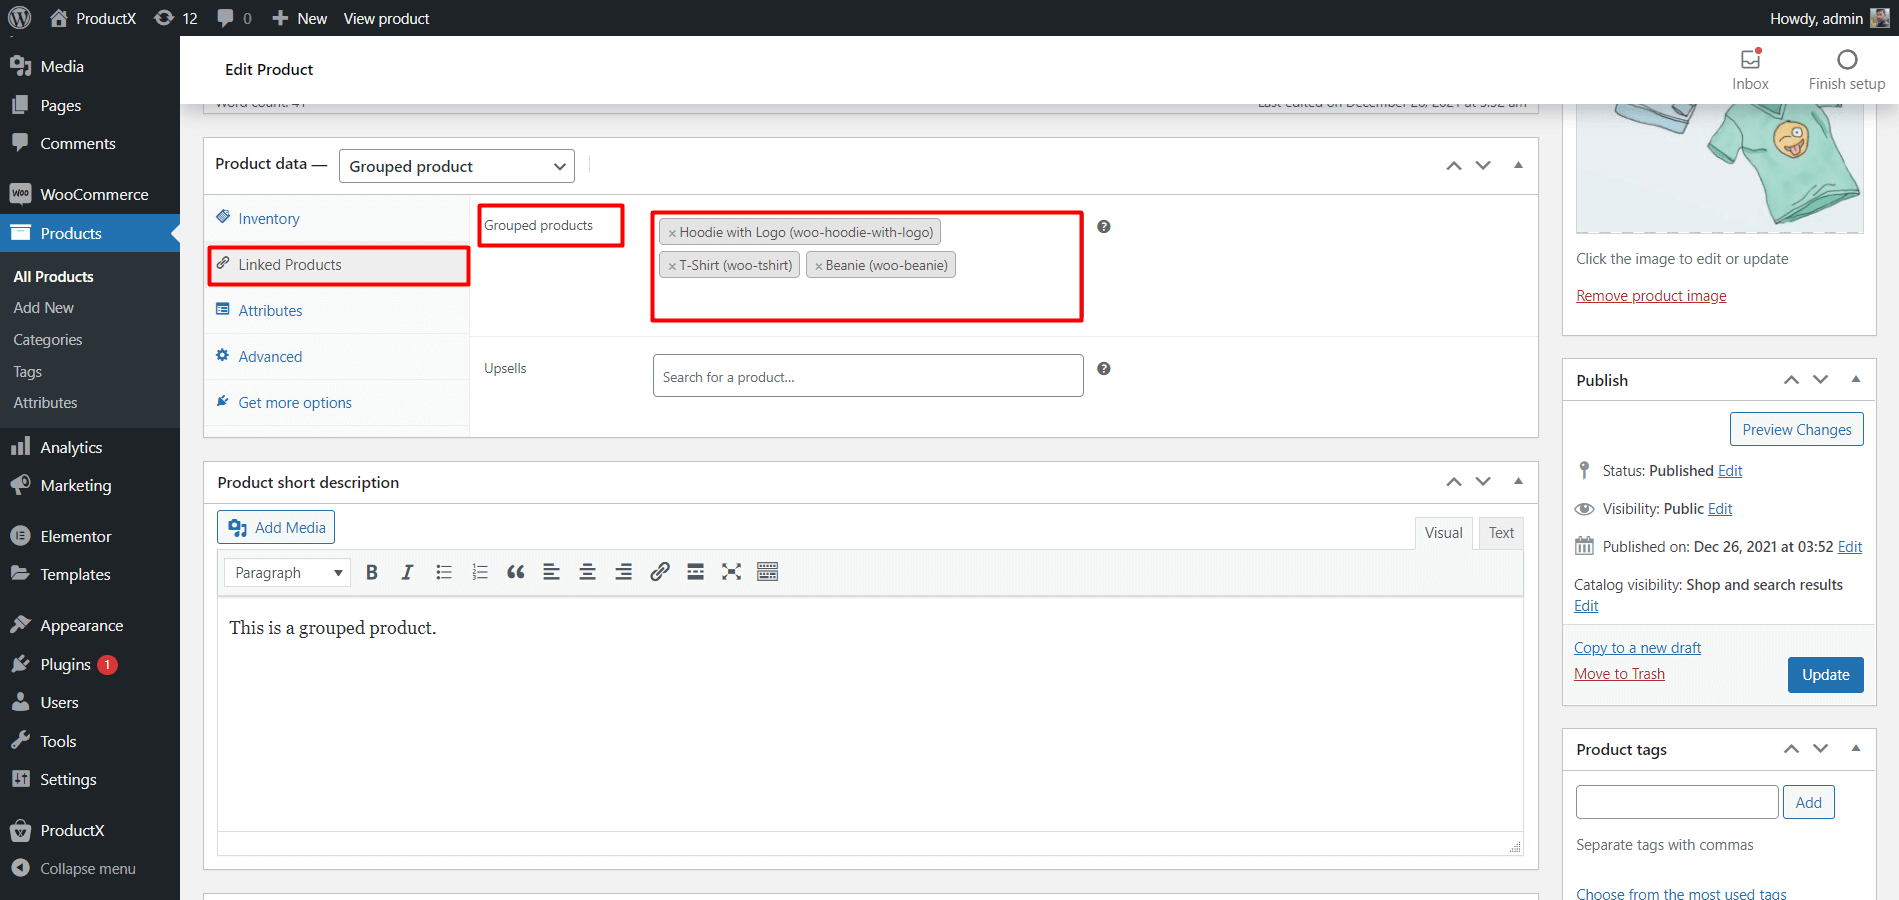
After adding your desired products, you need to publish this grouped product. Now, let’s see how it looks at the front end.
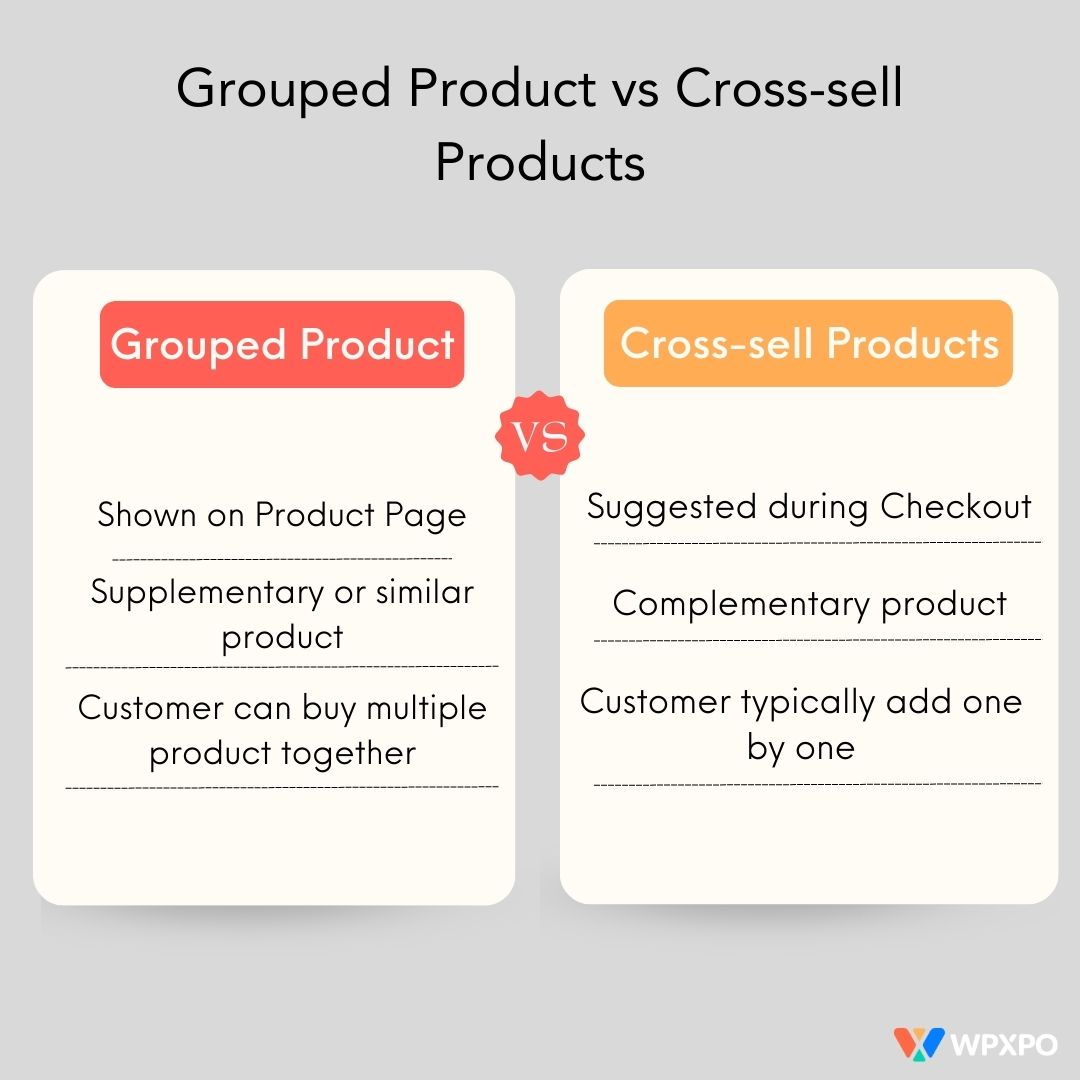
🆚 Grouped Products vs Cross-sell Products
Many of you may think that grouped and cross-sell products are similar. But there’s a slight difference. Cross-selling is the products that are complementary to the parent/main product. But groups can be supplementary and similar types as well.
For example, if someone is buying an iPad, you can showcase his/her iPad cover and Keyboard while checking out as a Cross-Sell. But in the case of group products, we can showcase Cover, Keyboard, or iPhone as well.
So, in short, every Cross-Sell product can be a part of a grouped product. But all grouped products can’t be displayed as cross-sell products.
However, you can display any product anywhere, whether group or cross-sell, but it won’t be that effective. The shoppers may not be satisfied with this kind of approach all the time.
🔄 Can We Create a WooCommerce Grouped Product with Variations?
Creating a WooCommerce Grouped Product with variation refers to a grouped product with variable products.
The answer is Yes, you can create such a grouped product in WooCommerce with variations. But the user experience will not be as good as the simple products.
The shoppers can not add the variable products to the cart directly from the grouped product page. Rather, they have to go to the variable product pages to select the desired variation and add the products to the cart.
However, if you still want to create a WooCommerce grouped product with variable products, you can read this article.
How to Create WooCommerce Grouped Products with External Products
We can also create WooCommerce grouped products with external/affiliate products as variable products. But shoppers can not see the product on our site for an obvious reason.
However, there will be a buy link with which shoppers can visit the original store of the product. So, if any purchase happens, we would earn some revenue.
First of all, you need to create an external type of product. Then you can add it to the grouped product.
🎁 Bonus: Can We Add Any Discount/Offer to Grouped Products in WooCommerce?
It’s a very effective way to give any sale or promotional activity to grouped products. It will increase the rate of conversion more than the usual way.
However, we can’t provide a sale price normally like we could for a simple product. For that, we need to use a plugin, WowRevenue. Its effective marketing campaigns will help in boosting your AOV.
In WowRevenue, we can create a product bundle campaign and provide a discount/offer to that bundle. It will work as a grouped product with a sale price.
To do that, simply create a Bundle Discount campaign and fill in the necessary information. While adding trigger products and products to offer, use those individual items that you want to be grouped.
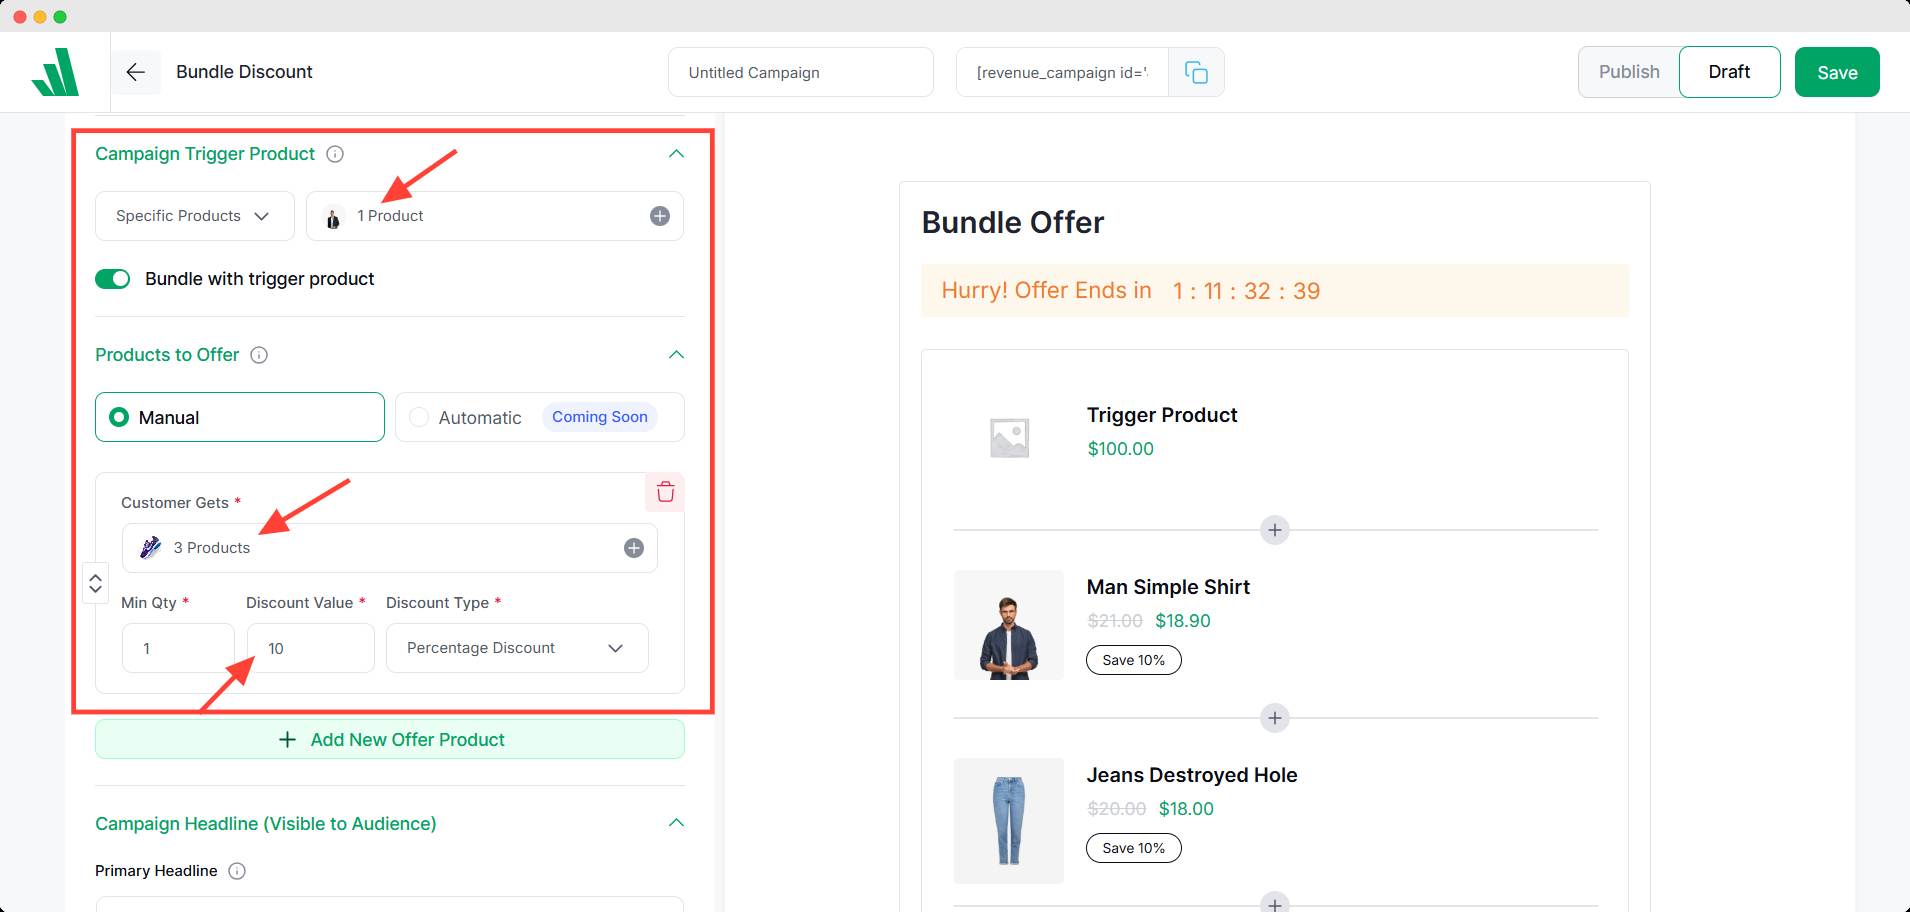
Then you can offer any type of discount (percentage, free, or fixed) to attract your customer. That’s how you can offer product bundle discounts in WooCommerce.
Conclusion
Grouped products in WooCommerce are a simple yet powerful way to sell multiple related items together, without forcing customers to buy them all. Whether you’re offering product variations, complementary accessories, or bundled options, grouped products give your customers ultimate flexibility.
The best part? You don’t need any extra plugins to set it up—it’s all built right into WooCommerce.
I hope you can now start creating grouped products for your WooCommerce store. If you still face any difficulties or have any suggestions, don’t hesitate to comment below.
FAQs
What is the Difference between Simple and Grouped Products in WooCommerce?
The main difference between simple and grouped products is that in simple product types, we can showcase a single product. However, we can display multiple products in the grouped product. So that the shoppers can buy any or all of the products from the group.
What is the Difference Between a variable and grouped product in WooCommerce?
In grouped products, shoppers can explore and choose from multiple products to purchase all or any of them. The variable product is a single product with multiple variations, like colors and sizes.
Will a grouped product affect my inventory tracking?
Each product within the group is tracked separately. So when someone purchases a grouped product, WooCommerce adjusts stock for each individual item accordingly.

