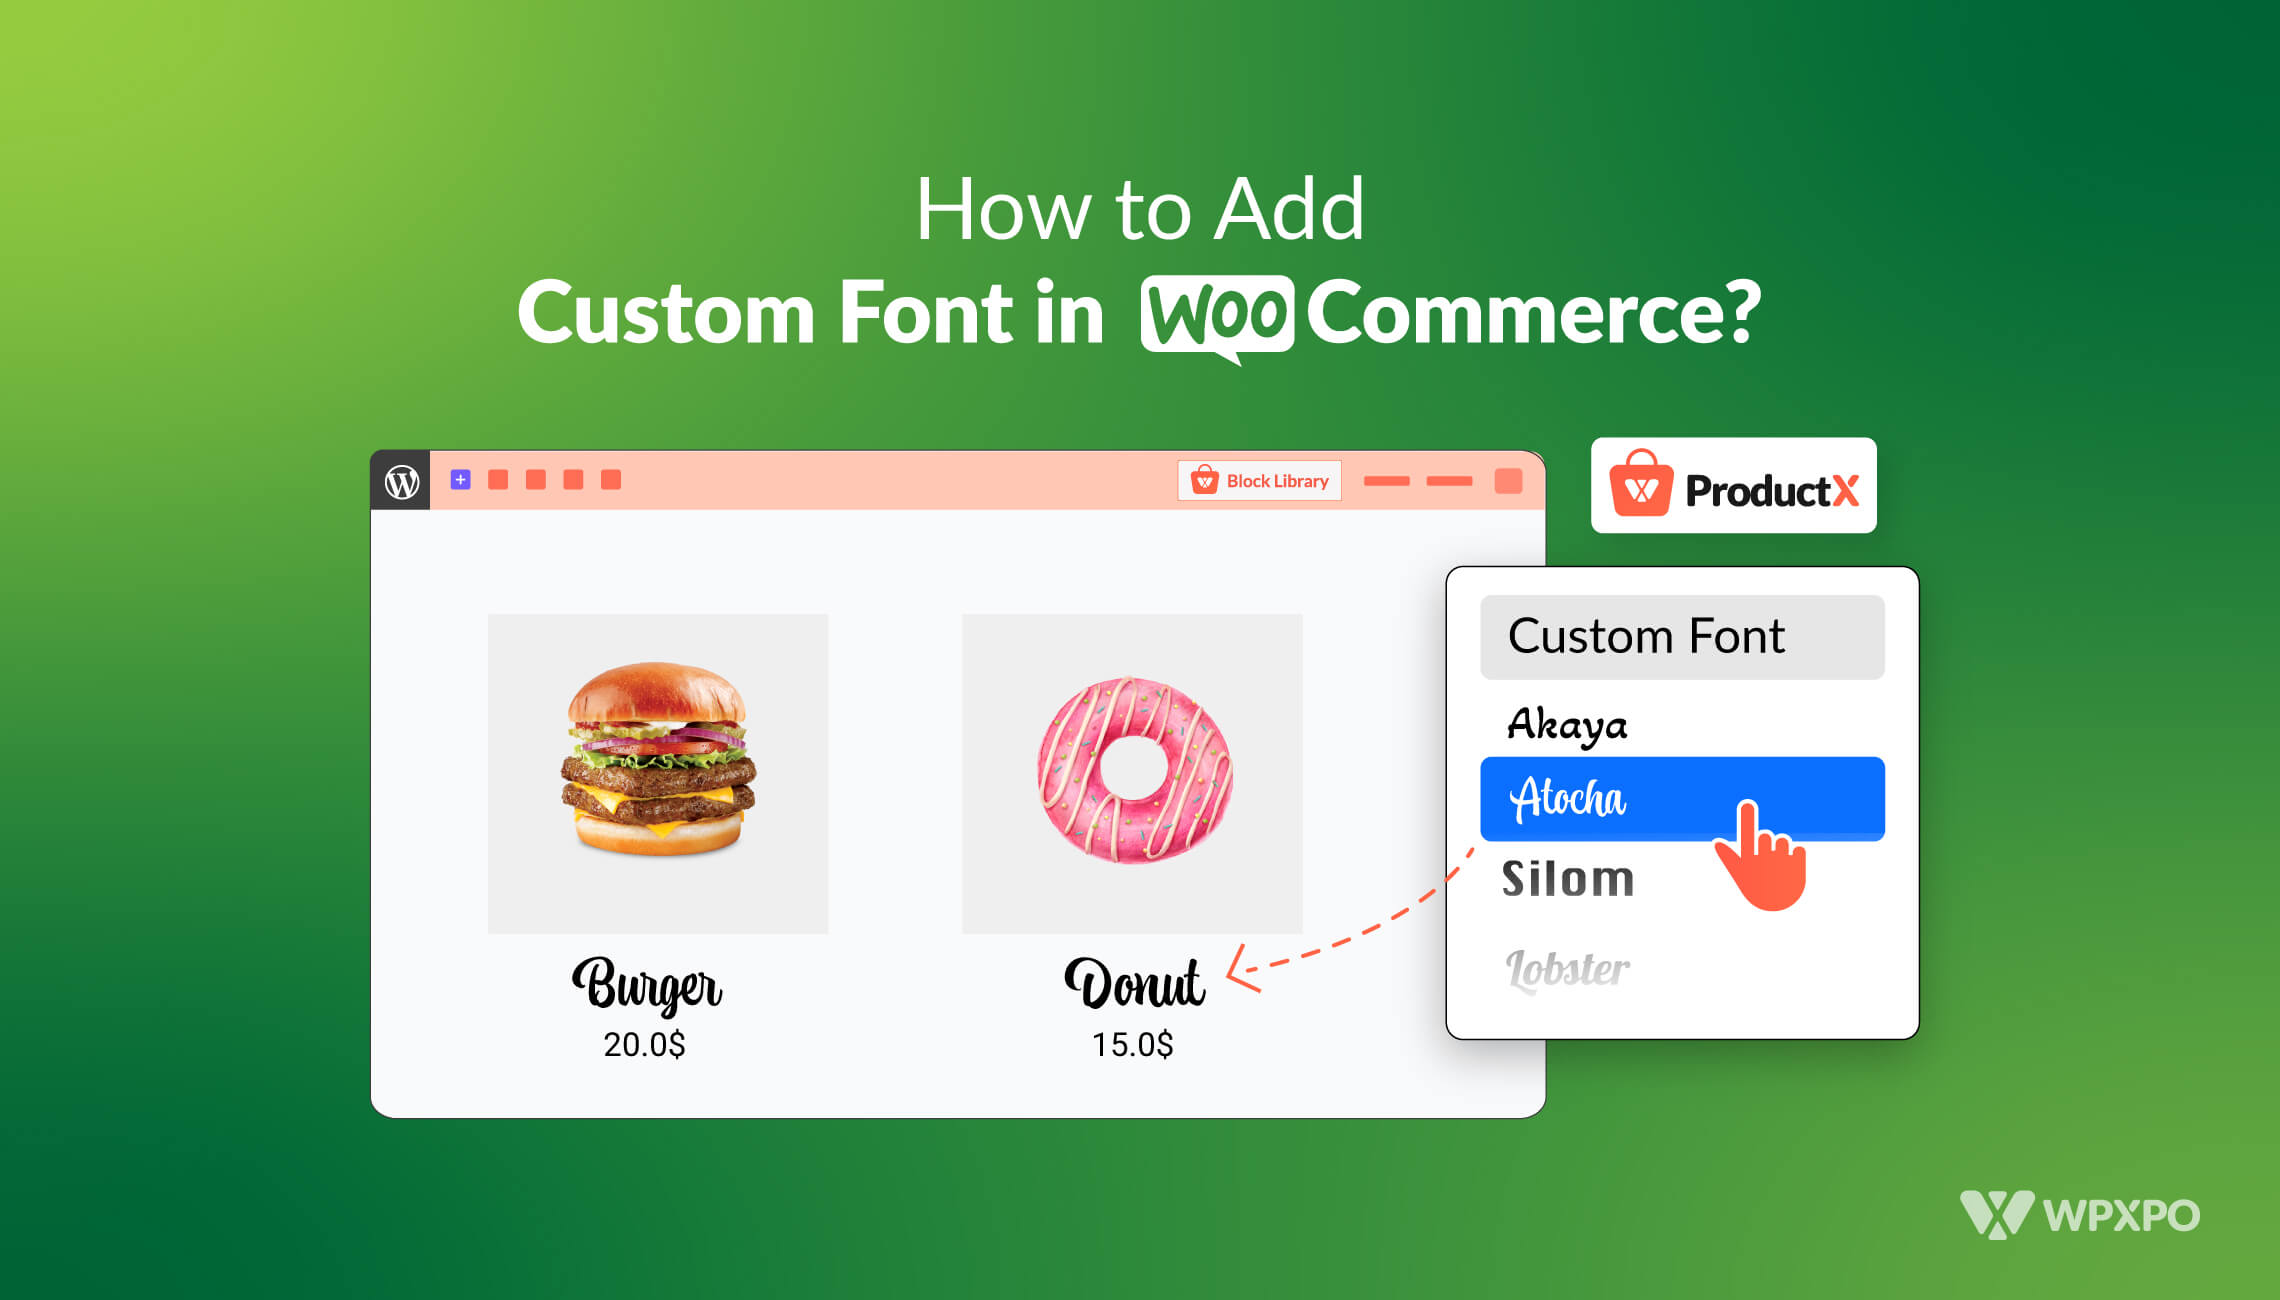
Do you know how to add font to WordPress? Well, we are here to discuss that today.
If we were to ask you – what do you see in a website besides images, and buttons? The obvious answer would be TEXT!
Almost 90% of a website consists of various text – custom typography in the form of headings, and regular text. This has an impact.
It creates a first impression in the minds of your readers.
And if it’s a WooCommerce store, then it’ll certainly have an impact on the minds of your customers. It can be either positive or negative.
So, it is crucial to add font to WordPress site that makes sense to your customers, there needs to be some extensive research involved here.
But, how to add custom fonts to WordPress? Especially when you have a WooCommerce Store to run.
Today, we will explore it together. We will share 2 ways to add custom font for WordPress.
How to Add Fonts to WordPress [2 Possible Ways]
There are many possible ways by which you can add fonts to your WordPress site. There’s the easy way and the hard way:
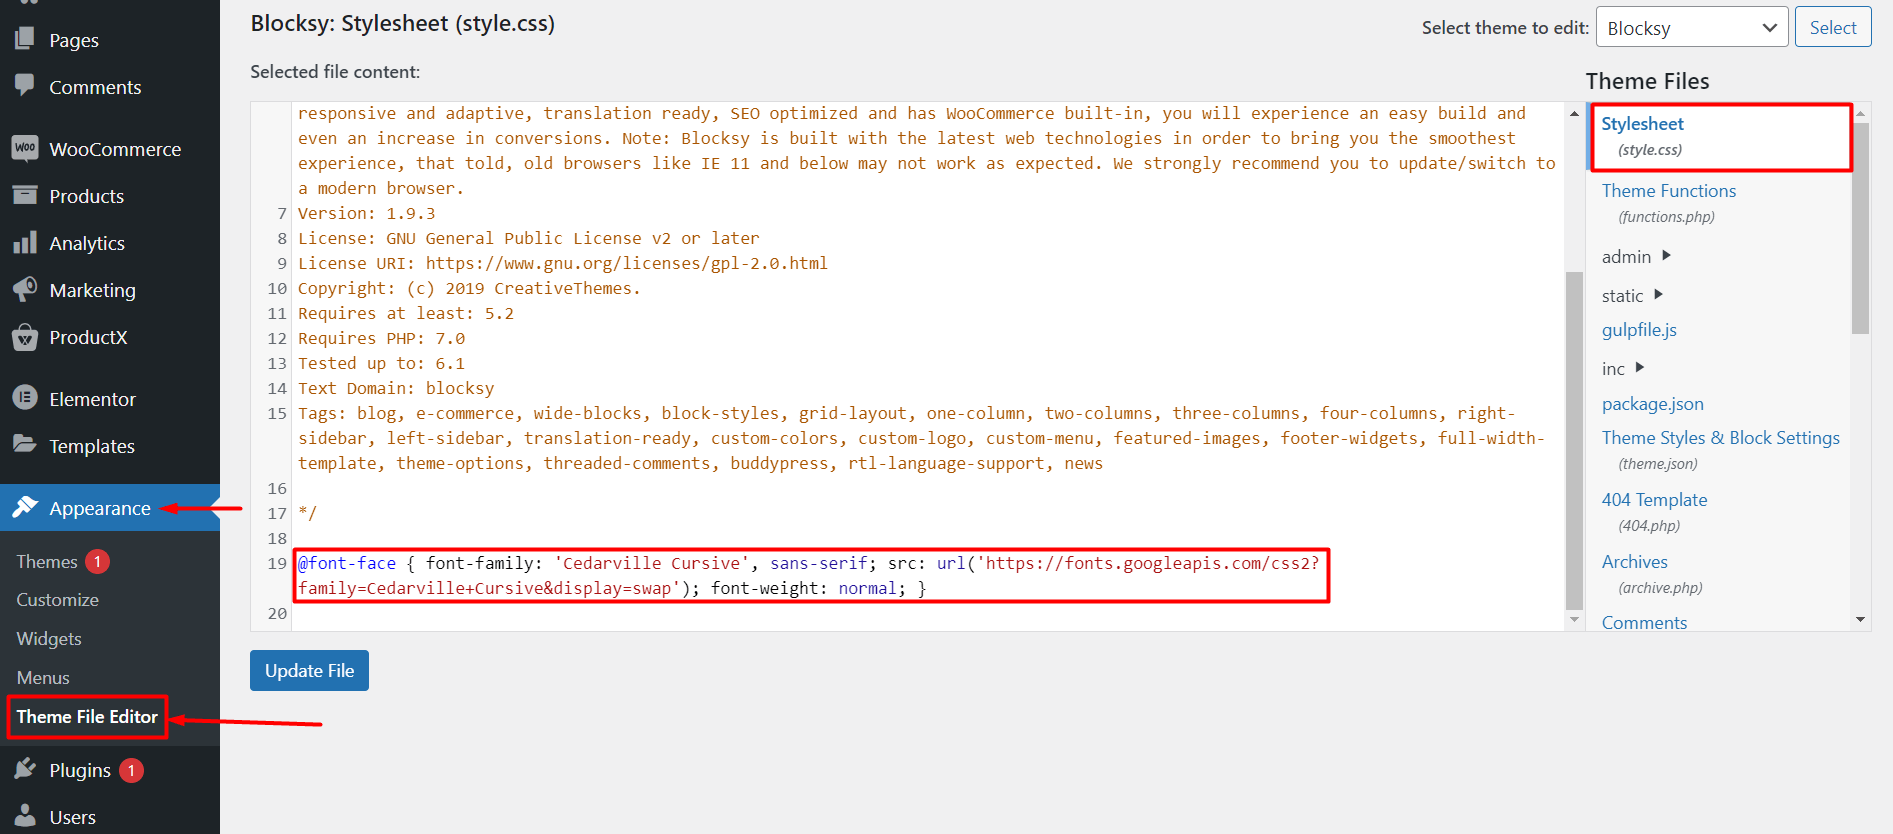
Add Font to WordPress WooCommerce Store [The Hard Way!]
People don’t really do this anymore. However, this is a way you can try:
You can add the following piece of code in the theme’s style.css file:
@font-face { font-family: 'Cedarville Cursive', sans-serif; src: url('https://fonts.googleapis.com/css2?family=Cedarville+Cursive&display=swap'); font-weight: normal; }Even then, there’s a caveat.
You will have to take individual classes and change the font properties. For example, if you were to change the site title of your WordPress site, you’d need the following piece of code:
.site-title {
font-family: "Cedarville Cursive", Arial, sans-serif;
font-weight: normal;
}
Now this does remove the reliance on plugins. However, there are problems with this approach.
The Problems with this Approach
- It’s “Super Hard” to implement for novice users.
- You will need to have extensive knowledge of coding.
- If you mess up the style.css file, there is a chance that your WordPress site may crash.
The next approach takes all of these caveats away. It’s to use the ProductX WooCommerce Builder Plugin.
The ProductX WooCommerce builder plugin is a proper solution for creating a wonderful-looking eCommerce store. You have features like the builder, variation swatches, product sorter, and pre-made templates for 1-click page deployment.
And you have the Brand New Custom Font Addon as well. This addon helps you to bring your site to new heights – giving you the chance to set a proper identity by allowing you to use the perfect font for your WooCommerce Store.
Let’s see how the Custom font addon works.
How to Add Fonts to WordPress WooCommerce Store Using the ProductX Custom Font Addon [The Easy Way]
ProductX is now WowStore! We’re very excited to bring you this experience, packed with exciting features. Please note that the features, blocks, starter packs, etc. all work the same. If you have used ProductX, you’ll feel right at home with WowStore.
Before we begin, there are some things you need to consider.
The first thing is to have a proper installation of the ProductX WooCommerce Gutenberg builder plugin. Otherwise, you will not be able to take advantage of the ProductX Custom Font functionality.
Also, you need to enable the Custom Font Addon from the ProductX Addons library. Otherwise, you will not be able to use the feature.
You can check out the relevant documentation to learn more about the installation and enabling the addons. You can also check the relevant parts of the documentation to learn more about the features:
Exploring the ProductX WooCommerce Custom Font Dashboard
There are a couple of things you’ll notice in the custom font dashboard once you enable the Custom Font Addon. But before that, here’s a quick look at the feature:
Back to the discussion:
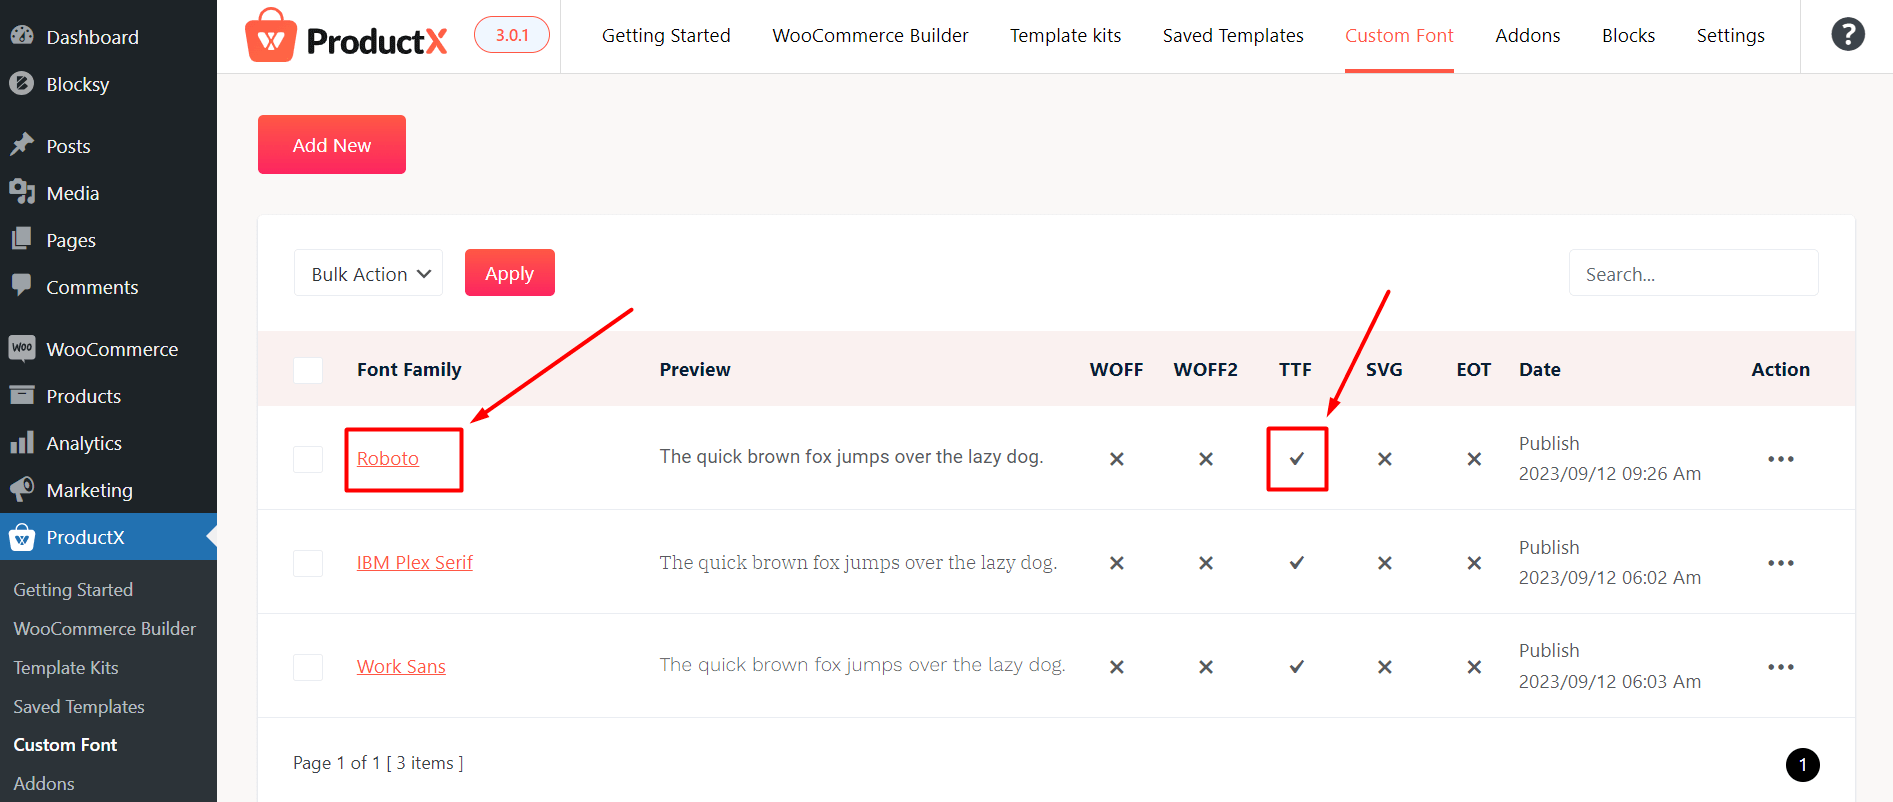
The Add New Button allows you to add a new custom font. Under the Font Family section, you will see the names of the fonts. Right next to that is the Preview section where you’ll see how the custom fonts look. Under the Action section, you will find a menu by clicking on the ‘three dots’. Finally, there are a couple of file formats you can use to upload your custom font.
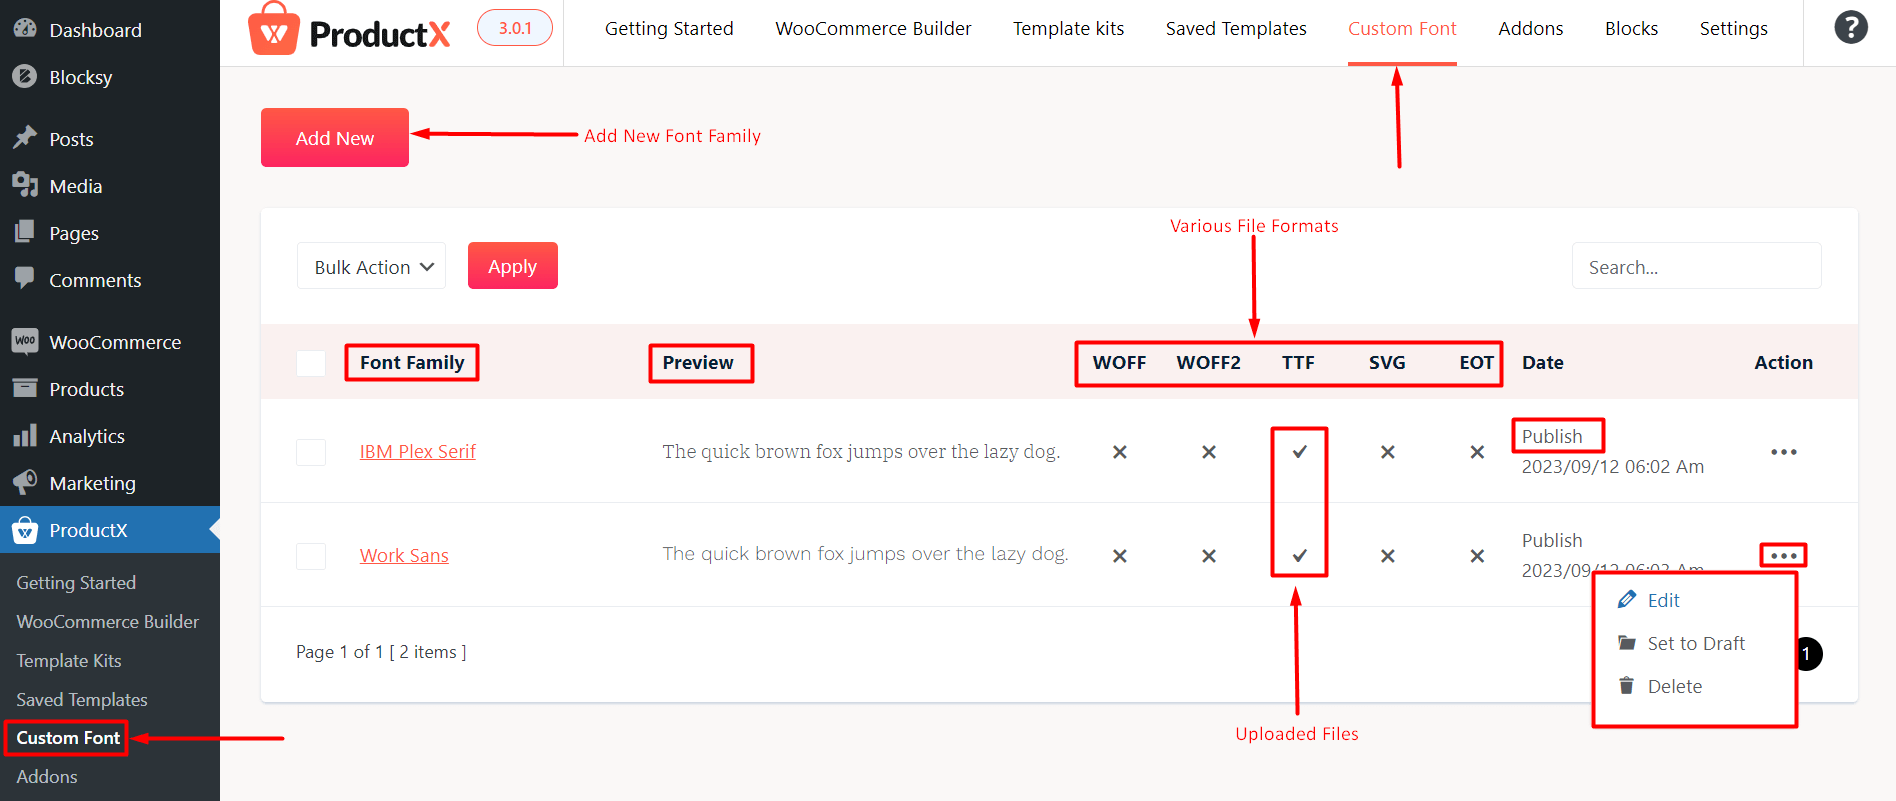
Supported File Formats for Custom Fonts
When you upload a specific file format, you will see a tick mark in that section of the file format. At the time of writing, you have five file formats to add font to WordPress WooCommerce store:
- WOFF and WOFF2: These types of file formats are specifically for web pages. The WOFF format was introduced in 2009 as a wrapper for TrueType and OpenType Fonts. Modern browsers support these file formats. Though you can use OpenType Fonts, there are clashes with licensing agreements. However, as web fonts need to be downloaded, they can affect page load times. The more web fonts you have the slower your WooCommerce site will become – affecting your website’s SEO.
- TTF: The TrueType or TTF format was developed by Microsoft and Apple back in 1980. These types of fonts are useful when you require support for mobile and older browsers.
- SVG: You can upload using the Scalable Vector Graphics or SVG format.
- EOT: Embedded OpenType fonts were used in older Microsoft Browsers. These fonts were often served to the user uncompressed. Although ProductX does offer support for the file format, it is better not to use it if you don’t wish to render support for old browsers.
Font Weight Guide
Font weight is crucial in determining the thickness of a font’s strokes, impacting the visual outlook of the text. When uploading custom font variations with ProductX, follow this guideline for optimal font weight selection:
Suppose you have thin, regular, medium, bold, and other variations for a font. Ensure consistent naming while adjusting the weight for each variation:
- “Thin” variation: Select weight 100
- “Light” variation: Select weight 200
- “Book” variation: Select weight 300
- “Normal/regular” variation: Select weight 400
- “Medium” variation: Select weight 500
- “Demi-Bold” variation: Select weight 600
- “Bold” variation: Select weight 700
- “Extra-Bold” variation: Select weight 800
- “Heavy” variation: Select weight 900
Follow this guide strictly when using multiple variations of the same font.
Create a Custom Font for WordPress WooCommerce Site with ProductX
***Remember to enable the Custom Font addon before moving on with the process. Read the section on enabling the ProductX addons mentioned above.
Here’s how to add a custom font for your WooCommerce Store:
- To create your new custom font, go to your ProductX > Custom Fonts from your WordPress Dashboard. Then click on Add New.
- You will be prompted to give a name for the font you want to add to your WooCommerce Store. The name is important as it will help identify the font and its variations.
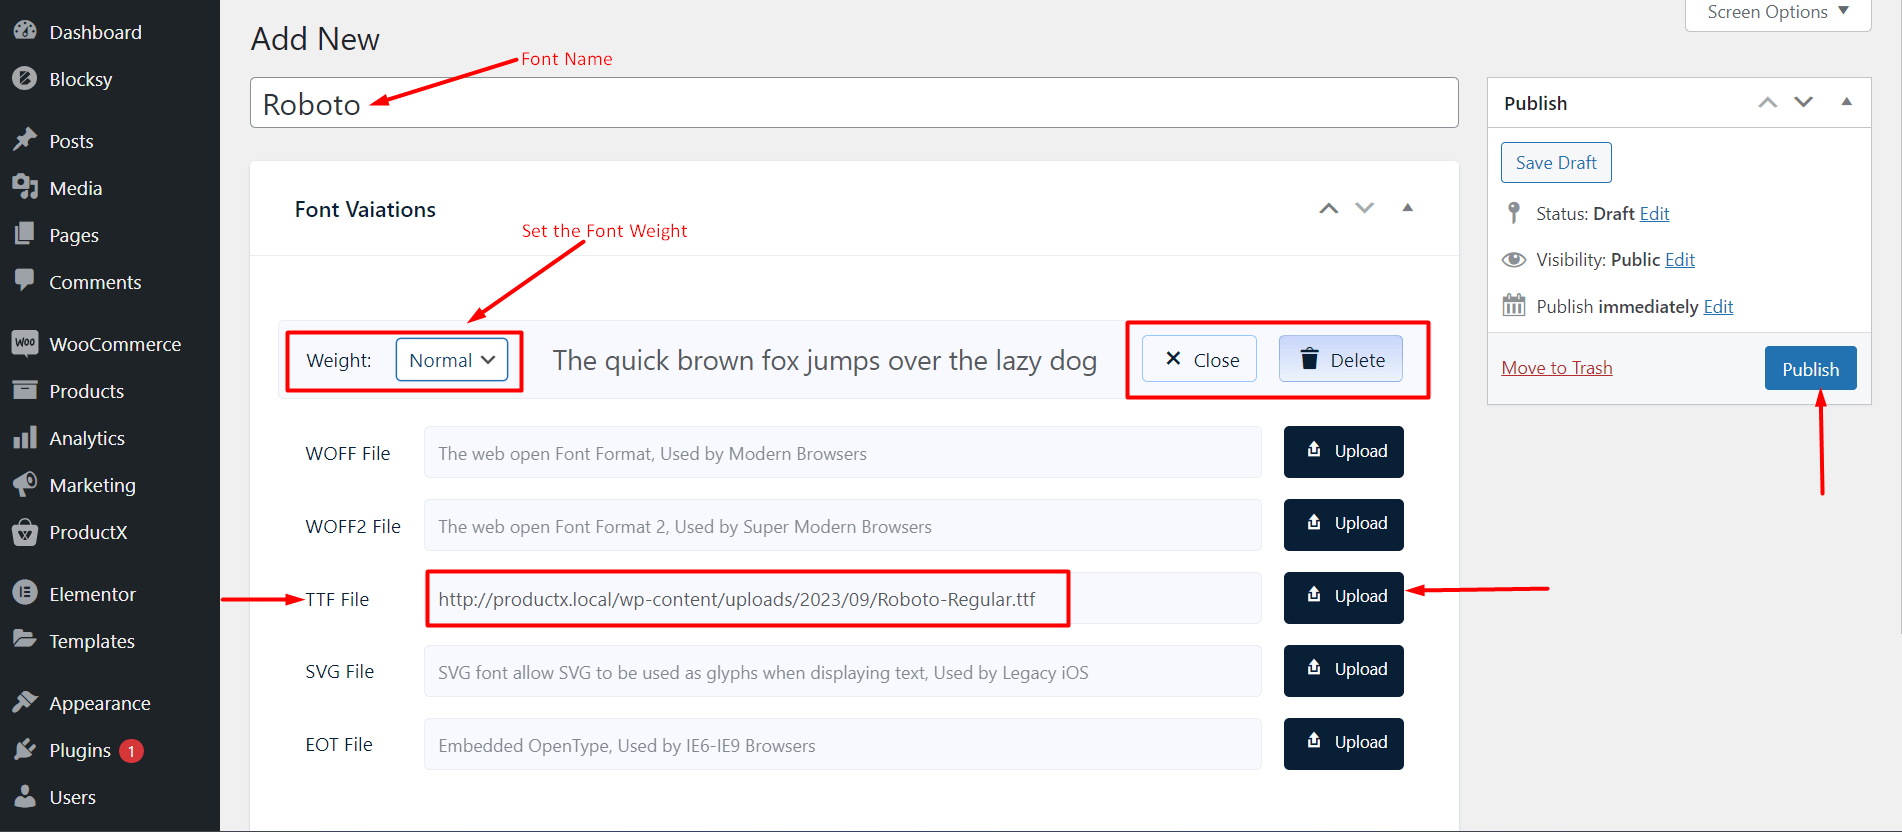
- Then click on Add Variation. A new window will appear where you can add the font file. As mentioned earlier, there are five formats you can use here. Once you click on upload, it will prompt you to upload the desired file format.
Note: Before you publish the font, you can add a new variation. Just scroll down find the Add Variation button and add the variation as mentioned in the steps above.
- Finally, publish the font.
You will now see the font published in the custom font dashboard.
Feeling lost? We have extensive documentation for you to guide you through the important parts of the process:
How to Use the Font in the Front-end?
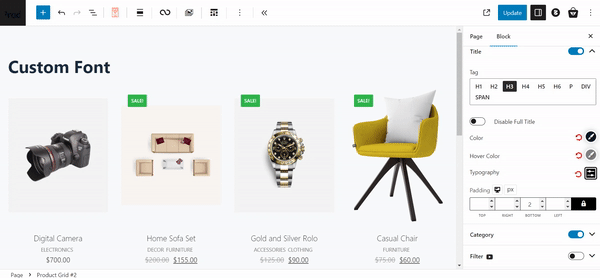
You will now be able to use the font with the ProductX blocks. Here’s a quick example:
Suppose you want to use the custom font for your Product Grid – change the product title for the items. Here’s how to do it:
- Go to the Title section of the Product Grid
- Click on Typography.
- Under the Family property, you will find the custom fonts you created at the very top.
- You can set the custom font and its weight.
Note: Note that the weight variations need to be added in the custom font. Otherwise, if there are no separate variations for a custom font, changing the font-weight will yield no changes.
- You can change the font style as well (to italic or any other setting).
Here’s how the change will look in real-time (notice the change in the Product Title) :
***Not just the Product Grid, you can work with all ProductX elements – wherever there is a typography element, you can implement the custom font you created using the ProductX Custom Font Addon.
Does it work in the ProductX WooCommerce Builder?
Yes, of course it will work in the WooCommerce builder. If you were to create a single product page using the ProductX WooCommerce Builder addon, you will be able to use the custom font. Here’s an example where we used a particular grid to show some specific items. Here’s how the change looks like:
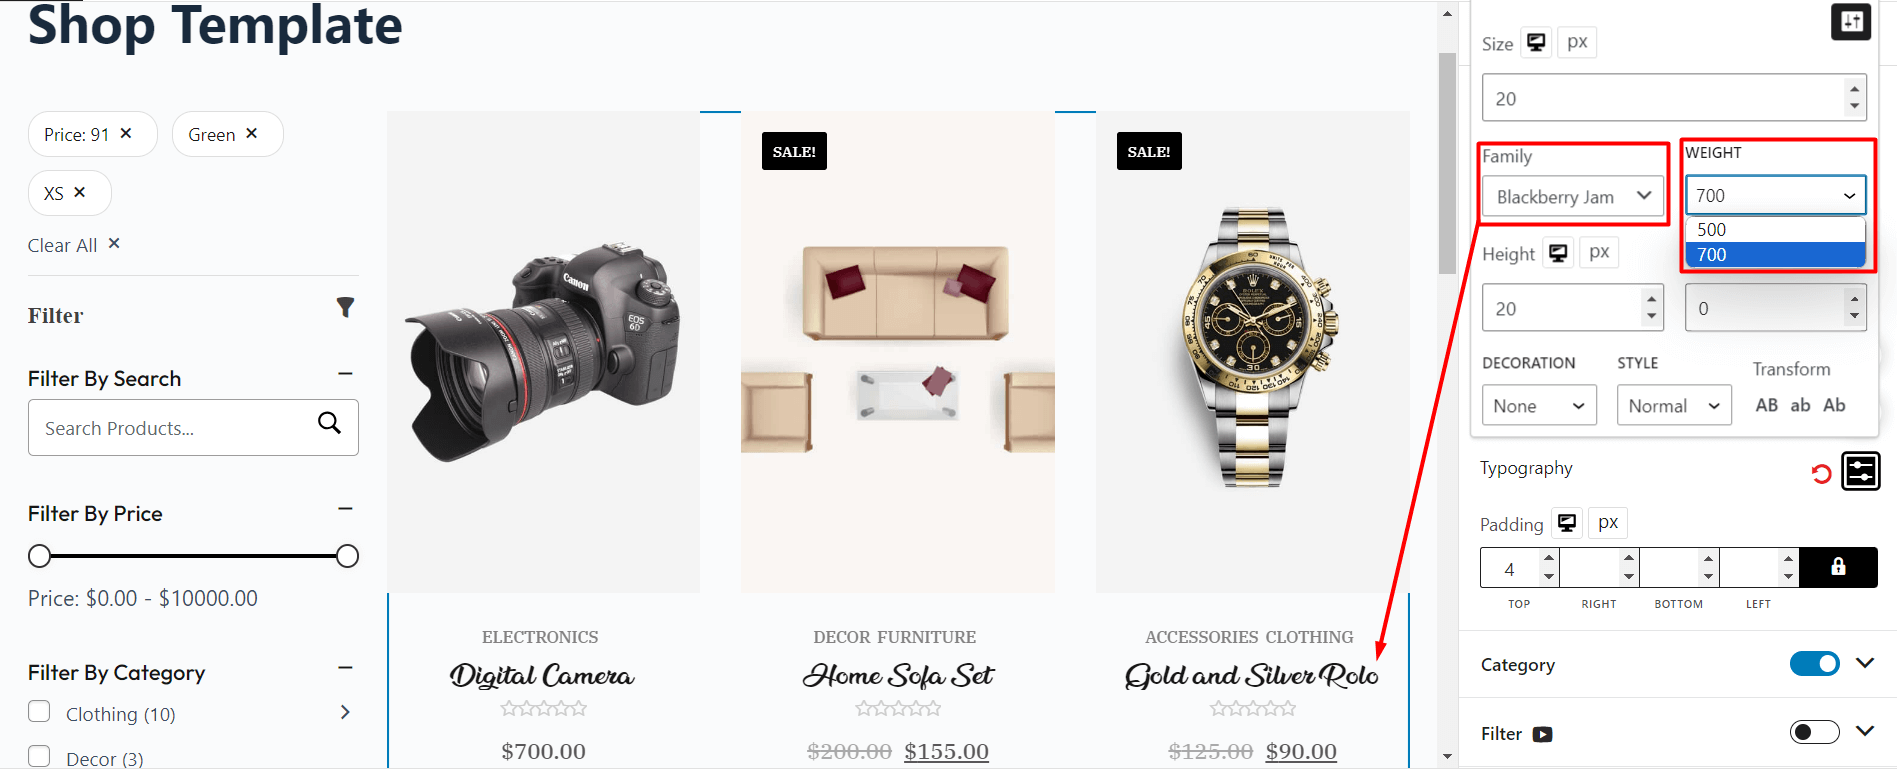
Please note that we didn’t just change the Product Title, but we also changed the fonts for the product category and the pricing as well. You can bring such changes to all editable blocks in ProductX (where you can change the typography of course).
This addon can be super helpful when a marketer is trying to offer a ‘Tailored’ experience to the user through their WooCommerce store. And this Black Friday, you can do it at an UNBELIEVEABLE PRICE. Enjoy up to 55% OFF on ProductX. Enjoy exciting features along with a Fully Packed Custom Font Addon:
How Does Font Property Affect SEO?
Although custom font for WordPress WooCommerce site may not seem like much, it does affect how the user interacts with the website – ultimately affecting SEO.
If a user finds anything hard to read or understand (such as the product description or SKU number), chances are he may leave without considering the product. This will increase the bounce rate of your website.
So, in order to remedy this issue, it is crucial that you keep the font you use to be proper – the customer should have no difficulty understanding what you are trying to sell. If you manage to do so, user retention will increase.
So, you cannot overlook your site’s readability as it directly affects the user experience.
Read about Relevant Features
While you’re at it, you may want to look at some other features of ProductX:
- How to build a WooCommerce Site with ProductX?
- How Does the ProductX Sorting Feature Work?
- How to Use the ProductX Filter Feature?
- How to Product Variations with ProductX?
Closing Remarks
You now know how to add font to WordPress WooCommerce Store. Use the custom fonts feature to make your eCommerce shop appealing, fresh, and functional to your users.
Make sure to check out other fan-favorite features of ProductX to learn about the power of this WooCommerce Gutenberg builder plugin.
Finally, we would like to know how you plan on using this feature. Tell us how you feel about it.
And while you’re at it, check out various WordPress video tutorials on our YouTube Channel. Also, find us on Facebook and Twitter for regular updates!