A few months ago, I noticed that my website itself was causing problems for my visitors. They visited my site, read a post or two, and then left. I needed clarification! It took some time to realize that visitors struggled to navigate through my ever-growing posts. They faced issues finding what they were looking for.
I found that a simple addition – a post carousel – could help me solve this navigation issue and boost user engagement on my website. It organizes and displays multiple contents within a single slideshow.
WordPress does not come with a Post Carousel by default, so many users found it difficult to add one. But, I assure you that after reading this complete guide, you’ll be able to do it in the simplest method possible.
You can also watch out this video guide on the post carousel below:
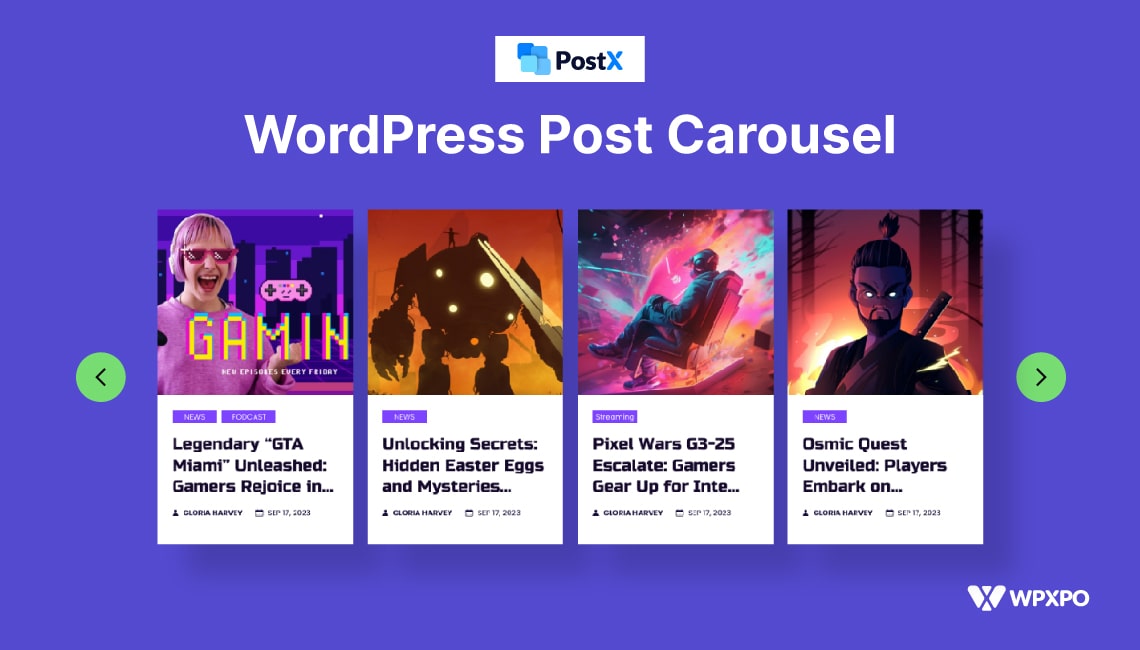
What Is a Post Carousel in WordPress?
A post carousel is a horizontal and scrollable display of your blog posts. Users click an arrow or swipe to move through them one by one. Instead of stacking posts in a grid or list, a carousel lets you show more content in less space without overwhelming the page.

Think of it as a content shelf: the posts sit side by side, and readers browse through them at their own pace.
What’s the Difference Between A Post Slider and a Post Carousel?
Sliders and carousels may look similar, but they serve different purposes and offer unique user experiences.
The main difference lies in how they operate. Sliders show one piece of content at a time, while carousels are like slideshows with multiple items.

Sliders are better suited for a focused, in-depth look at a single item. Imagine showcasing a travel photo on your blog. Viewers can appreciate the details and immerse themselves in the image.

On the other hand, carousels offer a wider view of multiple items. It is perfect for showcasing various blog posts, products, or testimonials. It also enables visitors to navigate swiftly and find something that captures their attention.
In summary, both sliders and carousels are effective ways to display content. Choosing between a slider and a post carousel depends on your website’s design and desired user experience.
Choosing the Right Post Carousel Plugin in WordPress
Before you pick one, you want to check how it fits your page builder, how much query and design control it gives you, and whether the team behind it is actively maintaining it.
I’ve compared the four strongest options side by side so you don’t have to dig through each plugin page yourself:
| Criteria | PostX | Smart Post Show | AnWP Post Carousel | AnWP Post Carousel |
|---|---|---|---|---|
| Best For | News, magazine & blog sites on Gutenberg | Simple carousels on any page builder | Multi-content carousels (posts, images, products) | Elementor-based post display |
| Key Features | 40+ blocks, 250+ templates, full site builder | Grid, carousel, slider, list layouts | Posts, images, WooCommerce, video carousel | 7 Elementor widgets, grid + slider layouts |
| Gutenberg Support | ✅ Native | ⚠️ Compatible but not native | ⚠️ Compatible but not native | ❌ No |
| Elementor Support | ⚠️ Limited | ✅ Yes | ✅ Yes | ✅ Native |
| Query Options | Category, tag, author, date range, post status, custom mix | Category, tag, author, post type | Post type, category, tag | Category, tag, custom post type |
| Customization Depth | High — typography, spacing, color, card layout, image ratio | Moderate | Moderate–High | Basic–Moderate |
| Responsive Controls | Per-device slide count control | Standard breakpoints | Standard breakpoints | Standard breakpoints |
| Performance | Block-only script loading | Good | Good | Good |
| Active Installs | 40,000+ | 20,000+ | 70,000+ | 20,000+ |
| Rating | ⭐ 4.8/5 (245+ reviews) | ⭐ 4.7/5 (200+ reviews) | ⭐ 4.7/5 (400+ reviews) | ⭐ 4.9/5 (80+ reviews) |
| Company Trust | WPXPO — established WP product company | ShortPixel team | ShapedPlugin — active WP plugin company | Independent developer |
| Last Updated | Active (April 2026) | Active (March 2026) | Active (2026) | Last updated Jan 2025 |
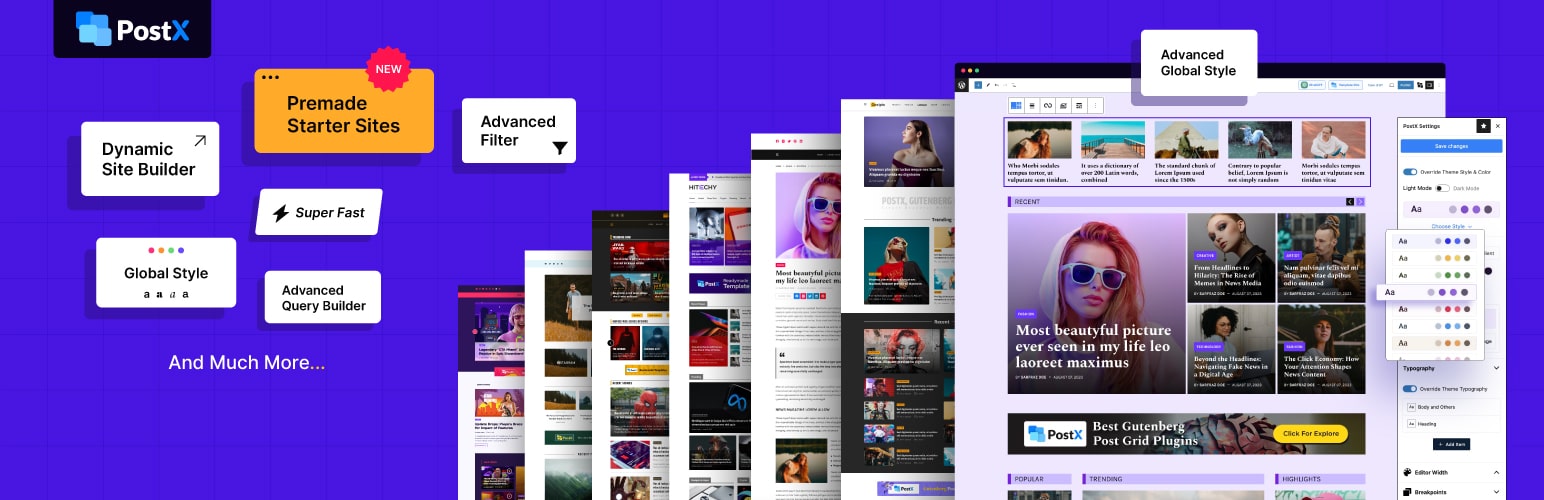
Why I Recommend PostX for Post Carousels in WordPress?
If you’re building a news site, magazine, or content-heavy blog on Gutenberg, PostX is the strongest option here. It’s not just a carousel plugin — it’s a full content display ecosystem, and the carousel is one of its most polished pieces.
That said, if all you need is a simple standalone carousel without caring about Gutenberg, the other plugins in this list can get the job done faster with less setup.
But for anyone serious about their WordPress content layout, here’s why PostX pulls ahead:
Faster Setup
You can go from installing the plugin to a live carousel in under two minutes, no shortcodes or template editing needed.
More Query Control
You can pull posts by category, tag, author, date range, post status, or any combination. Most carousel plugins give you a fraction of this.
Advanced Content Filtering
Want to show only posts from a specific category, exclude certain tags, or target a particular author? PostX handles it natively inside the block.
More Design Freedom
Typography, spacing, color, card layout, image ratio — you control it all without touching CSS.
Better Responsive Controls
Set different slide counts for desktop, tablet, and mobile independently. No more carousels that look broken on phones.
Built for Speed
PostX loads only what the block needs, keeping your page weight low compared to bloated slider plugins that load full libraries regardless of usage.
Native Gutenberg Experience
PostX works the way Gutenberg was designed to work. Every option lives inside the block editor, so there’s no jumping between admin panels and page builders.
How I Added Post Carousels in WordPress? (3 Simple Steps)
PostX makes the whole process straightforward, and you do not need to touch a single line of code. Here is exactly how I did it, step by step.
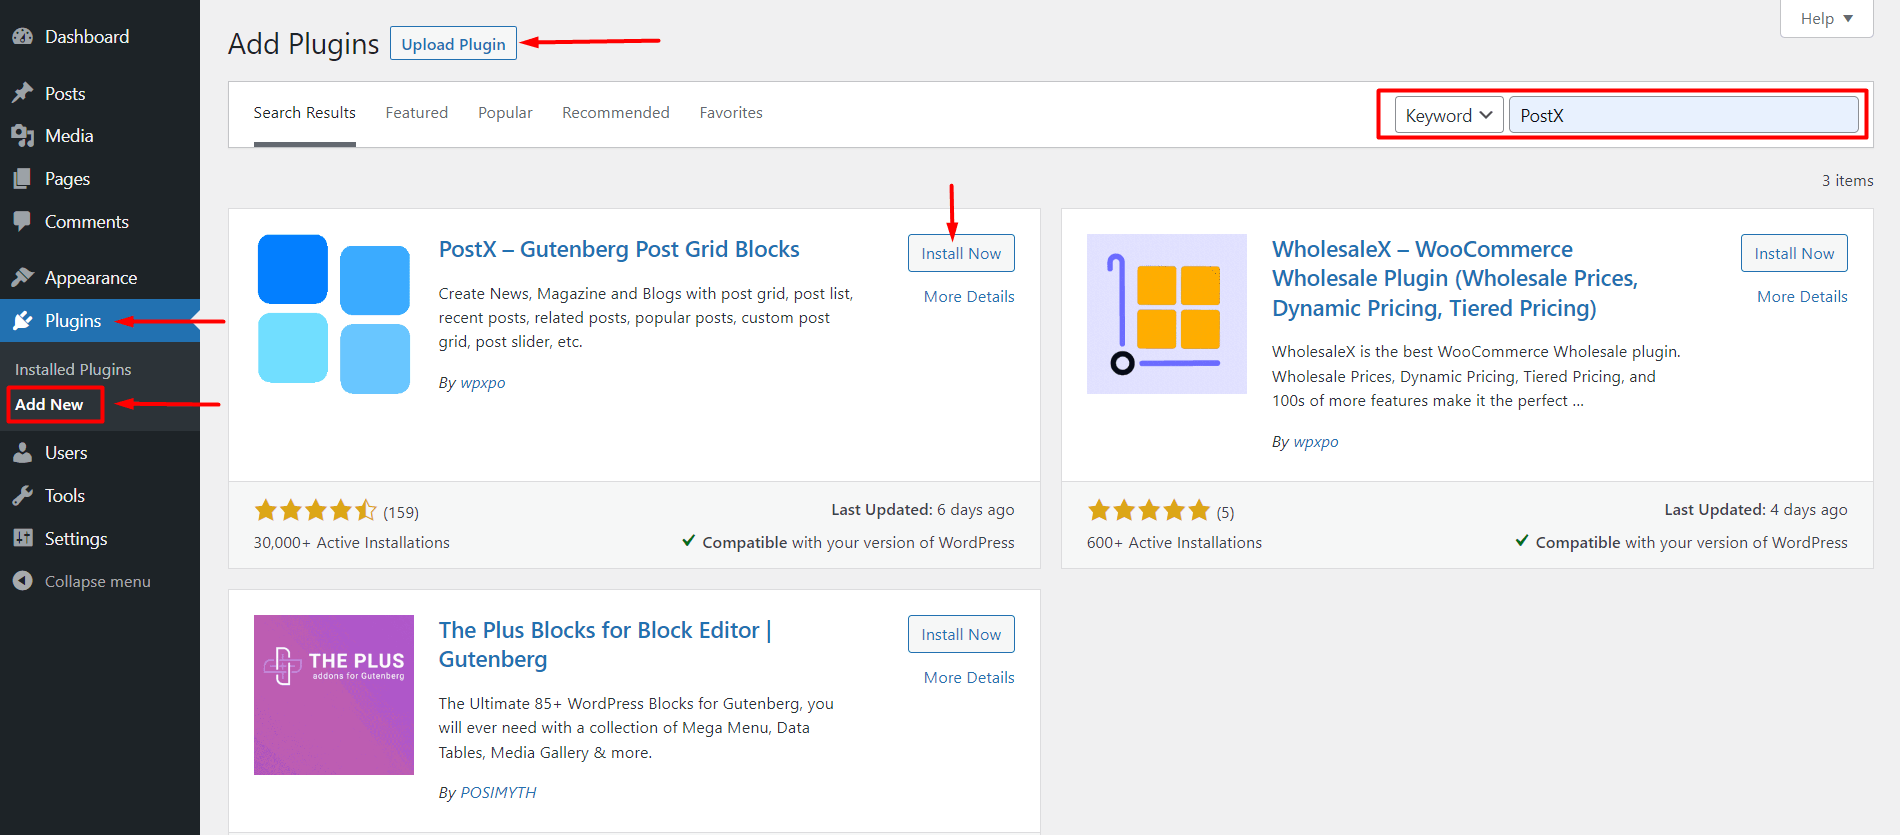
Step 1: Install and Activate PostX
Go to your WordPress dashboard, navigate to Plugins → Add Plugin, and search for “PostX.” Click Install Now, then Activate. The plugin is free to start and shows up in your sidebar immediately after activation.
Step 2: Open Your Page and Add the Carousel Block
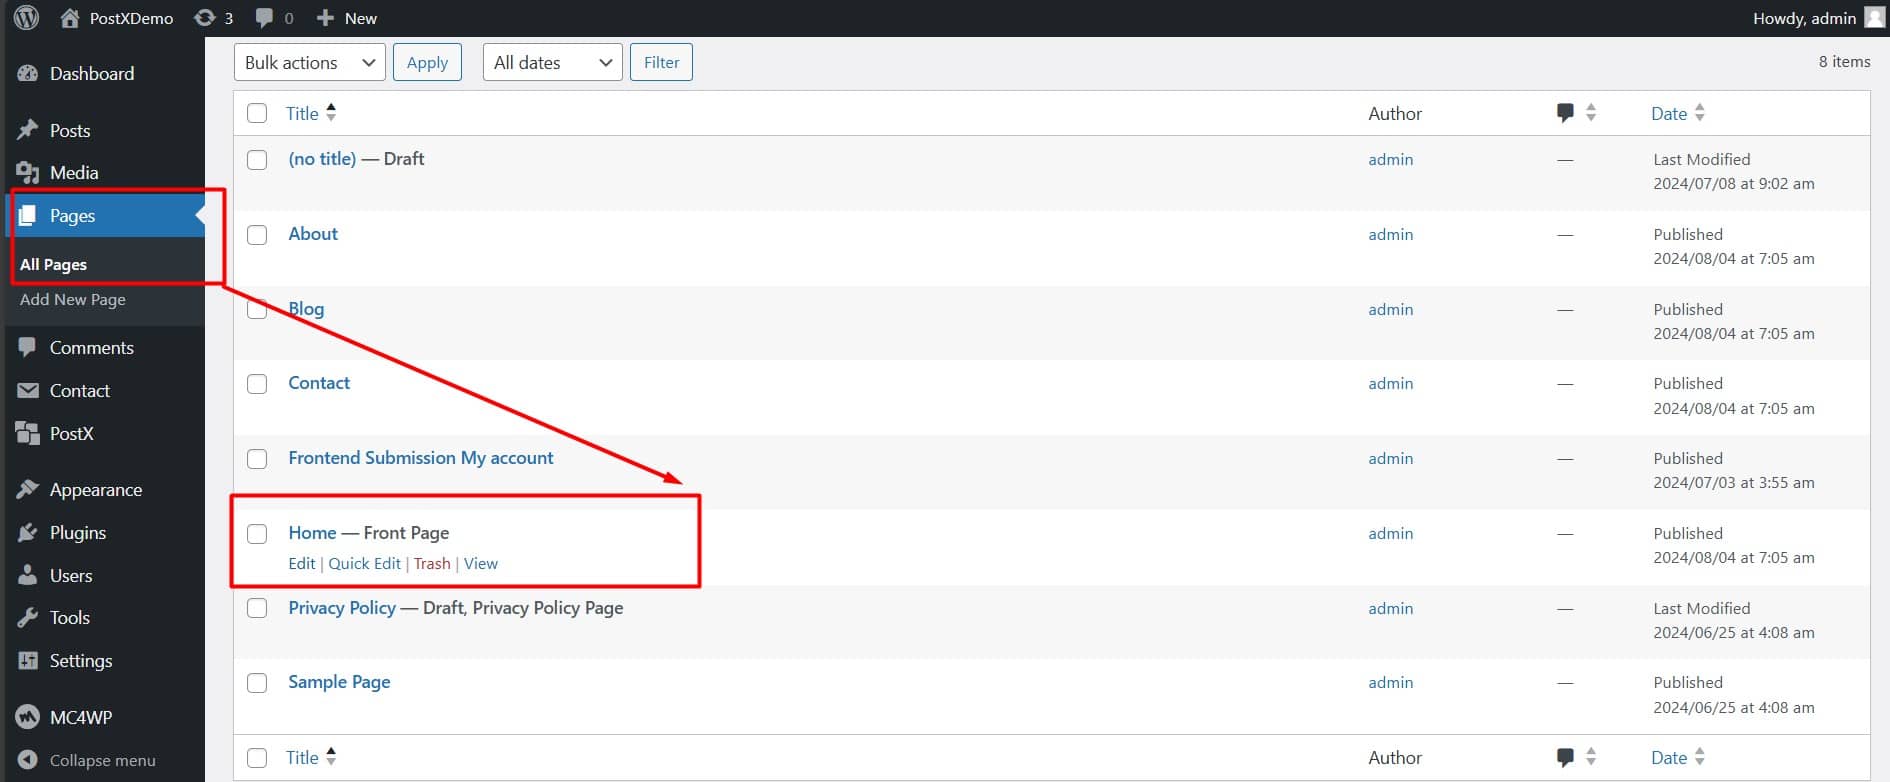
Decide where the carousel will live. Most people add it to the homepage since that is where visitors land first and where featured content gets the most exposure.
Go to Pages → All Pages, find your homepage, and click Edit. If you want to build a completely custom homepage layout instead, PostX also has a Site Builder you can access directly from the PostX menu.
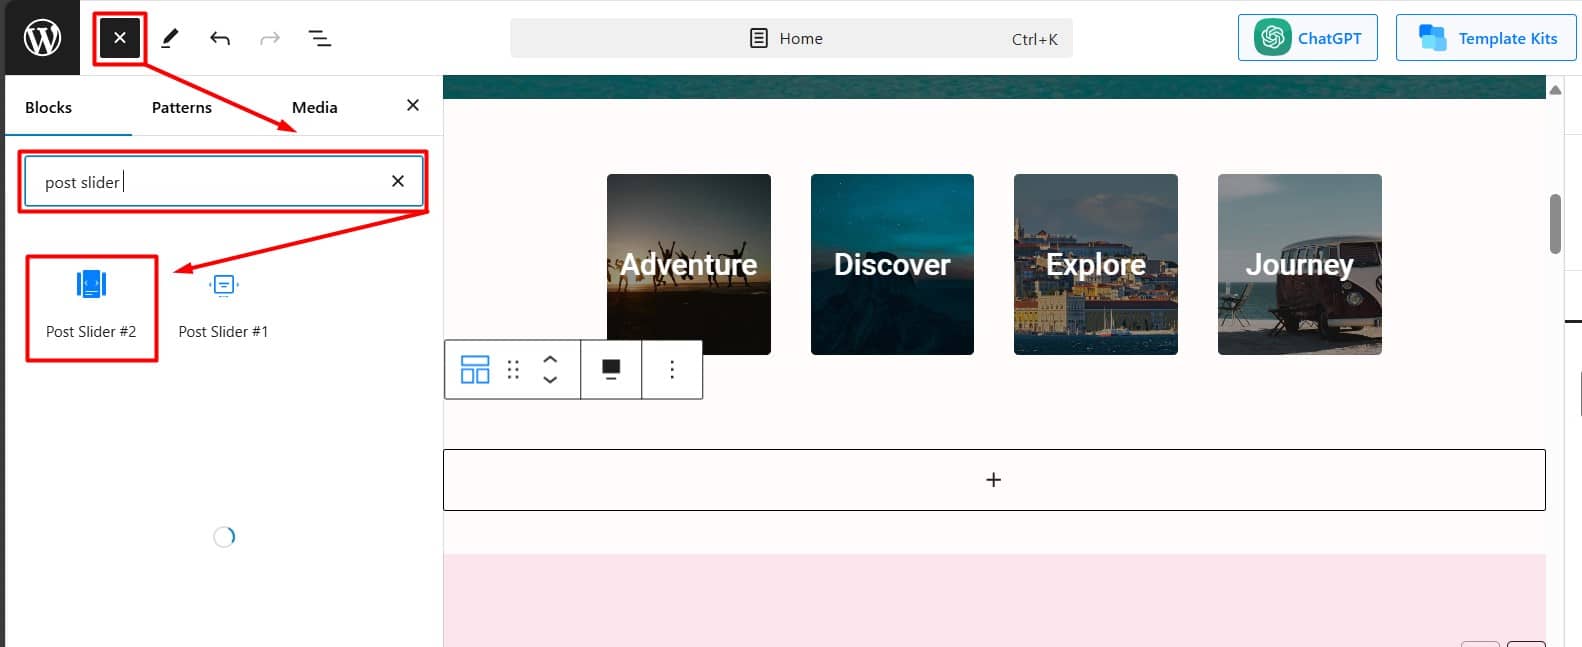
Once inside the editor, click the Add Block (+) button and search for “Post Slider #2”. This is the block that powers the carousel.
Before you start customising from scratch, check the Design Library first. PostX includes premade carousel designs you can import in one click, which saves a lot of time compared to building from a blank block.
Step 3: Customise and Publish
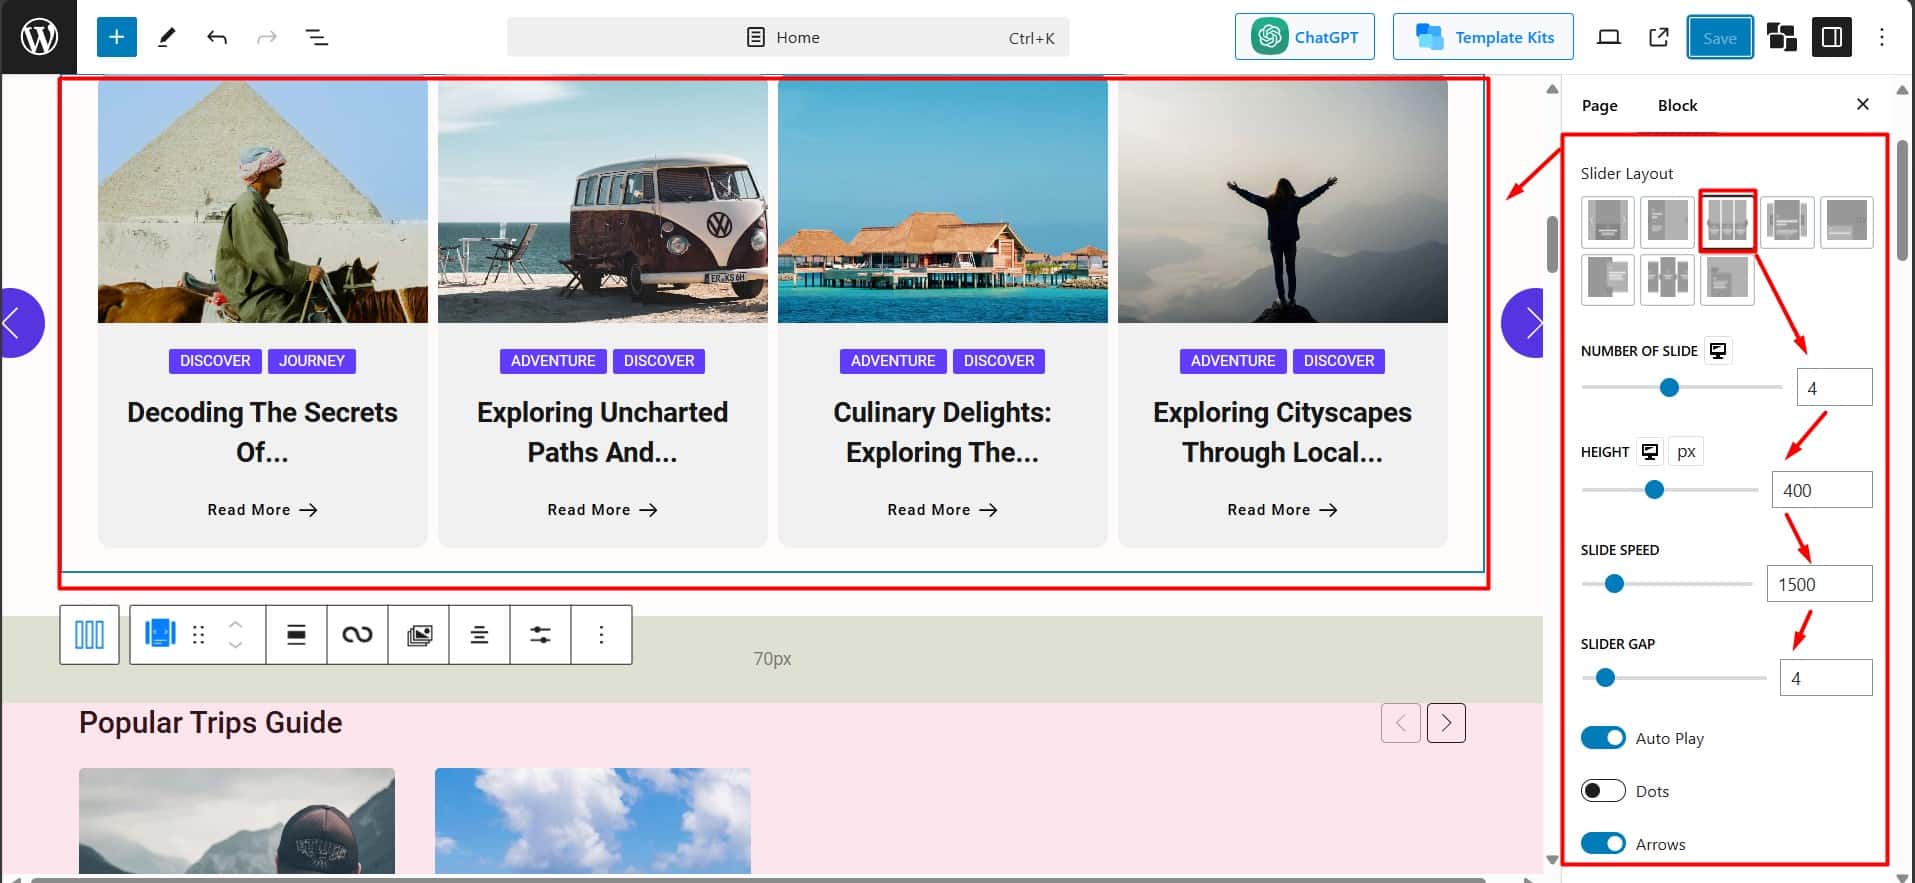
All the settings live in the Block Settings panel on the right side of your editor. Here is what to adjust:
Carousel Layout — Under the General tab, browse the available carousel styles and pick the one that fits your site design. You can switch between them in real time.
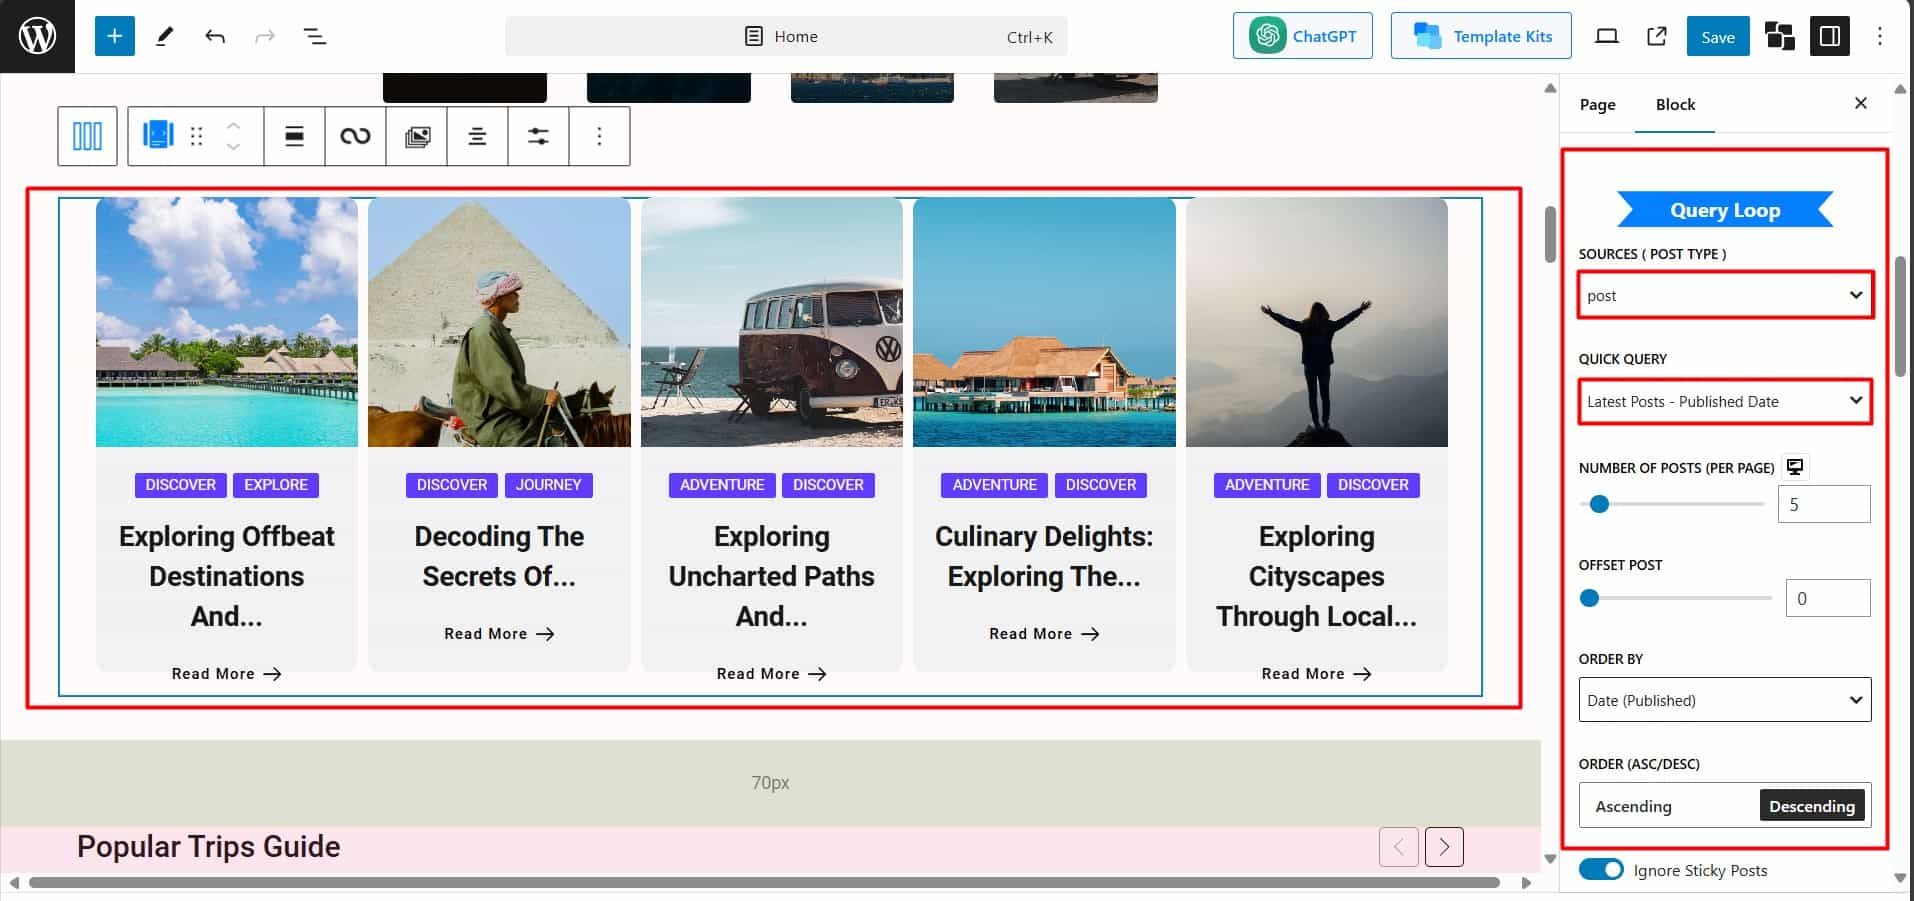
Content Source — Scroll down to the Query Loop section. This is where you tell the carousel which posts to show. You can pull from all posts, specific posts, or a custom selection filtered by category, tag, or post ID.
Quick Query — Once you have set your source, the Quick Query option gives you ready-made filters, including
- Latest Posts
- Popular Posts
- Random Posts
- Featured Posts
- Most Commented and More
I use this constantly, as picking “Popular Posts” for my homepage carousel immediately surfaced the content readers actually wanted to see.
Carousel Behaviour — Adjust the number of visible slides, transition speed, autoplay delay, and slide height to control how the carousel feels to visitors.
Once you are happy with the design, hit Publish if it is a new page or Update if you are editing an existing one. Your carousel is now live.
How I Customized My Post Carousel in WordPress Using PostX
Once you add the PostX carousel block, the real fun begins. Everything lives inside the Block Settings panel on the right side of the editor, neatly organized into tabs. I spent a good amount of time going through each one, and here is exactly what you can control.
Number of Visible Posts
This was the first thing I adjusted. You can set how many posts appear at once in the carousel row. I settled on 3 for the desktop after testing 2 and 4, since 3 felt balanced without looking sparse or crowded.
Navigation Arrows
Under the Arrows tab, you can enable or disable them with a single click. I kept mine on and customized the size, color, border, and background to match my site palette. You can also choose the arrow icon style, which is a small detail that makes a noticeable difference.
Dots
Same as arrows, dots have their own dedicated tab. You can toggle them on or off, change their size and active color, and position them below the carousel. I use both arrows and dots together so visitors know exactly how to navigate on both desktop and mobile.
Autoplay
You can enable autoplay and set a delay between slides in milliseconds. I turned it on with a 4000ms delay, which felt natural without being rushed. There is also a pause-on-hover option I always keep enabled so readers are not interrupted mid-read.
Infinite Loop
One toggle and the carousel cycles back to the first slide after the last one. I always enable this. Without it, the carousel just stops, which feels broken to most visitors.
Speed
This controls the transition animation speed between slides. I found 600ms feels smooth without being sluggish. Going below 300ms starts to feel too snappy.
Image Ratio
Under the Image tab, you can set a fixed aspect ratio for all thumbnails, which keeps the carousel looking uniform even when your original images are different sizes. I use a 16:9 ratio across the board. You can also control image height, width, and apply hover effects.
Card Spacing
The Content Wrap settings let you control padding, radius, and background color for each postcard. Getting this right took me a few tries, but it is what makes the carousel feel polished rather than default.
Typography
The Title tab gives you full control over font size, weight, line height, color, and hover color. I also found hover animations here, which I use to add a subtle underline effect when someone hovers over a post title.
Meta Information
Under the Meta tab, you can choose exactly which post details appear on each card. I display the author name, publish date, and reading time, and turned off comment count since my site does not lean heavily on comments. You can style each meta element separately from the Style tab, so the date does not have to look the same as the author name.
Excerpts
This tab lets you add a short post summary below the title on each card. You can set a word or character limit so nothing overflows, and control the typography, color, and padding around it. I personally switched this to a meta description instead of an auto-generated excerpt, since my meta descriptions are already written to hook readers in.
Read More Button
Under the Read More tab, you can add a clickable button at the bottom of each card. I changed the default text to “Read the Full Post” and picked an arrow icon to go with it. You can adjust the button text, icon style, color, border, and padding to match your overall design.
Taxonomy and Category Labels
This tab controls whether a category or tag label appears on each postcard. I keep it enabled and set to category so readers know at a glance what topic each post belongs to. You can style the label color, font, border radius, and position to fit your card layout.
Mobile Behavior
This was one of the most useful settings for me. You can set a completely different number of visible slides for tablet and mobile independently. I show 3 on desktop, 2 on tablet, and 1 on mobile. Without this control, carousels usually look broken on smaller screens.
Query Filters
Beyond design, PostX also lets you filter which posts appear in the carousel directly from the block settings. You can filter by category, tag, author, date range, and post status, or mix them together. I use this to keep certain carousels locked to specific categories without creating separate pages for them.
Every one of these settings is non-destructive, meaning you can change and preview in real time inside the editor. Nothing gets saved until you hit publish or update, so experimenting is completely risk-free.
How to Display Specific Posts in Your Carousel?
You can choose by specific category, specific tags, specific author, or even a mix of them. To enable this, you can follow the steps below.
Step 1: Source Selection
Under the“General” tab, scroll down to the“Query Loop”. Click on “Sources” to unveil a variety of options. Among them, select the “Specific Posts” option. Then select the posts you want to showcase. That’s it!
Step 2: Targeting by Category, Tags, Author, or a mix of them
You can highlight posts based on their category, Tags, Author, or a mix of them. To enable this, just click on the “Category” option under the “Query Loop” section.
Then, you need to select “Taxonomy Value” from the lower box. Here, select the category or tag you want to show on the carousel. Then you can also choose posts from the Specific Authors.
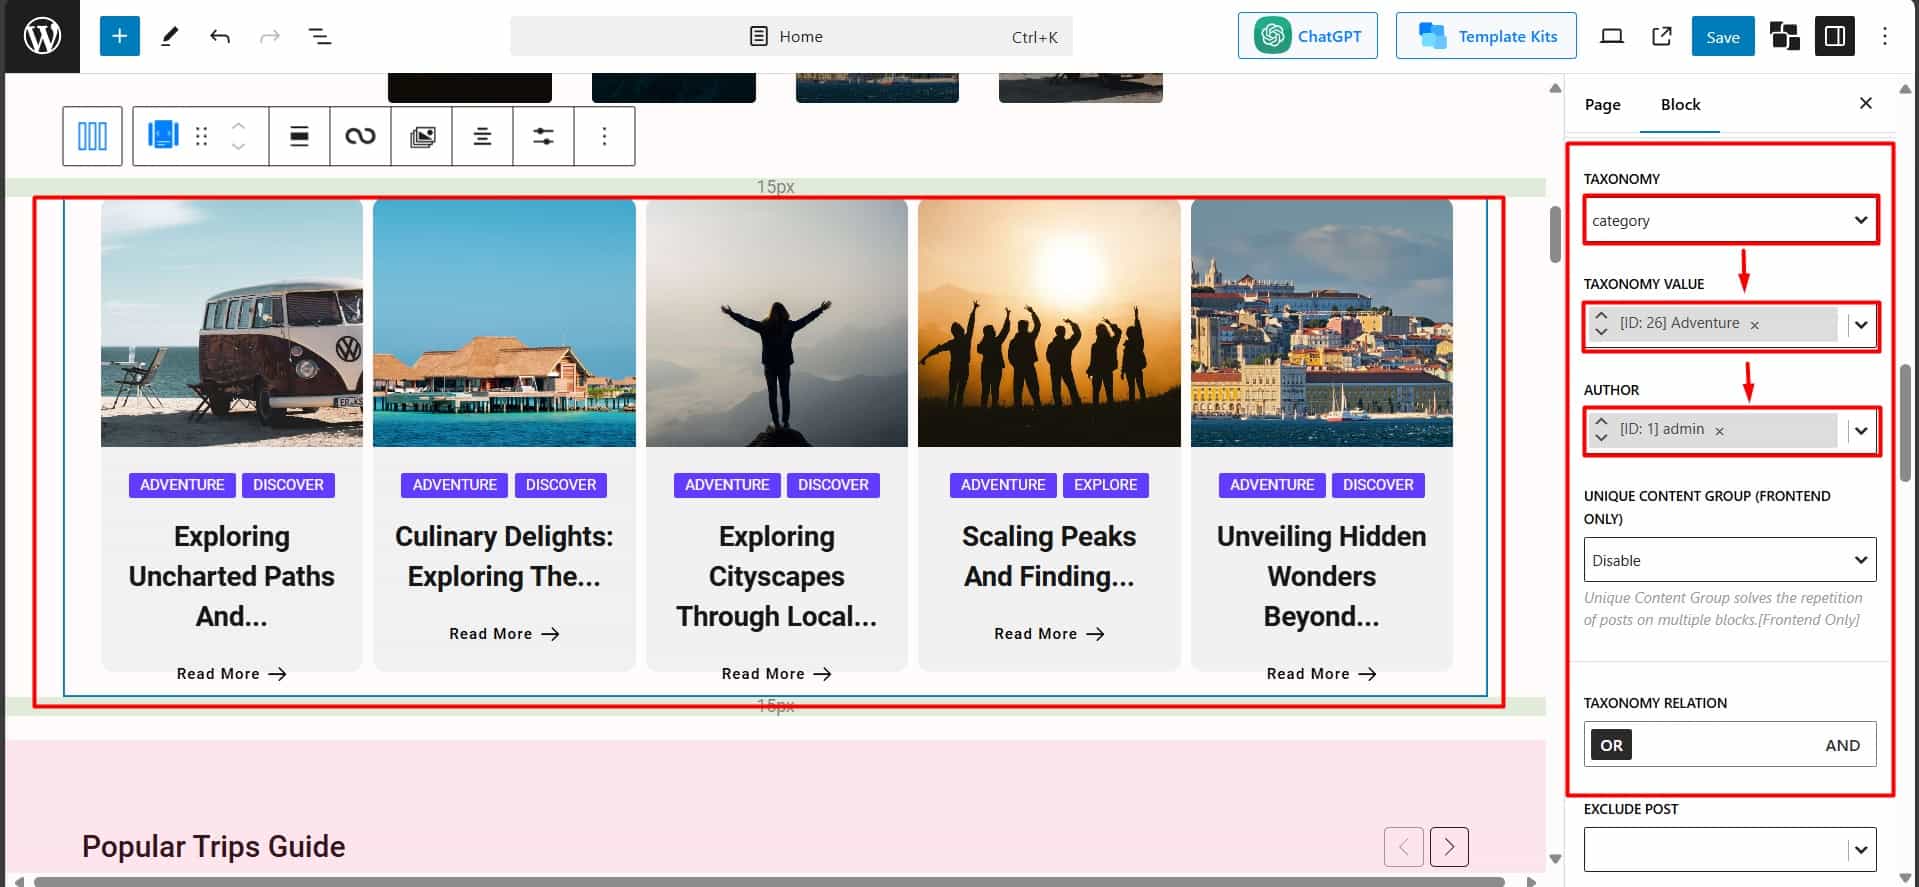
Step 3: Update and Shine!
Once you’ve selected your desired targeting criteria, simply hit the “update” button. Your carousel will be updated to display the posts that perfectly align with your selections.
What Actually Makes a Post Carousel Work on My Site
Three things I learned the hard way so you don’t have to.
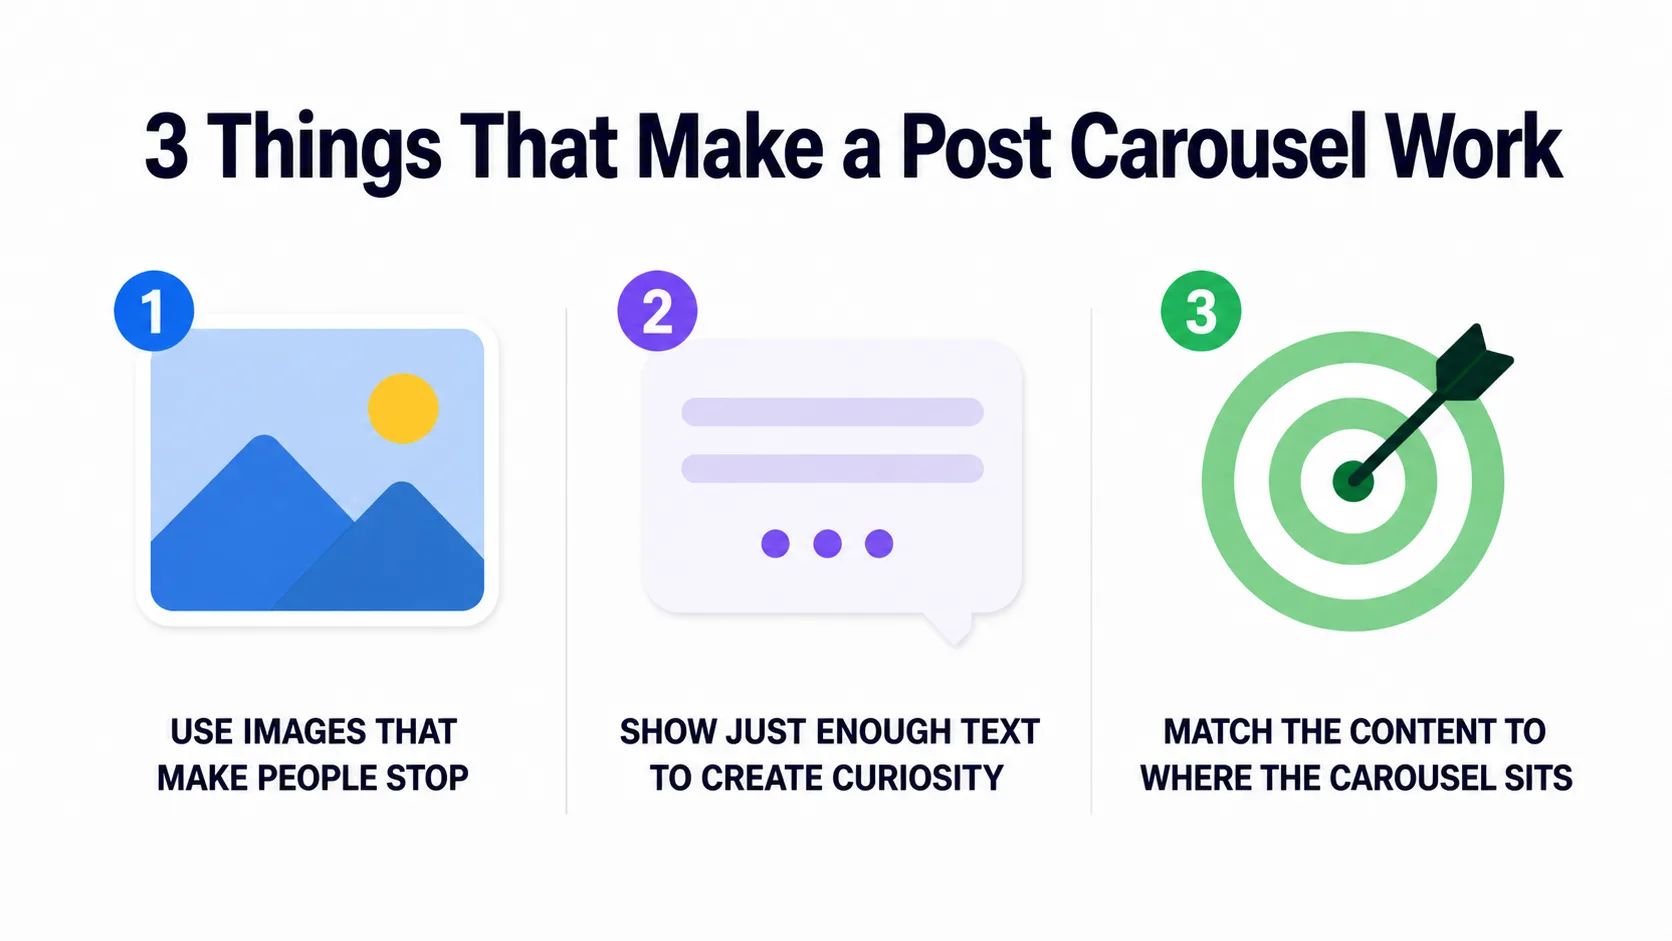
Use Images That Make People Stop Scrolling
Your thumbnail gets noticed before your title does. I standardised my featured image ratio and quality across all posts in one afternoon, and the carousel looked twice as polished without changing a single word.
Show Just Enough Text to Create Curiosity
I trimmed my excerpts to 15 words, and clicks went up immediately. Give readers just enough to want more, then let the post do the rest.
Match the Content to Where the Carousel Sits
A homepage carousel should show your best content. A carousel at the bottom of a post should show related content from the same category. I run three separate carousels filtered differently depending on where the visitor is, and that targeting alone doubled my pages per session.
Benefits I Noticed After Adding a Post Carousel to My WordPress Site
After a couple of months of running a post carousel on my site, these are the changes that actually stood out.
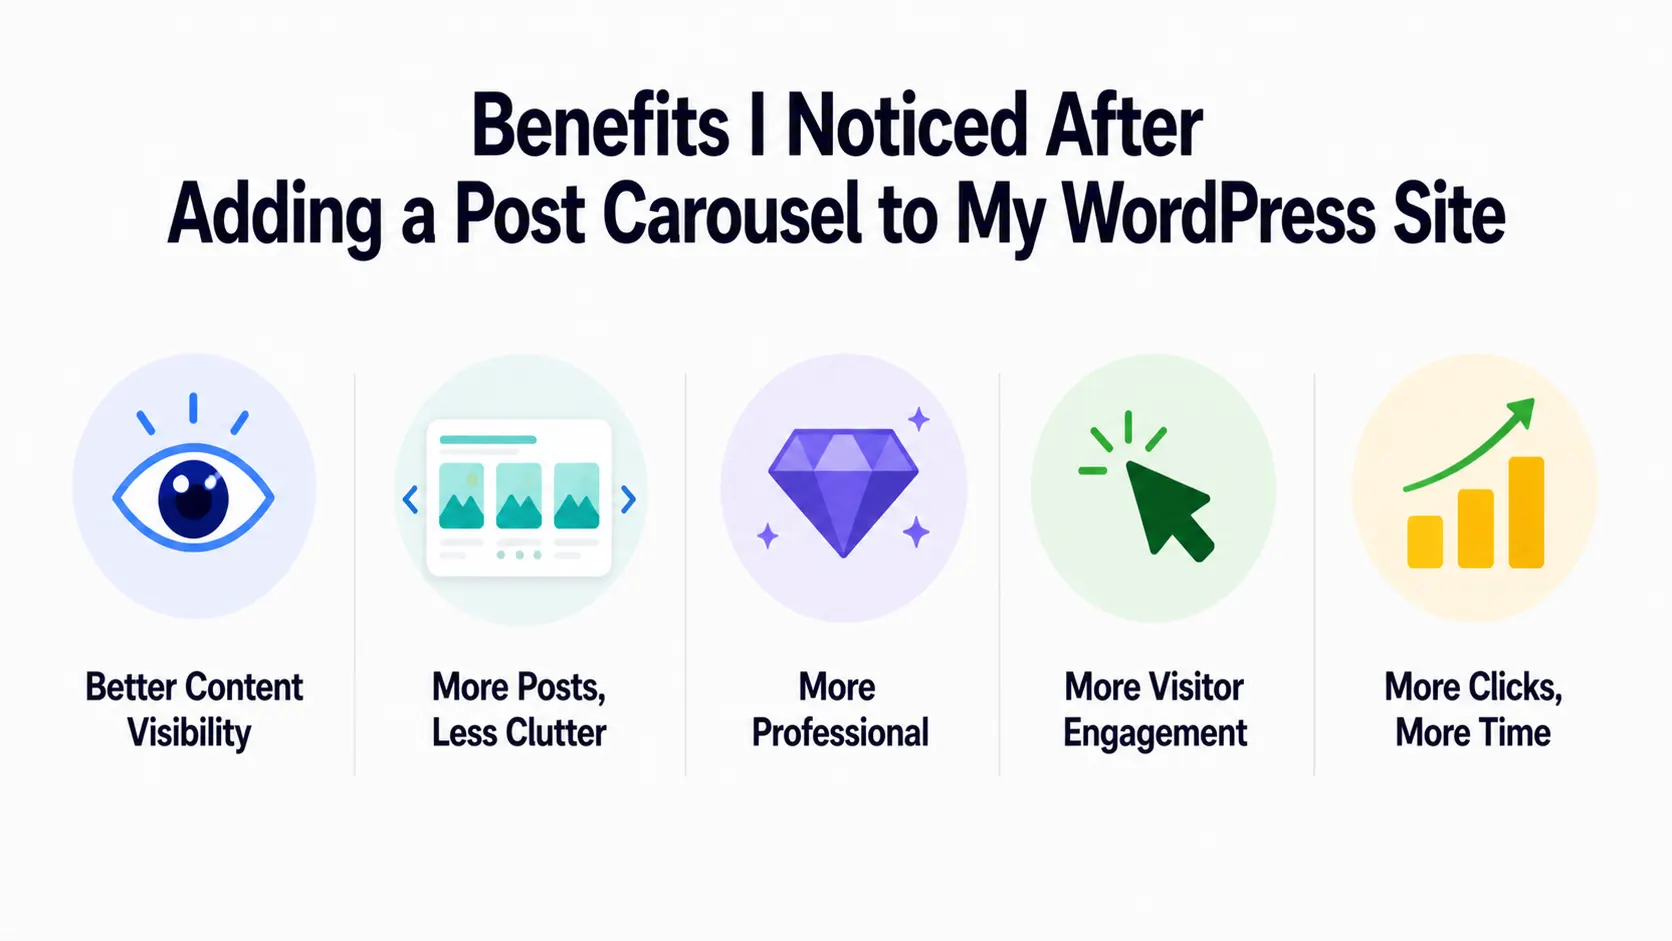
It Puts My Best Content Where Eyes Actually Land
My featured category was getting maybe 3 to 4 clicks a day when it was buried in a grid. After placing it in a dedicated carousel just below the header, it jumped to 20+ clicks daily within the first week. The content didn’t change; only its position and presentation did.
More Posts, Less Page Clutter
I went from displaying 6 posts in a stacked grid that pushed everything below the fold, to showing 8 posts in a single carousel row. My homepage load feels improved, and my average scroll depth increased by 34% according to my heatmap tool.
Makes My Site Look Instantly More Professional
This one is harder to measure with numbers, but my email subscribers started mentioning the site looked “cleaner” and “more like a real magazine.” My newsletter signup rate went up 18% in the same two-month period, which I partly credit to the improved first impression.
Visitors Actually Interact With My Content
Before the carousel, my average pages per session sat at 1.4. Two months after adding it, that number climbed to 2.1. Visitors were no longer landing on one post and leaving; they were genuinely browsing.
More Clicks, More Time on Site, More Return Visits
My average session duration went from 1 minute 12 seconds to 2 minutes 5 seconds. Returning visitor rate also grew from 18% to 27% over the same period. A carousel alone didn’t do all of that, but it was the only major change I made during that time.
Start Adding Carousel in WordPress Post!
So yeah, that’s how I added a post carousel on my website.
It helps me ease navigation, improve user engagement, and boost traffic on my website. It can help you too.
In this article, I showed the difference between sliders and carousels. Then I outlined the advantages of using a post carousel. Finally, I provided a step-by-step guide for creating and customizing a post carousel with the PostX Plugin for WordPress.
Remember, PostX offers extensive customization options. So play around with the settings and get creative. Even the free version has tons of design options. Why not try it out?


