WooCommerce is a great plugin for WordPress users, especially for store owners who want to create an online store without any coding knowledge. However, it lags in the customization options. Yes, we can tweak a few things, but there are no remarkable customization options.
So it is obvious that you want to override WooCommerce template files. Don’t worry, we have got your back. From this detailed guide, you can learn the process of overriding WooCommerce templates with both a child theme and the WooCommerce plugin. Plus, a smarter way to use the most advanced and complete WooCommerce builder plugin.
What are Template Files In WooCommerce?
WooCommerce Templates refer to the plugin files that are built with code to define the structures of the pages of a WooCommerce store. When you visit the front end, it displays products or whatever static content the site admin added. However, the contents are displayed according to the structure of the templates.
You may not have noticed them at the beginning, as WooCommerce automatically sets up all essential pages/templates upon installation. However, you can see them in the plugin file.
When Do You Need to Override WooCommerce Template Files?
Before we start guiding you with a step-by-step guide, we would like to share the common reasons behind overriding WooCommerce templates. If you already have your own reason, you can skip the section and start following the process.
Customization Needs: The first and obvious reason behind overriding the WooCommerce template is adjusting the layout.
Theme Limitations: Some popular WooCommerce themes give advanced customization options, but most of them don’t. So, we may need to replace the default template with a new one.
Plugin Conflicts: WooCommerce may conflict with some plugins. So if the conflicting plugins are important to you, you must make some adjustments to use them with WooCommerce.
Customizing Shop Page Layout: The default shop page is good enough to start with. However, if you really want to establish a brand identity, then you must replace the default one.
Additional Elements to Single Product Pages: Another common reason for overriding WooCommerce templates is adding any additional elements to the product pages.
How to Override WooCommerce Template in Child Theme
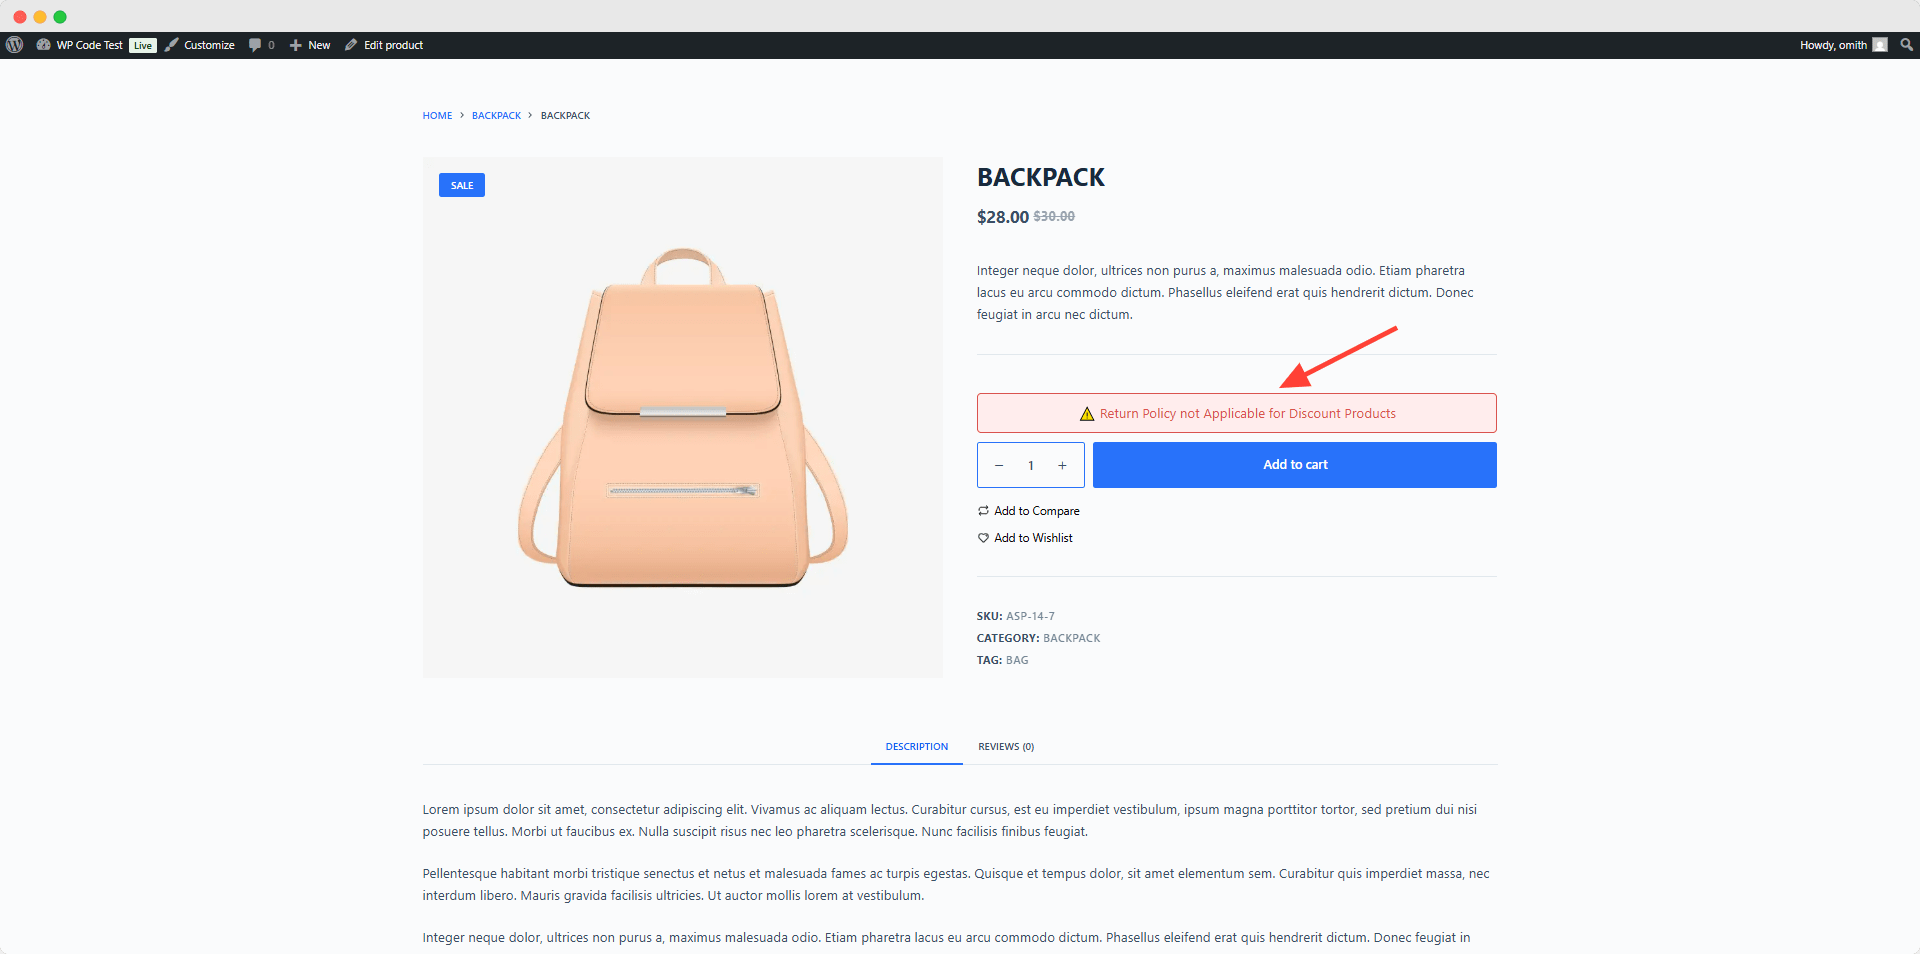
Now, let’s see how we can override templates in WooCommerce. For example, we will be adding a warning to the product page for the on-sale products. Here’s how:
Step 1: Set Up Your Child Theme
At first, we need to set up a child theme. Because if you add code to the main theme file, it will be removed when the theme is updated. As we are using Blocksy, we were able to get the Child theme from the official source. You can also get the child theme from the official source if you use a popular theme. If not, you can create your own child theme, too.
Step 2: Locate the WooCommerce Template Files
Now, we need to locate the template file that we want to override. We can find all WooCommerce template files from wp-content >> plugins >> woocommerce >> templates. For now, let’s copy the single-product.php template file as we want to override it.
Step 3: Create a WooCommerce Folder in Your Child Theme
Now, we need to open the folder of our child theme and create a folder and name it “woocommerce”. Then paste the template that we have copied. So we are replicating the WooCommerce template structure as wp-content/themes/our-child-theme/woocommerce/single-product.php.
Step 4: Customize the Template
So, as we have successfully overridden the product page template, we need to add additional code to fulfill our goal. For now, we are adding the following code.
<?php
// Hook to display the warning before the Add to Cart button
add_action('woocommerce_before_add_to_cart_button', function() {
    // Get the global product object correctly
    $product = wc_get_product( get_the_ID() );

    // Check if the product is on sale and display a warning
    if ( $product && $product->is_on_sale() ) {
        echo '<div class="discount-warning" style="background-color: #ffeded; color: #d9534f; padding: 10px; margin: 10px 0; border: 1px solid #d9534f; border-radius: 5px; text-align: center;">';
        echo '⚠️ Return Policy not Applicable for Discount Products';
        echo '</div>';
    }
});
?>

<div class="summary entry-summary">

    <?php
    /**
     * woocommerce_single_product_summary hook.
     *
     * @hooked woocommerce_template_single_title - 5
     * @hooked woocommerce_template_single_rating - 10
     * @hooked woocommerce_template_single_price - 10
     * @hooked woocommerce_template_single_excerpt - 20
     * @hooked woocommerce_template_single_add_to_cart - 30
     * @hooked woocommerce_template_single_meta - 40
     * @hooked woocommerce_template_single_sharing - 50
     * @hooked WC_Structured_Data::generate_product_data() - 60
     */
    do_action('woocommerce_single_product_summary');
    ?>
</div>
Now, you can see a warning note on the product page that is on sale.
Note: We have collected the codes from ChatGPT as per our requirements. You can also share your goal with ChatGPT and get custom code accordingly.
How to Override WooCommerce Template in the Plugin
Although using a child theme for overriding the WooCommerce template is the most efficient way, you can also do it directly in the WooCommerce plugin. Here’s how:
At first, go to wp-content >> plugins >> woocommerce >> templates and open the template that you want to override. For instance, let’s customize and add “Delivery that may take up to 2 weeks“. You can also do the same by adding the following code.
<?php
/**
 * The Template for displaying all single products
 *
 * This template can be overridden by copying it to yourtheme/woocommerce/single-product.php.
 *
 * HOWEVER, on occasion WooCommerce will need to update template files and you
 * (the theme developer) will need to copy the new files to your theme to
 * maintain compatibility. We try to do this as little as possible, but it does
 * happen. When this occurs the version of the template file will be bumped and
 * the readme will list any important changes.
 *
 * @see         https://woocommerce.com/document/template-structure/
 * @package     WooCommerce\Templates
 * @version     1.6.4
 */

if ( ! defined( 'ABSPATH' ) ) {
	exit; // Exit if accessed directly
}

get_header( 'shop' ); ?>

	<?php
		/**
		 * woocommerce_before_main_content hook.
		 *
		 * @hooked woocommerce_output_content_wrapper - 10 (outputs opening divs for the content)
		 * @hooked woocommerce_breadcrumb - 20
		 */
		do_action( 'woocommerce_before_main_content' );
	?>
<?php
// Hook to display the warning before the Add to Cart button
add_action('woocommerce_before_add_to_cart_button', function() {
    // Get the global product object correctly
    $product = wc_get_product( get_the_ID() );

    // Check if the product is on sale and display a warning
    if ( $product && $product->is_on_sale() ) {
        echo '<div class="discount-warning" style="background-color: #ffeded; color: #d9534f; padding: 10px; margin: 10px 0; border: 1px solid #d9534f; border-radius: 5px; text-align: center;">';
        echo '⚠️ Delivery that may take up to 2 weeks';
        echo '</div>';
    }
});
?>

<div class="summary entry-summary">

    <?php
    /**
     * woocommerce_single_product_summary hook.
     *
     * @hooked woocommerce_template_single_title - 5
     * @hooked woocommerce_template_single_rating - 10
     * @hooked woocommerce_template_single_price - 10
     * @hooked woocommerce_template_single_excerpt - 20
     * @hooked woocommerce_template_single_add_to_cart - 30
     * @hooked woocommerce_template_single_meta - 40
     * @hooked woocommerce_template_single_sharing - 50
     * @hooked WC_Structured_Data::generate_product_data() - 60
     */
    do_action('woocommerce_single_product_summary');
    ?>
</div>

		<?php while ( have_posts() ) : ?>
			<?php the_post(); ?>

			<?php wc_get_template_part( 'content', 'single-product' ); ?>

		<?php endwhile; // end of the loop. ?>

	<?php
		/**
		 * woocommerce_after_main_content hook.
		 *
		 * @hooked woocommerce_output_content_wrapper_end - 10 (outputs closing divs for the content)
		 */
		do_action( 'woocommerce_after_main_content' );
	?>

	<?php
		/**
		 * woocommerce_sidebar hook.
		 *
		 * @hooked woocommerce_get_sidebar - 10
		 */
		do_action( 'woocommerce_sidebar' );
	?>

<?php
get_footer( 'shop' );

/* Omit closing PHP tag at the end of PHP files to avoid "headers already sent" issues. */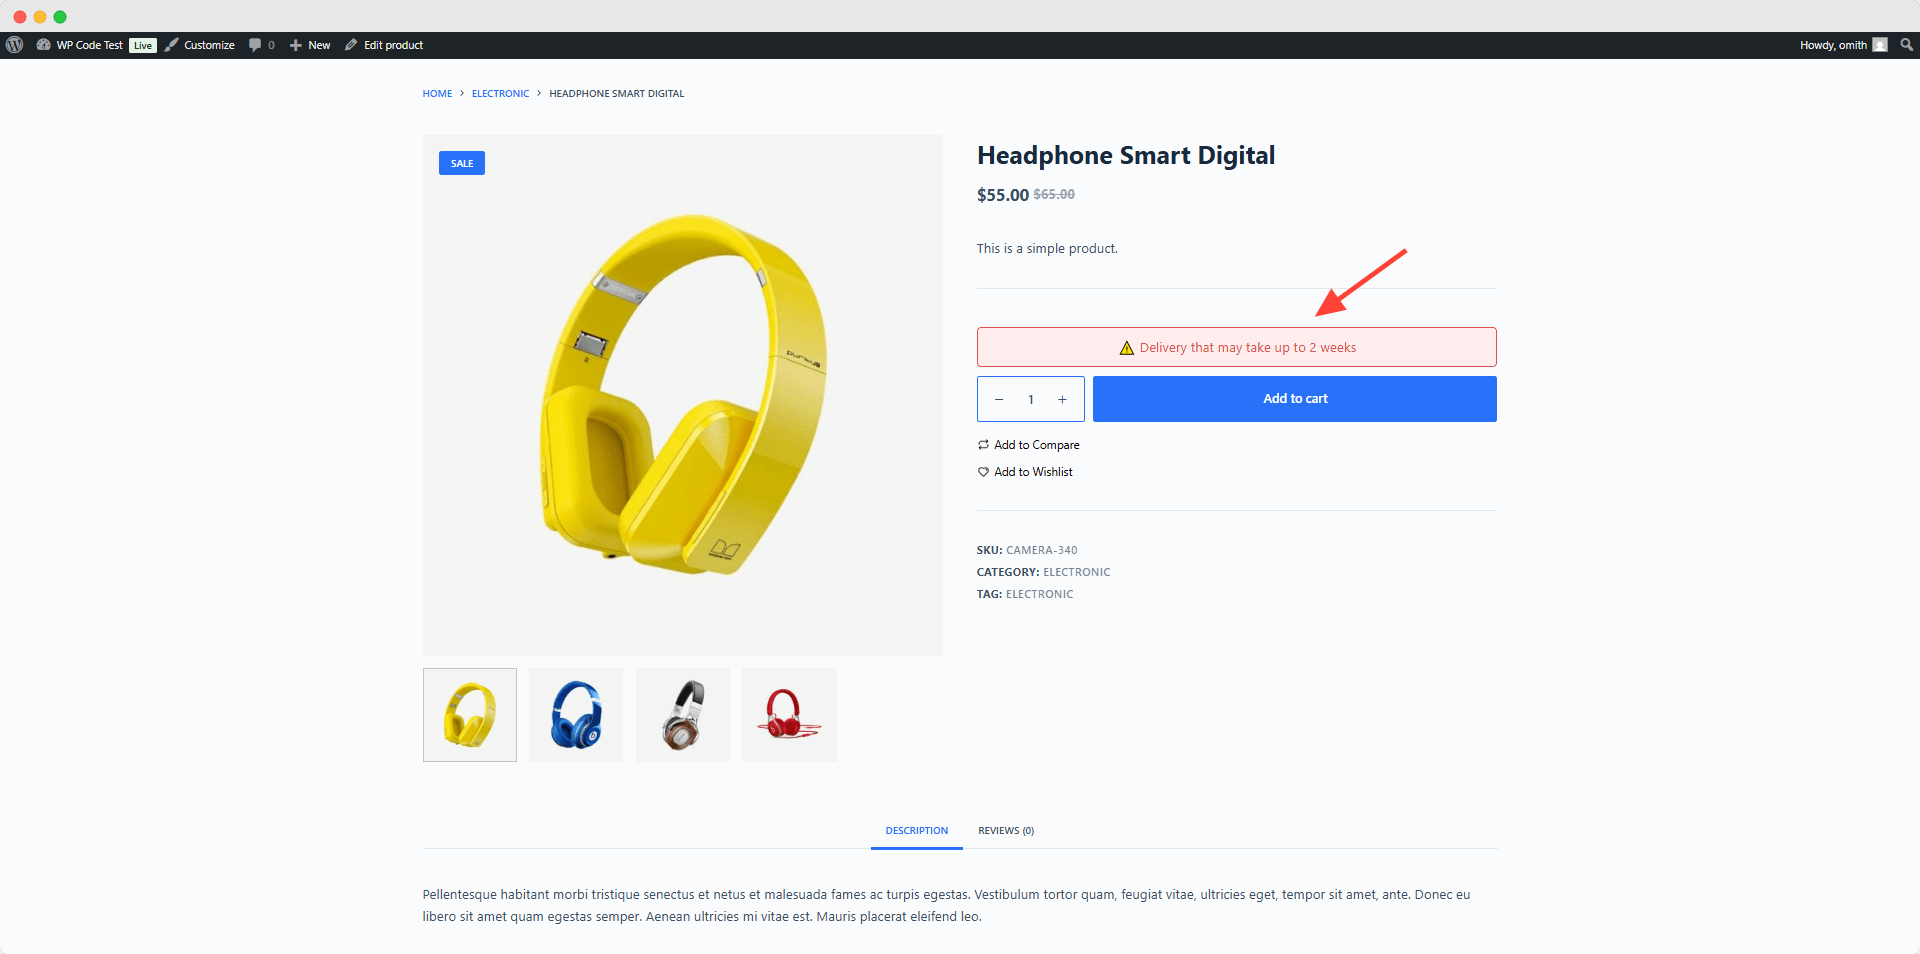
Bonus: How to Override WooCommerce Templates Using the WowStore Plugin
Now, let’s explore the smartest method to override the WooCommerce template: using WowStore, the most complete WooCommerce Builder plugin. It comes with premade templates for all essential WooCommerce pages and also allows you to create templates from scratch. So, let’s start exploring the capabilities of WowStore by creating and overriding the shop page template.
Get the first-ever WooCommerce Builder for Gutenberg. Get WowStore Now.
Step 1: Enable the Builder Addon
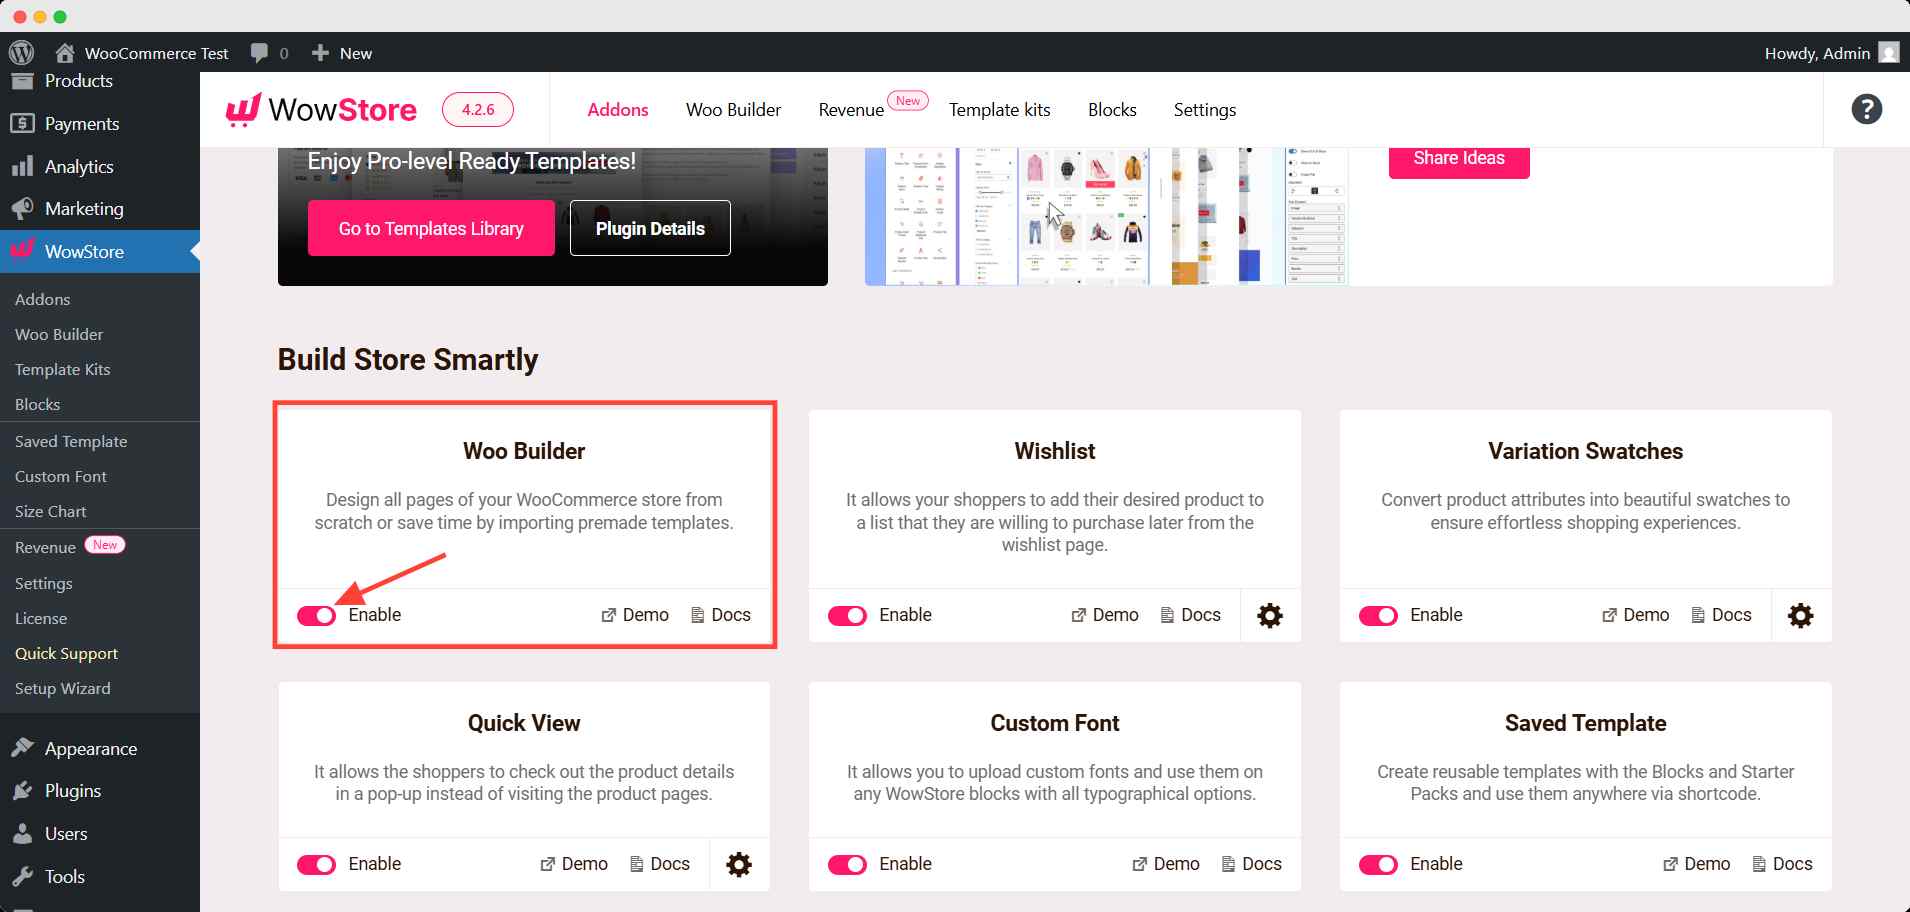
After properly installing the WowStore plugin, go to its addons. Enable the WooCommerce Builder addons, which allow us to create custom templates and replace the default WooCommerce templates.
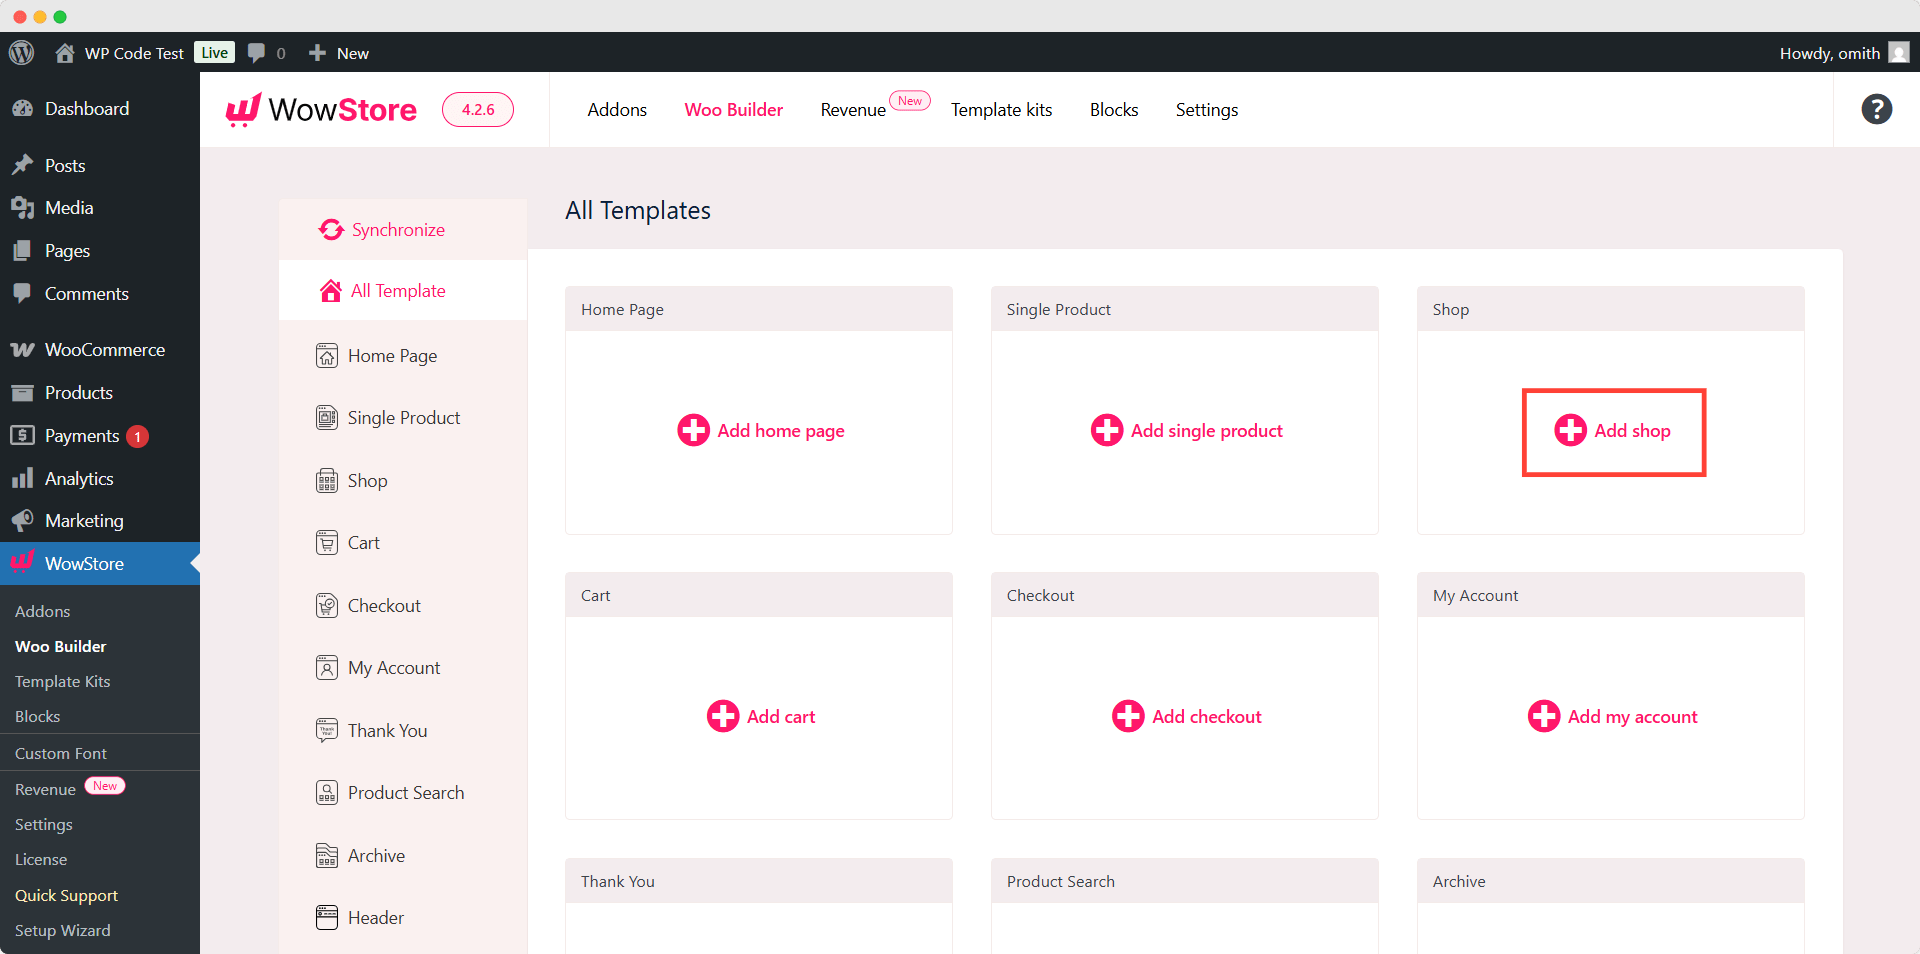
Step 2: Override WooCommerce Shop Page Template
Now, go to the WooCommerce Builder section of WowStore. Here we can see the template creation option for all WooCommerce pages. For now, let’s select Shop as we want to replace the default shop page template.
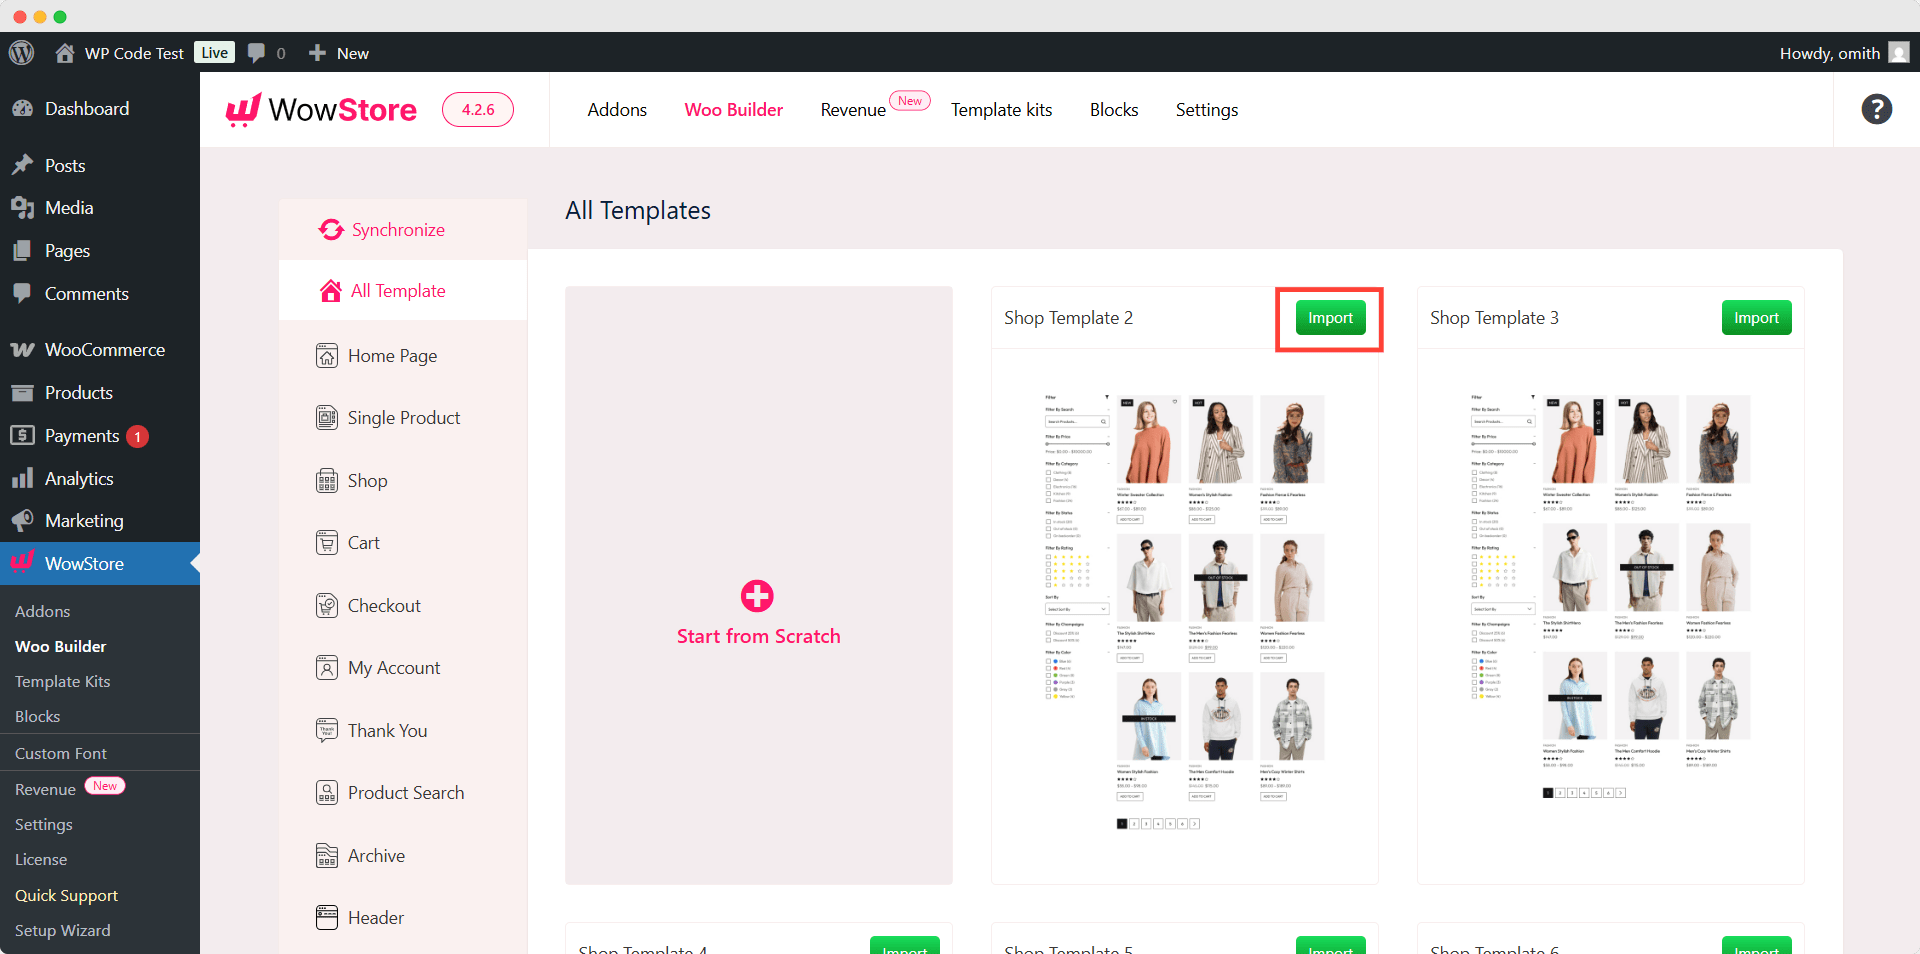
Here you can see that we can either start from scratch or choose a premade template. For now, let’s import a premade template.
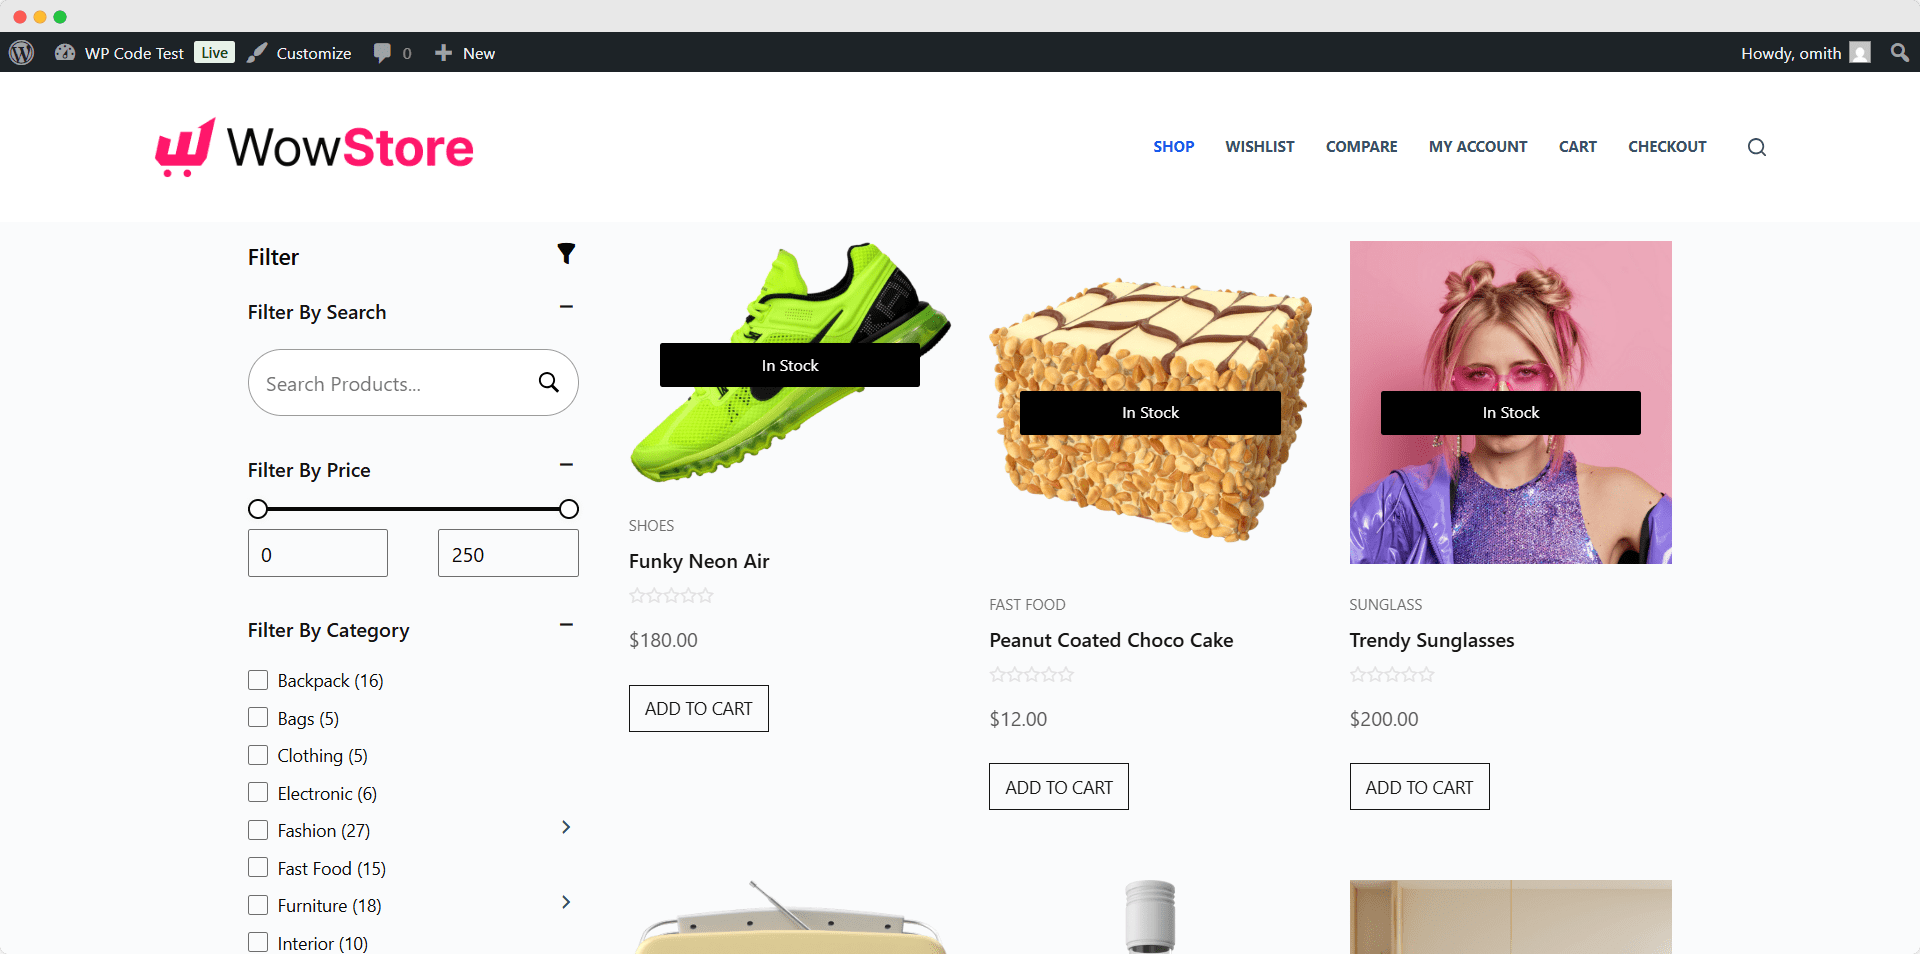
All templates of WowStore are built with its blocks. For the shop page, we have used a filter block and a product block. So you can click on them and customize the look to make them even better. Once satisfied, we need to publish the template and see how it looks from a user’s perspective.
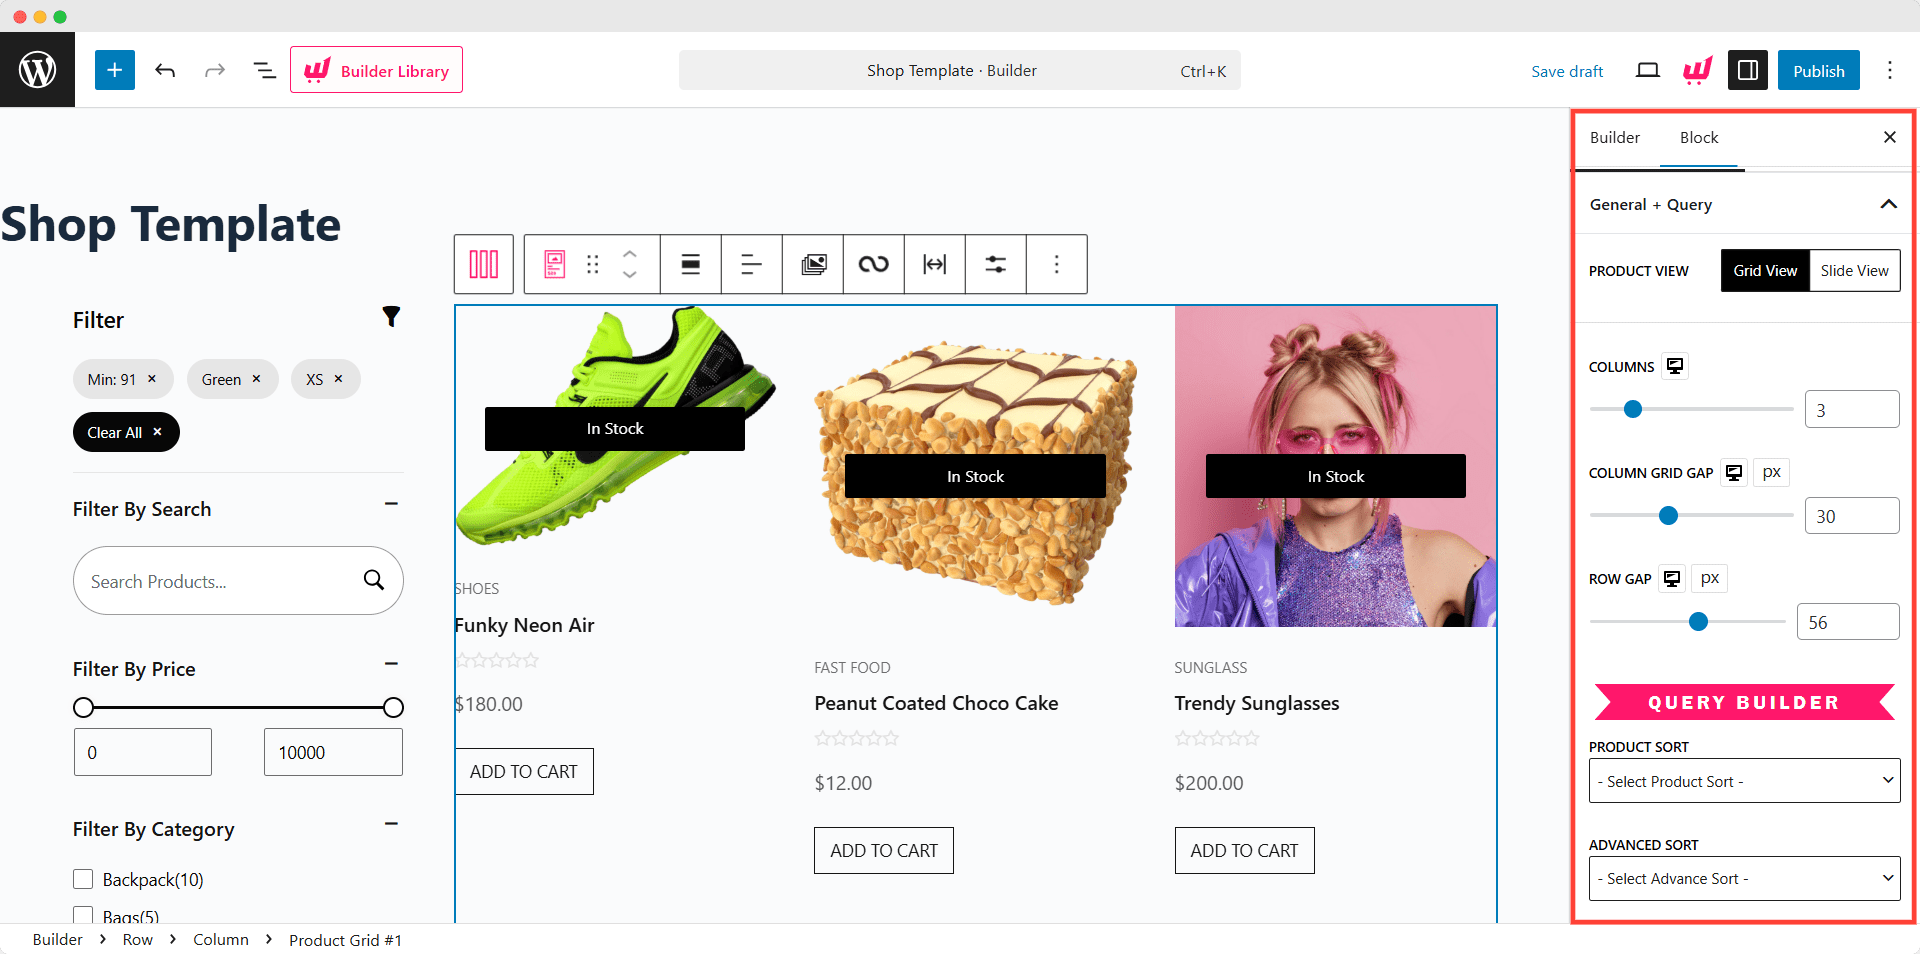
Here you can see that we have successfully overridden the default shop page template with a beautiful template that also has a product filtering option.
You may also like to read:
- Create and Customize WooCommerce Shop Page Template
- Create and Customize WooCommerce Product Page Template
- Create and Customize WooCommerce Category Page Template
- Create and Customize WooCommerce Cart Page Template
- Create and Customize WooCommerce My Account Page Template Page Template
- Create and Customize WooCommerce Thank You Page Template
Which Method Should We Use for Altering WooCommerce Templates
You may find it difficult to choose one, as all three methods are easy to follow. Let us guide you through choosing the best one to accomplish your goal.
Child Theme Method: This method is ideal for you if you want to make some small changes or add any basic elements. But you must have some basic coding knowledge. The best part is that your changes will not be removed once your theme or WooCommerce plugin is updated.
Direct Plugin Modification: Although this is a simple and straightforward way to make minor changes to custom codes. However, it is not ideal as the changes will be replaced when the WooCommerce plugin gets updated.
WowStore: If you want to customize the layout and the visuals, then WowStore will be a great choice. It comes with visually stunning premade templates and full customization freedom. And you also don’t need to have coding knowledge. However, you need to get its pro version to enjoy the full potential.
| Method | Ideal For | Coding Knowledge | Customization Flexibility | Update Safety | Limitations |
| Child Theme Method | Small changes, adding basic elements | yes | Moderate – Requires manual coding | Safe from theme/plugin updates | Requires coding skills |
| Direct Plugin Modification | Minor changes with custom code | yes | Low – Directly edits plugin files | Not safe – Changes lost on updates | Risky and not recommended |
| WowStore Plugin | Customizing layout and visuals | no | High – Visual editing with premade templates | Safe – Uses plugin templates | Full customization requires the pro version |
Final Words
That’s all about overriding WooCommerce templates. Now it’s your turn to choose the preferred method and accomplish your goal. We would like to know which method you are going for. You can also share your suggestions and feedback in the comment section below.
Get the first-ever WooCommerce Builder for Gutenberg. Get WowStore Now.