WooCommerce automatically creates Cart and all other essential pages. So what if you want to edit? Or, want to create and customize the WooCommerce cart page from scratch?
If you are using WooCommerce for some time you may already know that WooCommerce doesn’t offer many customization options. You may change the WooCommerce page designs by changing your theme. However, you still can’t get the full editing options. So that to do? How to Edit WooCommerce Cart Page?
If you want to edit WooCommercrce Cart Page, follow the below steps:
- Step-1. Install ProductX WooCommerce Blocks Plugin
- Step-2. Turn on WooCommerce Builder Addon
- Step-3. Create a New WooCommerce Cart Template
- Step-4. Customize WooCommerce Cart Page
- Step-5. Edit WooCommerce Cart Page
What is WooCommerce Cart Page?
WooCommerce Cart page, also known as the shopping cart is the page where all the desired products of shoppers are displayed on a cart table with prices and quantity. From this page, the shoppers remove products, increase or decrease the quantity and purchase the product by going to the checkout page.
How to Edit WooCommerce Cart Page
ProductX is now WowStore! We’re very excited to bring you this experience, packed with exciting features. Please note that the features, blocks, starter packs, etc. all work the same. If you have used ProductX, you’ll feel right at home with WowStore.
Now that, you know what is cart page and why we should edit it. Now, it’s time to explain how to edit the WooCommerce cart page. For that, we are going to create a custom WooCommerce cart page template using the WooCommerce builder addon of the ProductX plugin.
It sounds difficult and confusing? Actually, it’s not if you follow the below steps properly. So without further a do let’s get started.
Step-1. Install ProductX WooCommerce Blocks Plugin
As I have already mentioned, we are going to use the WooCommerce Builder addon for ProudctX to edit the default cart page of WooCommerce. First of all, we have to install the ProductX plugin. For that:
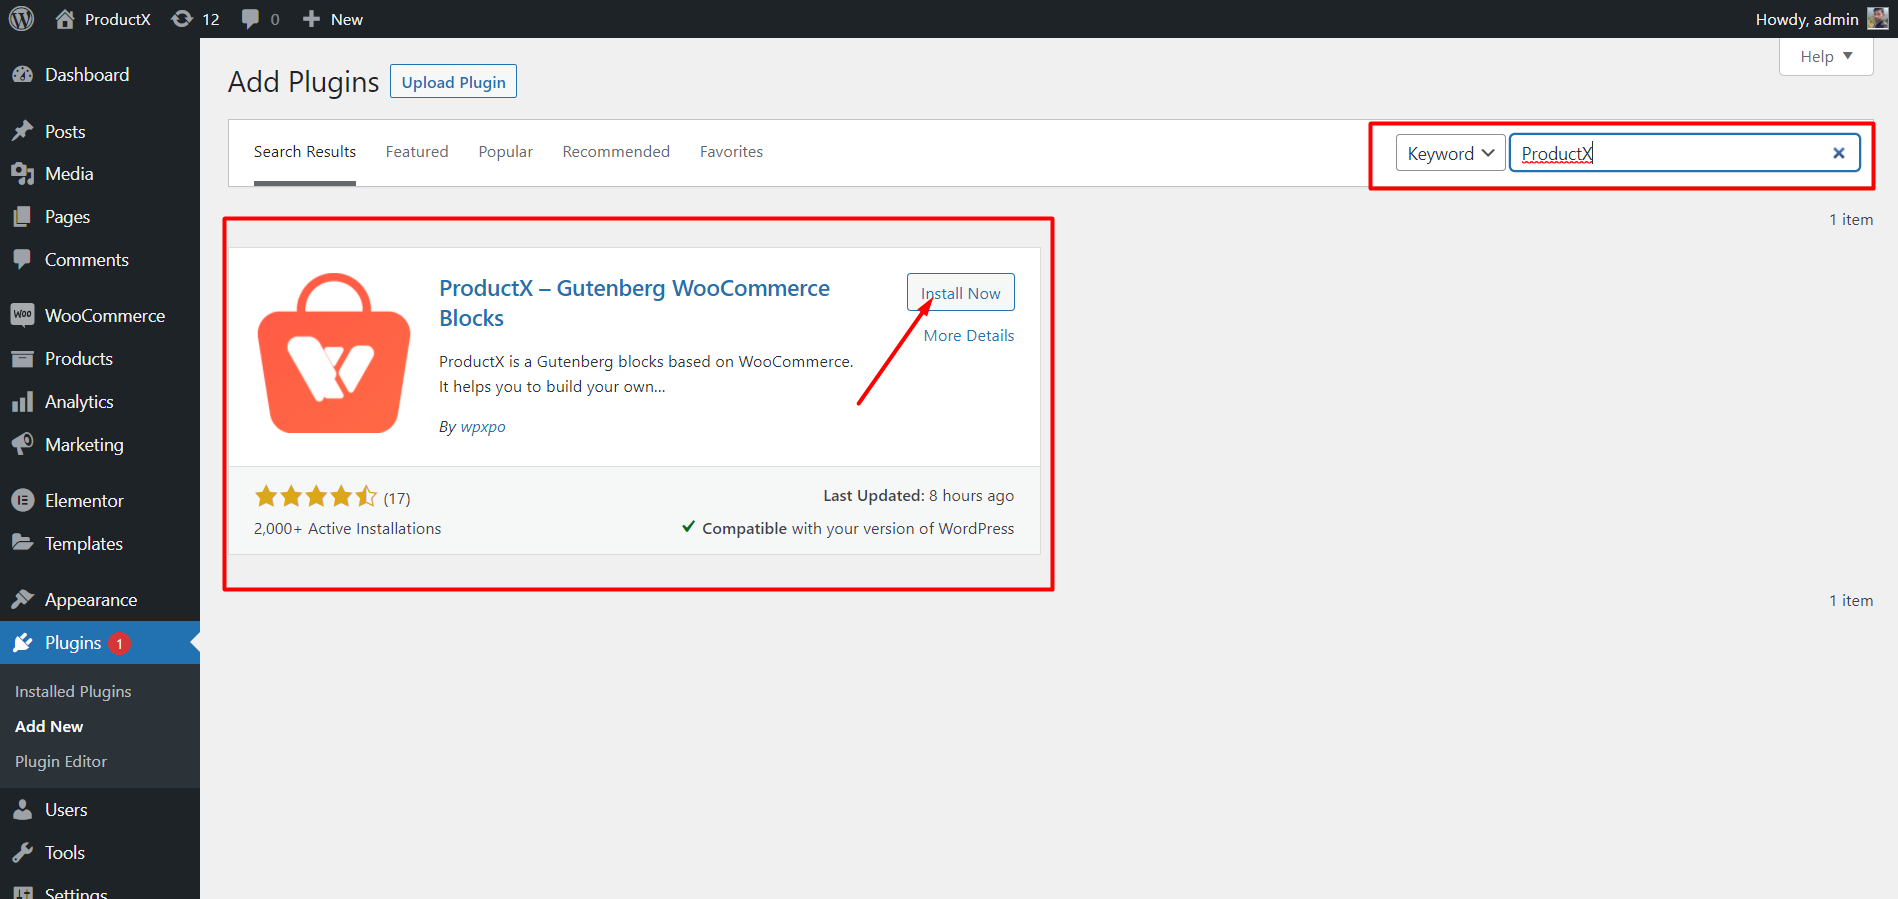
- Go to the Plugin section from your WordPress Dashboard.
- Type the plugin name “ProductX” on the Search Bar.
- Install and Activate the ProductX plugin.
Step -2. Turn on WooCommerce Builder Addon
WooCommerce Builder is an addon for ProductX. It helps to create templates for custom shop pages, archives, carts, and single product pages. To start using the template we have to turn it on. For that:
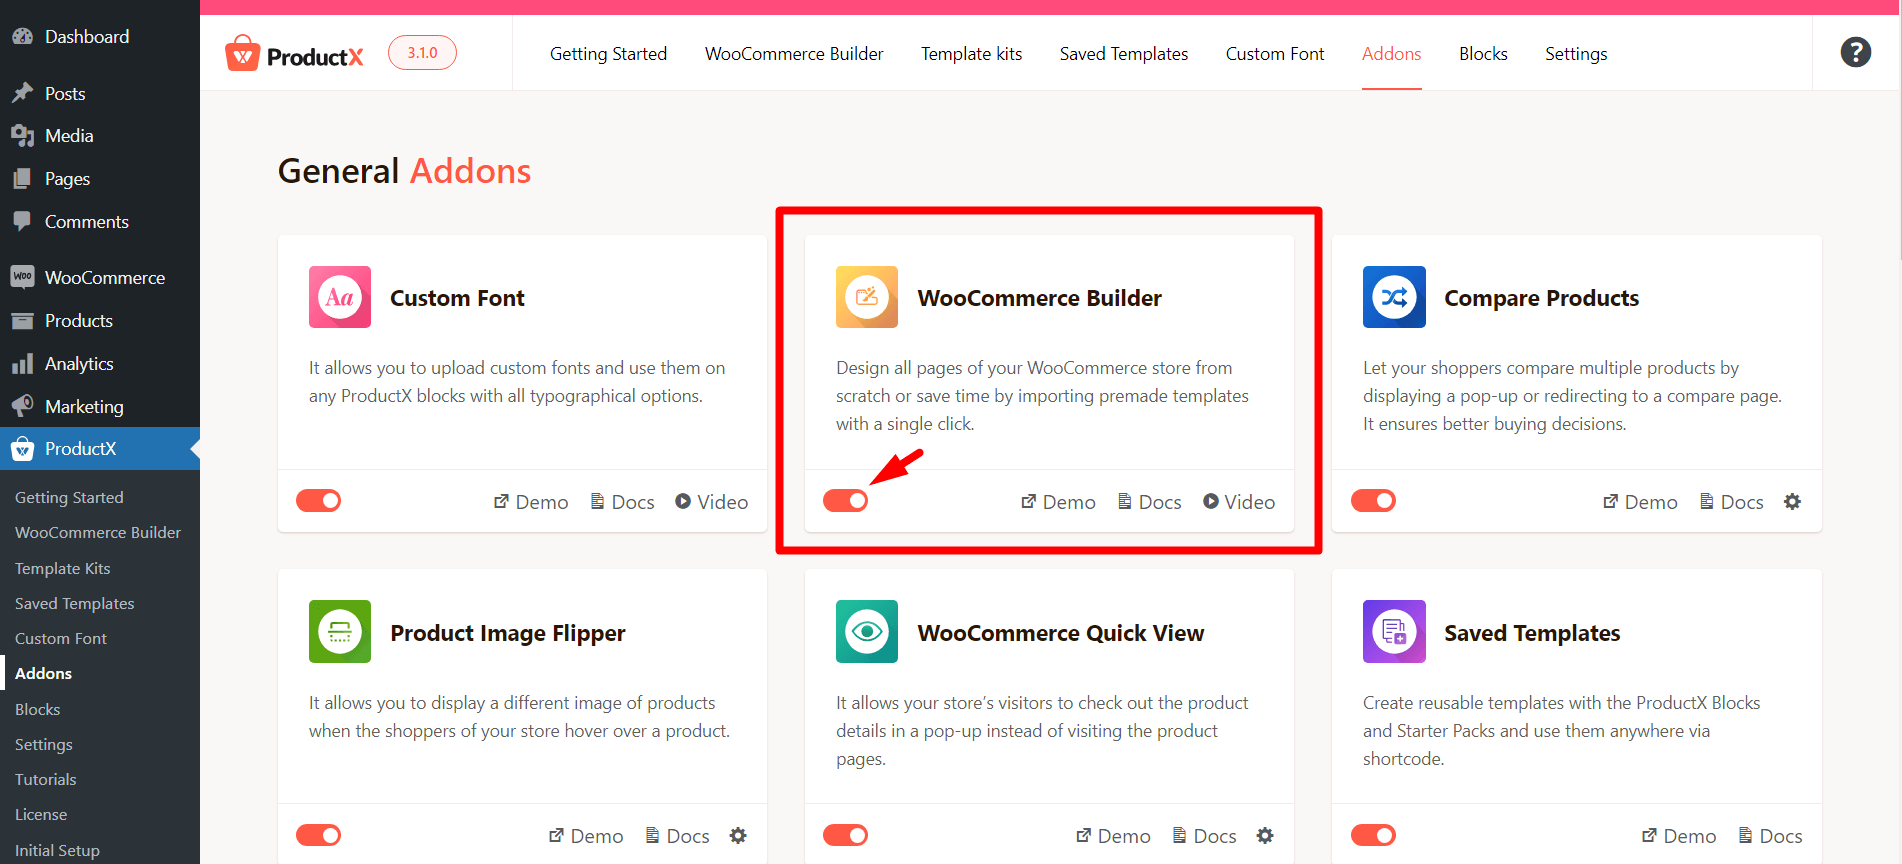
- Go to the ProductX section
- Click on “Addons” to go to the All Addons section
- From the All Addons list turn on Builder Addon
Step-3. Create a New WooCommerce Cart Template
After turning on the builder addon, we can start building custom woocommerce templates. For instance, we will be creating a WooCommerce cart template. For that:
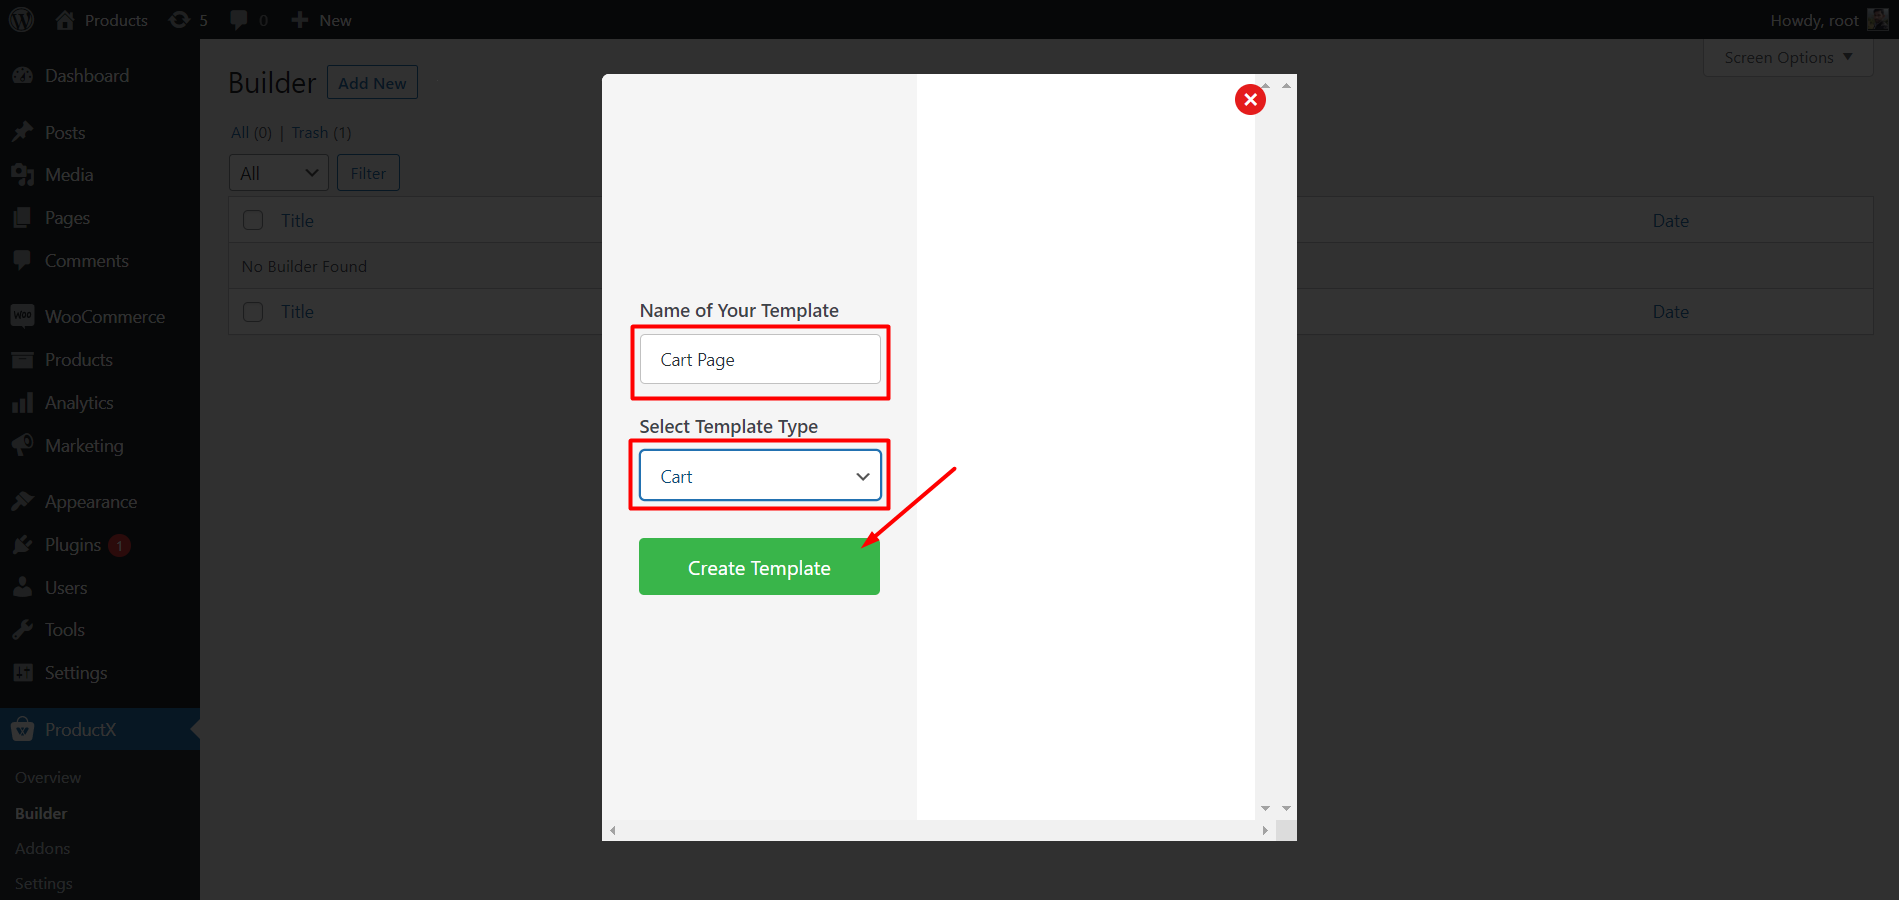
- Go to the Builder section from ProductX.
- Click on Add New.
- Add the Template Name.
- Select Cart from the Template type tab.
- Click on save and start editing the template.
That’s all, the new WooCommerce cart template is ready. However, if you go to the cart page it will be empty. Because we didn’t add anything to the template. We have to add the elements and customize them according to our needs.
Read More: Learn how to customize the add to cart button in WooCommerce
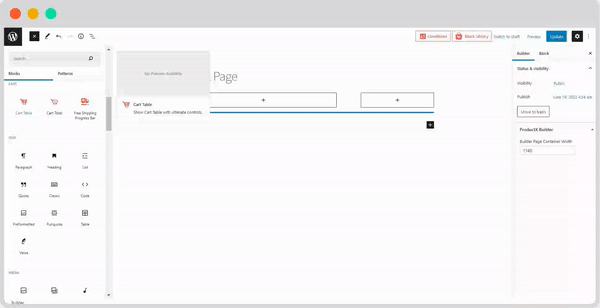
Step-4. Customize WooCommerce Cart Page
Now that you have created the custom cart page template, it’s time to customize it. The ProductX cart page builder comes with three new WooCommerce blocks with customization options. By which we can customize our WooCommerce cart page according to our needs. So let’s start adding the blocks to the cart template.
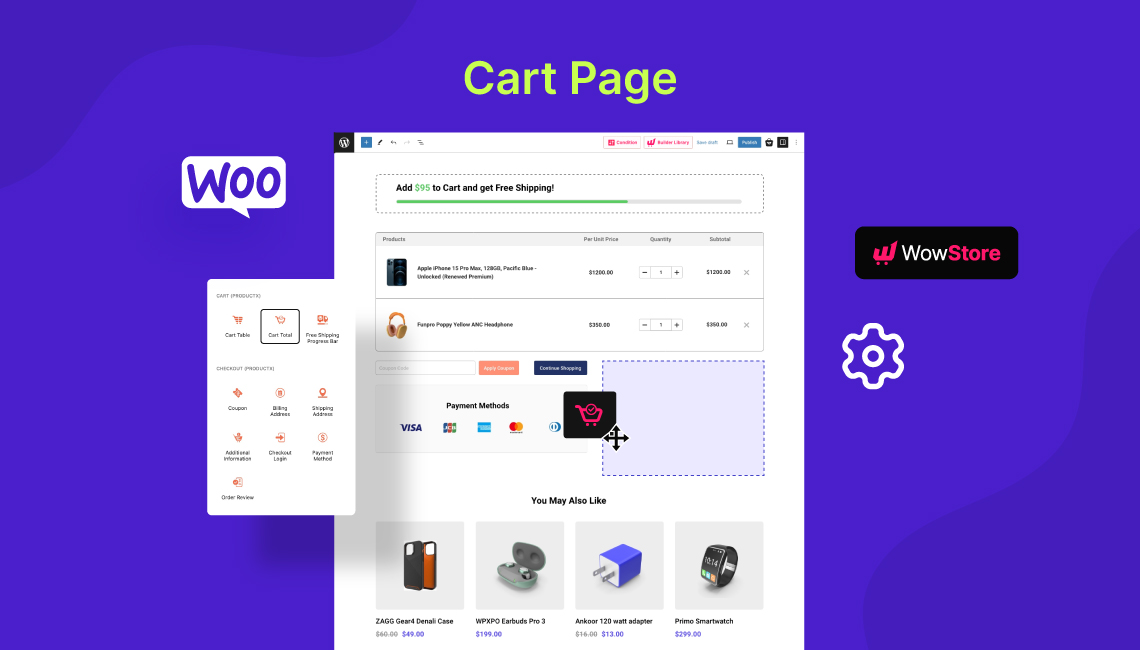
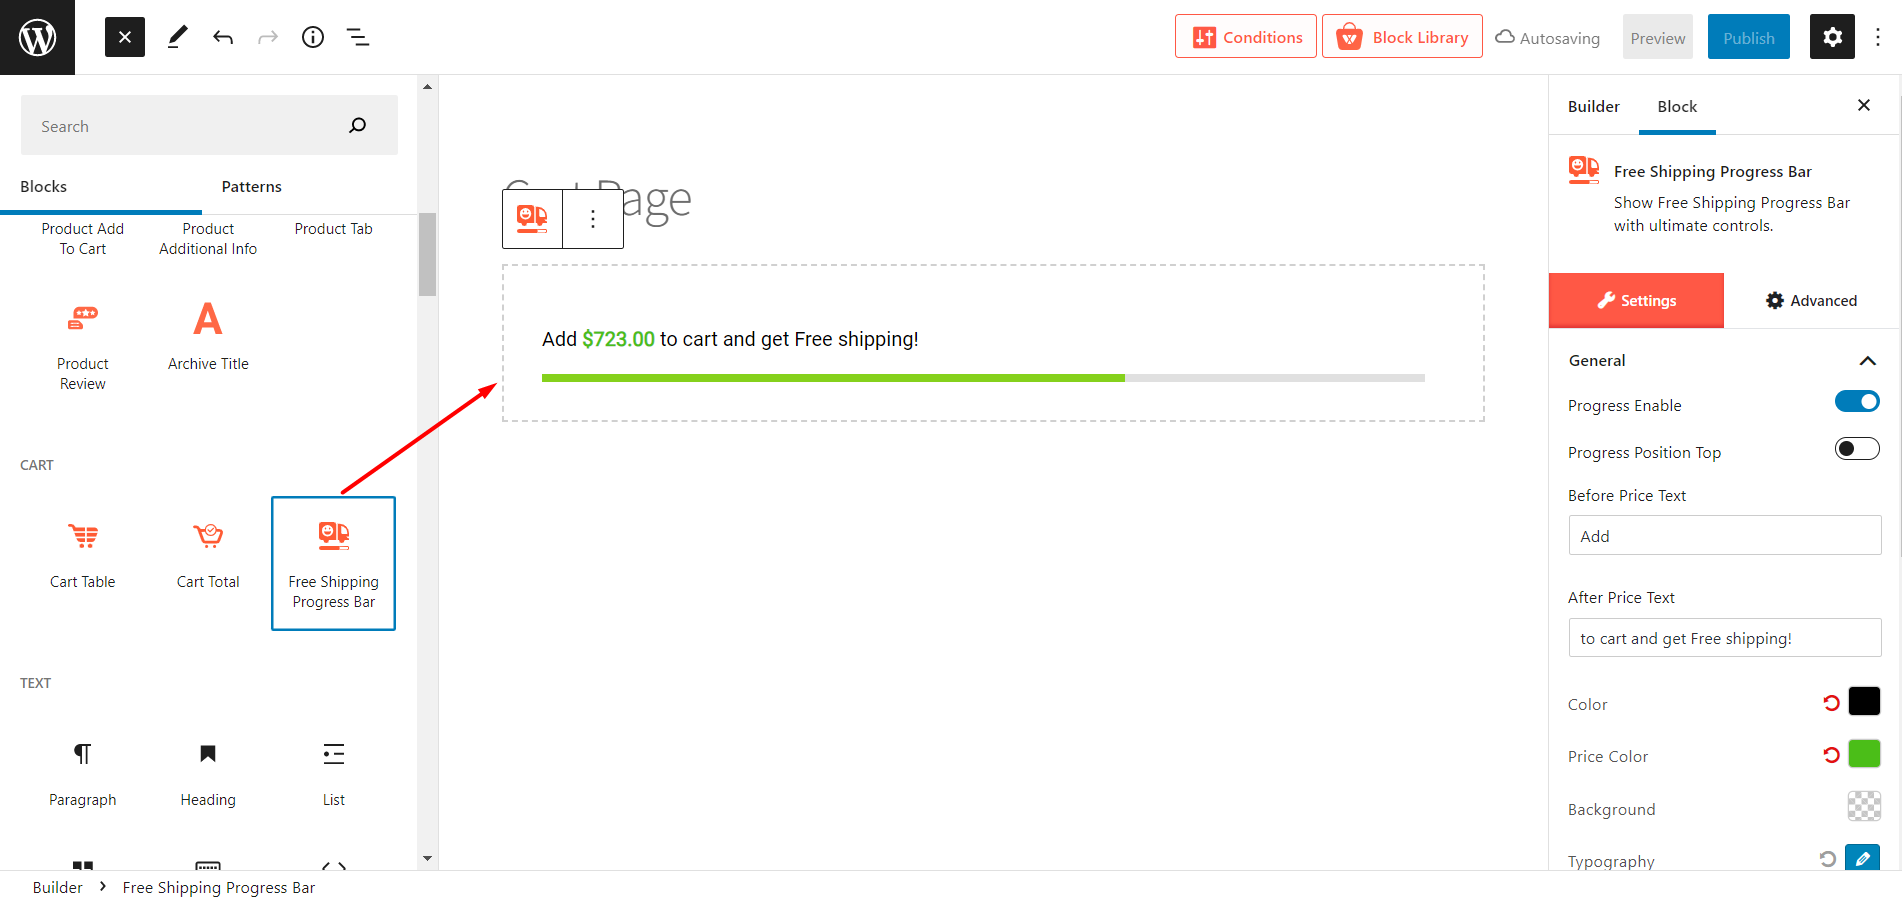
Add the Free shipping Progress bar
ProductX also offers a progress bar block along with all other blocks. But what is this progress bar represents?
You probably know that WooCommerce allows us to add a free shipping option depending on a minimum order amount. So that, the shoppers can enjoy free shipping by fulfilling the criteria.
With this feature, you can attract the shoppers to add more products to carts resulting increase in the average order value.
However, WooCommerce doesn’t let us display the minimum order amount for free shipping. But want to display it right? Don’t worry ProductX got your back. You can just add the Free Shipping Progress Bar addon to highlight it and encourage users to purchase the product.
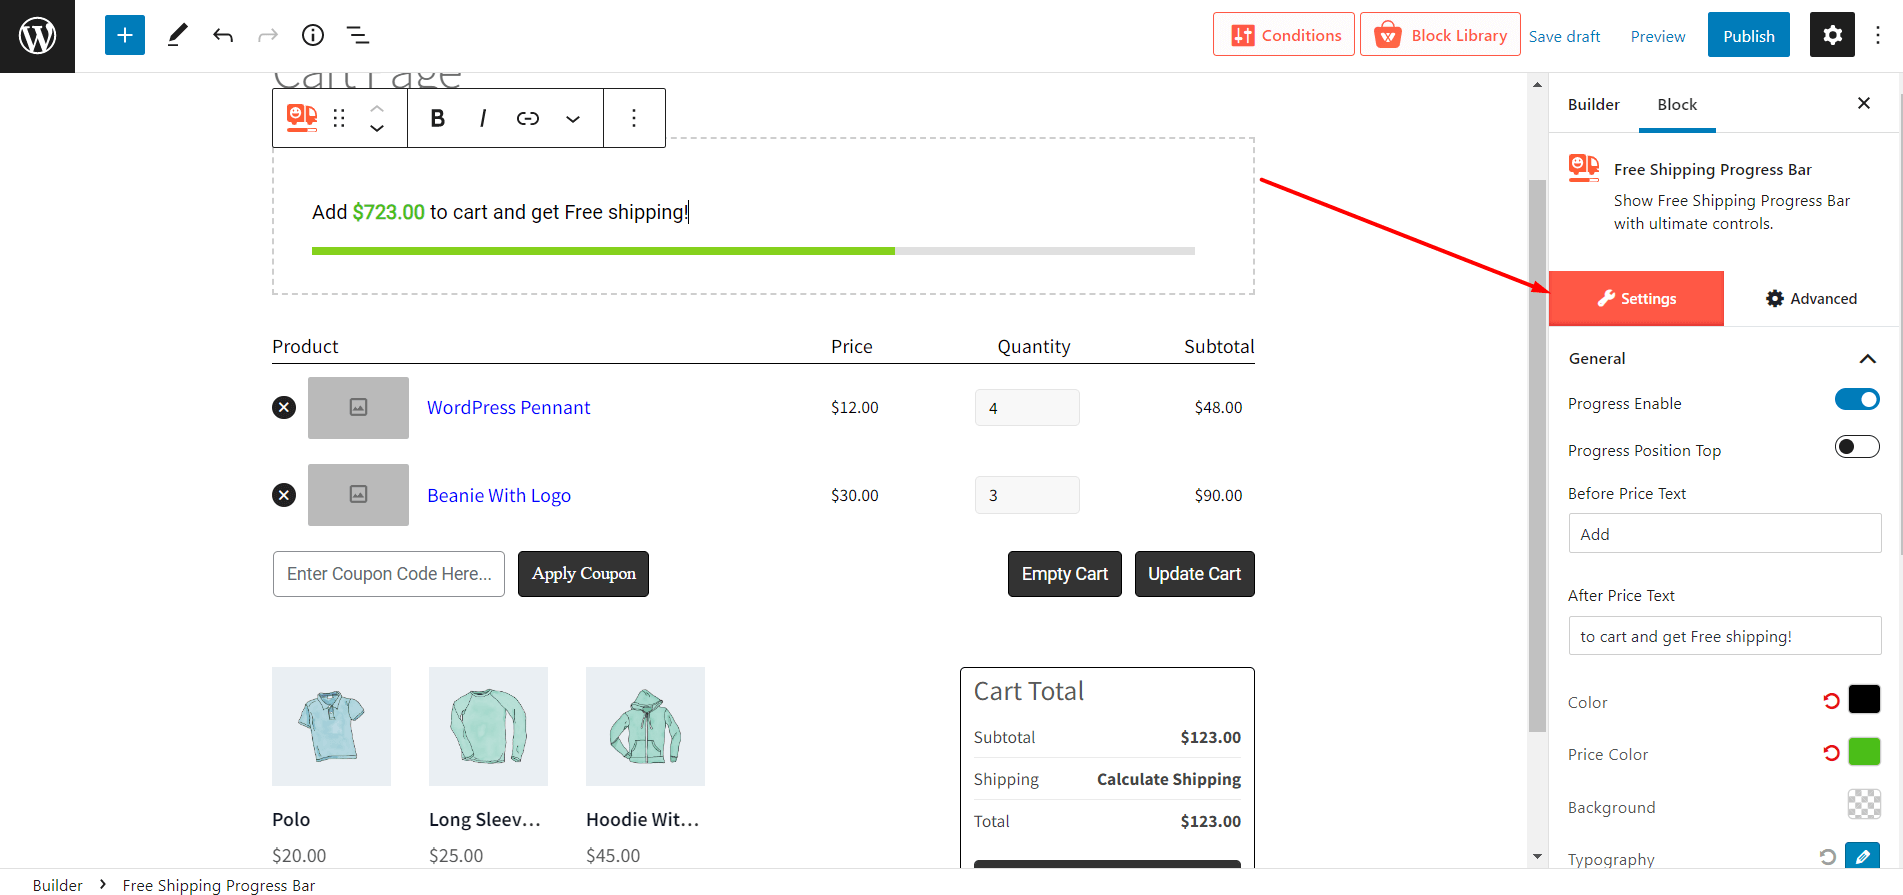
So, decide where you want to add the block and click on the plus icon. Then select the progress bar block and it will be added to your desired position. For instance, I am adding it to the top of the cart page. But as I said you can add it to any position on the cart page.
Add Cart Table
First of all, we have to add the cart table. For that, ProductX offers a cart table block. To add this block:
- While editing the cart template click on the plus icon
- Scroll down and click on the cart table of block
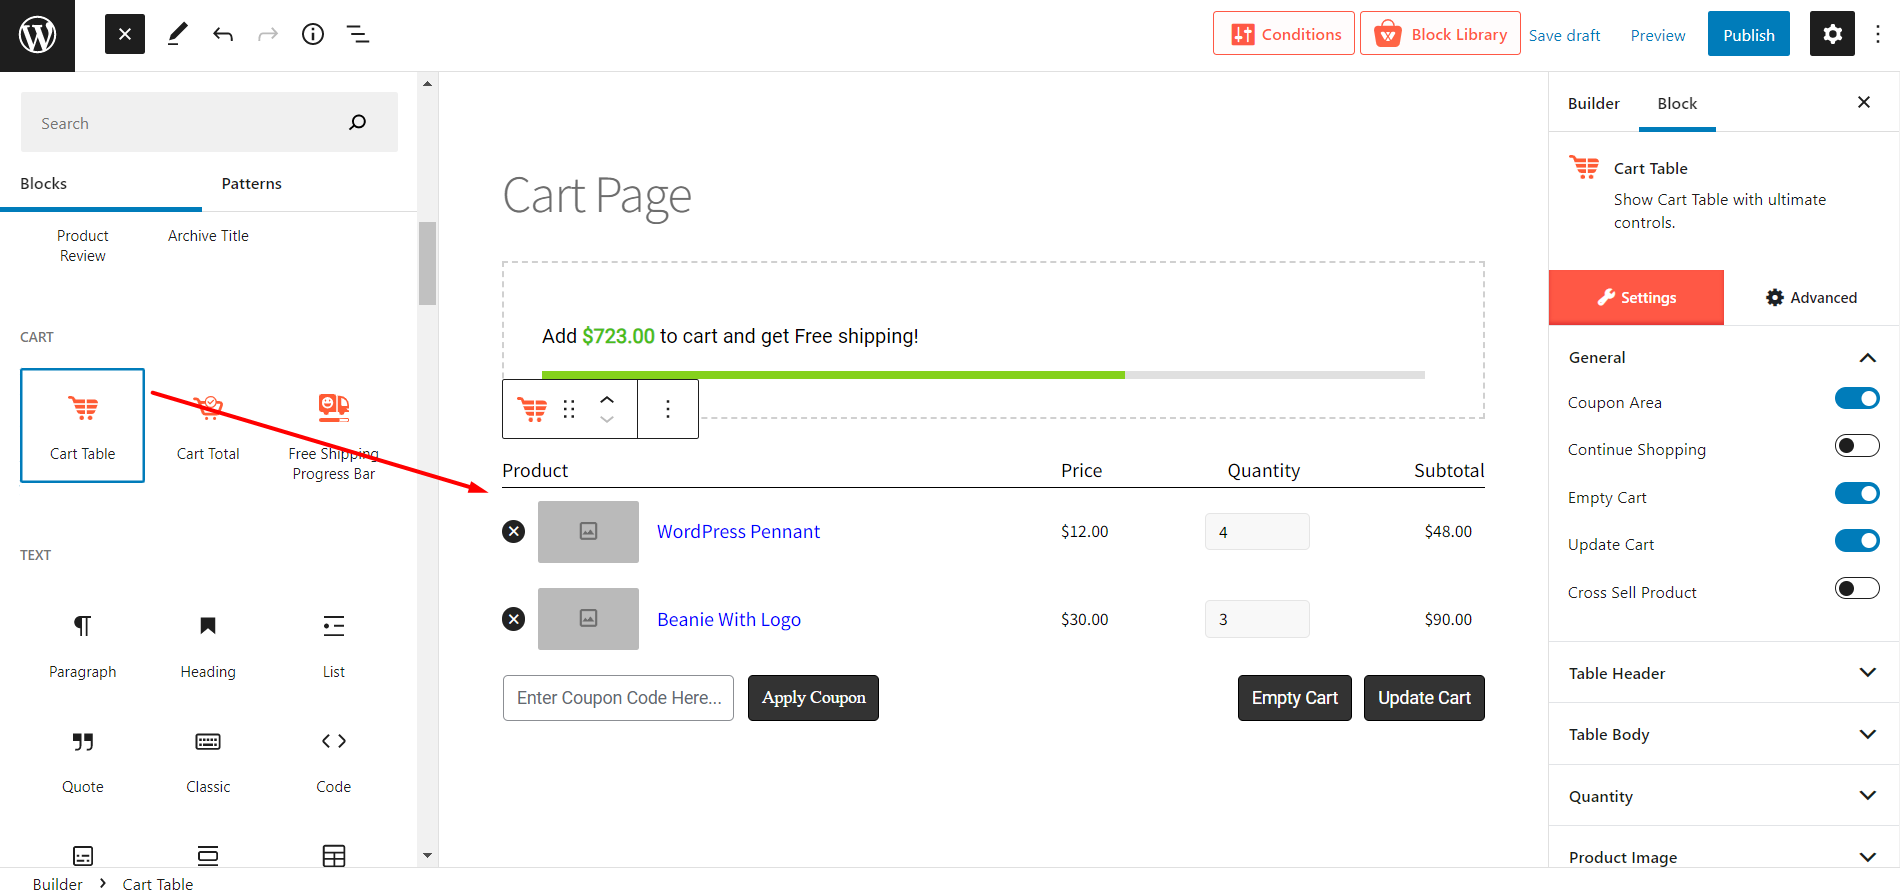
After clicking on the block it will be automatically added with some dummy content. Don’t worry the content will be replaced with the exact product information after adding products to the cart. You will have all the essential buttons that are required for an idle cart page. And, of course, you can also edit all the elements according to your need. We will get into that in a bi. For now, let’s continue customizing the page.
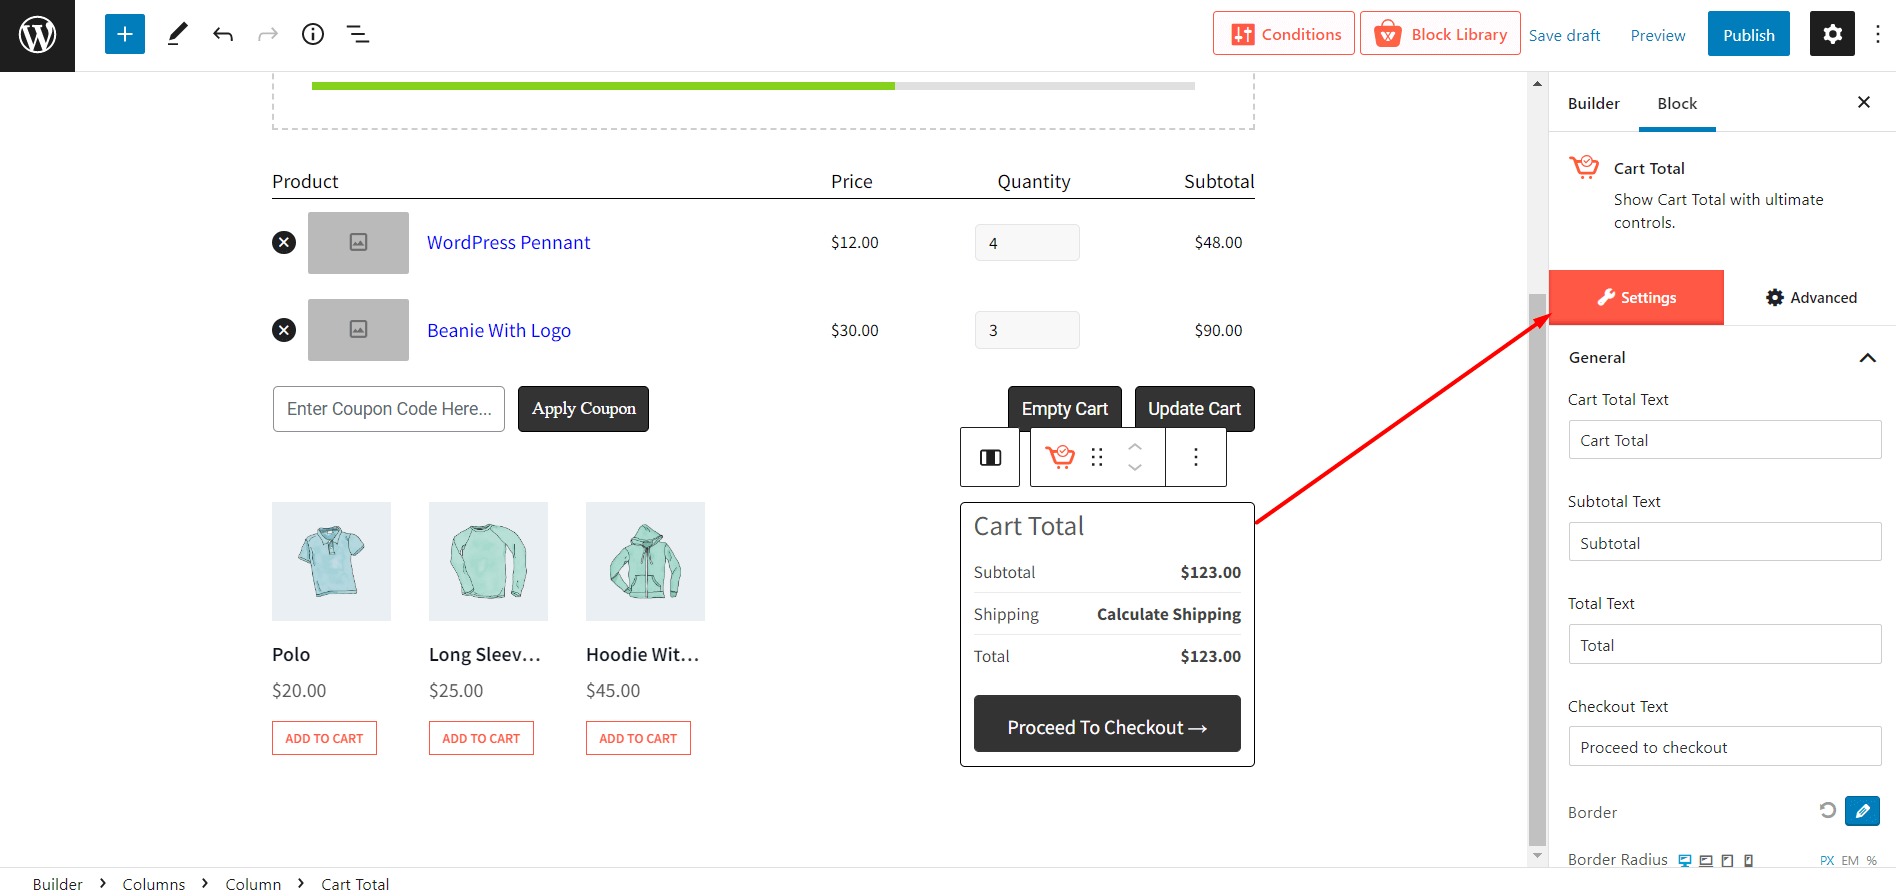
Add Cart Total
After adding the cart table we also have added the cart total right? Don’t worry ProductX also offers cart total block. As we are editing the template using Gutenberg, we can organize the blocks according to our needs. For instance, I will add the cart total block following a standard layout. You can also follow it if you wish to.
- Click on Plus Icon
- Add a Gutenberg Column block with a 70/30 ration
- Then add the cart total block to the right area of the column
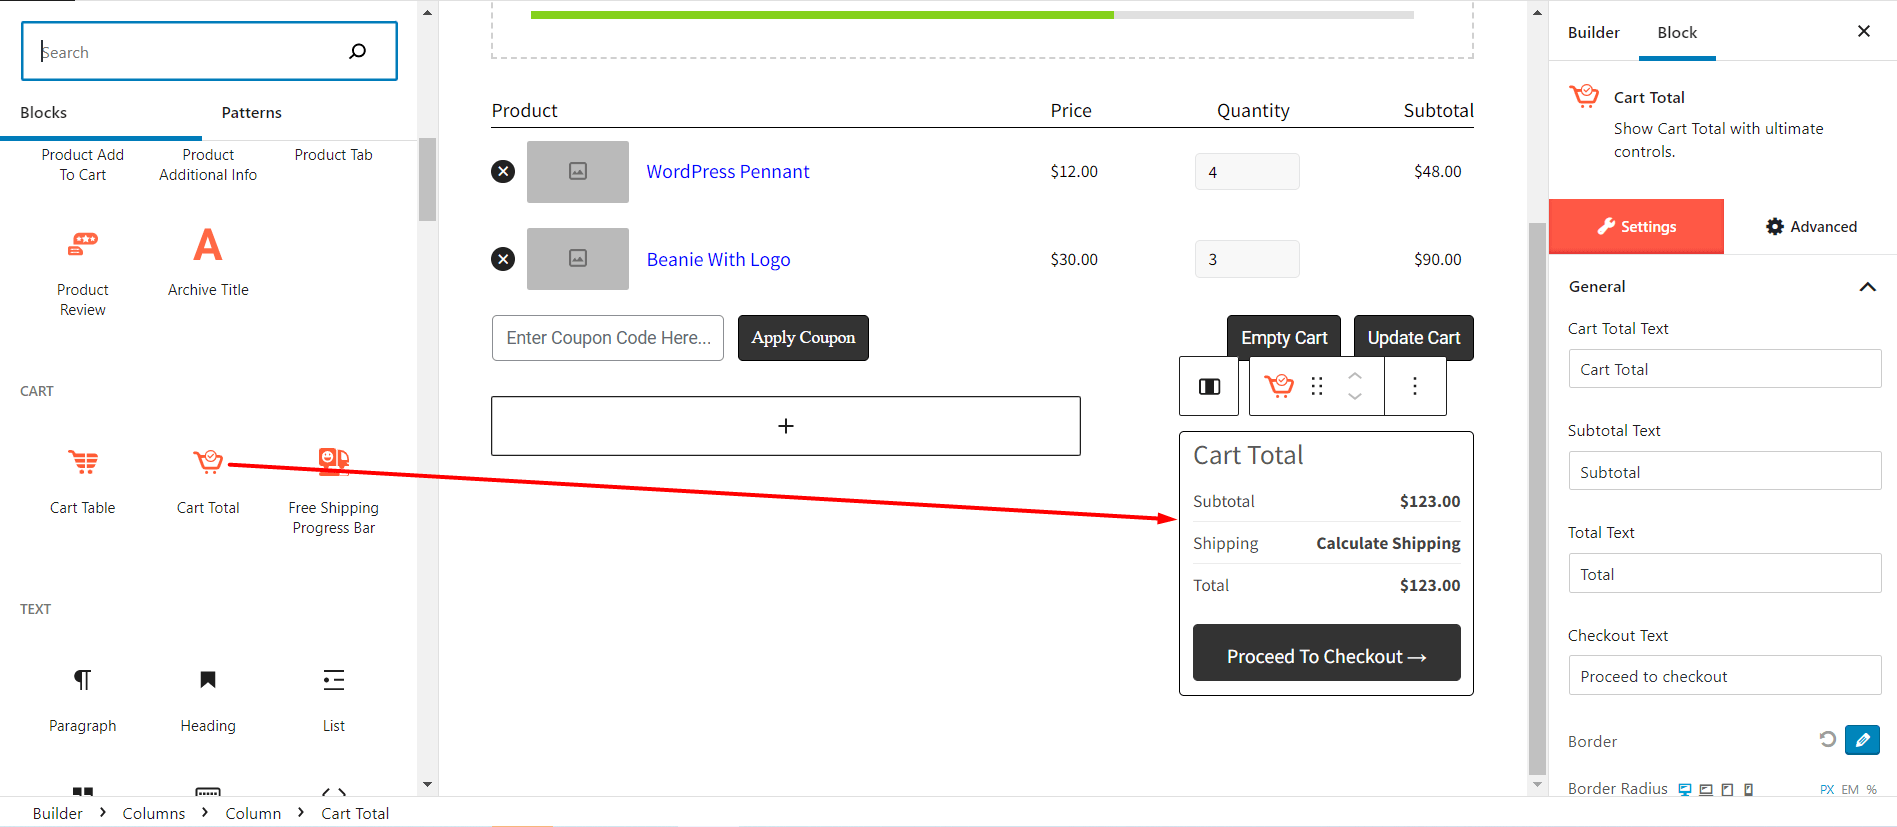
Now, you can see that the cart page is following a standard. However, you can organize it differently as well.
The Cart Page customization has been completed. Now click on the publish button. Add some products to the cart and check the real-time view of the cart page. Keep reading the blog posts to check out the ways of editing the cart page.
Display Cross Sell Products
As you may know, the default WooCommerce cart page displays cross-sell products. You can do the custom cart page as well.
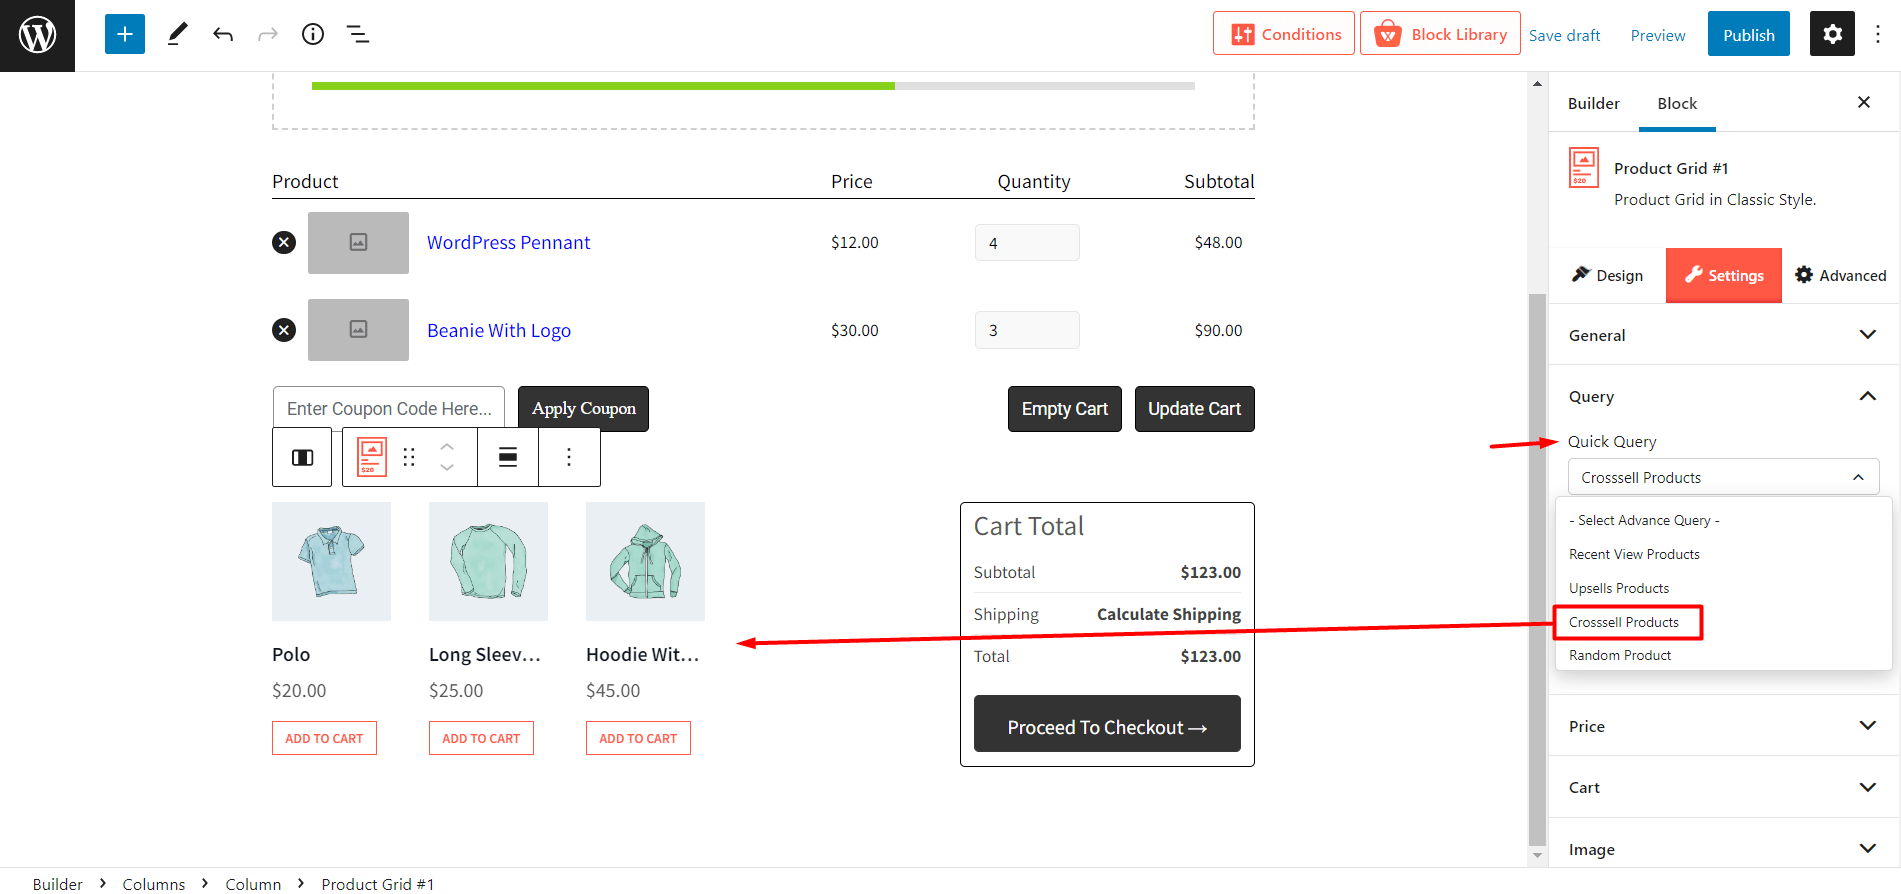
However, you can also add Product blocks of PostX and sort the products as cross-sell using the product query feature.
Step-5. Edit WooCommerce Cart Page
Now it’s time to discuss the main part of this blog post: how to edit the WooCommerce Cart Page. The ProductX development did a great job by enabling options to edit all the elements of the cart page blocks. Because without the editing the option the custom cart page doesn’t make any sense.
So, without further ado let’s start exploring the editing options.
Editing Options of Cart Table
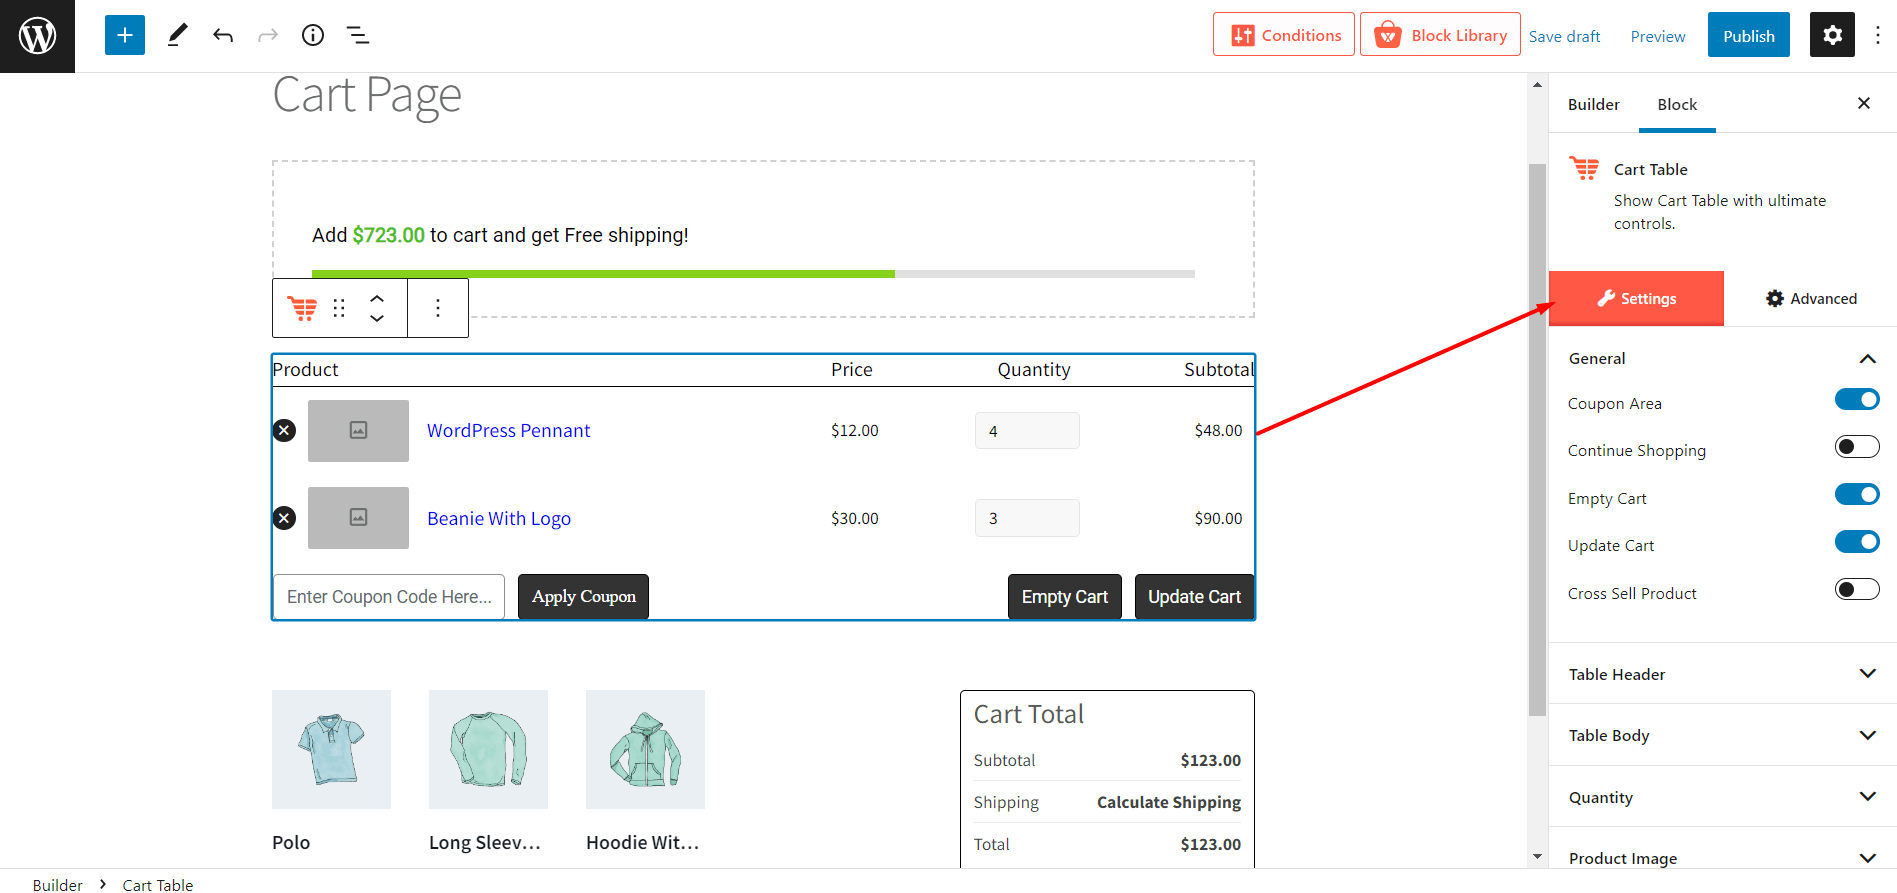
After adding the cart table block, you will see an editing option. First of all, you can hide or unhide the button from the general settings. If you enabled any button. there will be a dedicated for that button from there you can make customize all elements that including text colors, background colors, hover colors, typography, padding, etc.
Edition Options of Cart Total
The Cart Total block also comes with all sorts of editing options including typography, text color, background color, hover color, padding, etc.
Edition Options of Free Shipping Block
The Free shipping block edition options start with enabling or disabling and position adjusting the progress line. Then you can also change the text, color, typography, border radius, padding, etc.
Pro Tips
Implement an Exit Intent popup on your cart page to reduce abandonment rates. WowOptin helps you to be sensitive, so you never miss out on potential sales. Don’t let those customers slip away—take action now!
Conclusion
That’s all about creating and editing a WooCommerce cart page. Now, you can start creating your desired cart page with style and encourage shoppers to add cross-sell products to the cart. Feel free to comment below if you face any difficulties while using the ProductX Cart Builder.