![WordPress Robots.txt [How it all Works]](https://www.wpxpo.com/wp-content/uploads/2021/12/Wordpress-banner-jpg-1.jpg)
Introduction
If you’re on WordPress, then it’s almost certain that you’ve heard about robots.txt for WordPress? But the question remains:
Do you understand what WordPress robots.txt does to your website? Do you need to understand the ins and outs of the robots.txt file and how to correctly update it?
First of all, you do need an understanding of the robots.txt file if you want to be on top of your Search Engine Optimization or SEO efforts.
Second, In order to get proper results, you will need to understand how it all functions and how you can use it to your advantage. In short, knowledge on manipulating the WordPress robots.txt file will not go to waste. It will come in handy when you’re thinking of a long-term SEO plan.
Today’s discussion will be a long one [Sorry about that, it’s for your own good!]. We’ll be exploring what robots.txt is and how it works. Also, we’ll be taking a look at how you can manipulate it and get results. Finally, we’ll have a list of super important frequently asked questions; here we’ll be talking about important aspects relating to WordPress robots files.
It’s time to get started. We hope you enjoy this one!
WordPress Robots.txt [What is it and why does it matter?]
Now the term robots.txt may sound odd to those who are hearing it for the very first time (we don’t expect everyone to know about this!). But in order to understand what robots.txt is, you will need to understand what ‘robots’ are; they are basically entities (otherwise known as crawlers) that go through the contents of your website.
But why would you need ‘robots’ to ‘crawl’ your website in the first place?
It’s simple. Your content needs to be visible to the search engines. This way, when someone searches for a topic you discussed, it can appear before them.
In short, ‘robots’ or ‘bots’ go through your web content to allow search engines like Google, Bing, and others in order to rank the huge number of pages to appear on the internet.
How necessary is it?
It should be obvious by now that bots are necessary for search appearance [meaning your webpage may not appear on search results if the bots didn’t crawl the page]. So, it may appear to you as a necessary thing.
However, nothing’s perfect!
There may be pages on your website that are not fit for the search results. There may be nothing on those pages. Naturally, you’d want the bots to ignore the page and index pages of your WordPress website with relevant information.
It’s one of the very reasons why you don’t want robots/bots to have a free reign, you definitely want some form of control over the robots.txt.
*** The robots/bots exclusion standard in the ’90s is a result of the user’s urge to control what happens with robots.txt (naturally to control what pages needed had to be crawled and be visible to search pages).
The standard is an open call to manipulate the robots.txt file and take control of the search visibility. In short, you had control over what pages the bots can crawl, restrict their access to certain WordPress pages, add rules to their directives.
In short, you should care about WordPress robots.txt for the following reasons:
- If you want specific pages to index, then you can optimize the bots to crawl those pages and restrict them to the ones that don’t need indexing.
- Make changes to directives so that only the bot focuses on the most relevant pages.
- Free up server resources [make your servers faster] by blocking/optimizing bot directives.
How to Control your website’s Indexing?
You can easily control your WordPress site’s indexing via various WordPress robots.txt plugins [more discussion on that later on]. However, the established practice is to use the ‘noindex’ directive. But you can also do so via the header in the HTTP response.
What happens if the WordPress robots.txt cannot access a certain page?
If this happens, then the page can appear on Google search results.
Let’s say the robots.txt [Googlebot, bingebot, etc.] is somehow blocked. So, even if there is a ‘noindex’ directive, chances are the bots won’t be able to see it. So, even if the page is restricted via ‘noindex’ it can still appear in the Search Engine Results Page.
According to Google’s webmaster prodigy analyst John Mueller, a page that blocked robots.txt can still appear on the Search Engine results page. Simply because if someone links to that page, in reality, there’s no way to understand whether or not the page needs indexing. So, the chances of it appearing in the Google Search Results are there.
However, if someone uses the ‘noindex’ directive, Google will entirely leave that page alone. So, that page will not be indexed.
In short, disallowing the robots.txt isn’t a full-proof solution. You may want to use the ‘noindex’ directive instead to be on the safe side.
How to use the ‘noindex’ for restricting bots?
There are 2-ways you can implement this. You can use a meta tag, or you can use it in the HTTP response header:
Using ‘noindex’ in the meta tag
You can place the following meta into the <head> section of your page:
<meta name="robots" content="noindex">
In case you want to restrict only Google bots/crawlers, you can use the following in the meta tag:
<meta name="googlebot" content ="noindex"> ***Take note that different search engine crawlers/bots may see the directive differently. So, there is the ‘very’ slight possibility that the page may still appear in search results [for different search engines].
Using ‘noindex’ in HTTP response headers
You can use response headers in files like PDFs (Portable Document Format), images, and video files. Here’s an example using the ‘X-Robots-Tag’ :
(...)
X-Robots-Tag: noindex
(...)
WordPress robots.txt Examples [How to use and update robots.txt file in WordPress?]
In general, WordPress creates a robots.txt file. You don’t have to do any excess tinkering to create it on your own. If you have a WordPress site, all you have to do is go to :
https://yourdomain.com/robots.txt
You’ll see a virtual file. So, you won’t be getting any customization options just yet. You will need to create a physical file to make changes.
We will now go through the steps as to how you can update WordPress robots.txt file. We’ll be showing you the manual way as well as how to use robots.txt with plugins as well:
How to use Robots.txt with the Yoast SEO Plugin?
If you’re running Yoast, then follow the steps to make changes to the robots.txt directives:
- Go to SEO>Dashboard>Features from your WordPress dashboard.
- Toggle Advanced Settings Pages: [turn it on]
- Once enabled, Go to SEO>TOOLS
- Then click on File Editor

- You’ll now be given the option to create a robots.txt file.
- Click the button to edit the robots.txt file directly from the interface.
You can now edit the bots’ directives using the Yoast SEO plugin.
How to Edit Robots.txt using the Rank Math SEO Plugin?
You can create a robots.txt file in the WordPress dashboard using RankMath (by using a virtual file). But take note that You’ll need to delete the robots.txt file from the website’s root folder using the FTP client.
In order to use the robots.txt with Rank Math, WordPress Dashboard>Rank Math>General Settings>Edit robots.txt.
*** Rank Math automatically sets rules/directives to your WordPress robots.txt file. You can edit this code from the text area in Rank Math. Then you can save the changes.
Adding Rules to Robots.txt file
- Robots.txt file can have one or more groups; each group consists of multiple rules.
- Each Group begins with a ‘User-agent’ and specifies which directories or files against the agent can/cannot access.
- By default, a ‘User-agent’ can crawl any page.
- Rules/directives are case-sensitive.
How to Edit Robots.txt using All-in-one SEO?
You can create and edit the robots.txt file from the plugin as well. However, you may need to delete the root folders robots.txt to use the plugin’s functionality.
In order to manipulate the robots.txt with the All-in-one SEO plugin, Go to All in One SEO> Feature Manager>’ Activate ’ Robots.txt feature.
Once you’ve done this, you can have access to the robots.txt file directly from the menu of the All-in-one SEO plugin.
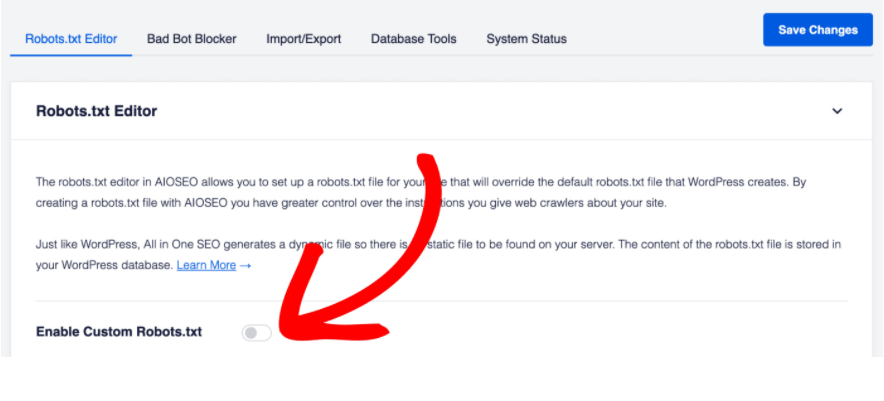
How to Edit Robots.txt file using SEOPress PRO?
If you’re using SEOPress Pro, then you need to:
- Go to SEO from your WordPress dashboard.
- Toggle Robots.txt .
- Once it’s ON, you can click on ‘Manage’.
- Finally, check ‘Enable Robots.txt’.
Once you’ve done this, you can add rules to the robots.txt file directly from the plugin. It’s very easy to implement the commands.
***If you have a physical robots.txt file, then chances are your plugin’s robots.txt will not bypass it in any way.
How to Manipulate Bots Using Squirrly SEO
For changing the bots directives via the Squirrly SEO plugin, you need to:
- Go to Squirrly SEO from your WordPress dashboard.
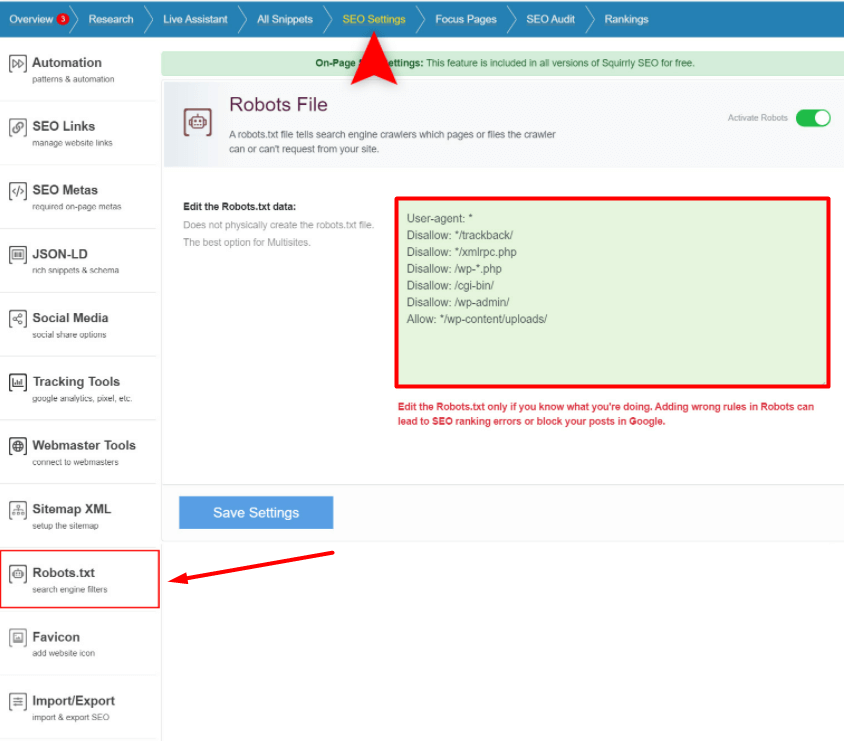
- Then go to SEO Settings> Robots.txt
You can activate/deactivate files using the toggle on the right. And of course, you can add rules for the bots in the text area.
*** Did you know PostX is capable of working with all of these above plugins? We have addons support for all of the above-mentioned WordPress SEO plugins to offer you the competitive edge in the SEO game. Read about the integration below:
How to Update bot Directives using FTP (File Transfer Protocol)
This is more like a manual method for updating the robot’s directives for WordPress websites. Here are the steps:
- First, use a text editor to create a file that’ll have the title ‘robots.txt’.
- Use SMTP clients like FileZilla, WinSCP, or any client of your choice to add the file to the root folder of your WordPress site.
- You can make modifications via the client.
Also, there is the option to add new files and update them as it goes.
How to Use the Robots.txt Directives?
In this section, we’ll be talking about how to use the rules/directives for Search Engine Bots. First of all, let’s start with the basic rules:
Important Commands for Robots.txt
There are 3-commands you can use. 2 of these commands are mostly used. The 3rd command isn’t very common. But in certain cases, it does come in handy:
1. User-agent
This command allows you to target specific bots. For example, if you want to target the Google bot, you can do so using this command. Using the * (asterisk), you can address all bots/crawlers.
2. Disallow
If you use the Disallow command, you are telling the crawlers that they do not have access to specific pages or directories.
3. Allow
In general, everything on your website is marked to be ‘Allowed’ [meaning bots can crawl through them]. Unless there is a special need, you don’t need to use them too much. However, if you want to specify permission [allowing only special folders for crawling in a restricted mother file], you can do this with the Allow command.
*** Add rules/directives by first specifying which User-agent [bot/crawler in this case] will be using the rule. Then list out what rules to apply using Disallow and Allow. There are other rules like Crawl-delay and Sitemap. But these are ignored for the following reasons:
Because major crawlers ignore it/are interpreted in a different way. Furthermore, It is redundant because of tools like Google Search Console (For Sitemaps).
How to Block Access to the Entire Website?
If you want to block all crawlers/bots from your website (very unlikely-only likely when you’re running a development site), add this code to your WordPress robots.txt file:
User-agent: *
Disallow: /
***Meaning: Select all user agents (using the asterisk*). When you use the asterisk, it applies to all User-agents/bots (wildcard). ‘Slash’ means you want to disallow access to all pages that contain ‘yourdomain.com/’ (every single page of your website).
How to Block Access to a Specific Bot/Crawler using Robots.txt?
You can use the previous code to block a single bot from your website. All you have to do is remove the wildcard Asterisk (*) with Bingbot/any other bot.
User-agent: Bingbot
Disallow: /
***Meaning: You are choosing the Bingbot using the User-agent command. Then with the ‘Slash(/)’ you are telling the bot to disregard every folder of the WordPress website.
How to Use WordPress Robots.txt to Block Access to a Specific Folder?
If you want to disallow access to an entire folder but allow access to a specific folder, then you’ll need to use the Allow command.
User-agent: *
Disallow: /wp-admin/
Allow: /wp-admin/admin-ajax.php
***Meaning: The code disallows access to the wp-admin folder but allows access to the admin-ajax.php folder.
How to Use Robots.txt to Stop from Crawling WordPress Search Results:
You may want to stop search crawlers from crawling your search results page. By default, WordPress uses the query parameter “?s=”. In order to block access, you need to do the following:
User-agent: *
Disallow: /?s=
Disallow: /search/
This is an effective way to stop soft 404 errors (soft error 404).
*** Meaning: With the ‘User-agent: *’ you are addressing all crawler bots. Then you are disallowing the crawlers from the search results page by using the special character.
FAQ
We made a promise earlier to share answers to some frequently asked questions. Here they are:
Q: How to access robots.txt in WordPress?
Ans.: If you want to find out where is robots.txt in WordPress, you need to go to:
yourdomain/robots.txt
It would look something like the following:
yourdomain/robots.txt
It would look something like the following:
https://www.domain.com/robots.txt
Q: I cannot find robots.txt in WordPress? What do I do?
Ans.: We did mention previously that WordPress creates robots.txt files automatically. But, if the file is missing [if the site editor cannot find it], it’s either in a different URL or is completely missing.
Do note that the robots.txt file is case-sensitive. Also, it’s supposed to be located in your site’s top-level directory or main directory. So, if an error like this occurs [which is very unlikely], you may want to check if the characters are written correctly. You can verify it from your browser by searching for:
yourdomain.com/robots.txtMaybe the file is inaccessible, in which case you may need to consult a seasoned professional. But even if it’s not there, the possibility of your content not being indexed is very minimal [search engines can disregard the robots.txt directives]. In short, you don’t have to worry too much!
Q: How to disallow robots.txt for a WordPress development site?
Ans.: Ans.: We’ve shown several examples in the previous sections. However, if you’re just installing WordPress, then you may want to keep an eye out for the ‘disallow search engines from indexing’ button. Once you check it, WordPress will know that the site won’t need to be indexed.
Q: What is a recrawl request? How do I make it?
Ans.: If [for some reason] your webpage URL doesn’t appear on Google’s Search Engine Results Page, you can request your page to be crawled again. You can do this from the Google Search Console.
From the console, you can check whether or not your page is live on Google. If the URL doesn’t appear on Google [after testing your page link], you can request a recrawl.
Now do keep in mind that the WordPress robots.txt isn’t about controlling what pages to index. In fact, if an external site is linking to a page on your website and the page isn’t restricted, Google will index the page.
Q: Should you update robots.txt in WordPress for hiding webpages?
Ans.: You can certainly do that. As a matter of fact, we have shown different ways to how you can tell WordPress robots.txt to stay away from particular website pages/directories.
We also mentioned that the ‘noindex’ directive. From what we understand, it is better to use a ‘noindex’ directive rather than disallowing the bots. Because search engines can disregard the rules of the robots.txt file. But if you have a ‘noindex’ in the meta tag, it works better.
Q: Is there a WordPress robots.txt generator?
Ans.: There are various robots.txt generators for WordPress. For example, you have a generator from Small SEO Tools. You will find other options online. However, make sure you’re using something that’s secure.
Q: My sitemap contains URLs that are blocked by robots.txt in WordPress? What do I do now?
Ans.: If you’re having such problems, make sure to try the following things:
- If you switched from HTTP to HTTPS make sure to update the property.
- Try resubmitting your sitemap. You may want to wait sometime to check back again.
- You can ask Google to recrawl your site.
- Clear website cache (including the cache plugins).
Q: Do I need start editing robots.txt for WordPress right away?
Ans.: If you’re a casual user, then you should not worry about the robots.txt file right away. You may want to understand it first before making any changes.
Q: What happens if I disable robots.txt?
Ans.: Here’s the thing:
If you want to disable/disallow robots.txt for particular pages, if another web page links to it, it will be indexed. If the page contains private information, you should not use robots.txt.
Q: What is User-agent* in robots.txt?
Ans.: The ‘User-agent’ command addresses the bots in search engines. For example, if you only want to target the Google bot, the command would be:
User-agent: googlebot
(….)
Q: How do I reduce Googlebot crawl rate?
Ans.: First of all, you need to know what is the Googlebot crawl rate. It’s the number of requests per second the Googlebot is making to your WordPress website when the bot is crawling it.
Unfortunately, you won’t be able to change the Googlebot crawl rate readily. You may need to make a special request in order to change parameters. But, in general, it’s not changeable.
Still, you have the option to change the crawl speed if there are too many requests when the bot is making too many requests, making the server speed slower.
It is possible to update the WordPress robots.txt file for root-level websites. For example, you can change the bot crawl rate for pages like: ‘www.example.com’ or ‘subdomain.example.com’.
Q: What is the default Googlebot crawl rate?
Ans.: When you set a crawl rate for the Googlebot, by default, it is the maximum crawl rate for the Googlebot. However, there’s no saying whether or not it will reach the maximum crawl rate.
It’s also good to know that the maximum crawl rate someone sets for Googlebot is valid for 90-days.
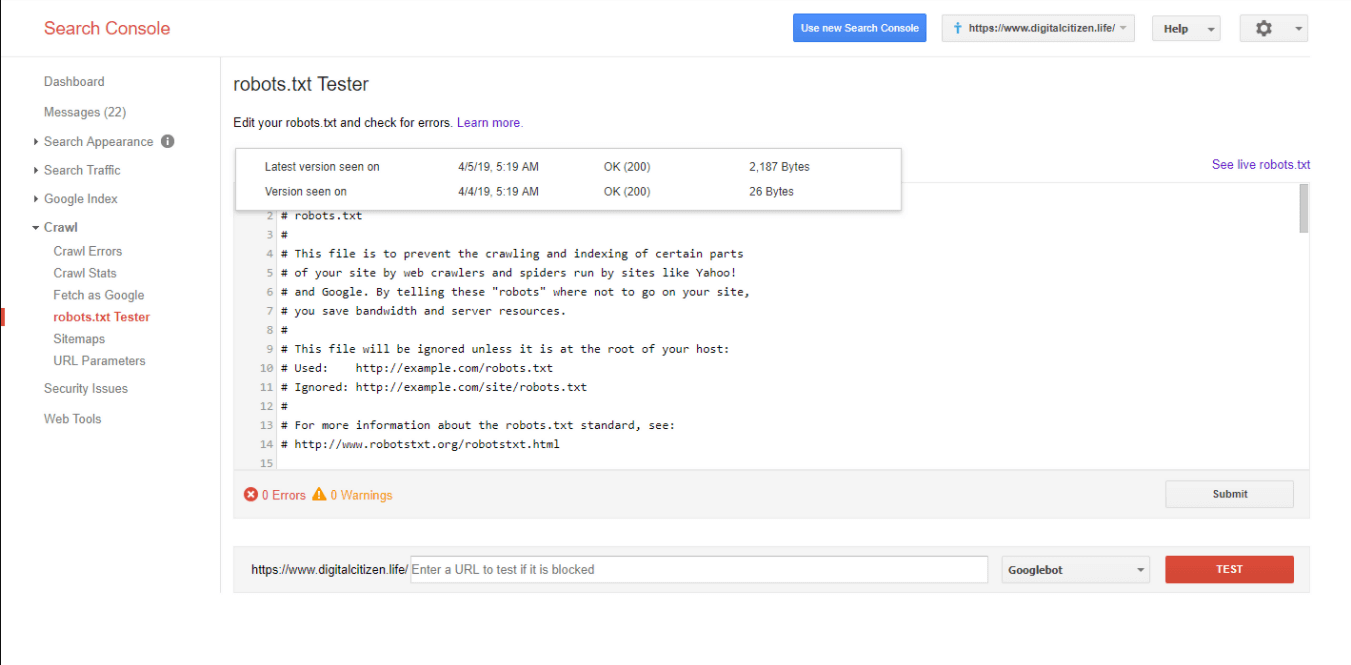
Q: How to use the Google robots.txt tester?
Ans.: The Google robots.txt tester shows you if any of your URLs are blocked by the WordPress robots.txt. You can check whether robots.txt is blocking any of your URLs.
Final Thoughts
We know, it’s been a long ride.
Still, having this much information at your disposal never hurts. As a matter of fact, today’s discussion will certainly assist you in resolving issues regarding WordPress robots.txt.
Now the question stands:
What did you think of today’s article? Did you find it to be helpful? Sound off in the comments below and share your thoughts.
Goodbye for now.