As a store owner, I frequently schedule sales in WooCommerce to promote and increase the sales of my products. Scheduling is one of the most used activities among store owners like you and me.
That’s why I compiled the necessary dimensions in this blog to make it easier for store owners like us. You can schedule sales in your WooCommerce store,
✅ Without any plugins:
- Go to the product editor page and add the sale price
- Add a schedule for the given sale price
- Update the product.
✅ With the right plugin:
- Install and activate the plugin
- Create a suitable sales campaign and add all the necessary details
- Add sales discount type and amount
- Create a schedule with start and end date & time for the campaign
- Save and publish the campaign
I will explain each step of both methods elaborately in this blog. That’s not all.
You can also learn about the benefits of scheduling sales in WooCommerce, comparison among popular plugins, several real-life use cases of sales scheduling, and a troubleshooting section for you.
Let’s go ⬇️
What is Sales Scheduling?
Sales scheduling automates the timing of discounts and promotions by setting specific start and end dates. This feature helps store owners plan their sales in advance, reducing the need for manual adjustments.
With sales scheduled, promotions can be executed seamlessly, ensuring timely offers that align with business goals.
How does it work in WooCommerce?
Schedule sales in WooCommerce work allows owners to:
- Set a start and end date for promotional offers.
- Manage multiple limited-time discounts like flash sales, seasonal sales, or holiday promotions.
- Fully automated price update after the schedule starts and ends.
This way, you can control your promotional activities effortlessly and focus on more urgent matters.
Benefits of Scheduling Sales in WooCommerce
Why should you use scheduled sales? Here’s how it helps:
✅ Automation: You don’t need to set any discount or offer manually.
✅ Effective planning: You can plan in advance when to run particular offers or discounts based on the date. A strategic plan for a year lets you have more control over promotional activities.
✅ Efficient time management: With scheduling, you can set any offer or promotion to a specific date. So once set, you don’t have to spend any more time on this activity.
✅ Higher conversion: A perfectly scheduled sale activity can boost your overall profit within a short period.
Are sales scheduling and flash sales the same?
No, they are not the same feature in WooCommerce. Sales scheduling allows store owners to set start and end dates for promotions automatically, while flash sales are typically short, limited-time offers to drive quick sales.
Flash sales can be scheduled using the sales scheduling feature, ensuring that discounts are applied at the right time without manual intervention.
Can You Schedule Sales in WooCommerce without a Plugin?
Yes, you can schedule sales without any plugin from the WooCommerce built-in settings.
To do that, go to the Product list from the WordPress Dashboard and enter any product you want.
Then, in the General tab, find & click the Schedule button under the Sale Price box.
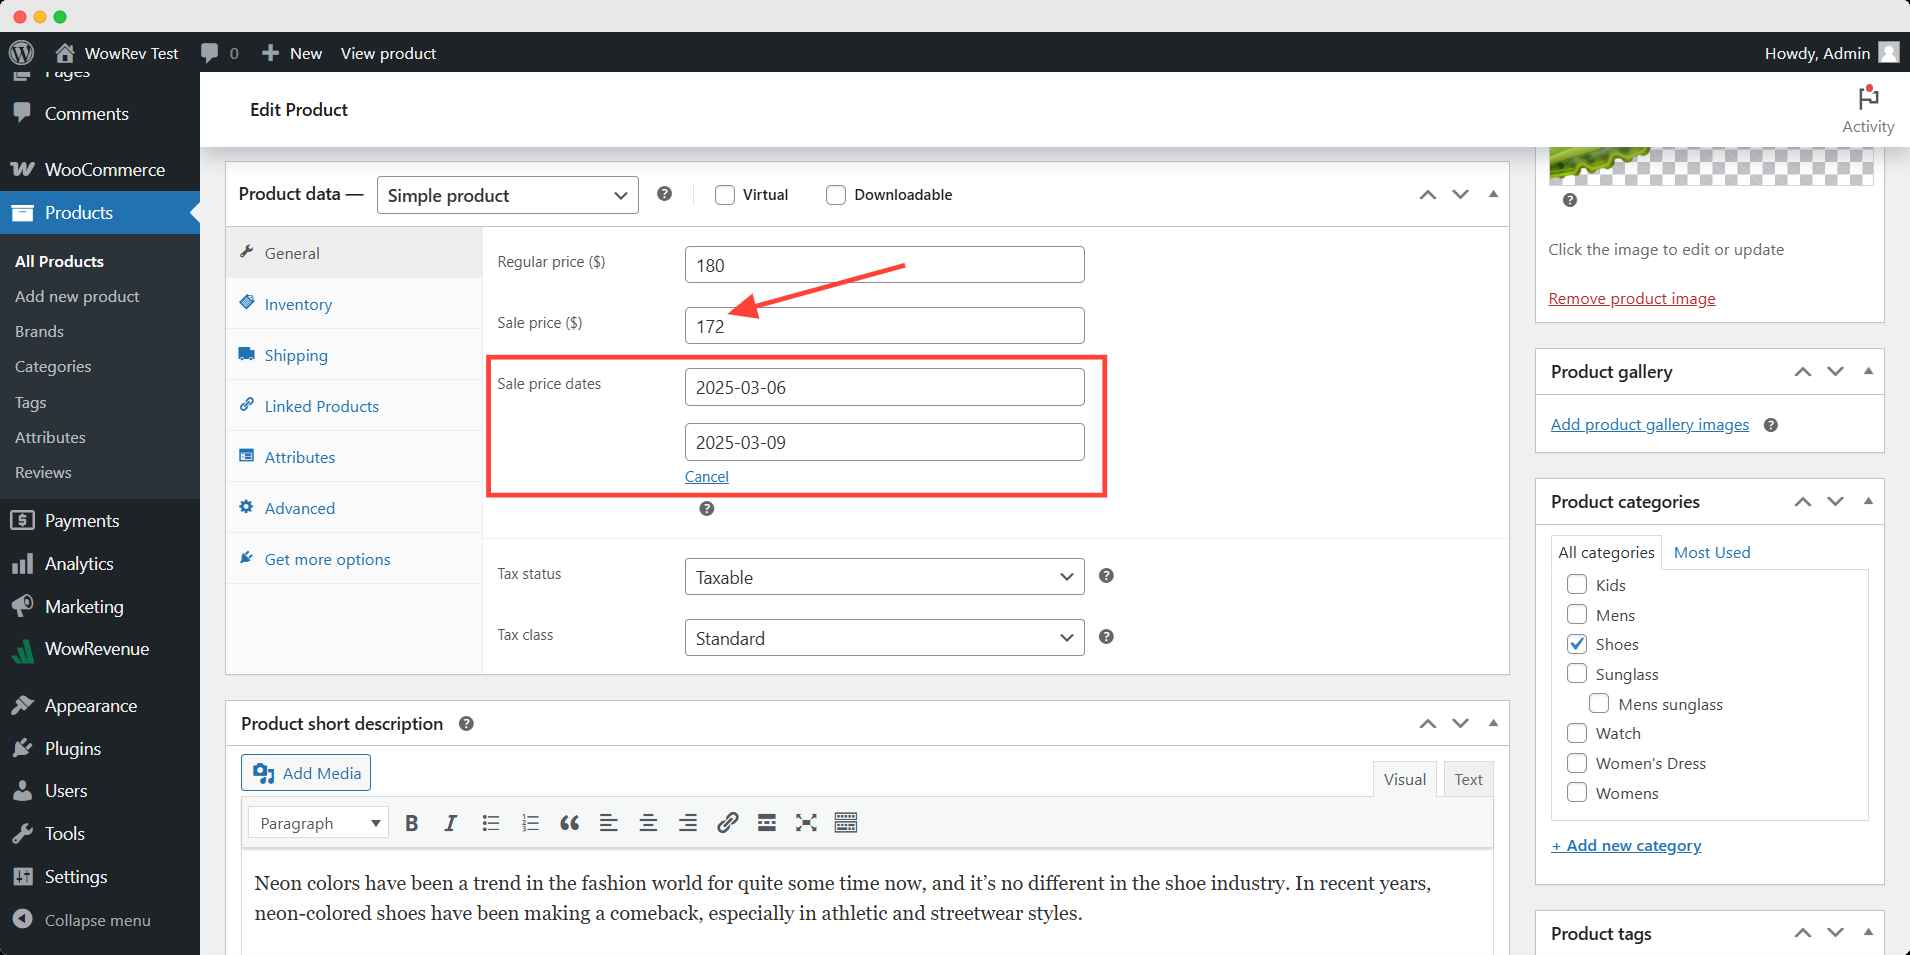
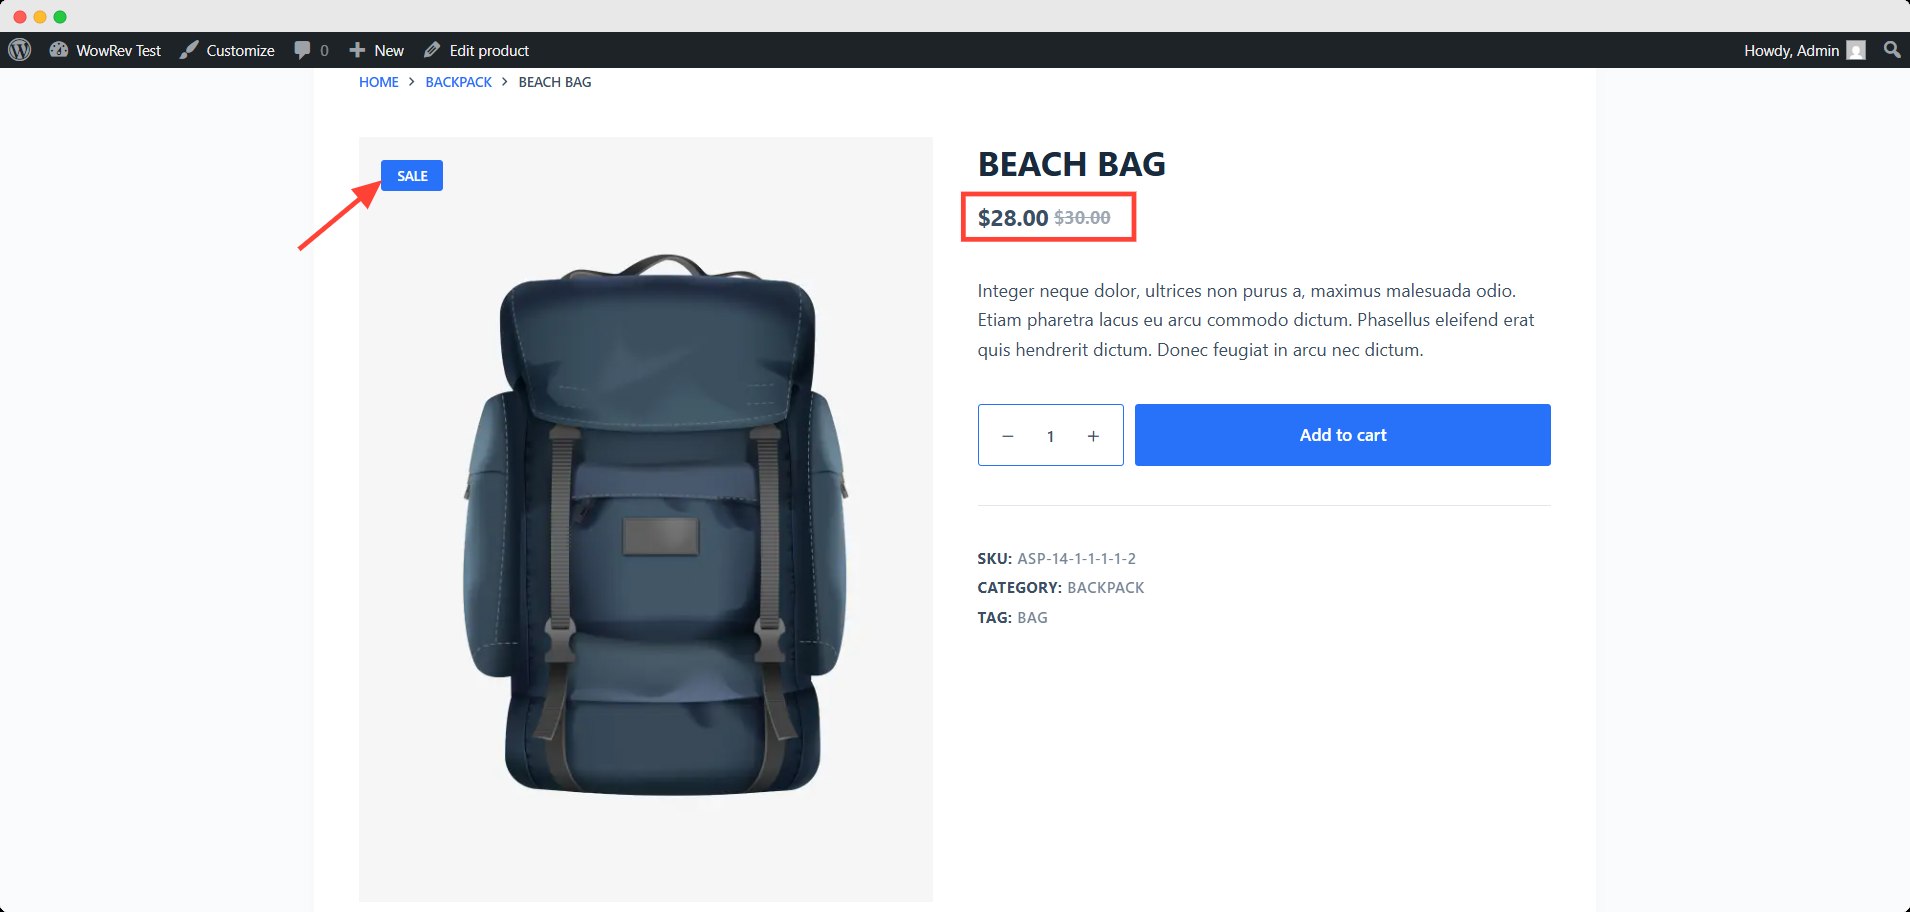
Here you can set the start & end date for the sale price of that product. The sale will be active during the given period.
In this procedure, your user will see the sale price and badge on the product page, but won’t see the duration of this sale.
Remember, this is a basic option to set the schedule only. If you want to get more control and customization options, you need to use a plugin.
How to Schedule Sales in WooCommerce Using a Plugin?
There are several plugins to set a schedule for sales in WooCommerce stores. Here, you will learn how to schedule sales by WowRevenue in WooCommerce.
Before going through a step-by-step process, you need to ensure that some requirements are fulfilled. First, you have to install and activate the WowRevenue plugin. Follow the installation documents for this purpose.
Now, let’s get into the procedure of the sales schedule.
Step 1: Create Your Preferred Campaign
After installing and activating, go to the WowRevenue Dashboard and click the Campaign tab. It will take you to the campaign page.
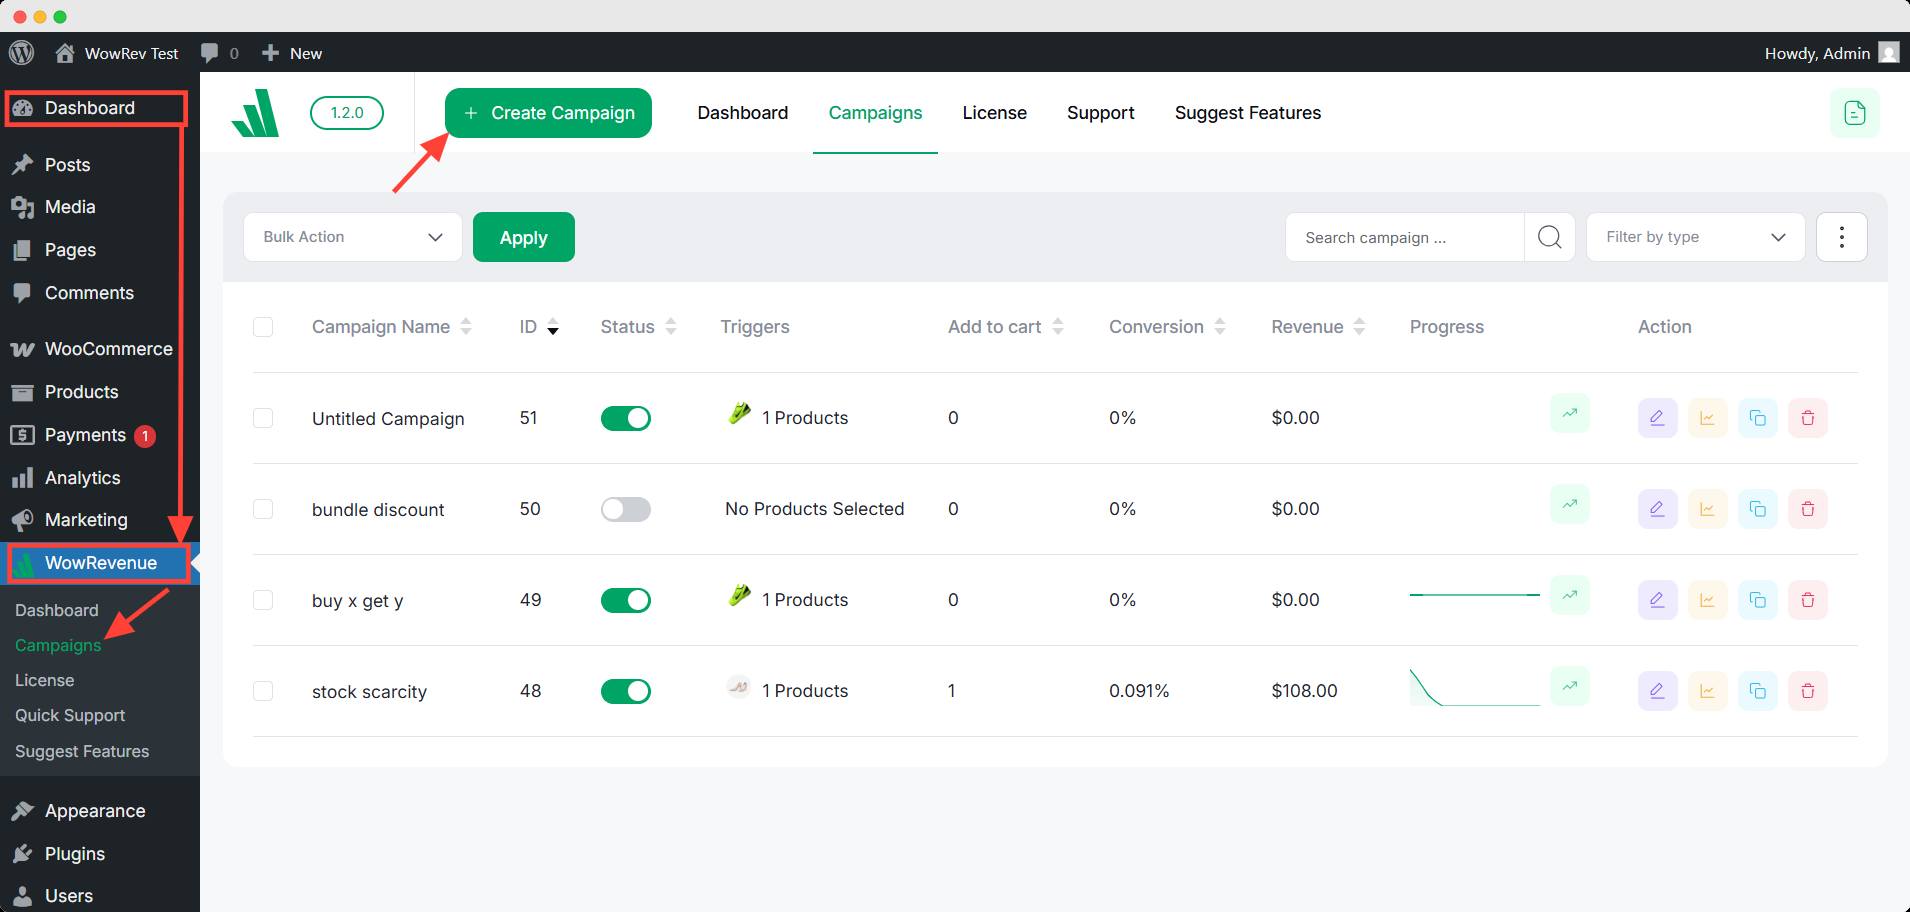
Click the Create Campaign button here, and you will find multiple options for sales campaigns. Select your preferred campaign.
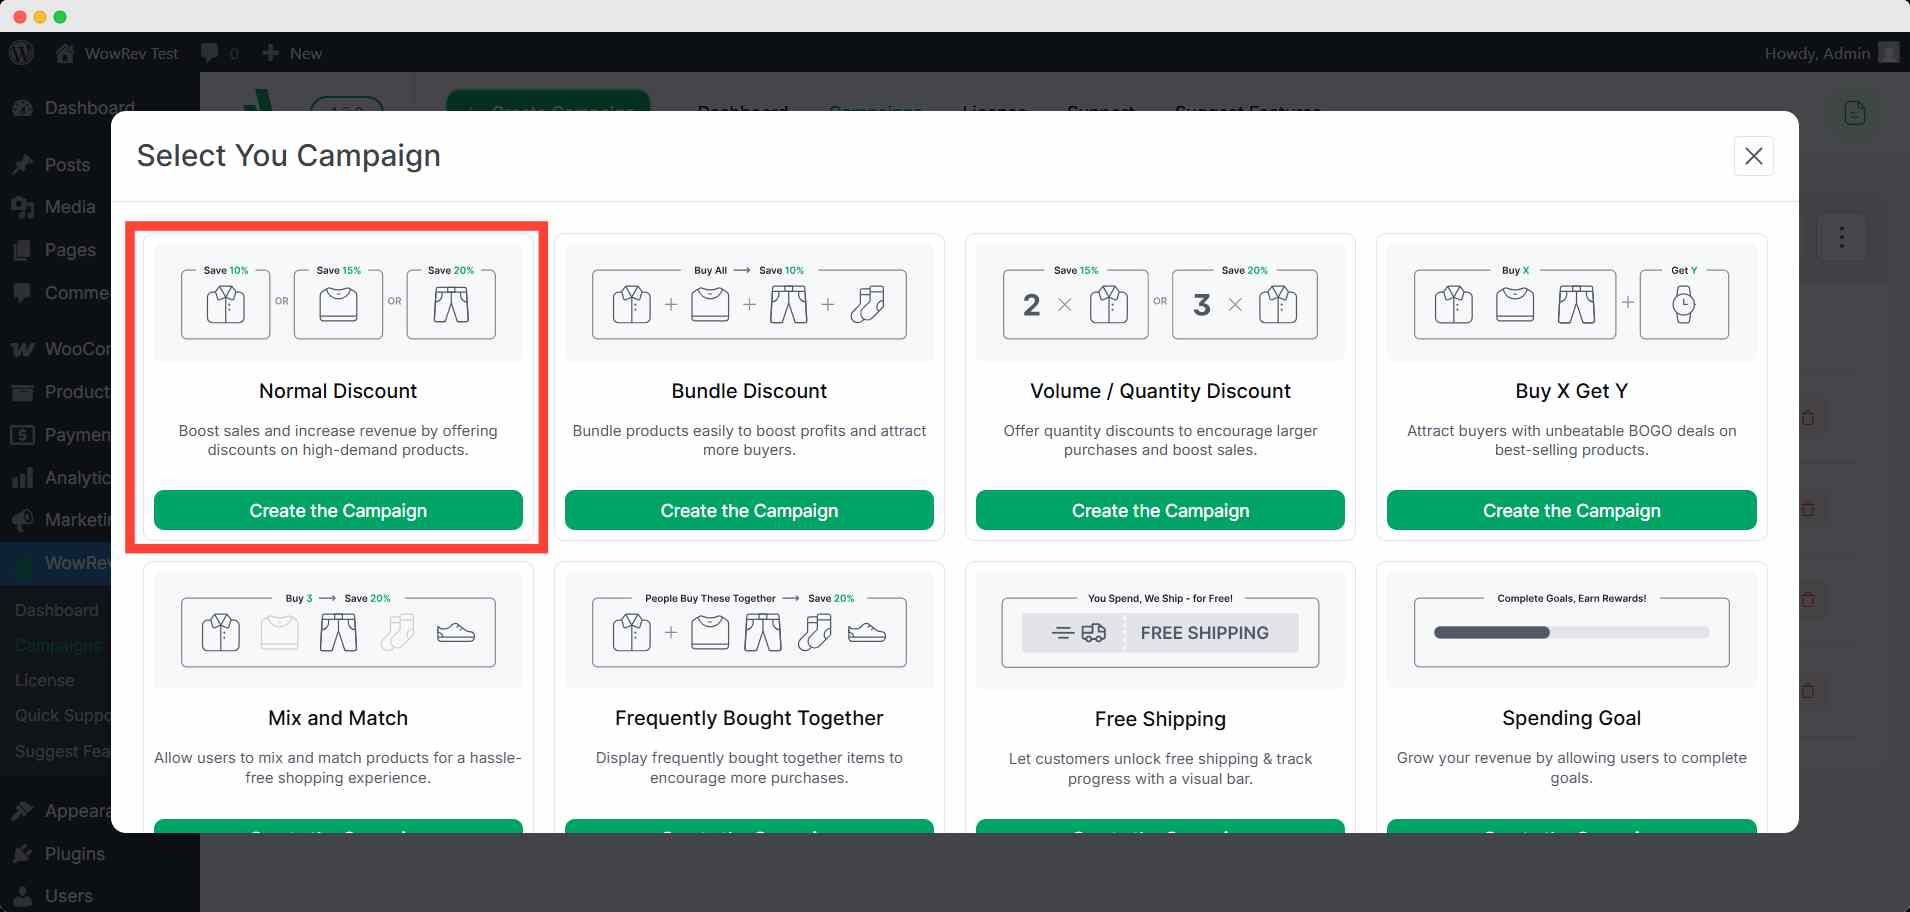
To demonstrate, I chose the Normal Discount campaign. Click the Create the Campaign button to start.
Step 2: Set the Campaign Details
On the campaign page, you can select the pages to view the campaign, page status, display mode, and in-page position option initially. Set these things up.
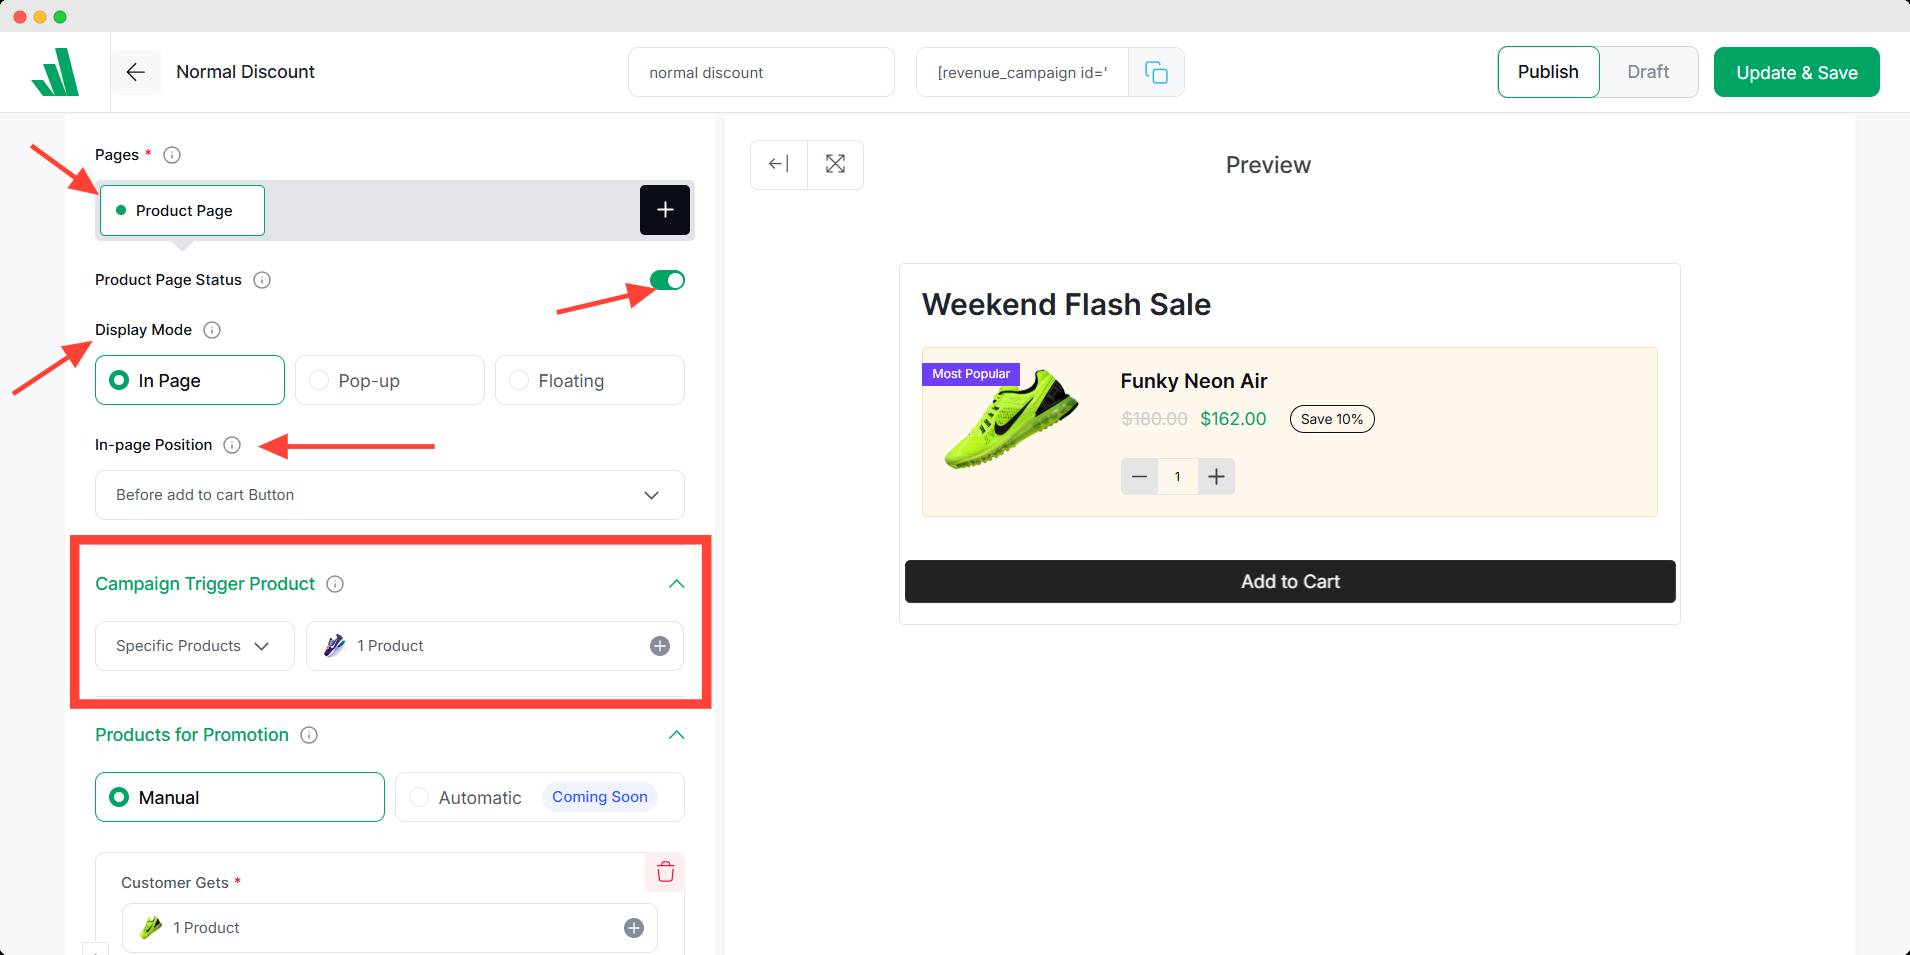
Now choose the trigger product where this campaign would be shown to your customer.
Step 3: Set the Discount as You Want
Now you need to select the product(s) to offer in the Customer Gets box. Then set the quantity, discount value, and type to offer the customer.
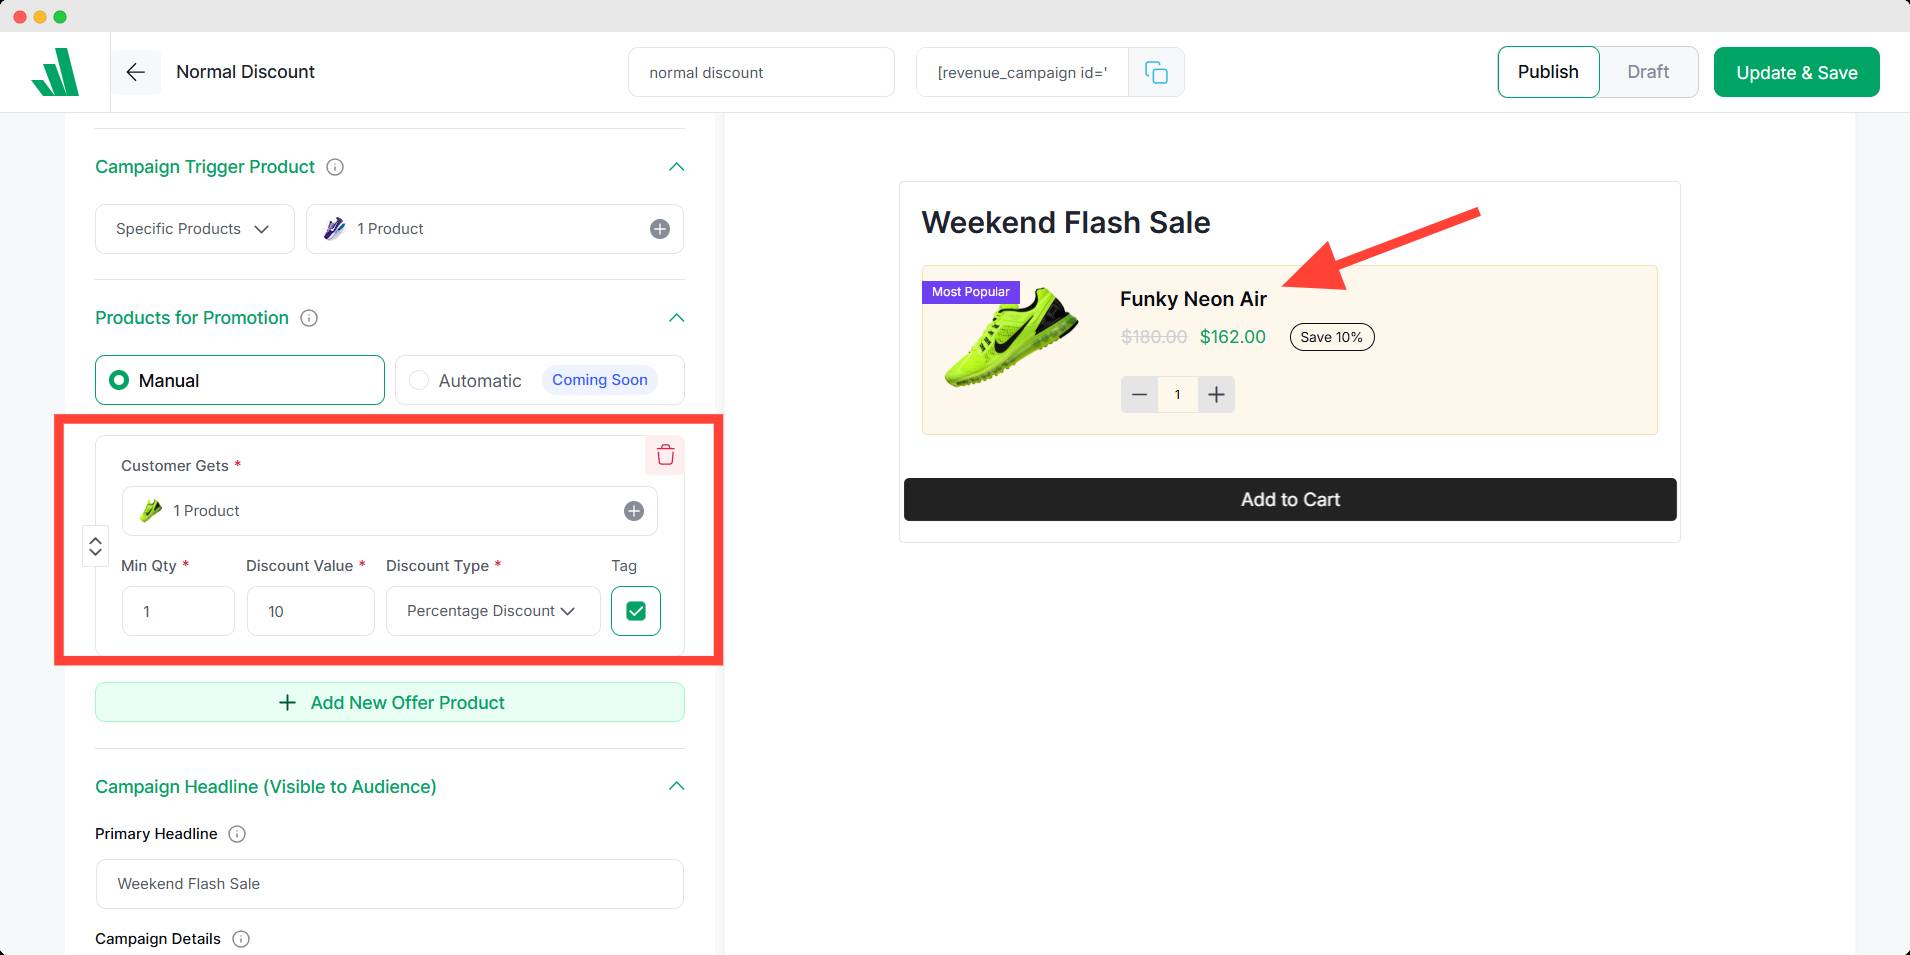
You can also add tags and another new offer at your convenience.
Step 4: Schedule the Campaign
After that, scroll down to the scheduling setting, and choose the start & end date/time for the campaign. It will set the duration of this campaign.
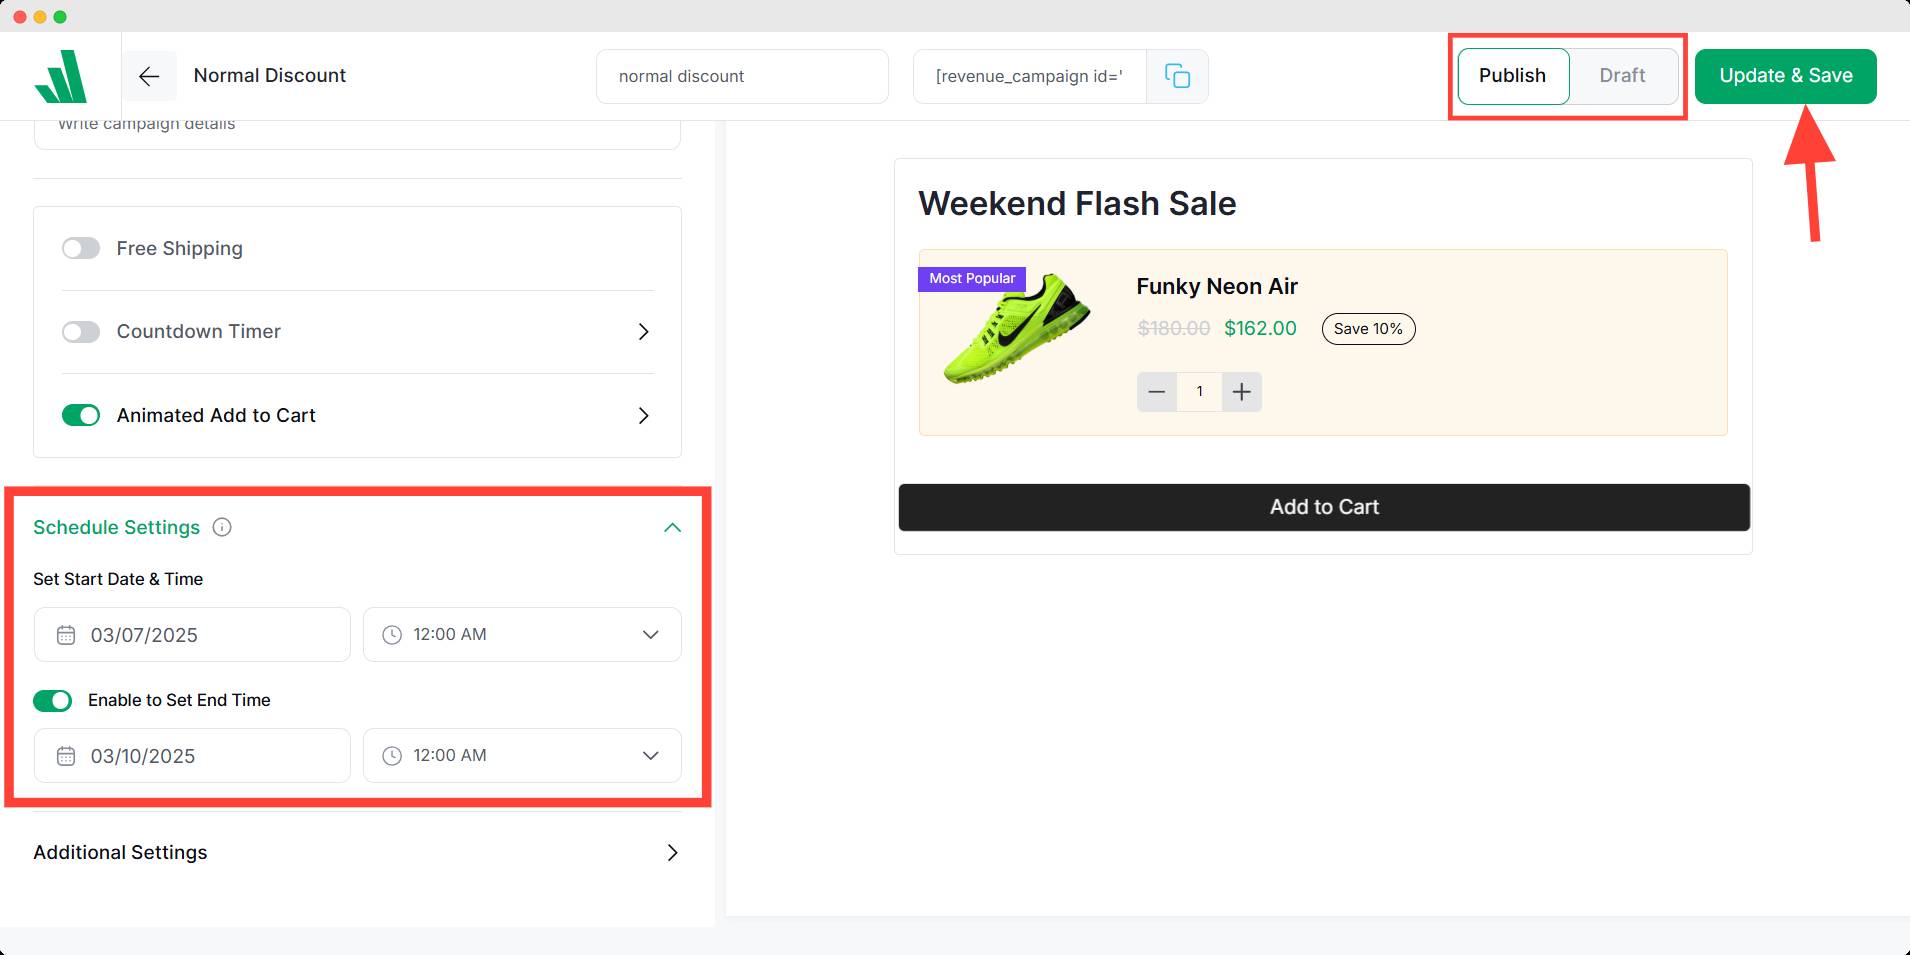
After finishing up, toggle the publish button on and hit Update & save.
You can also explore additional features to customize your campaign to your preference.
💡Pro Tip
You should add a countdown timer to create urgency and an animated add-to-cart button to trigger users. You can also track the performance to observe how your conversion is boosted.
Other Popular Plugins for Scheduling Sales in WooCommerce
While WowRevenue is my top pick, there are several other plugins that can schedule WooCommerce sales. Here are three popular alternatives to WowRevenue:
1️⃣ WooCommerce Sales Discount Scheduler
This plugin lets you schedule time-limited discounts for your products. You can set a date & time range for the sale, and it will automatically show a discounted price. It even includes countdown timers to create FOMO.
Best for: Seasonal promotions.
You can schedule future sales precisely with this plugin for entire categories of products. It supports various discount types (percentage, fixed price, BOGO) and can skip products already on sale.
Best for: Bulk sale scheduling.
This plugin lets you set start & end dates for sales, and apply discounts to multiple products or whole categories. You can even display sale badges on product images.
Best for: Visual sale notifications.
Why should you use WowRevenue?
With several alternatives, you may think why did I choose WowRevenue to schedule sales? This quick comparison will help you in your decision.
| Feature | WowRevenue | WooCommerce Sales Discount Scheduler | PW Sales Scheduler | Sales Manager & Scheduler |
|---|---|---|---|---|
| Bulk Sale Scheduling | ✅ Yes | ❌ No | ✅ Yes | ✅ Yes |
| Countdown Timer | ✅ Yes | ✅ Yes | ❌ No | ❌ No |
| BOGO & Dynamic Discounts | ✅ Yes | ❌ No | ✅ Yes | ❌ No |
| User-Friendly Dashboard | ✅ Yes | ✅ Yes | ❌ No | ✅ Yes |
| Analytics & Reports | ✅ Yes | ❌ No | ❌ No | ❌ No |
As you can see from the comparison, WowRevenue offers an all-in-one solution. Its broad feature set contains various promotional campaigns and is conversion-focused.
Can You Schedule a Bulk Sale in WooCommerce
Yes, you can schedule a bulk sale from WooCommerce, but it has to be done traditionally. This means you must set up sales for each product individually.
Bulk sale indicates putting multiple products on sale at the same time for a promotion. But if you had to go through every product in bulk, it would be time-consuming and tiring. That’s where plugins are needed.
With WowRevenue, you can set the bulk sales schedule with a few clicks. Using it with WooCommerce accelerates your productivity overnight. You may wonder how.
Follow these steps to easily configure your bulk sale schedule:
- You can bulk-edit prices from WooCommerce. Select the products and apply the edit in the bulk action. You will find an interface where you can set your sale price.
- Then go to the WowRevenue campaign. Select the bundle discount campaign and add the trigger product.
- Select those bulk products in the products to offer. You can set different discounts additionally if you want.
- Set the schedule, toggle the publish button, and hit the save button to activate the sale.
Now you have a scheduled sale for bulk products that are created within minutes.
You can watch this visual demonstration for better understanding:
You can explore other plugins for woocommerce to increase sale for your store.
How to Schedule Sales for Variable Products in WooCommerce
You can create a scheduled sale for variable products, too. This is a bit simpler than bulk sales; you can do it in the WooCommerce built-in settings.
Head over to the product edit page for variable products and set a sales price and date from there. You can also set sales prices for individual variations. However, if you have many variations, it might be time-consuming.
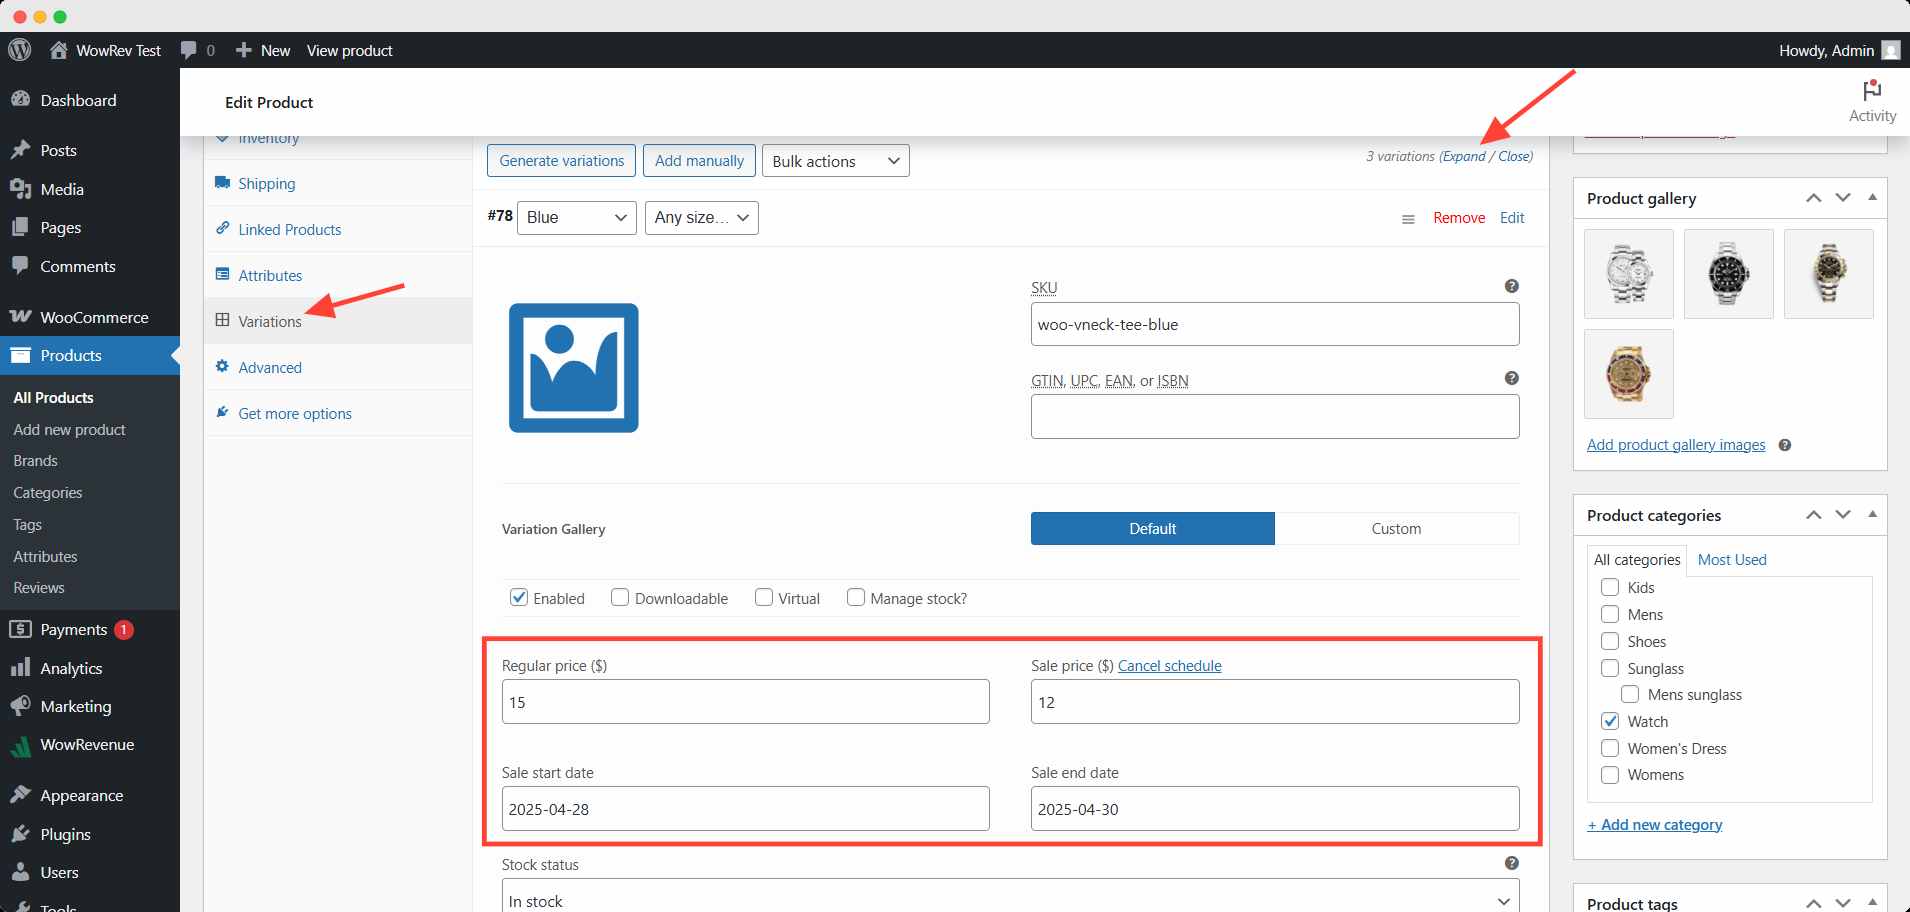
For this purpose, you can use WowRevenue too. Set the campaign similarly to bulk sales, and instead of bulk items, you can set individual discounts for variations.
How to Notify Customers about Upcoming Scheduled Sales in WooCommerce
You can notify customers about upcoming scheduled sales by showing them a simple image pop-up. Customers would see such after entering or before leaving the site. It will inform them about upcoming or ongoing sales activities.
You can implement such engaging popups with WowOptin. WowOpitn lets you customize and control your popups to increase traffic and boost sales eventually.
How to Set Up a Sale Notification Popup
Here’s a step-by-step process for making a notification pop-up:
- Install & Activate WowOptin.
- Go to the Popup Dashboard → Create a new popup.
- Design the Popup → Add a countdown, sale details, and CTA.
- Set the Trigger → Choose “Exit Intent or Scroll down”
- Save & Activate!
Watch this tutorial video for a step-by-step process:
💡Pro Tip
Popups create FOMO in your customers’ minds so they might act on the visual triggers. Explore different types of optins to get a better idea.
How to Fix the WooCommerce Sale Schedule Not Working Issues
Sometimes you might notice the scheduled sales don’t function as you set them. Here are some common issues, their reasons, and solutions:
- The sale didn’t start
The scheduled sale won’t start if there’s any mismatch with the time setting.
| Reason | Solution |
|---|---|
| Incorrect timezone | Check the WordPress timezone and align it with the setting |
| Mixup in time setting | Check if you use the AM/PM setting correctly. |
- Prices didn’t update
Price doesn’t change with the scheduled start or end, or in either case.
| Reason | Solution |
|---|---|
| Page caching serving stale content | Clear the site’s cache before and during the schedule |
| CDN or browser cache holding old data | Use a cache-clean plugin for regular maintenance |
- The sale stopped too soon
Promotional activities stopped abruptly during the scheduled period.
| Reason | Solution |
|---|---|
| Another plugin overriding prices | Temporarily deactivate other conflicting plugin |
| Outdated WooCommerce version with known bugs | Update WooCommerce to the latest version |
Final Words
By now, you should have a clear understanding of how to schedule sales in WooCommerce, whether manually or with the help of powerful plugins like WowRevenue. Proper scheduling not only automates your store’s promotions but also boosts your efficiency and sales performance.
Start planning your sales campaigns smartly and watch your WooCommerce store thrive! If you have any more questions, let us know in the comments!
FAQs
Can I schedule sales for specific user roles in WooCommerce?
You can’t schedule sales for specific user roles through the WooCommerce default settings. To do this, you need another plugin that offers customization with user roles. WholesaleX is the best plugin for this purpose.
Can I set up recurring scheduled sales in WowRevenue?
Yes, you can make a recurring schedule of sales by using WowRevenue campaigns. You can create multiple campaigns for the same sales and set the schedule for each campaign. Thus, you don’t have to set the schedule for the same sales repeatedly.
How can I track the performance of my scheduled sales?
You can track performances from WowRevenue’s campaign statistics. You can observe an overall performance from the dashboard. You can also track the performance of each campaign from the action tab on the campaign page.
What happens if I change the sale schedule after it has started?
If you change the price, start, or end date of the sales during the campaign, it will take effect immediately. However, if a customer sees the old price & date, s/he needs to refresh the cache to see the updated information.