

Introduction
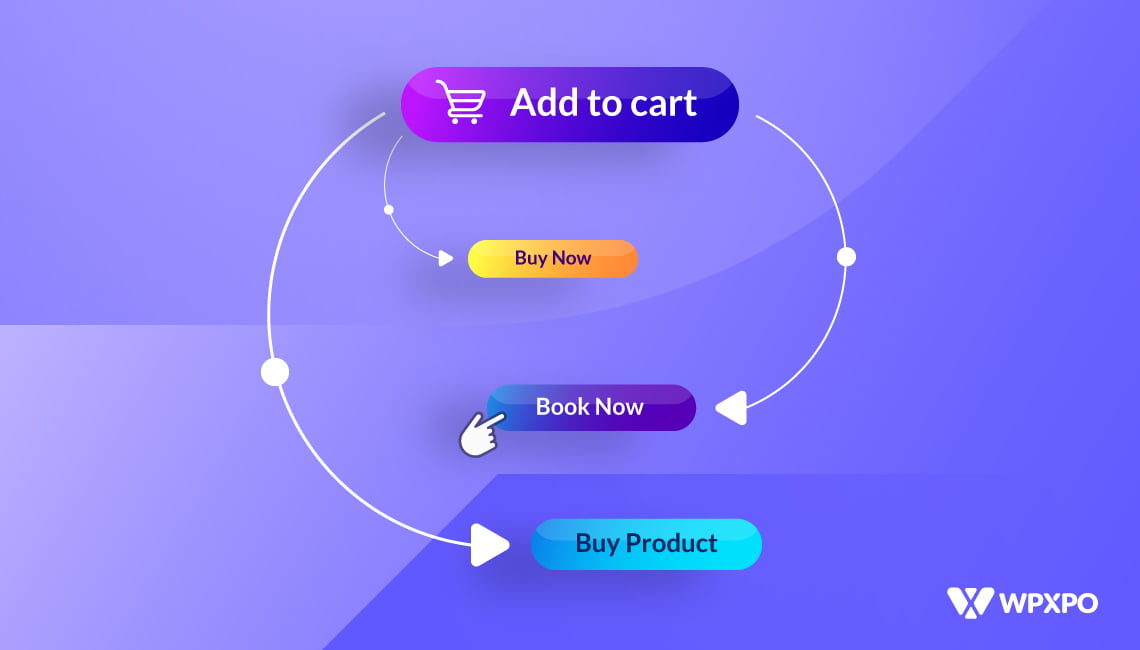
Do you want to know how to change Add to Cart button text?
It’s not that simple to change the Add to Cart button. But we have some custom pieces of code that can help you change the button text to your liking. Also, we have a couple of plugin suggestions as well. The processes are simple. You have to choose which one works best for you.
We will be showing you how to add a custom piece of code to your WooCommerce site and change the text. Then we will move on to ProductX, a WooCommerce builder plugin that has a dedicated Add to Cart Gutenberg button block. Finally, there is one more plugin – it only helps to change the add to cart button text.
Then we have suggestions for another plugin (as a bonus) – it helps you change your button as well as showcase products in a catalogue mode.
So, let’s get started!
How to Change Add to Cart Button Text in WooCommerce: Adding Custom Code Snippets
There are two custom pieces of code you can add here. You can use both of these or either of these to change the Add to Cart button text on your WordPress Store.
The first piece of text will show you how to change the text on a single product page. And the second one is to change the Add to Cart text on all product archive pages.
Adding both of these custom code pieces is the same. But first, you will need to install WooCommerce on your WordPress website.
How to Install WooCommerce on Your WordPress Site
In order to implement the solution on how to change the Add to Cart Button Text in WooCommerce, you can/may have to install WooCommerce on your WordPress site first.
It’s a super simple process. All you have to do is follow these steps:
- Access your WordPress Dashboard.
- Go to Plugins and click on ‘Add New’.
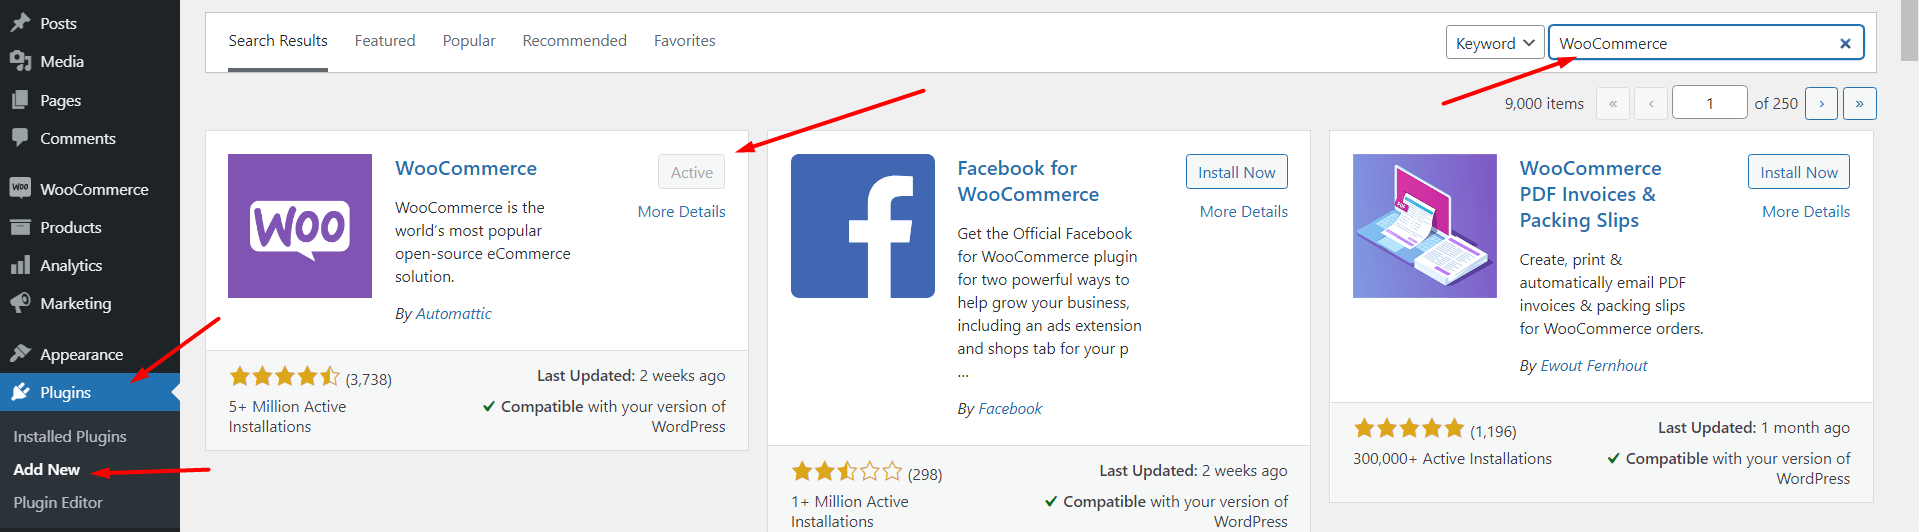
- In the search box to the right type ‘WooCommerce’. The plugin should appear at the very top.
- Now all you have to do is click ‘Install’ and then ‘Activate’ the plugin.
***Now we believe it is safe to assume that you already have WooCommerce set up. If you haven’t already, then you can follow the above-mentioned steps.
Once you activate WooCommerce, a setup wizard will help you set up your storefront.
Now we are showing you how to add the WooCommerce Add to Cart button code snippets. So, for the sake of simplicity, we will be installing some sample data to WooCommerce and then show you how to add the WooCommerce custom add to Cart button text on the WooCommerce shop page.
Generating Sample Data for WooCommerce Shop Page: Making Sure Everything Works!
This is more of a precautionary measure when it comes to the matter of how to change the Add to Cart button text in WooCommerce. As mentioned earlier, we will be generating some sample WooCommerce products to show you the way to add the WooCommerce Add to Cart button.
***Of course, you can choose to ignore this step and start building your WooCommerce store right away. But going through this precautionary measure will add to your WooCommerce Knowledge Library.
So, let’s see how you can add sample product data to your WooCommerce page:
- Search for WooCommerce on your WordPress dashboard. Click on it.
- Then click on ‘Status’.
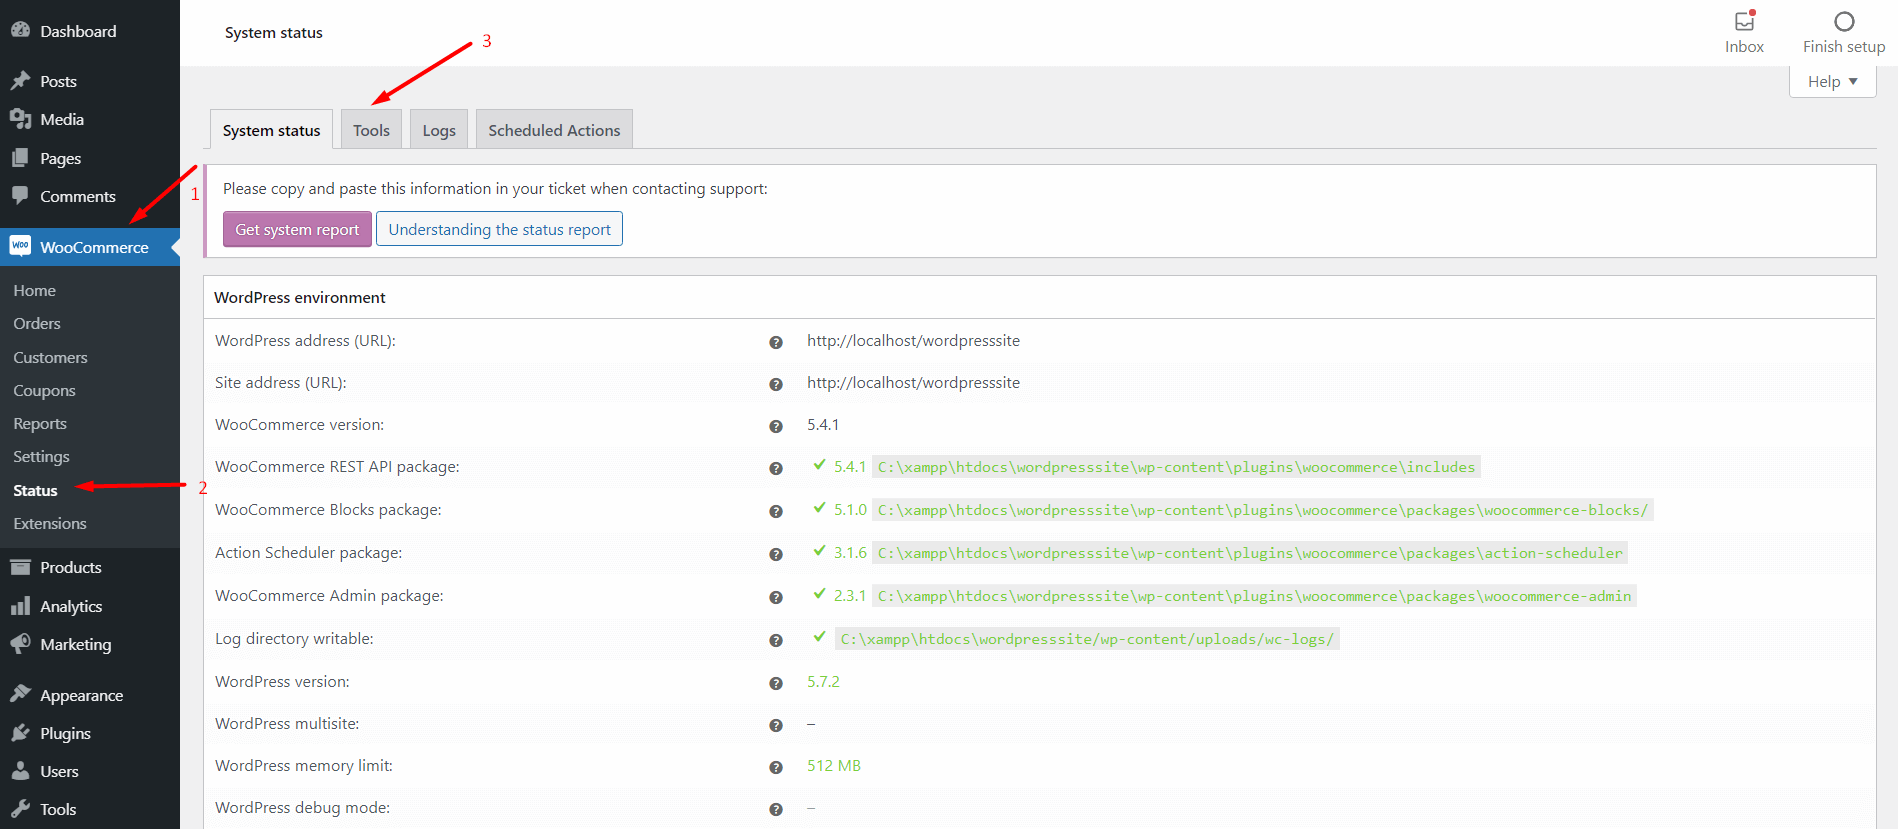
- Then click on ‘Tools’ which should be at the top of the page.
- Now scroll down the page to find “Create default WooCommerece Pages”.
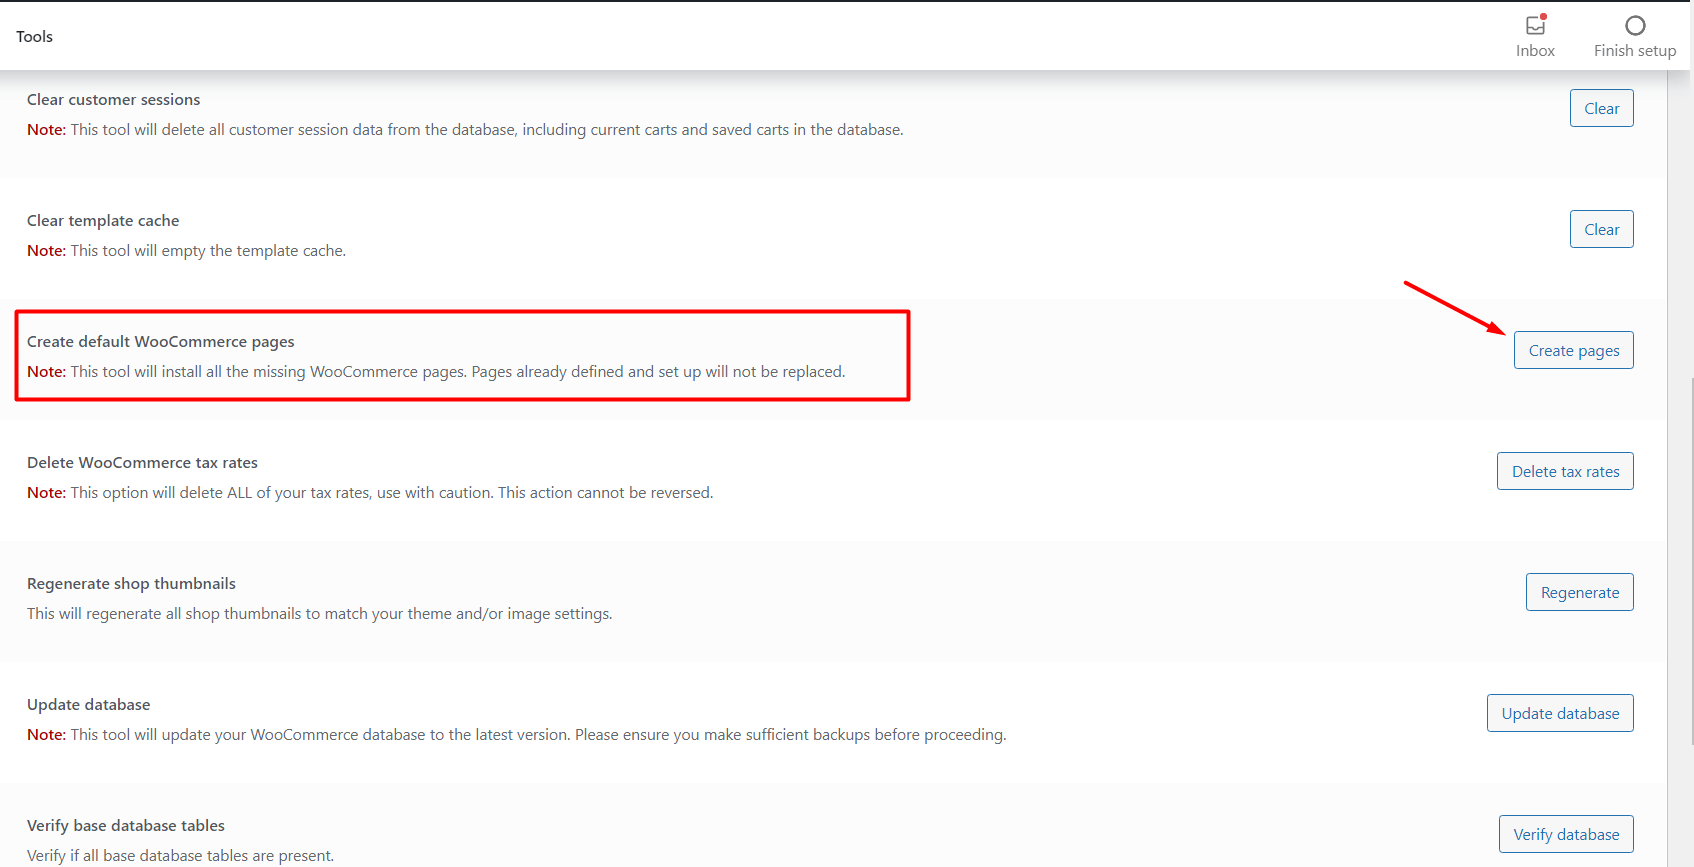
- Click on “Create Pages” which should be on the right.
You will now see a status bar somewhere on the top indicating that all missing WooCommerce pages were installed successfully.
Now, you need to follow these steps to complete the process:
- Search for “Tools” on Your WordPress dashboard.
- Then click on “Import”.
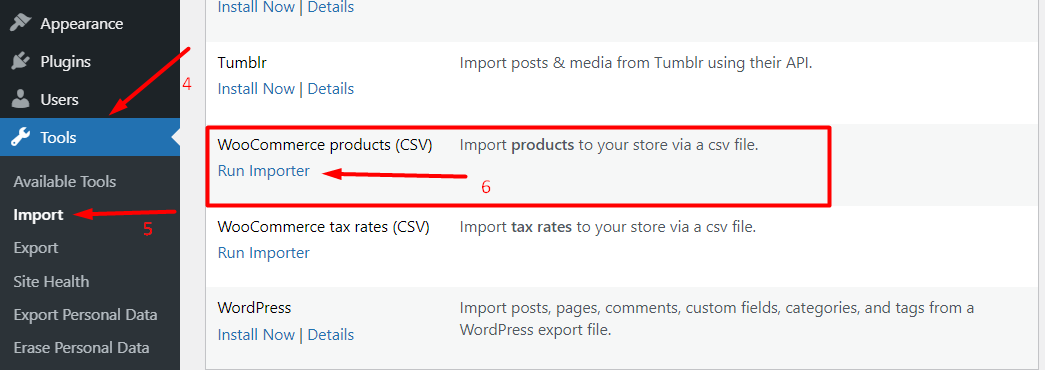
- Scroll down to find “WooCommerce Products (CSV)”.
- You will see a “Run Import” button. Click on it.
At this stage, the Importer will ask you to upload a CSV file. The easiest way to get this is by downloading the WooCommerce plugin from wordpress.org. Just download it to a folder on your computer and ‘Extract’ it.
Now:
- Go back to the Importer.
- Click on “Choose File”.
- You want to find the “Sample Products.csv” file. It should be under WooCommerce> Sample Data> Sample Products (CSV).
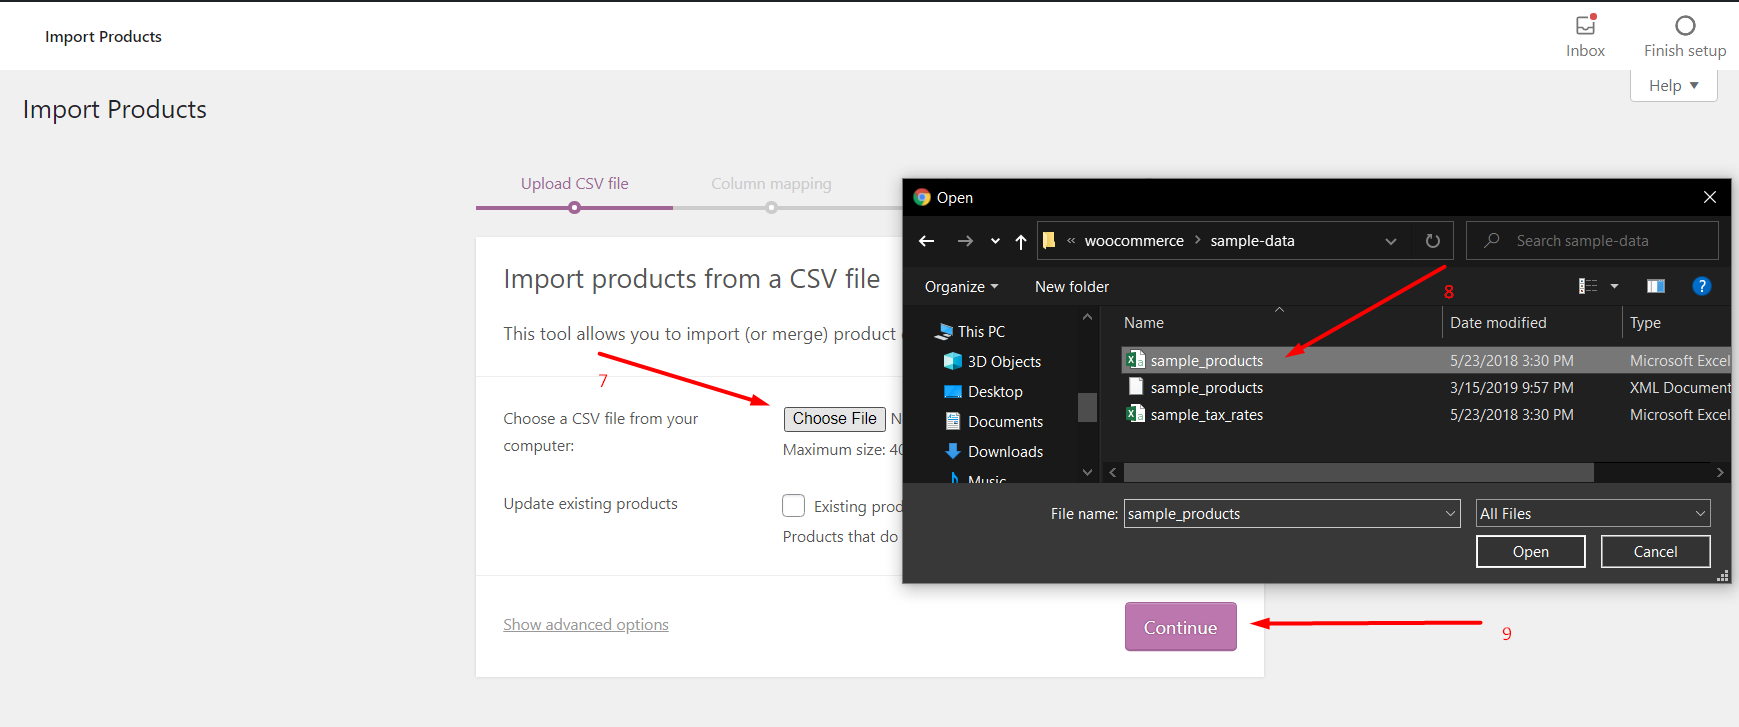
- Now click on ‘Continue’.
- Scroll down to the next settings page and hit “Run the Importer”. You don’t need to change any settings here.
The importer will now add sample products to the sample pages. You now have a fully functional WooCommerce store for testing.
*** Again, you can ignore all these steps and go straight to changing the WooCommerce Add to Cart button, either on a single product page or all product category pages.
WooCommerce Text Change: How to Change Add to Cart Button Text in the Theme Editor
Before we begin, here is a quick disclaimer:
*** Be sure to be extra careful when adding extra bits of code to the theme files. If you add the code incorrectly, it may break your theme. Again, stay sharp!
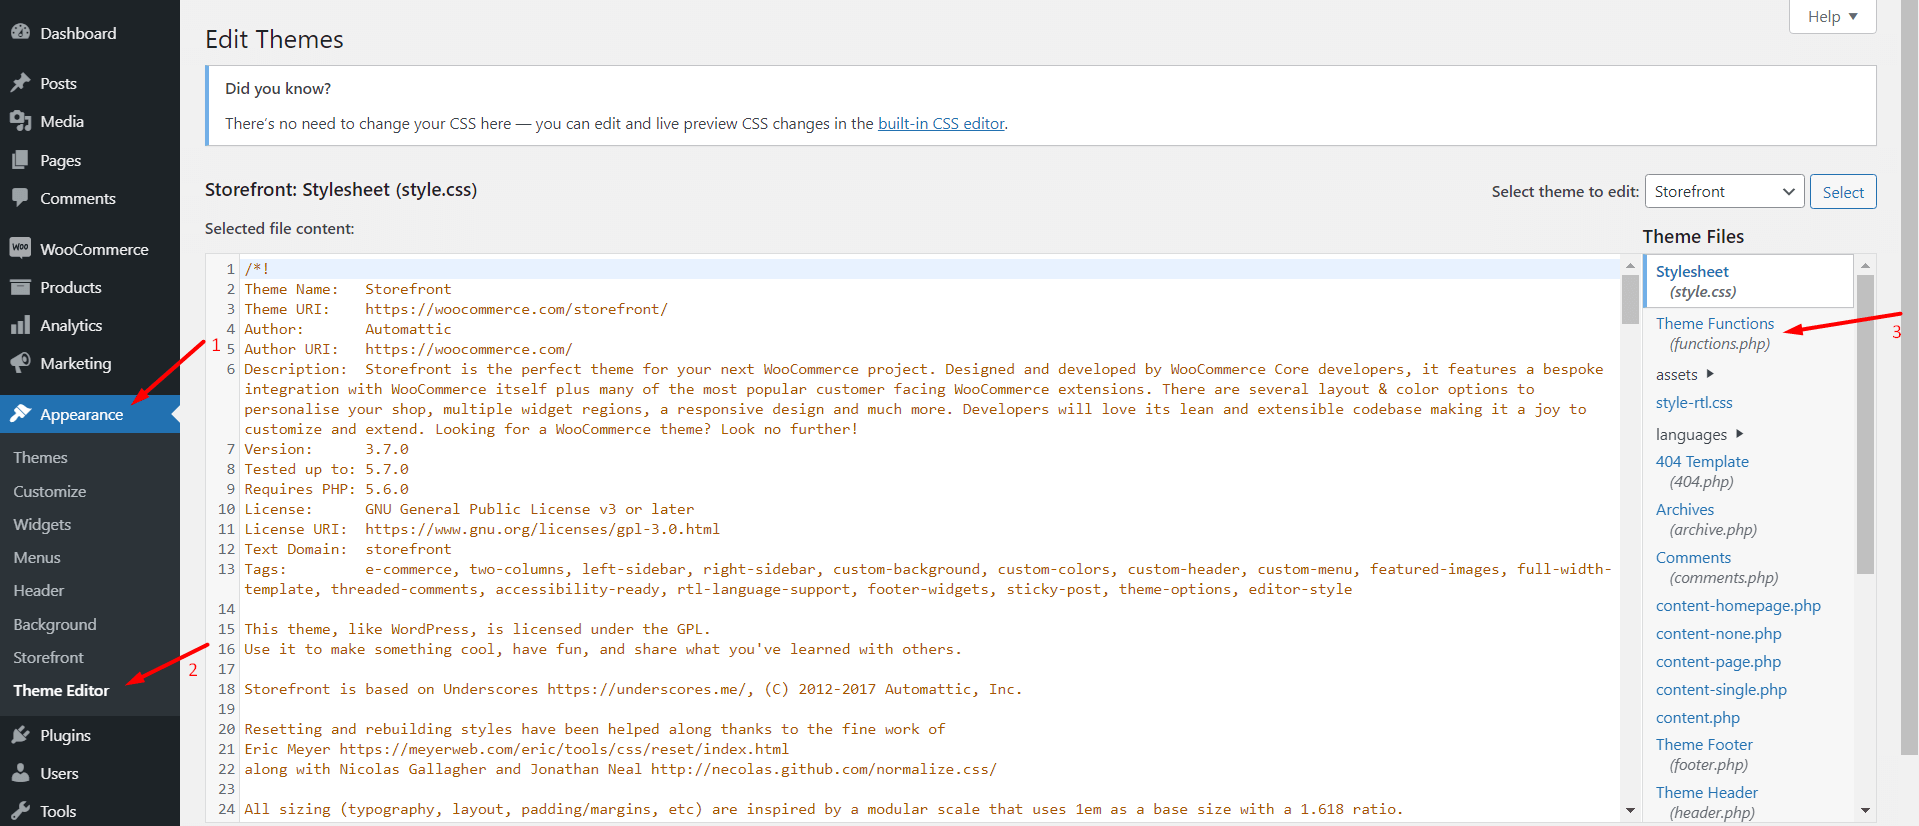
- Go to your WordPress Dashboard. Make sure you’re logged in as the administrator.
- Now Go to Appearance> Theme Editor
- You should see the ‘Theme Files” on the right. In the Theme- files choose “Theme Functions” (there will be a label underneath saying functions.php).
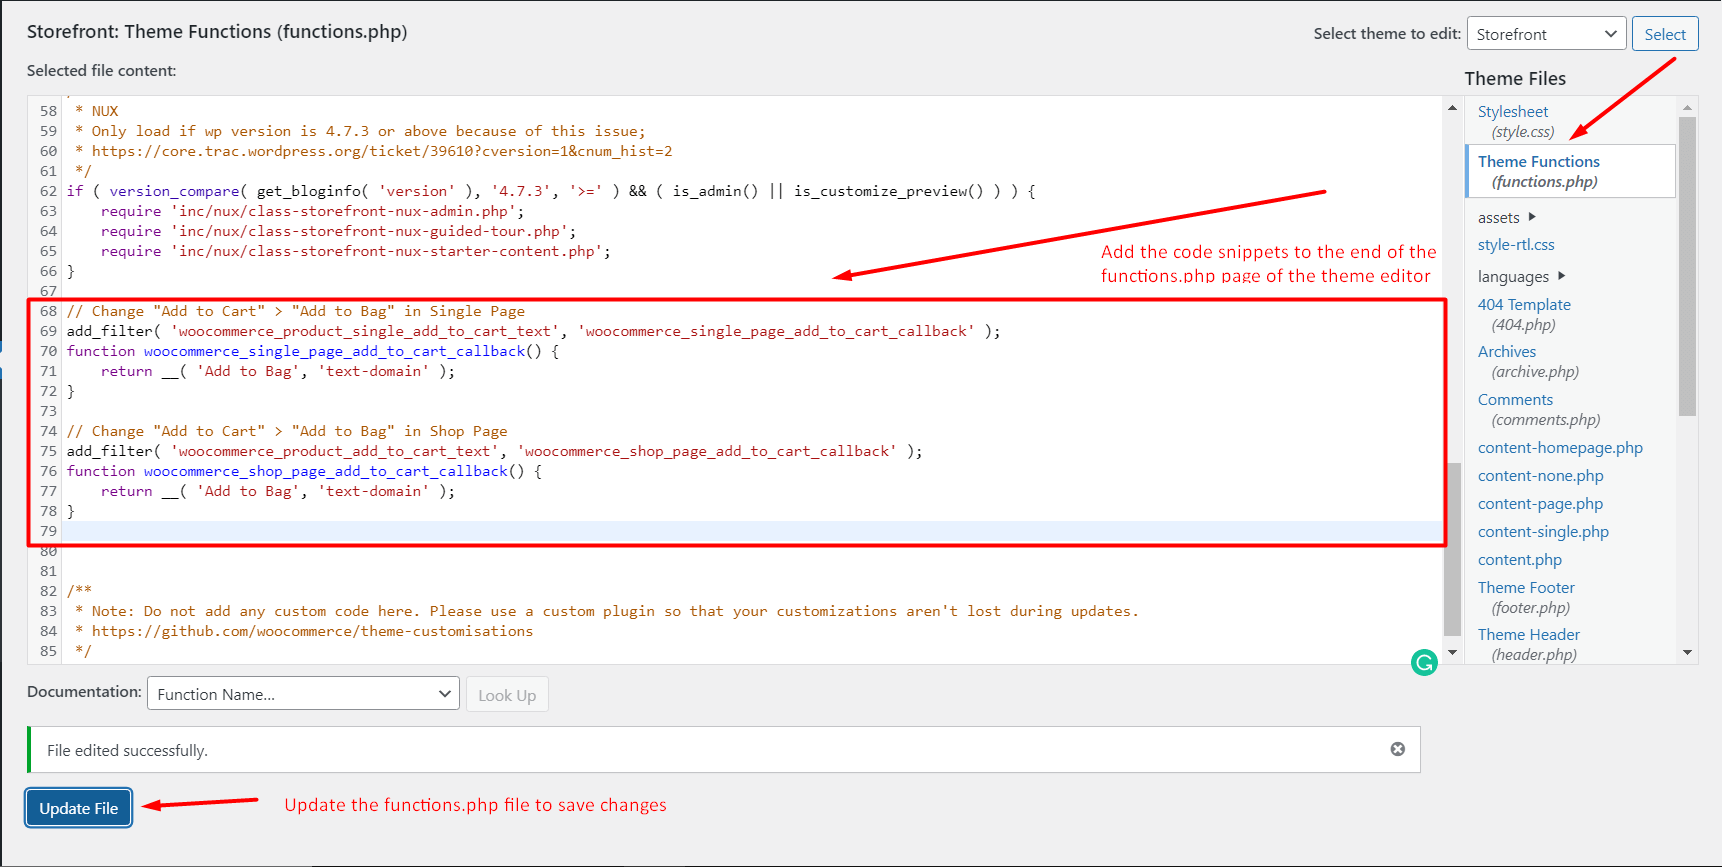
- Now copy these codes at the end of the functions.php file:
- Here’s the code to change the add to cart WooCommerce button text in the shop/archive pages:
// Change "Add to Cart" > "Add to Bag" in Shop Page
add_filter( 'woocommerce_product_add_to_cart_text', 'woocommerce_shop_page_add_to_cart_callback' );
function woocommerce_shop_page_add_to_cart_callback() {
    return __( 'Add to Bag', 'text-domain' );
}- Here’s the code to change the add to cart button for a single product:
// Change "Add to Cart" > "Add to Bag" in Single Page
add_filter( 'woocommerce_product_single_add_to_cart_text', 'woocommerce_single_page_add_to_cart_callback' );
function woocommerce_single_page_add_to_cart_callback() {
    return __( 'Add to Bag', 'text-domain' );
}- Now save the functions.php file by clicking on the “Update File” button. Again, be extra careful while doing this.
Now you can change the text to whatever you want. Just be cautious when changing the text.
Here’s the preview:
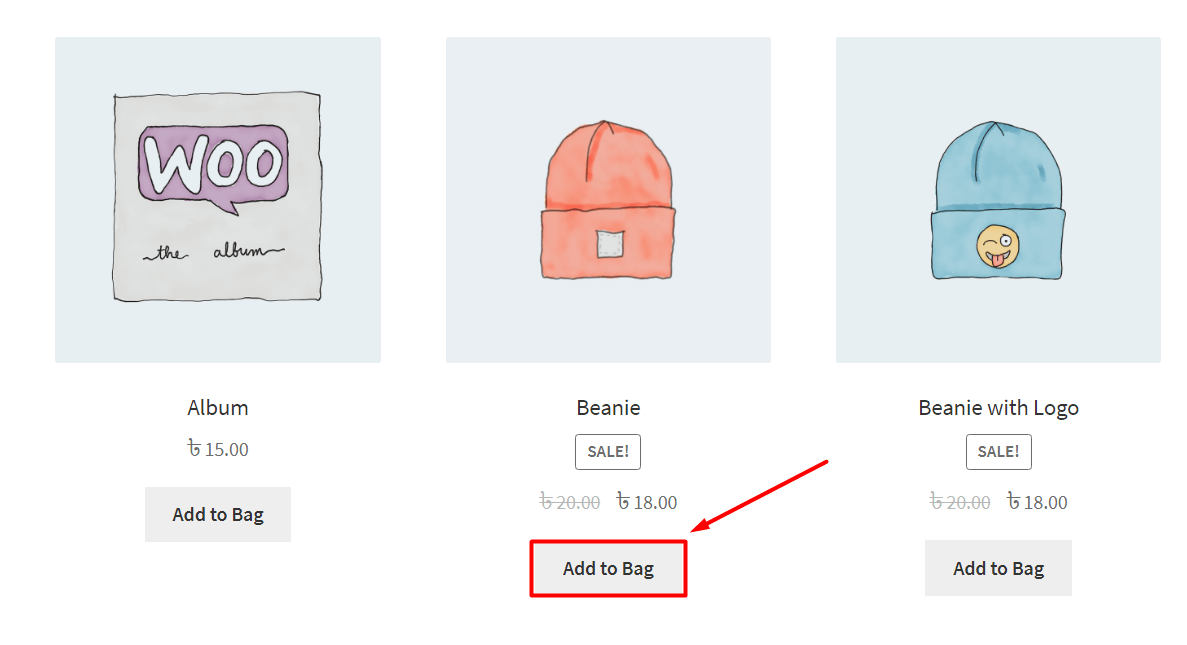
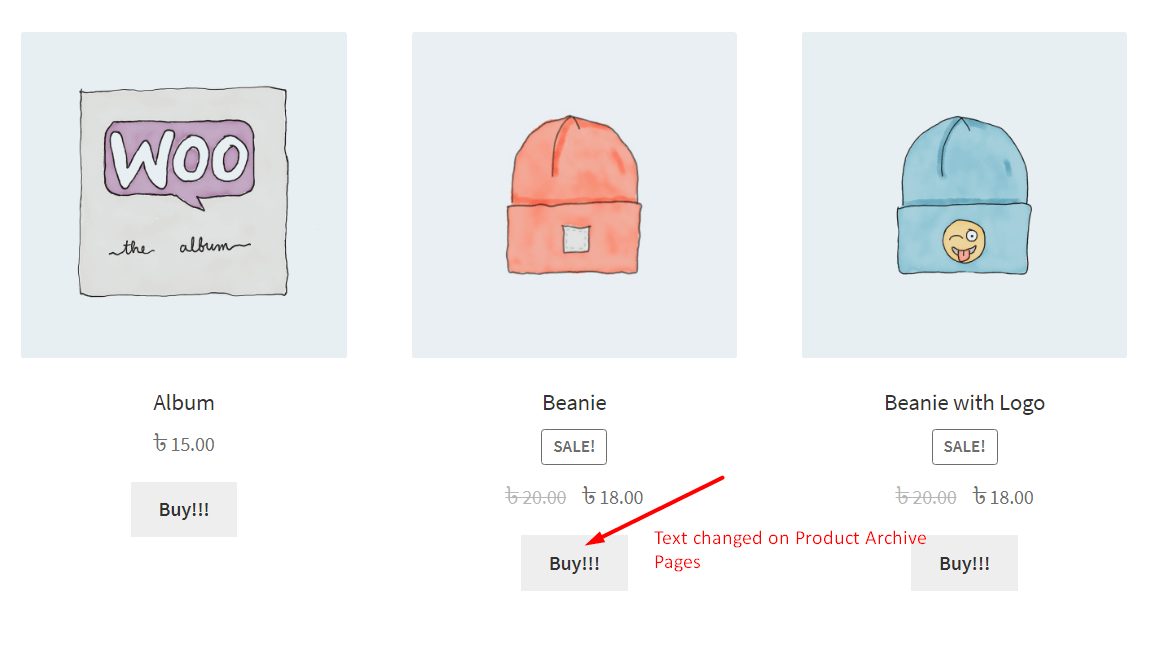
WooCommerce Add to Cart Button Text Change in the Archive Page:
Here’s what the preview looks like on the archive page:
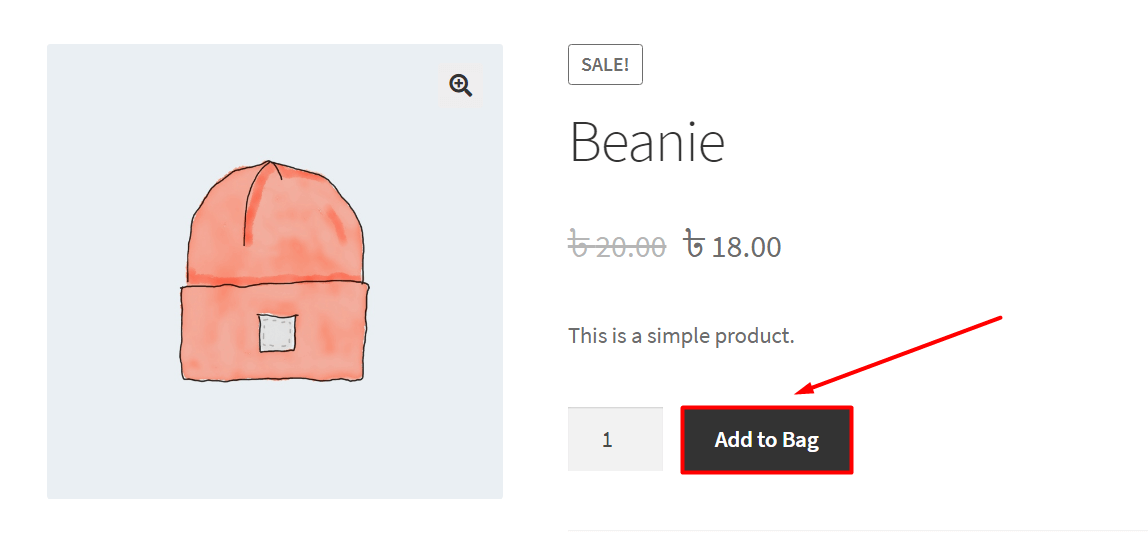
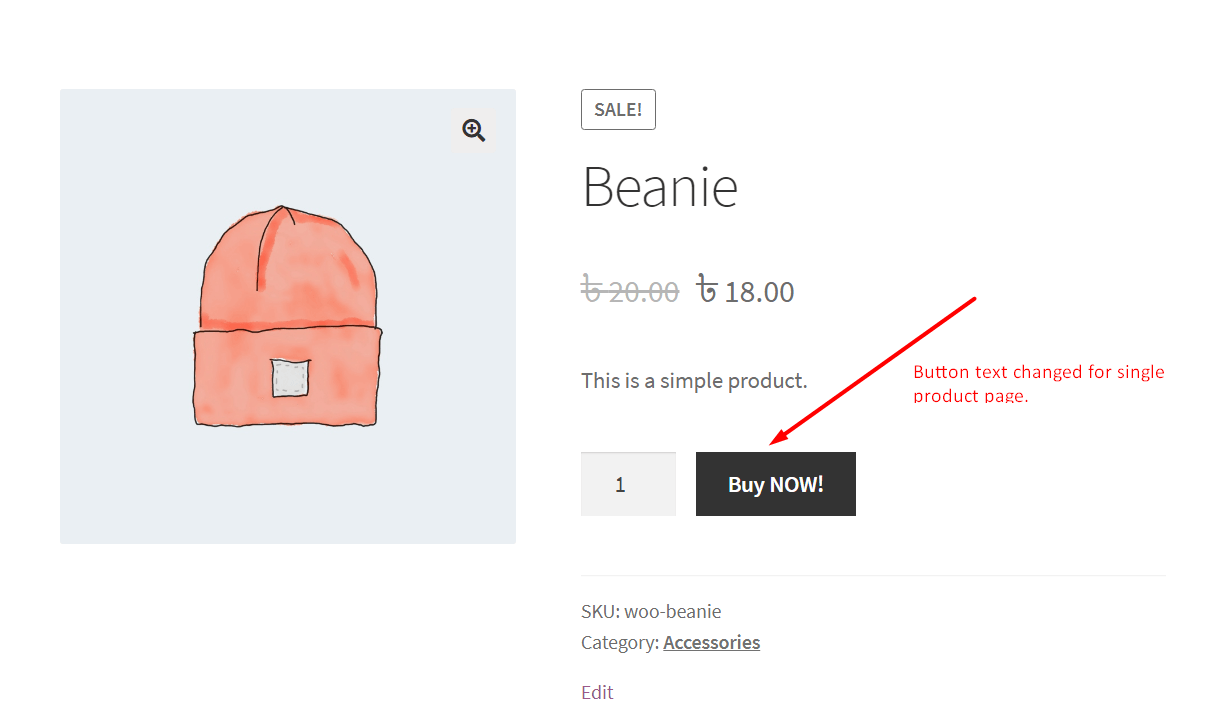
WooCommerce Add to Cart Button Text Change in the Single Product Page:
Here’s what the preview looks like on the single product page:
Editing WooCommerce Add to Cart Button Using the ProductX Plugin
The above-mentioned method has a couple of problems. One, it’s not for everyone. Two, there is a risk of failure that can potentially render your WooCommerce store useless.
The easier way is to use a proper plugin. We have two plugins here that can help you with the situation. However, one has a significant advantage over the other.
And it’s the ProductX WooCommerce Builder Plugin.
The ProductX WooCommerce builder plugin has a Product Add to Cart button block that can help you create a custom WooCommerce custom add to cart button. And the great thing is, you can create a custom product page and shop page templates and make changes to the button there as well.
ProductX is now WowStore! We’re very excited to bring you this experience, packed with unique features. Please note that the features, blocks, starter packs, etc. all work the same. If you have used ProductX, you’ll feel right at home with WowStore.
Here’s an example where we design a custom button for a single product page. Here’s how to do it:
- In order to change the WooCommerce Add to Cart button text, you’ll need to have the ProductX plugin on your WordPress site. The installation process is simple, go to Plugins>Add New. Then write “ProductX” in the Search Bar.
- The plugin should appear straight away. If not, then you can also download it from wordpress.org and add it to your WordPress site. All you have to do is hit the “Add New” button and upload the plugin from the download directory of your computer.
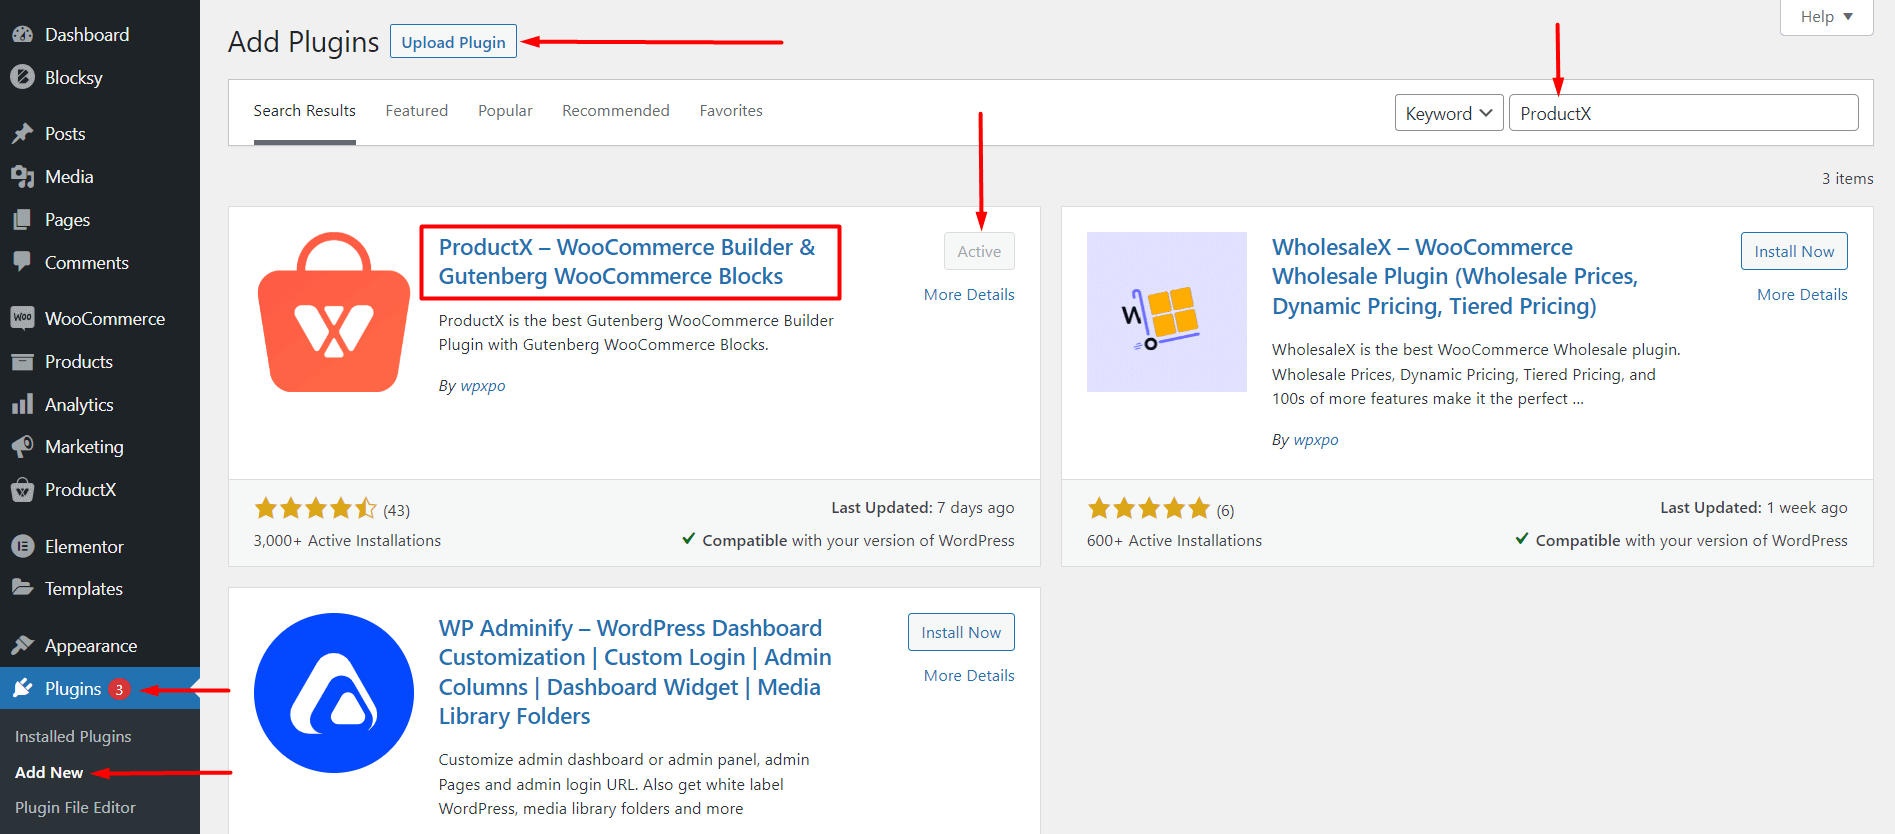
- Now “Install and Activate” the plugin.
Once the plugin is installed, you’re ready to use the ProductX WooCommerce builder. The builder is a powerful feature of the plugin that lets you create custom product page templates and use them on your WooCommerce store.
We are about to create a single product page template that will be used for all of the single products in a WooCommerce store. Here’s how to do it:
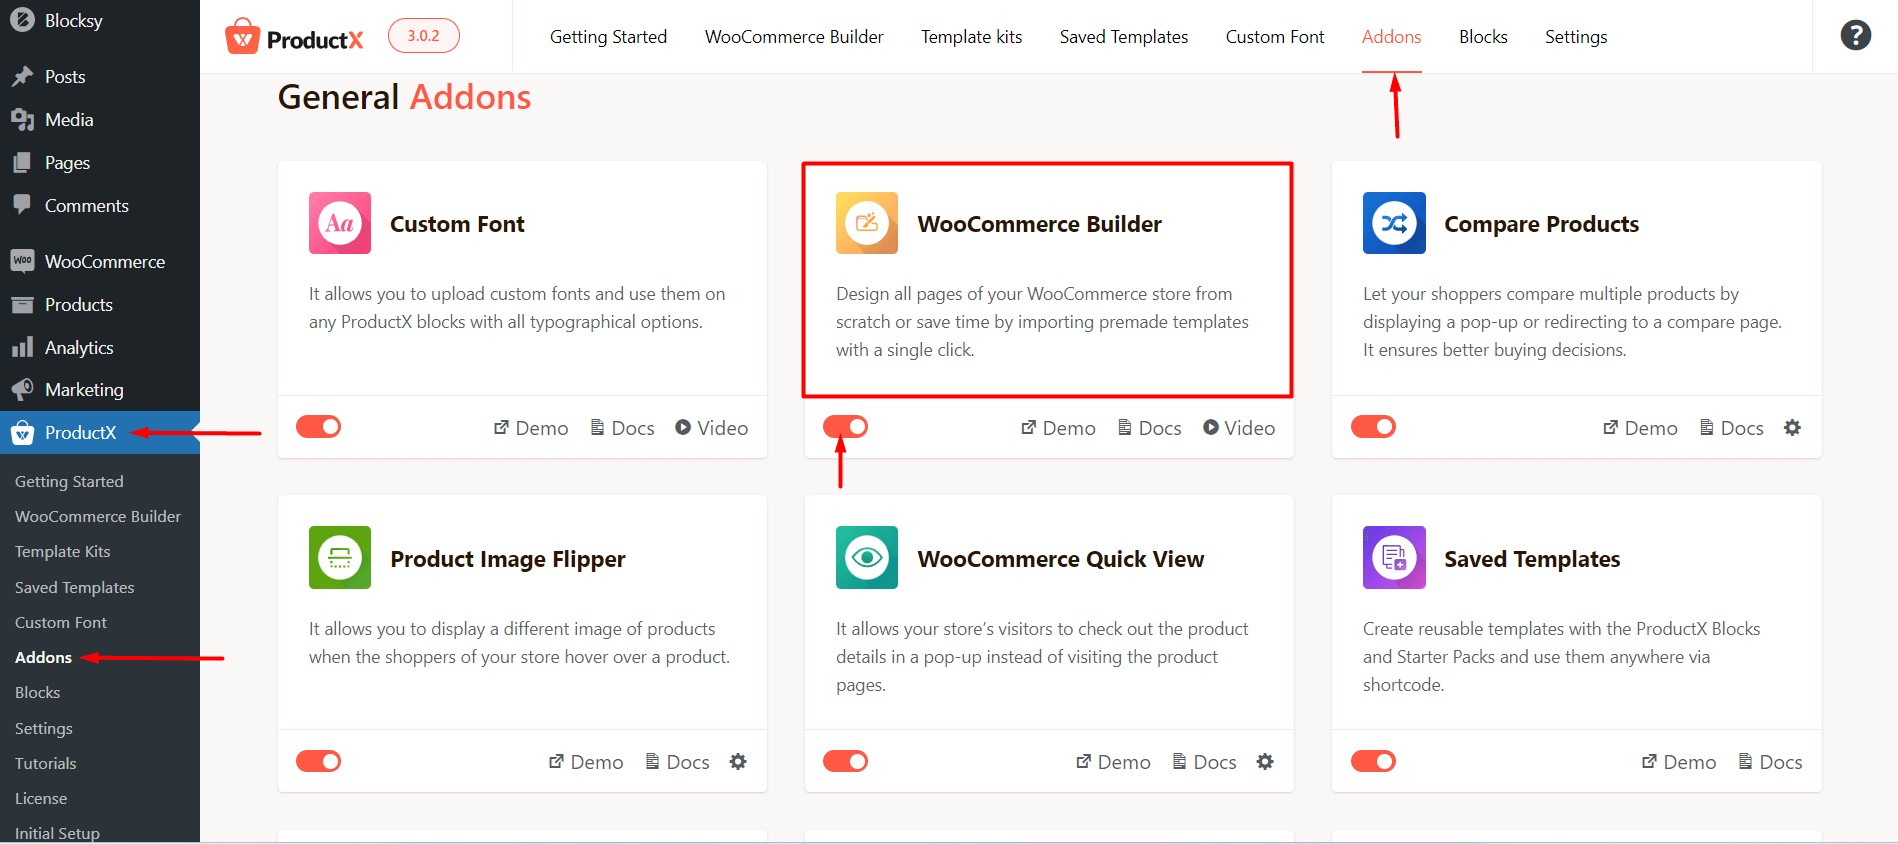
- Enable the WooCommerce builder addon from ProductX > Addons.
- Go to ProductX > WooCommerce Builder from your WordPress dashboard. Then click on Single Product.
- Here you will find the option to create a single product page template from scratch or use one of the pre-made templates. We will create a single product page template from scratch.
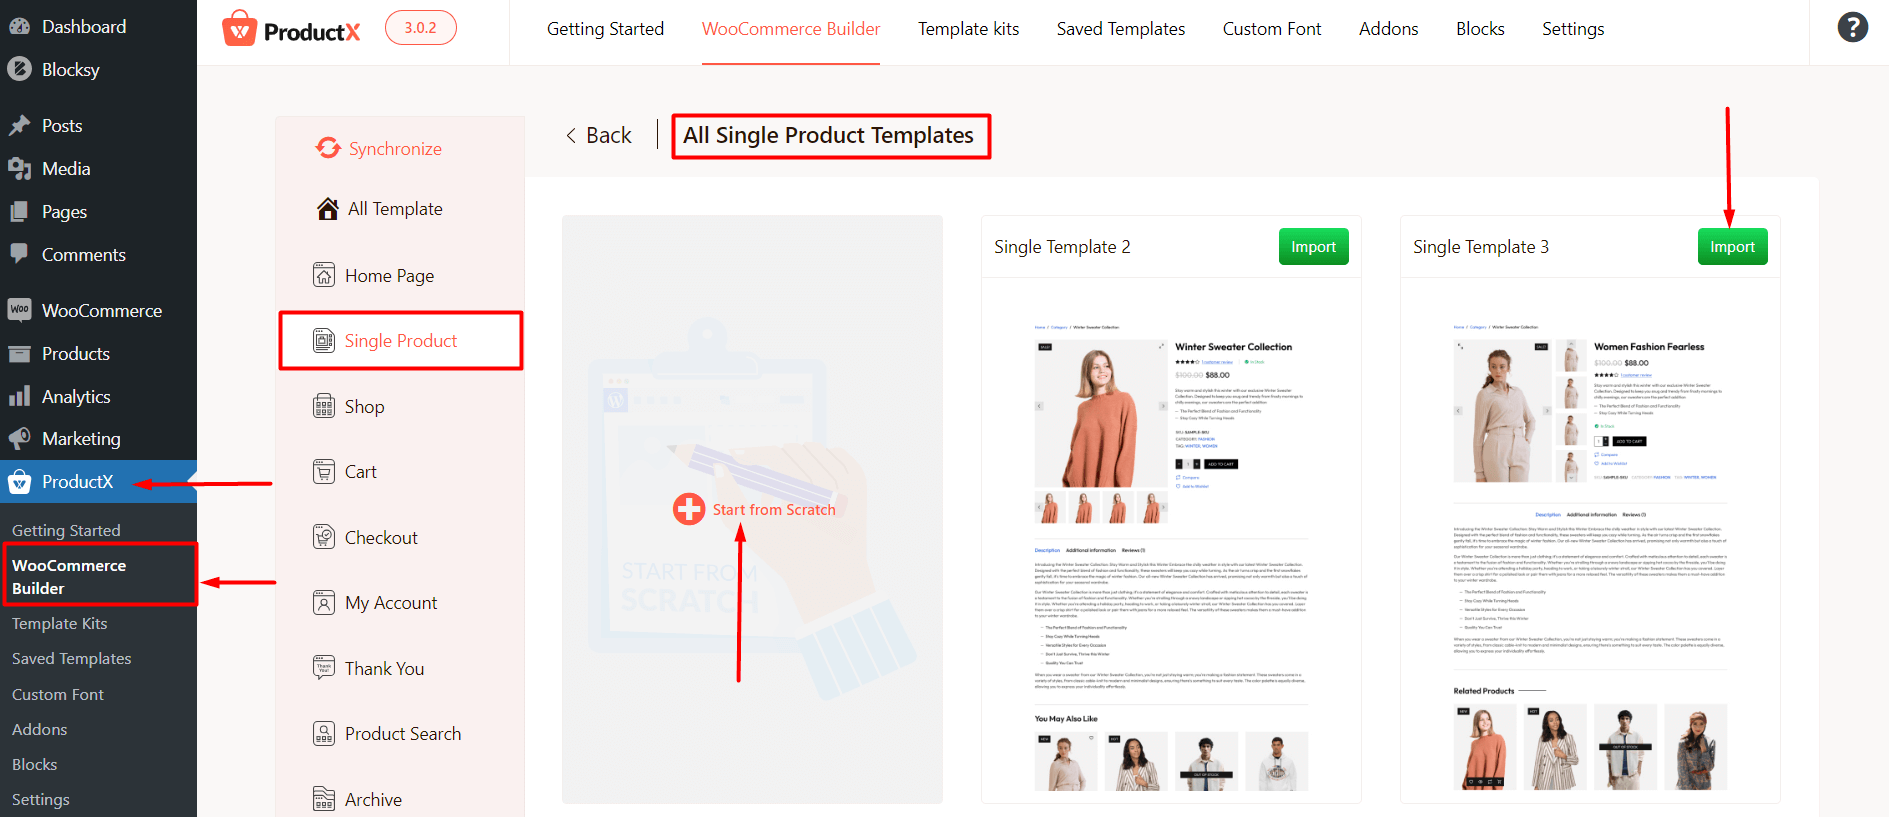
- In the single product page template creator, we will add the Product Breadcrumb, Product Title, Product Stock, Product Price, Product Image, and the Product Add to Cart block. Apart from these blocks, ProductX has 10+ blocks dedicated to building single product pages.
Now, we will change the design properties of the product Add to Cart block. We will change the quantity and the plus-minus design properties as well as the appearance of the button. Here’s what it looks like (with the design and the button text change):
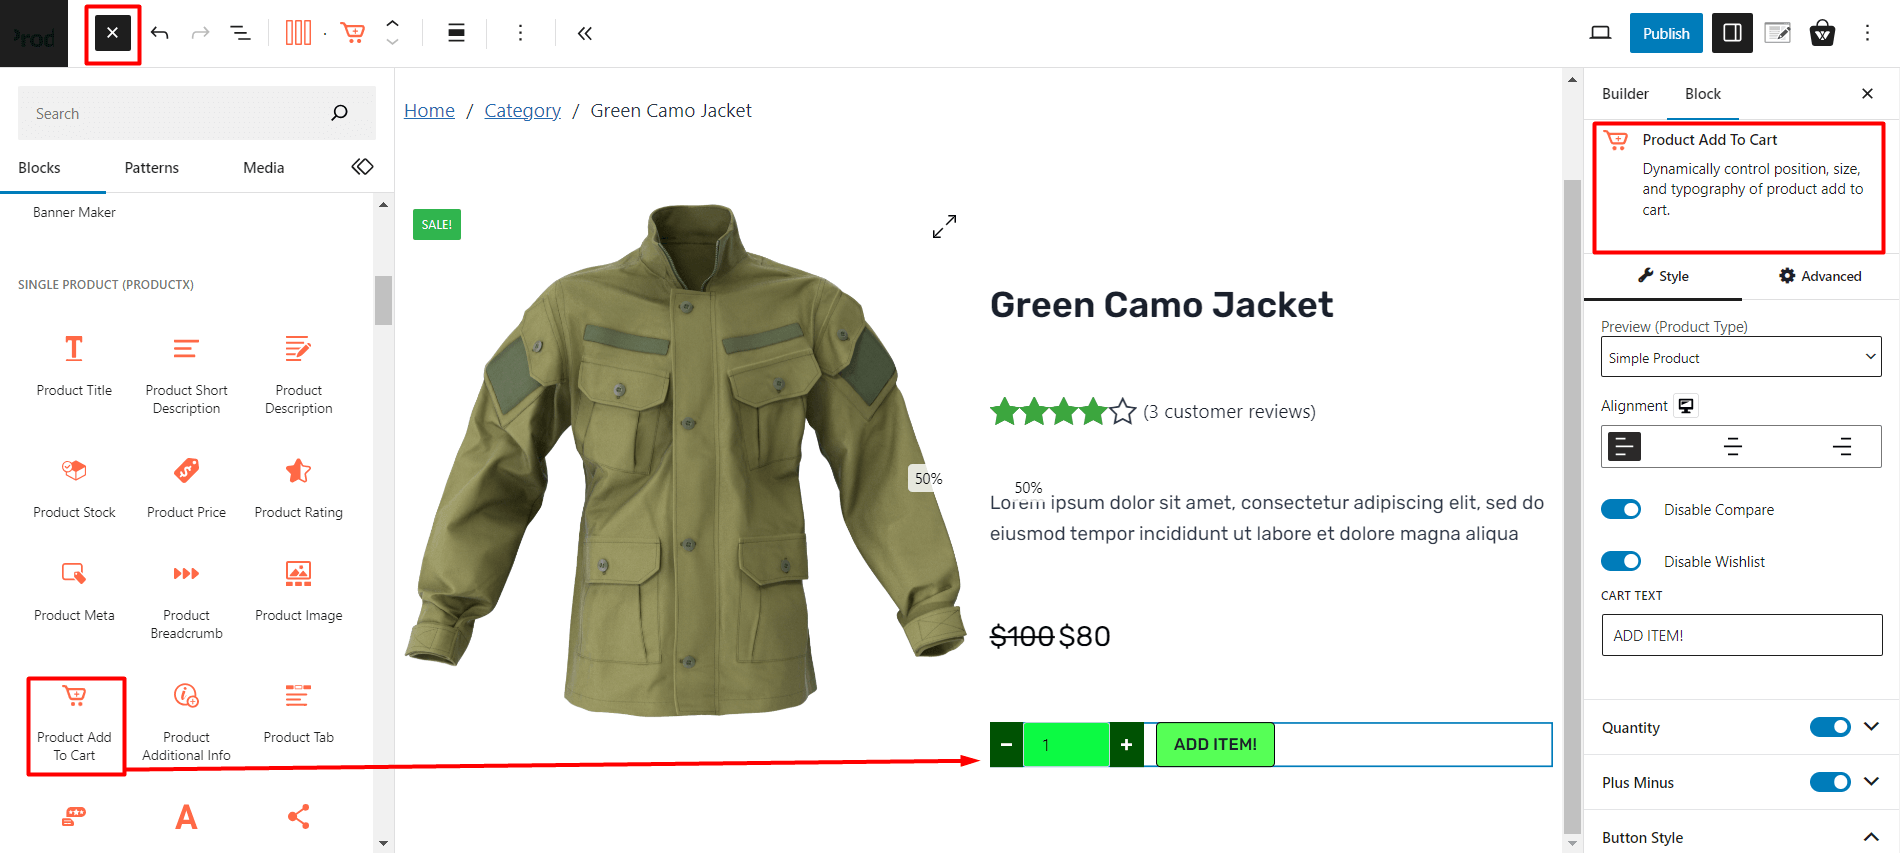
If you are not sure what each setting does, then you may want to check out the official ProductX documentation for the Product Add to Cart block feature.
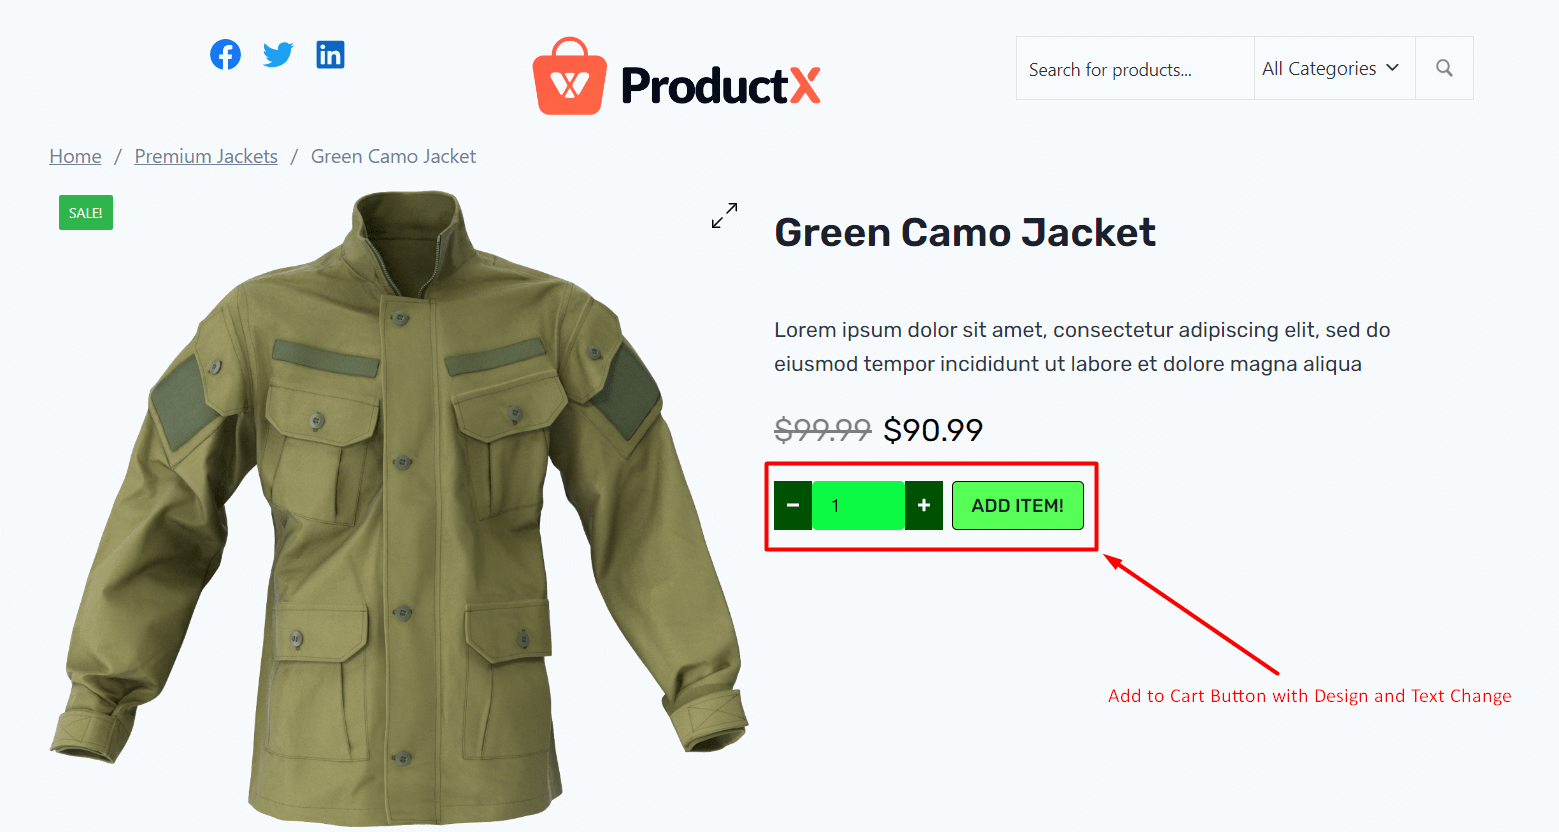
Then we will change the page condition to show it on all pages. Finally, we will publish the page.
Here’s what the change looks like on the front page:
***Note: This is just one example. The ProductX WooCommerce Builder can help you build a custom shop page, archive page, and more. And you can set your WooCommerce custom Add to Cart button on these pages. Here’s a quick overview of the ProductX WooCommerce builder:
If you like what you see, why not give it a try? The ProductX Gutenberg plugin has a lot of cool features you can explore and use for your personal website:
How to Change the Add to Cart Button Text in WooCommerce Using another Plugin?
It is probably the more conventional way to change the Add to Cart text on your single Product WooCommerce page or the archive product page.
Although it’s simple, it has a significant drawback. We will discuss it later on.
First, let’s see how you can use the “Add to Cart Button Custom Text” plugin to change the add to cart button text on your WooCommerce single product/product archive pages.
This plugin lets you change the texts on a single product page (you can change the different button texts) and the archive product pages (again, you can change the different button texts).
Here’s how to do it:
- The installation process is similar to the method shown previously. You just need to follow it and install and activate the plugin.
- Once the WooCommerce Add to Cart button change plugin is ready for use, you need to navigate to Settings>Add to Cart Button to use the plugin.
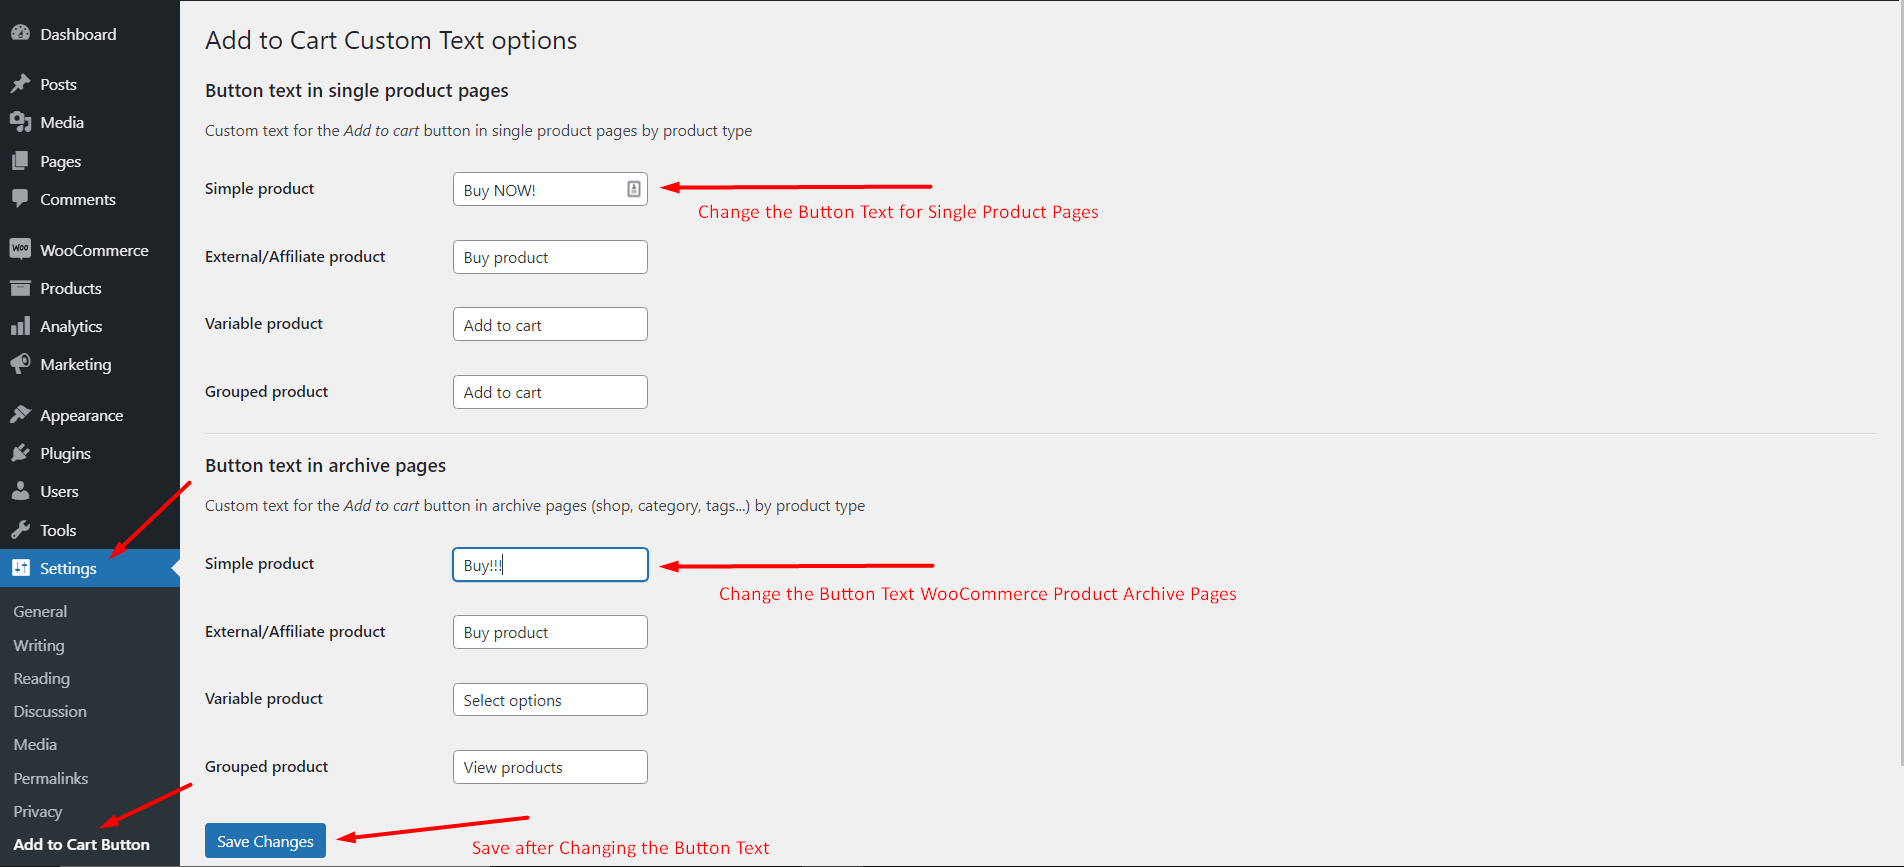
In the “Add to Cart Button Custom Text Plugin”, you can change the WooCommerce single product button text or the button texts of the WooCommerce product archive pages. For both categories, you have the option to change:
- The Simple Product
- The Variable Product
- The External Product
- The Grouped Product
You can play with the different options. For our use case, if you change the “Simple Product Text” for either the single product page or the WooCommerce archive page, then you’ll see the change right away.
WooCommerce Add to Cart Button Change in Single Page:
Here’s what the change looks like:
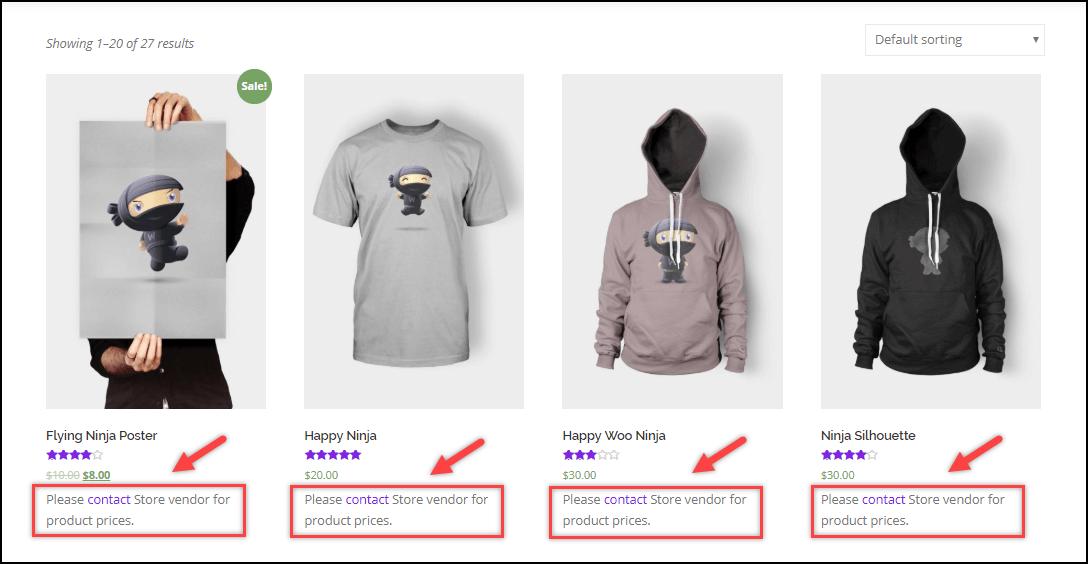
WooCommerce Add to Cart Button Change in Product Archive Page:
Here’s what the change looks like:
***You can use this plugin to change the button text. However, that’s pretty much all you can do with this plugin -change the names of the button. With ProductX, you can get a lot more!
Customize the Add to Cart Button with Additional Catalogue Mode Capabilities
What if we told you that there is a way you can not only edit and customize the add-to-cart button on your store but also convert your store into a product catalogue by hiding the add-to-cart button?
This can be easily done with the help of the ELEX WooCommerce Catalogue Mode plugin. You have the option of substituting a custom button for the Add-to-Cart button that is displayed on both the product page and the shop page.
Additionally, you can also remove the add to cart button as a whole, turn your store into a product catalogue by hiding the add to cart button, hide product prices, and set a custom URL for the custom button on the shop page to redirect customers to another (internal or external) website for certain products.
Simple, right?
Not that simple!
You’re getting all these options with only a couple of clicks. So, there has to be a catch right!
There is!
You see, plugins like these do not add to the site loading speed. If anything, they make your WooCommerce e-store slower. And that’s something you don’t want!
If you have a lot of plugins on your WordPress site, then naturally the site loading speeds will take a hit. Because the job of a plugin is to load JavaScript files. If you have too many plugins on your WooCommerce store, then naturally, the loading effects of these plugins will add up, making your site slow!
Customers are not going to wait for your site to load and buy something from you. If you’re site loads slow, then there is a great possibility that your customer will find products elsewhere. Also, slow-loading e-commerce sites generally rank lower on Google SERPS.
It means you may go under the radar of the customer. Although you have something great to offer to the customer, because of a slow WooCommerce store, you won’t be able to reach them!
So, to improve site loading times, you’ll need to optimize your site, which can be cumbersome if you don’t know what you’re doing. As a whole, you’ll need to allot extra time to optimize your site and go through other (maybe never-before-seen) processes.
You don’t have to use too many plugins. ProductX itself is a very lightweight plugin that has all the features you could possibly need to create a proper WooCommerce store. It’s built in a way that’ll not slow your site down! However, you can choose to use the code snippets as they won’t add too much weight to your website.
So, What should I Do?
There are 3 potential options you can use to change the button text.
- You can use the code snippets to change it. However, we would not recommend it if you are a novice and don’t have too much experience with code. It can do more harm than good. However, if you are familiar with WordPress, already have too many plugins, and don’t want to make your website too bulky, you can choose to use it.
- Using the ProductX plugin eliminates the need for other bulky plugins (you do need to install WooCommerce though!). It’s a lightweight e-commerce builder plugin that can help you create a full WooCommerce store. If you are just starting out, then it is highly recommended to use this plugin.
- The 3rd and 4th choices are optional. They don’t offer much. But you can certainly try them out and see if they meet your needs.
***Going with the ProductX plugin is your best choice here. You are not just able to change the add to cart button text – but you can create full WooCommerce websites.
Final Thoughts
You now know how to change Add to Cart button text on WooCommerce product pages. You know the way to change the WooCommerce button text by adding custom code snippets to the theme’s functions.php file.
You also know how you can use a plugin to change the Add to Cart text.
On top of all this, you know which option is better for your WooCommerce business.
So, we will leave the final choice in your hands. After all, you’re the one running the business online.
👉 Get ProductX to unlock all conversation-focused features and skyrocket your sales!
some21
June 28, 2021Thank you for adding the video tutorial. It is very useful.
Sadik Ahmed
June 28, 2021We’re glad you like our post. Feel free to check out other relevant content in our blog. We have some very helpful content on WordPress plugins, especially PostX and ProductX.