Introduction
In today’s discussion on using WordPress, we’ll be taking a look at the WordPress HTTP error-specifically when you’re uploading images/similar media. We’ll be taking a look at how to address the HTTP error uploading image to WordPress issue.
We’ll be checking out a couple of things you can do to remedy this issue. In general, it’s nothing too major. And we can pretty much guarantee that you’ll be able to fix it with minimal effort.
However, if you don’t know what you’re doing, it can be annoying. So we’ll be checking out how you can tackle this issue on your own.
How to Fix HTTP Error When Uploading Images
Here are some of the common fixes you can try out:
1. Try a Simple Refresh
In many cases, simply refreshing your WordPress page can get rid of the WordPress HTTP error.
There may be an instance where you’ve simply lost your connection with WordPress. In particular, you cannot point finger at any specific problem. It can either be your Internet Service Provider (ISP) or it can be a slight hiccup with the hosting.
Furthermore, there can be instances when you’ve lost your session and you just need to log in. It’s one of those ‘fairly often instances that seems obvious but feels quite annoying.

So, you only have to log in to your WordPress website or simply refresh the page to get rid of the error. Super simple!
2. Try Deactivating WordPress Themes and Plugins
In general, users use this method to identify problems with WordPress themes and plugins. In various instances, some WordPress themes and plugins may break the design or functionality of your WordPress website.
In our case, we will also do the same and see if the HTTP WordPress error still exists when uploading media.
In order to do that, go to Plugins>Installed Plugins. Here’s you’ll see a list of all the plugins you have installed (activated/inactivated) on your WordPress website.
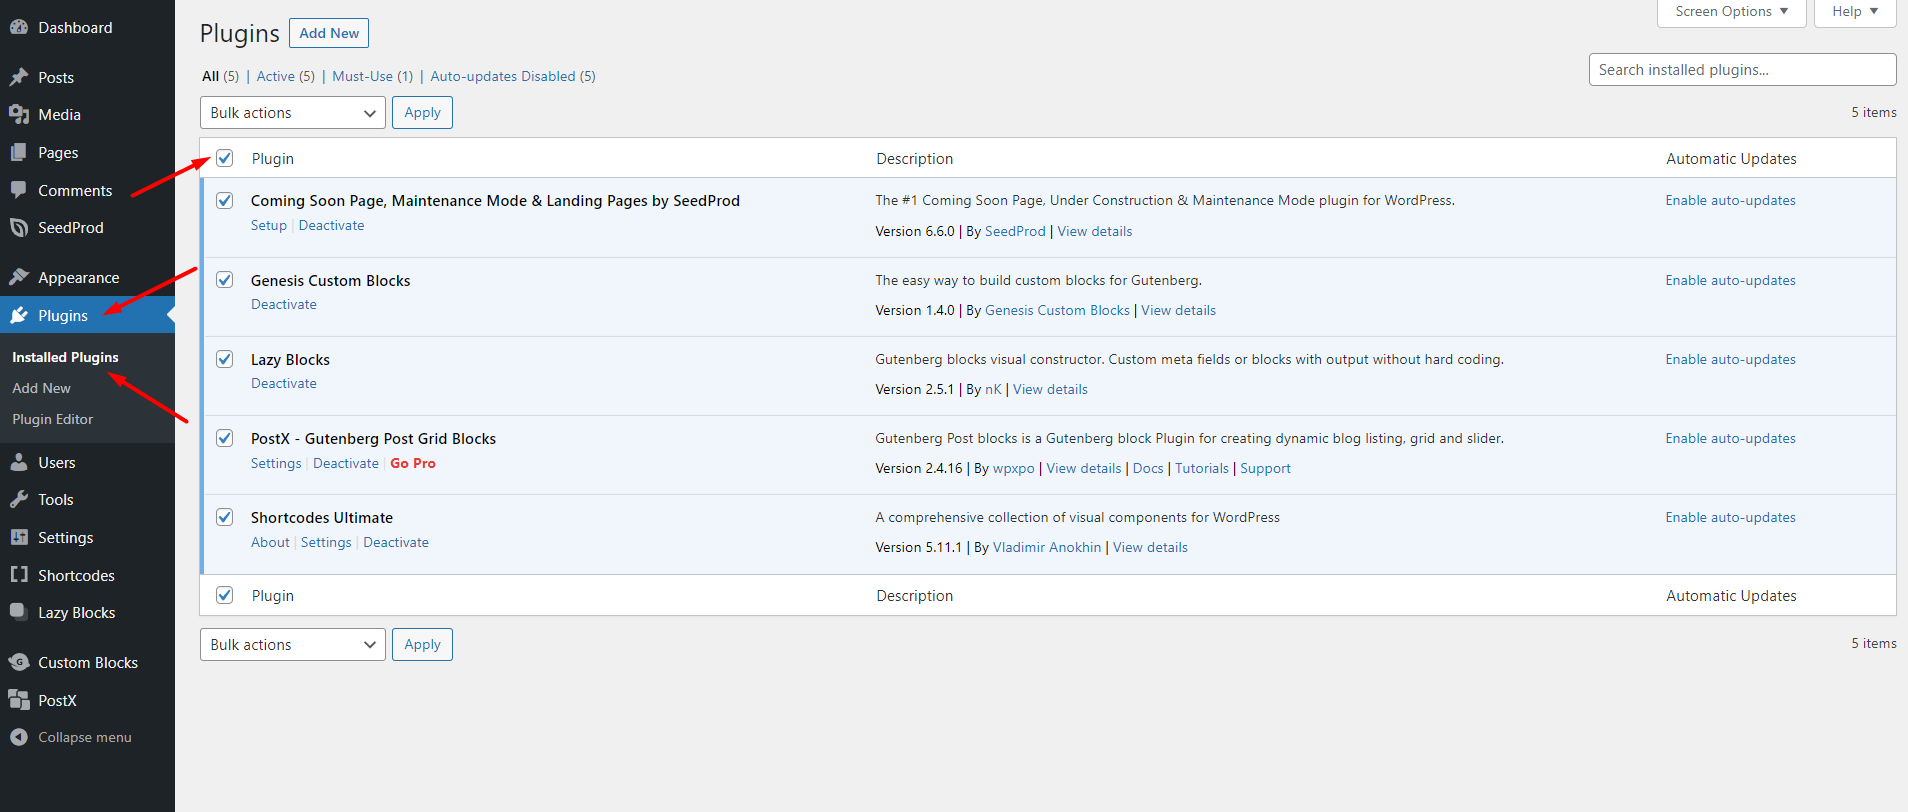
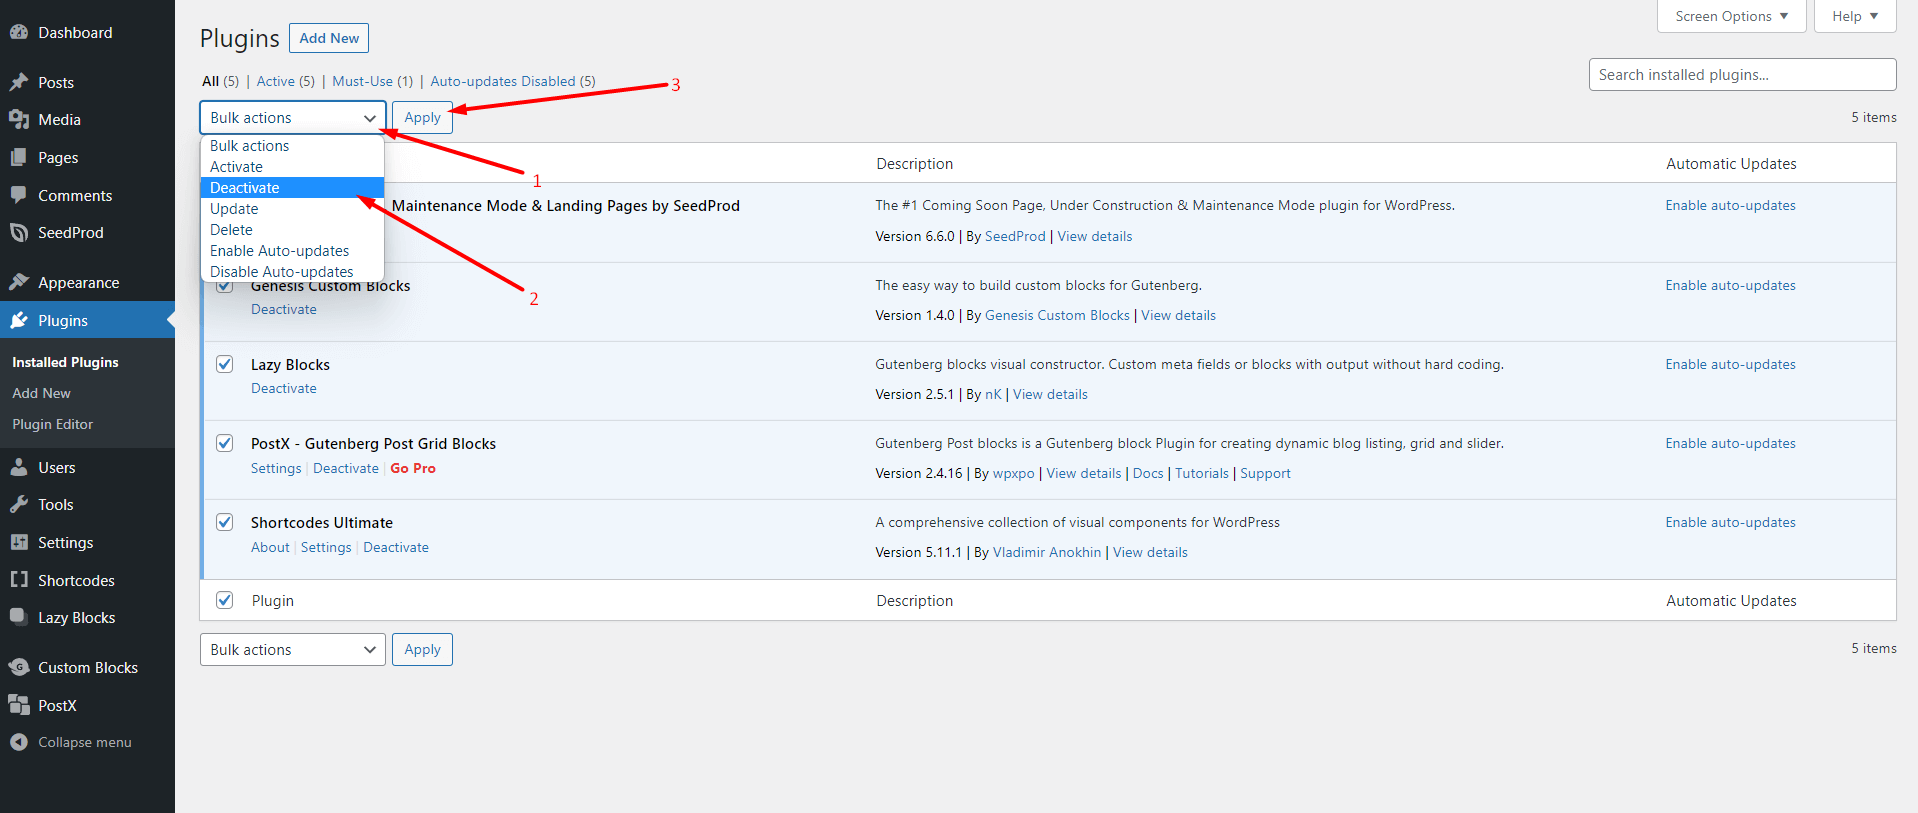
Now you have to select all the plugins. Once you’ve done that, Go to the ‘Bulk Actions’ dropdown and select ‘Deactivate’. Now all your plugins are deactivated.
In order to check the HTTP error, you will need to move to the default them of your WordPress website. You can choose to deactivate/delete the theme completely and see if the HTTP media upload error still persists.
The idea here is to bring WordPress to its original state to identify the problem. There are some plugins that are restrictive in nature, not allowing you to upload any specific media/type of media to your WordPress website.
Now there is an issue that may arise here:
‘Will I lose all my WordPress website data if I deactivate the plugins?’
The general answer is NO. Unless you totally delete a plugin and install something new to manage the data, your data should remain as it is.
Now the way it works is very simple.
Activate the plugins one by one. Once you activate one plugin, try to upload the images to your WordPress site. Whenever you come across the error, you can be sure that’s the plugin causing all the errors.
If you stop using the plugin [if you delete it] then there’s a good chance you’ll lose some data. So, the first suggestion would be to reach out to the problematic plugin developers and see if they can offer a solution. This won’t just help you, it may help others who are facing the same issue.
As an extra layer of security, you may want to back up your website [usually in this process, things DON’T go horribly wrong!]. You can use UpdraftPlus, VaultPress, or similar options to back up your WordPress website.
3. Increase the Memory Limit
One of the reasons for the WordPress HTTP error while uploading media is the amount of memory bandwidth available to WordPress. If the memory limit is low, then it can create all sorts of problems other than uploading new images/media.
You will need to add a piece of code to increase the memory limit. From the FTP server login, you’ll have access to the wp-config.php file.
[Make sure to back up your WordPress website before moving on with this process. It’s very volatile and doesn’t have too much room for error. We would highly recommend moving to this only [ONLY!] when you have tried all other methods. And yes, you should seek professional help if you’re unable to conduct it!]
define( 'WP_MEMORY_LIMIT', '256M' );
This will increase the memory size limit to 256-megabytes. It should help you with the low memory allocation issue and further fix the HTTP error issue.
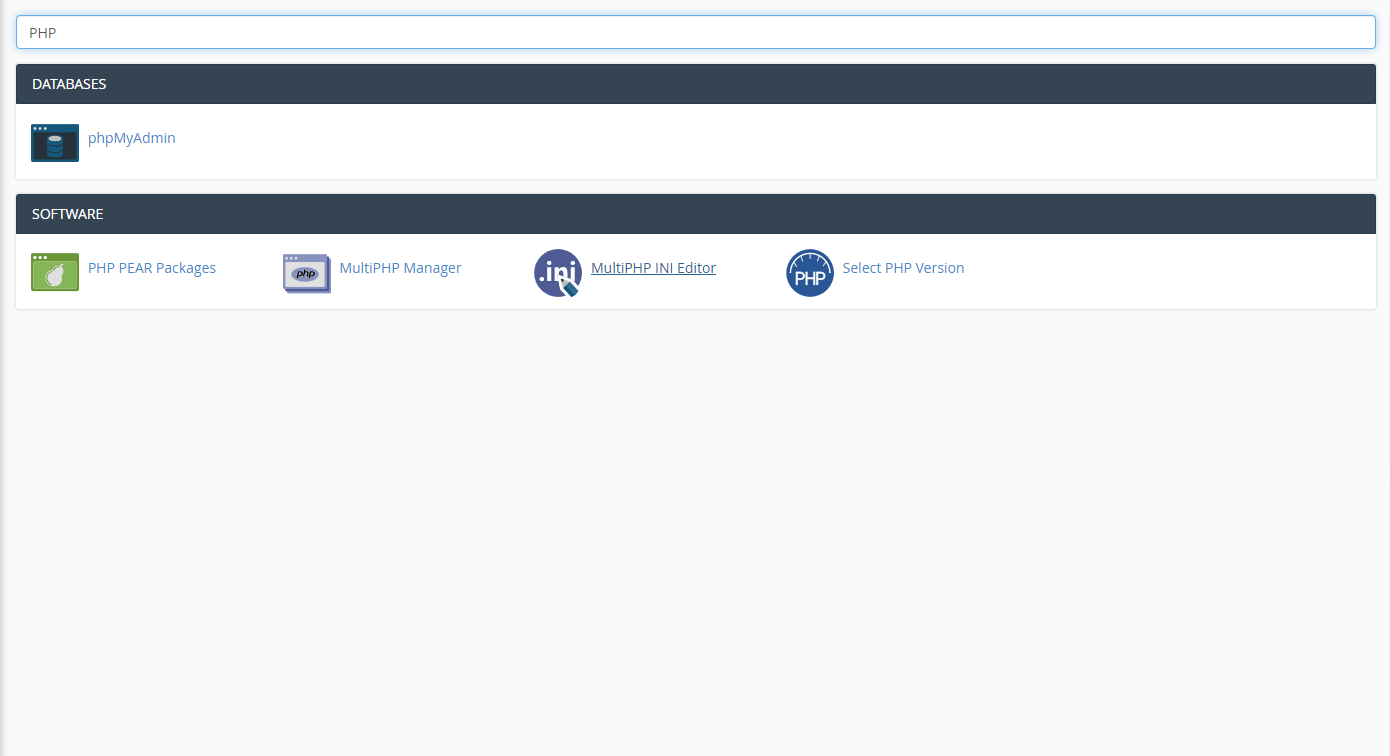
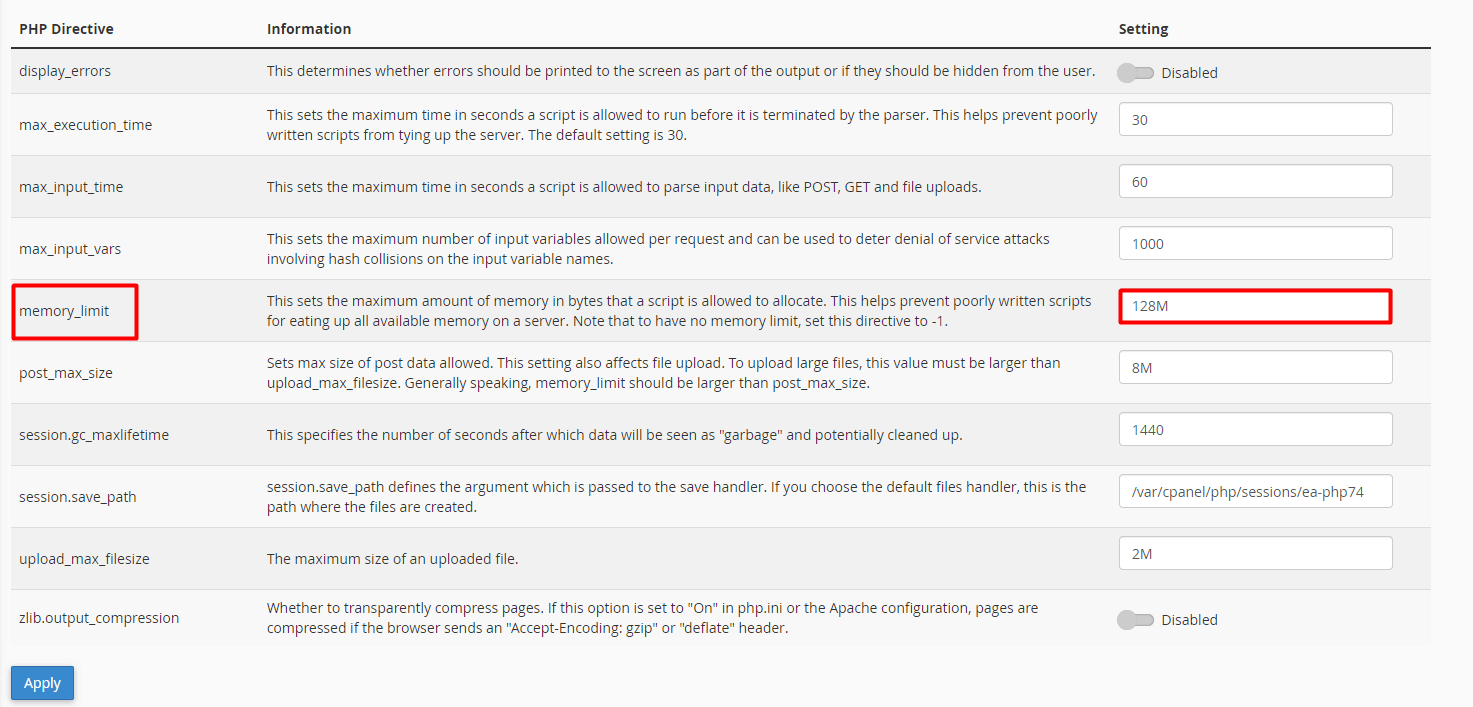
cPanel Access
For cPanel users, you can search for the ‘MultiPHP INI Editor’ from the search bar. Once you’re in, you can change the memory limit and to ‘256M’ and hit apply.
This should solve the issue.
4. Update the PHP Version
Make sure that you are running on the latest version of PHP for optimal performance. WordPress recommends that you run at least version 7.3 for better functionality.
If you’re struggling with this part of updating the PHP version of your WordPress website, contact your hosting provider for support.
5. Issues with Imagick and More
Imagick is basically a WordPress PHP module for processing the images on your website. If you’re using WordPress on shared hosting, then this may be one of the causes for WordPress HTTP error(s) when loading images to the site.
In some cases, resource allocation is limited for Imagick that may result in poor image loading performance. And that may also be the cause of HTTP error uploading image to WordPress.
You’ll need access to the .htaccess file for changing the thread limit and improving performance.
This file mostly makes the website more readable for visitors and cleans up URLs. If you select a particular style of URL structure, from the WordPress Permalinks setting, the .htaccess file is overwritten to accommodate the new structure. And this file is not accessible readily, as you’ll need to enable ‘Show Hidden Files’ to see it and bring any changes to it [which is very risky if you don’t know what you’re doing].
In order to get rid of the HTTP error, you’ll need to access the .htaccess file and add the following piece of code:
SetEnv MAGICK_THREAD_LIMIT 1What it does is bring the thread limit down to 1 so that only a single thread is used for image processing. And this is a tested method. Still, we would again urge you to be cautious when applying this method.
6. Tell WordPress to use the GD Library
As mentioned earlier, WordPress has PHP modules for image processing. One of them is Imagick. The other one is GD Library.
As Imagick is known to cause WordPress HTTP errors, you can use the GD Library by default. In order to make the GD library the default image processing library, you’ll have to paste the following bit of code to the functions.php file on your WordPress site:
function wpb_image_editor_default_to_gd( $editors ) {
$gd_editor = ‘WP_Image_Editor_GD’;
$editors = array_diff( $editors, array( $gd_editor ) );
array_unshift( $editors, $gd_editor );
return $editors;
}
add_filter( ‘wp_image_editors’, ‘wpb_image_editor_default_to_gd’ );
In order to add the code to the WordPress website, you need to:
- Go to Appearance>Theme Editort
- Find the functions.php file from the right Theme Files menu.
- Paste the code at the bottom.
- Hit ‘Update File’.
Once you add this code and apply the settings, try to add an image. If there’s no HTTP error, then you can be relieved.
However, if the error still persists, then you can remove the code and save the changes. It’s pretty straightforward. Just be careful and don’t remove any extra bit of code from the functions.php file.
HTTP Error Uploading Image to WordPress [Temporary]
It may be hard to point out, but the error may not be temporary at all. Maybe there’s a bigger issue with your WordPress website. In short, before moving ahead, you must find what’s the root of the error.
If you’re facing the error for the first time-uploading a specific media for the first time and the HTTP error occurs, do the following:
- Try reducing the image size and reuploading it.
- Try a different image file format. You can try PNG to JPEG or any other format acceptable by WordPress.
- Try a different image in a different format [may not work if the above-mentioned problems exist!].
You may want to try some of the other methods first before moving on to more complex procedures. Just be patient!
Frequently Asked Questions
Q: Should I set my custom library path?
Ans.: In general, users who bring their local site into production (make the site live) can face this issue. If you see a library path in your Media Settings, all you have to do is delete it. The percentage of this being an issue is minimal.
In short, by default, you should not need to set a custom library path. But if you’re making your site live, then you may have to delete the path and save the changes.
Q: Will ‘Clearing the Cache’ make a difference?
Ans.: Sometimes, Image WordPress HTTP error(s) can occur because of caching. You can use WordPress caching plugins and get the issue resolved. It does work!
Q: Can special characters in image names cause issues?
Ans.: It’s better not to use special characters like (`, @, $) when naming your images for WordPress. Sometimes, they are known to cause issues.
Q: WordPress is telling me-’please upload the image later/please try again later’-is there a fix for it?
Ans.: This can happen if the media file permission is not proper.
If you’re a cPanel user, then you can log in to your cPanel> Go to File Manager> wp-content>uploads. Once there, change the permission to 755.
For FTP users, navigate to the php.ini file>go to wp-content>change permission to 755.
Final Thoughts
The problem with HTTP error uploading image to WordPress can be an annoying one. But, as mentioned in the previous sections, solutions do exist.
But we will, however, tell you to get guided help if you’re new to all of this. But if you’ve been using WordPress for some time, then it should come to you naturally.


