Introduction
Do you want to know how to use the WordPress custom post type plugin? Well, you’ve come to the right place.
Here, we’ll show you how to create custom post types in WordPress using the Custom Post Type UI plugin (possible other options as well), a popular option to create new post types.
Also, we’ll show you some custom post examples alongside showing you the way to register your own custom post type with WordPress. We have some bonus sections related to custom posts as well.
But before we do all that, first, let’s get a quick idea about what custom posts really are in WordPress.
WordPress Custom Post Types: Does it matter?
It does matter!
In the early days of WordPress, you couldn’t really call WordPress a complete “CMS(Content Management System)” because of the lack of choices.
Then the following database addition came, which gave users the option to add/create new custom posts. It also allowed them to create static site pages with their own custom posts.
Post type can be any kind of content. It can be a specific page, a specific type of navigation, or anything that’s user-focused. By default, you’ll find the following post types baked into WordPress (Post Type Names are inside the brackets) :
- Post (‘post’)
- Page (‘page’)
- Attachment (‘attachment’)
- Revision (‘revision’)
- Navigation Menu (‘nav_menu_item’)
A popular example for a WordPress custom post type is ‘Product’. If you’re familiar with WooCommerce, then you’re already familiar with this type. Other examples included custom forms. You can use these forms using shortcodes from WPforms, Contact form 7, and other plugins.
Custom Post Type UI: Using the WordPress Custom Post Type Plugin
Here’s how you can create a ‘product’ post type with the Custom Post Type UI (CPT UI). We’re choosing this plugin because it’s got plenty of options to configure. Also, it’s suitable for all levels of users, from novices to advanced users.
Installing CPT UI is pretty straightforward if you’ve installed plugins on your WordPress site.
All you have to do is go to Plugins > Add New and write the name of the plugin in the Search Box. Once it appears all you have to do is click on Install. Once it’s installed you can activate it by clicking on the Activate button. Pretty simple!
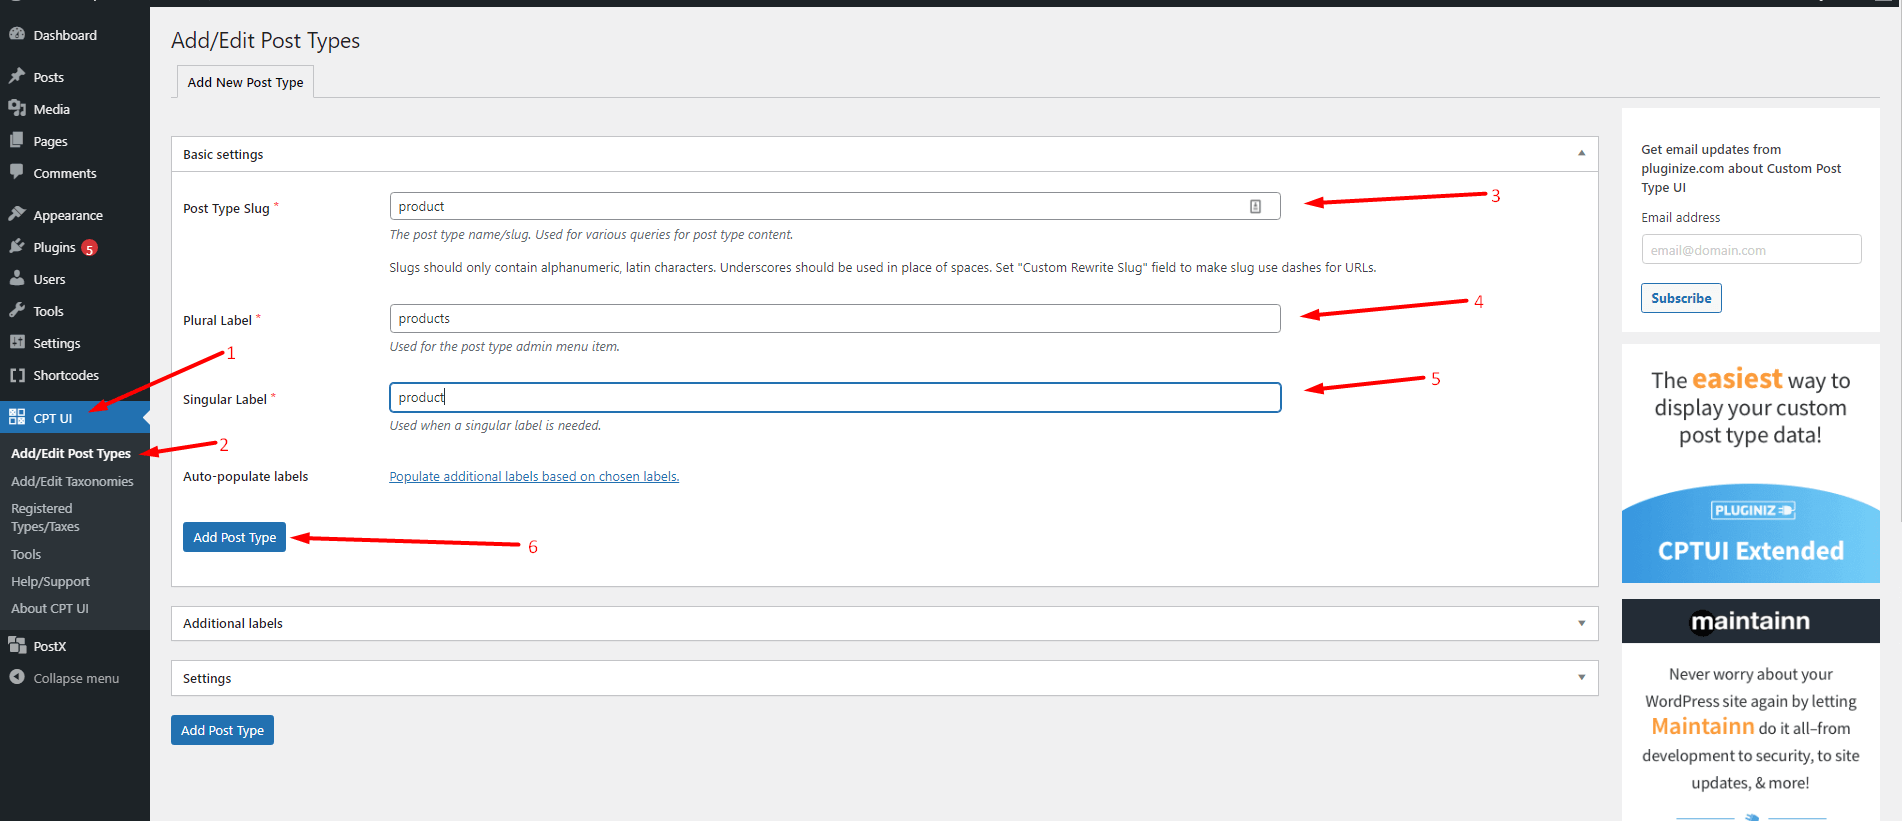
- We’ll start by going into Add/Edit Post Types section in the CPT UI menu.
- Once you click on it, you’ll find Basic Settings, Additional Labels, and another Settings section. We’ll create a new custom post type named ‘product’ in the Basic Settings.
- After adding the names we need, we’ll click on Add Post Type.
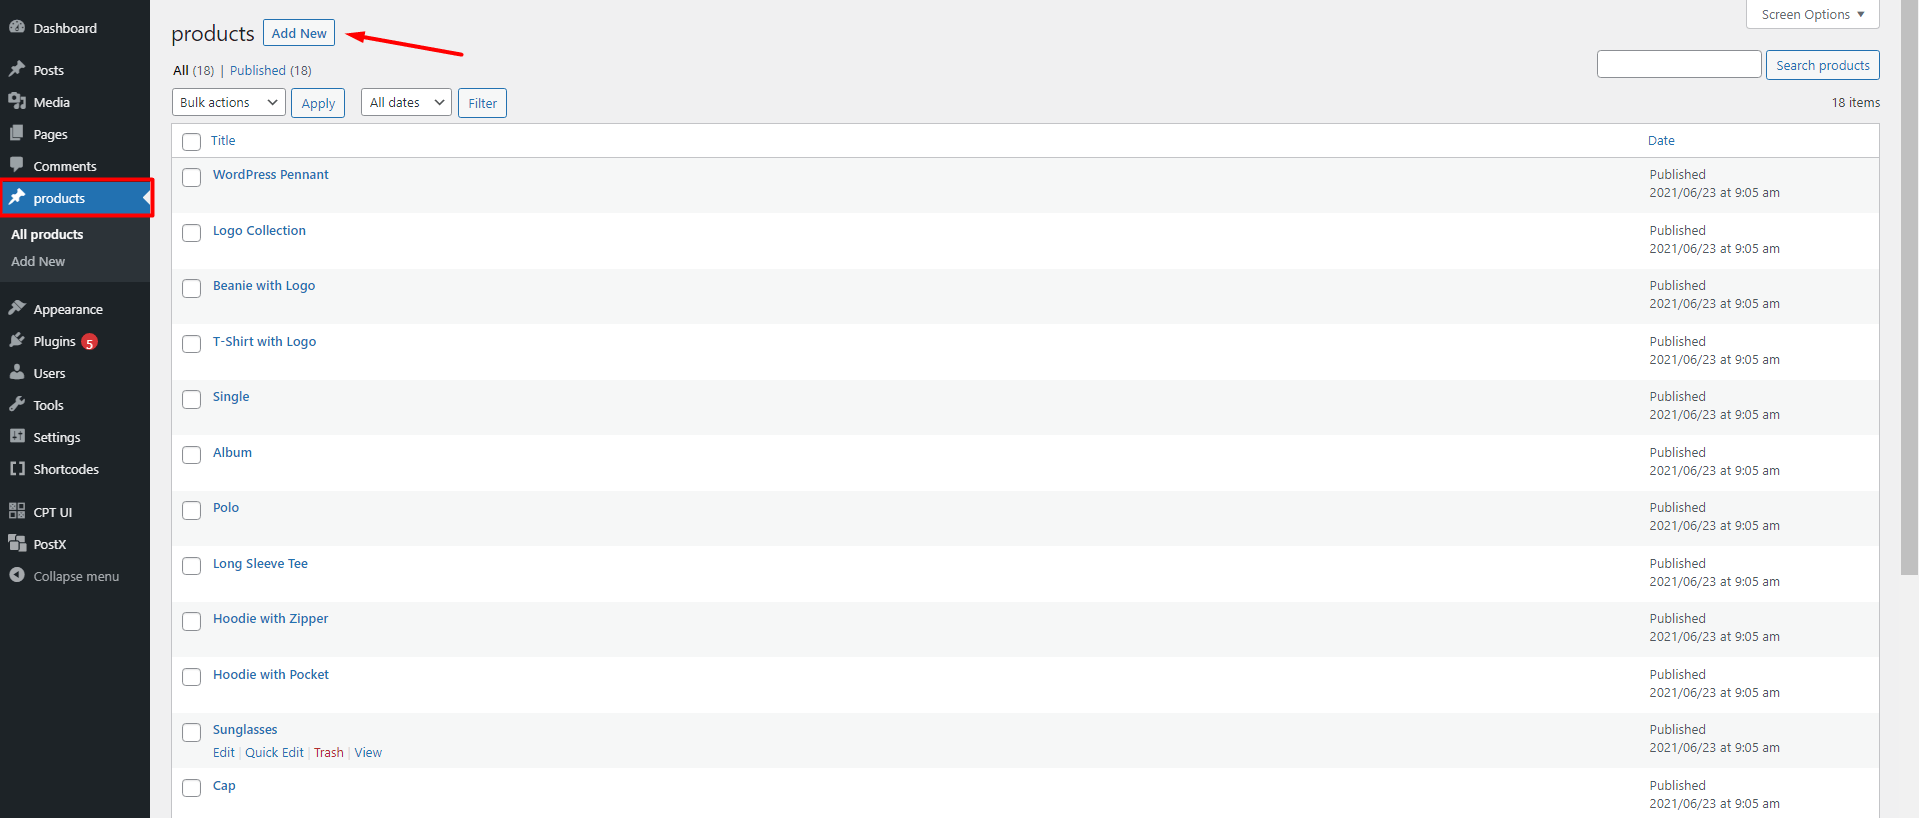
You’ll now see the ‘products’ post type in your WordPress dashboard. We will be adding further properties to it.
- Now go back to CPT UI>Add/Edit Post Types.
- Go to the Settings tab.
- Here we’ll change the menu positioning and add support for the editor as well. We’ll keep the menu position at 6 (it will show the menu below the posts section on your WordPress dashboard).
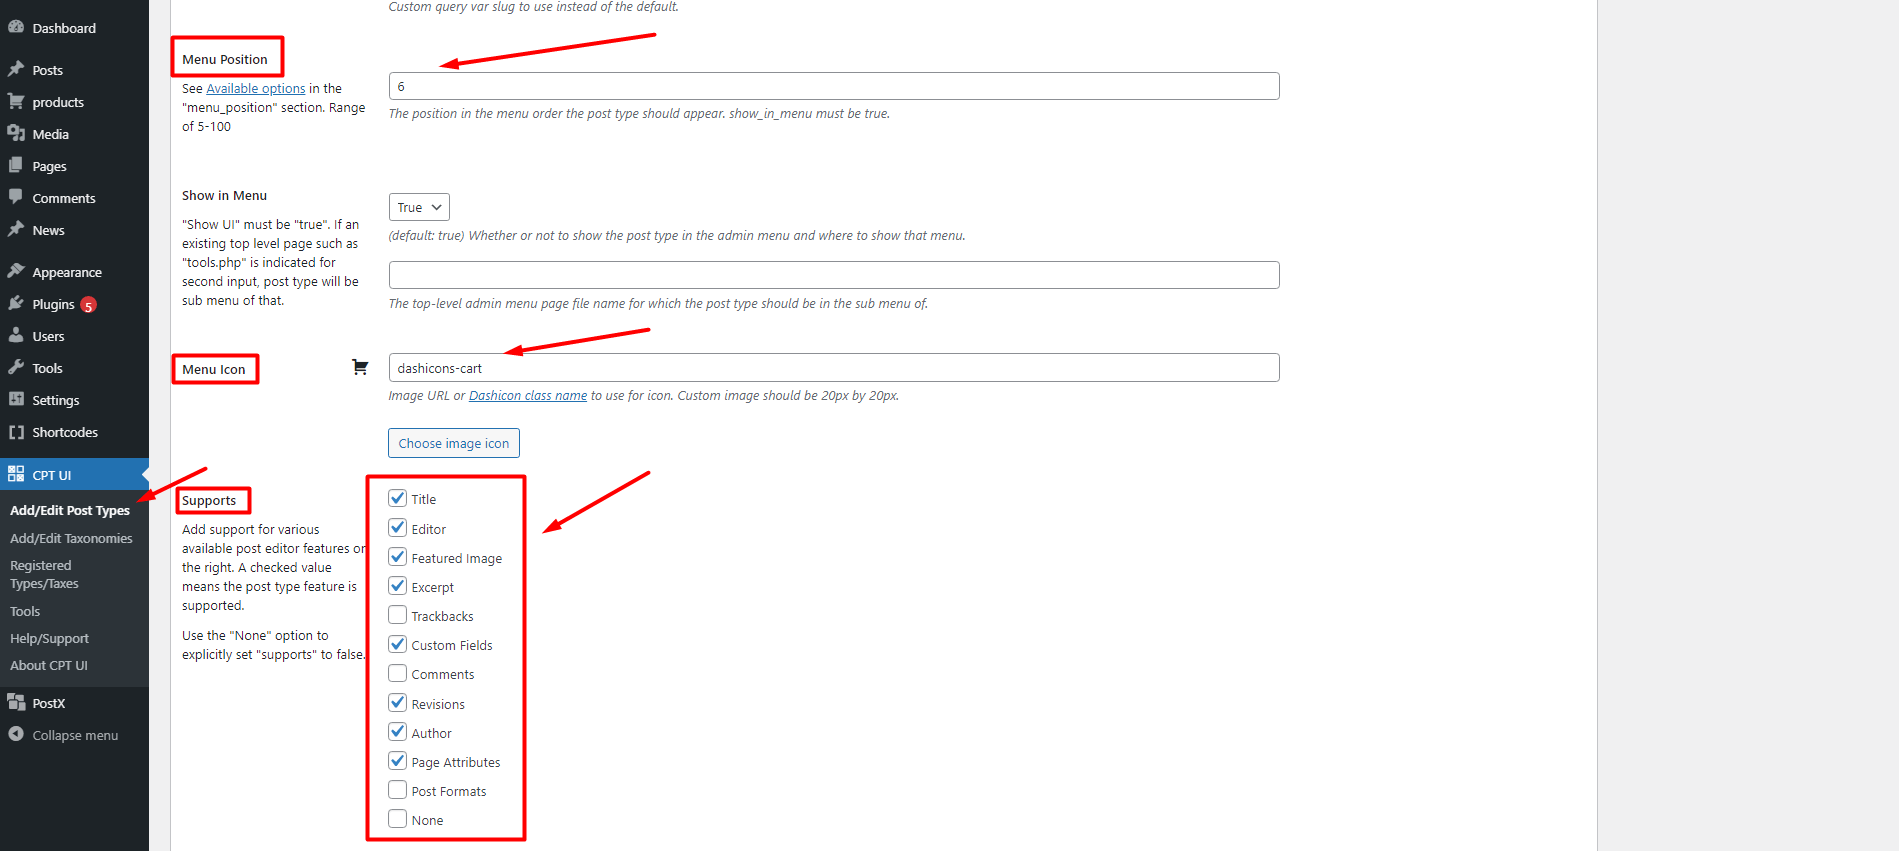
- Also, in the supports section of the plugin, we’ll tick all the necessary support we need.
- Finally, we’ll add a dash icon from the wordpress.org dash icon project.
- Then click on the ‘Add Post Type’ button at the very end.
Once it’s down, you’ll find all the necessary editor options in the ‘products’ custom post type we just created. We also want to create a custom taxonomy for the custom post type we made just now.
Create a Custom Taxonomy with CPT UI
In order to create a custom taxonomy with the Custom Post Type UI, follow the steps below:
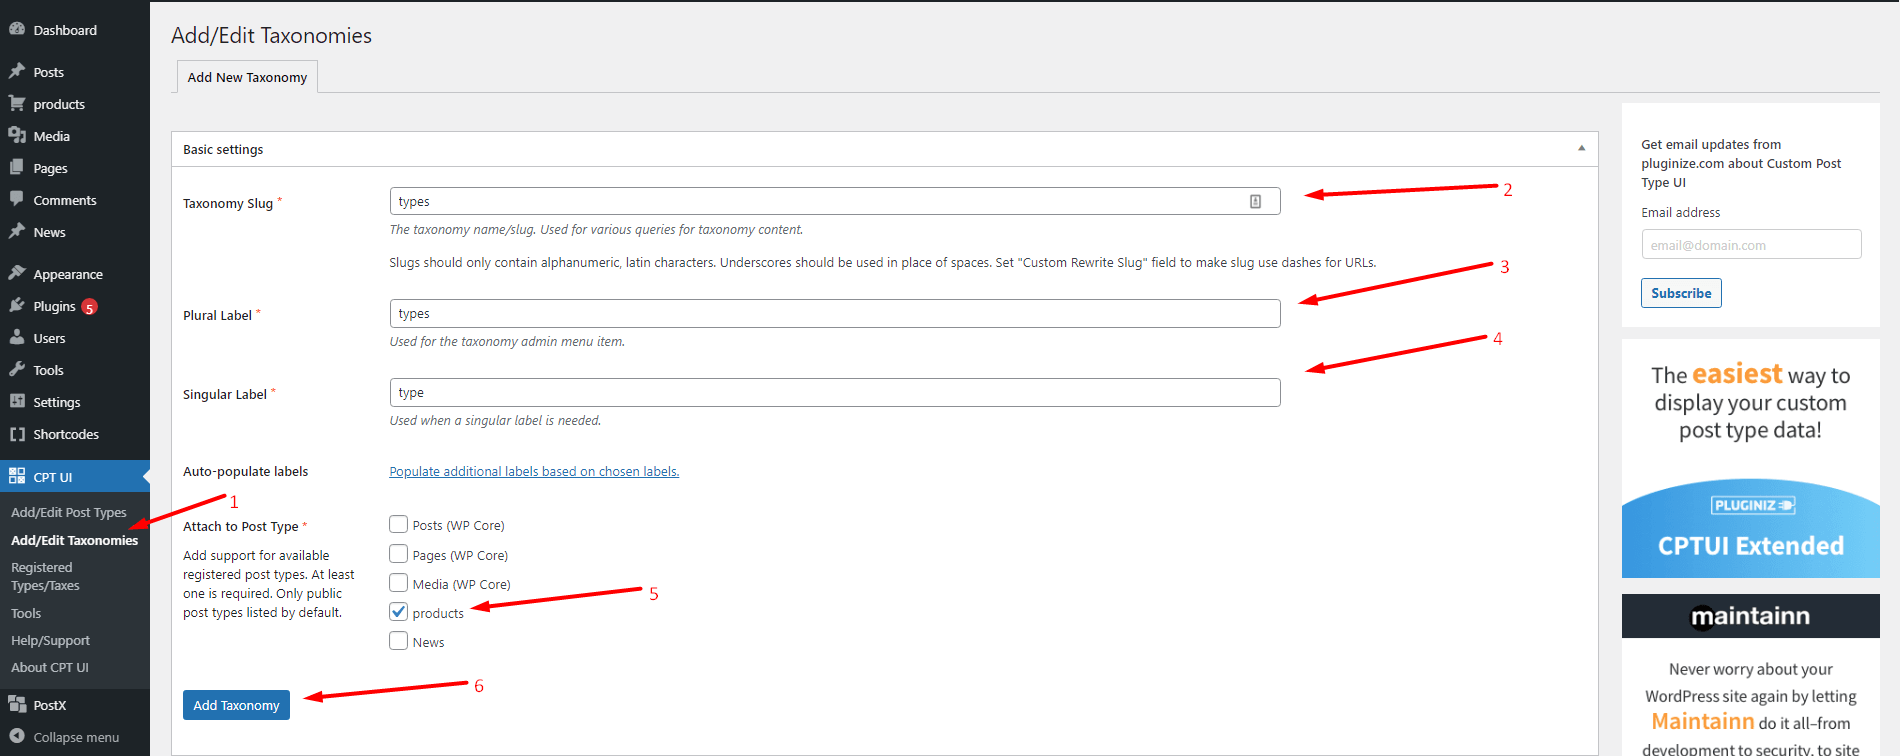
- Go to Add/Edit Taxonomies from the CPT menu.
- Write the taxonomy name in the fields.
- Now choose ‘products’ from the Attach Post Type Menu.
- Now click on Add Taxonomy.
Now, this taxonomy will be added to the ‘products’ post type you have in your WordPress dashboard.
*** In the settings, if you set the Rewrite Hierarchy to True, then it will show up in a hierarchy.
Shoutout to Pods: Custom Content-Type and Fields Creator
We found the Pods WordPress Custom Post Type Plugin to be an excellent alternative to CPT UI.
We love Pods for two reasons:
- First of all, the interface is very simple. You don’t need to be an expert to add your own custom post fields.
- Second, the support is excellent overall.
We would highly recommend you give both these plugins a try. Depending on your use case, you may choose either one of them as your daily driver.
How to Create Custom Post Types without a Plugin
Here we’ll show you how you can create your own custom post type without the help of any plugin.
There are two advantages to this:
- You are basically removing the limits to what post types you can create and use.
- Using two many plugins can slow down your site. So, if you choose to go the manual route, then you it will have a positive effect on your WordPress site.
Here’s how to create a custom post type:
- We’ll be using the following piece of code which will create a Custom News Post Type.
function prefix_codex_news_init() {
    $labels = array(
        'name'                  => _x( 'News', 'Post type general name', 'text-domain' ),
        'singular_name'         => _x( 'News', 'Post type singular name', 'text-domain' ),
        'menu_name'             => _x( 'News', 'Admin Menu text', 'text-domain' ),
        'name_admin_bar'        => _x( 'News', 'Add New on Toolbar', 'text-domain' ),
        'add_new'               => __( 'Add New', 'text-domain' ),
        'add_new_item'          => __( 'Add New News', 'text-domain' ),
        'new_item'              => __( 'New News', 'text-domain' ),
        'edit_item'             => __( 'Edit News', 'text-domain' ),
        'view_item'             => __( 'View News', 'text-domain' ),
        'all_items'             => __( 'All News', 'text-domain' ),
        'search_items'          => __( 'Search News', 'text-domain' ),
        'parent_item_colon'     => __( 'Parent News:', 'text-domain' ),
        'not_found'             => __( 'No News found.', 'text-domain' ),
        'not_found_in_trash'    => __( 'No News found in Trash.', 'text-domain' ),
        'featured_image'        => _x( 'News Cover Image', 'Overrides the “Featured Image”', 'text-domain' ),
        'set_featured_image'    => _x( 'Set cover image', 'Overrides the “Set featured image”', 'text-domain' ),
        'remove_featured_image' => _x( 'Remove cover image', 'Overrides the “Remove featured image” phrase for this post type. Added in 4.3', 'text-domain' ),
        'use_featured_image'    => _x( 'Use as cover image', 'Overrides the “Use as featured image” phrase for this post type. Added in 4.3', 'text-domain' ),
        'archives'              => _x( 'News archives', 'The post type archive label used in nav menus. Default “Post Archives”. Added in 4.4', 'text-domain' ),
        'insert_into_item'      => _x( 'Insert into News', 'Overrides the “Insert into post”/”Insert into page” phrase (used when inserting media into a post). Added in 4.4', 'text-domain' ),
        'uploaded_to_this_item' => _x( 'Uploaded to this News', 'Overrides the “Uploaded to this post”/”Uploaded to this page” phrase (used when viewing media attached to a post). Added in 4.4', 'text-domain' ),
        'filter_items_list'     => _x( 'Filter News list', 'Screen reader text for the filter links heading on the post type listing screen. Default “Filter posts list”/”Filter pages list”. Added in 4.4', 'text-domain' ),
        'items_list_navigation' => _x( 'Books list navigation', 'Screen reader text for the pagination heading on the post type listing screen.', 'text-domain' ),
        'items_list'            => _x( 'Books list', 'Screen reader text for the items list heading on the post type listing screen.', 'text-domain' ),
    );

    $args = array(
        'labels'             => $labels,
        'public'             => true,
        'publicly_queryable' => true,
        'show_ui'            => true,
        'show_in_menu'       => true,
        'query_var'          => true,
        'rewrite'            => array( 'slug' => 'news' ),
        'capability_type'    => 'post',
        'has_archive'        => true,
        'hierarchical'       => false,
        'menu_position'      => null,
        'supports'           => array( 'title', 'editor', 'author', 'thumbnail', 'excerpt', 'comments' ),
    );

    register_post_type( 'news', $args );
}
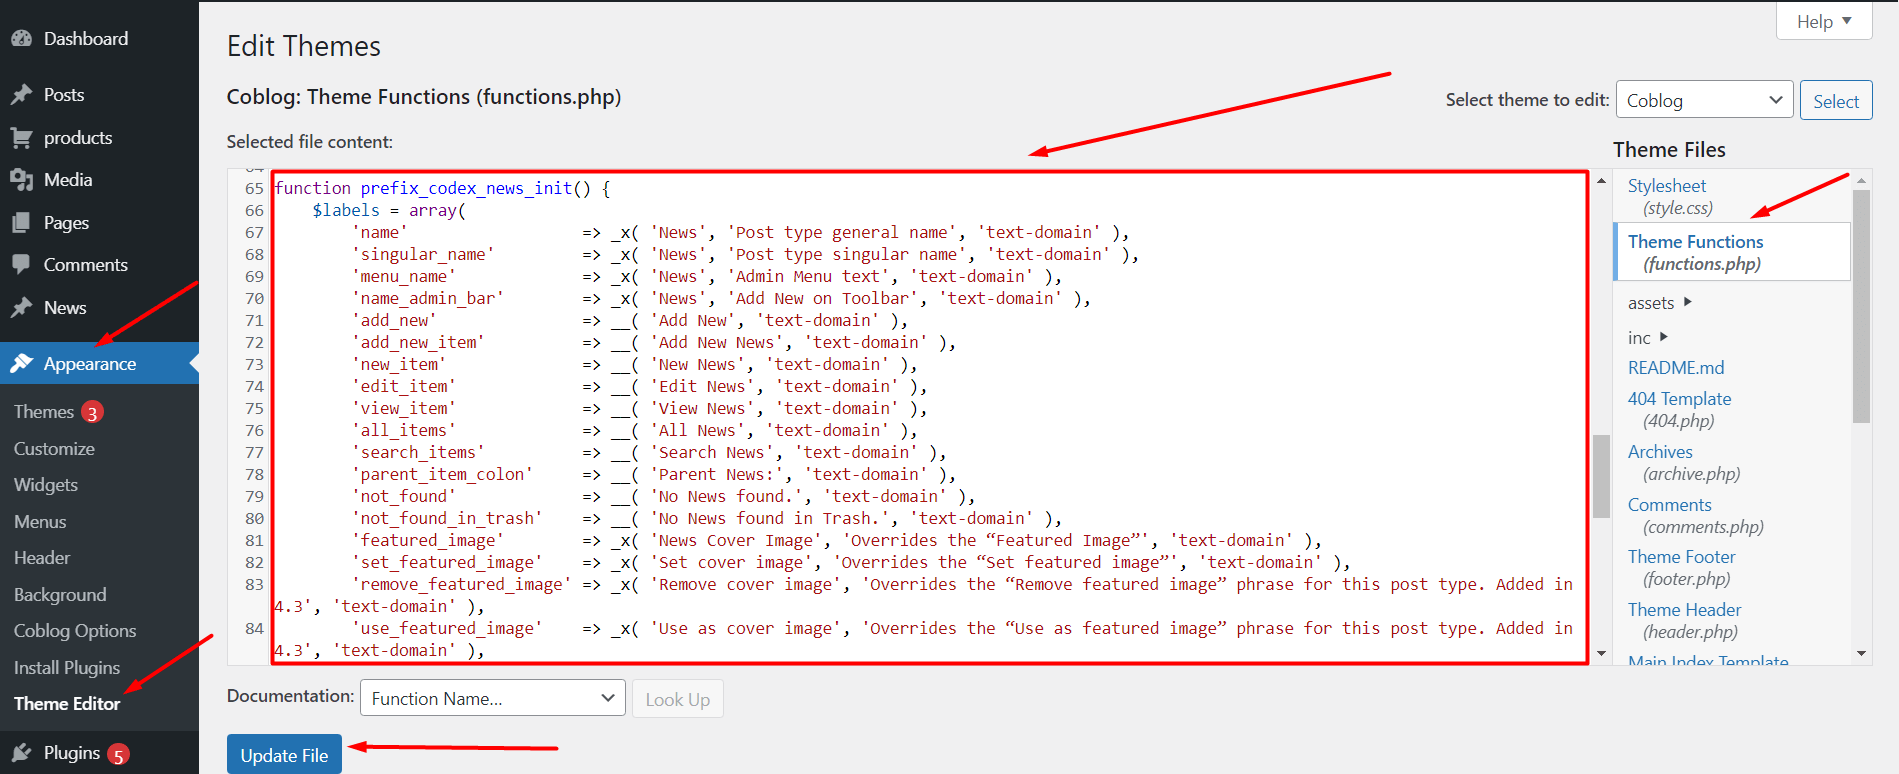
add_action( 'init', 'prefix_codex_news_init' );- Add the code to your site’s functions.php file. Navigate to Appearance>Theme Editor>Functions.php.
- Paste the code into the functions.php file.
You’ll now see the News Post Type on the WordPress Dashboard Menu.
Now that you learned to create custom post types, the next thing that comes to mind is how to manage them. If you have to go to each post type to make a single adjustment, managing and changing this data will be a nightmare. But, we’ve found a fantastic solution to manage hundreds of WordPress post types, obviously including custom post types.
Bonus Section: How to Create A Custom Query to Show Posts
You can use the following code to create queries for the Custom Post Type you just made. For instance, if we wanted to create a custom query for our custom news list, then we would paste in the following piece of code:
<?php
$args = array( 'post_type' => 'news' );
$fetched = new WP_Query( $args );
?>
<?php if ( $fetched->have_posts() ) : ?>
	<?php while ( $fetched->have_posts() ) : $fetched->the_post(); ?>
		<h2><a href="<?php the_permalink() ?>"><?php the_title(); ?></a></h2>
		<div class="entry-content">
			<?php the_content(); ?>
		</div>
	<?php endwhile;
	wp_reset_postdata(); ?>
<?php else:  ?>
<p><?php _e( 'Sorry, no posts matched your criteria.', 'text-domain' ); ?></p>
<?php endif; ?>
Bonus Section: How to Create a Custom Post Page Template for Fetching Posts
In order to create a Custom Page Template, you’ll need to:
- Access the Theme Files from Cpanel (If you’re running WordPress on a local host using xampp, then navigate to xampp>htdocs>’your site name’>wp-content>themes>’theme’.)
- You’ll need to create a file with .php extension (the same goes for xampp users as well. The process is similar for programs similar to xampp).
- Paste the following code:
<?php
/*
Template Name: News Template
*/
get_header();
query_posts( array( 'post_type' => 'news' ) ); ?>

<ul>
	<?php while (have_posts()) : the_post(); ?>
		<li>
			<h2><a href="<?php the_permalink() ?>"><?php the_title(); ?></a></h2>
			<p><?php the_excerpt(); ?></p>
		</li>
	<?php endwhile; ?>
</ul>

<?php get_footer(); ?>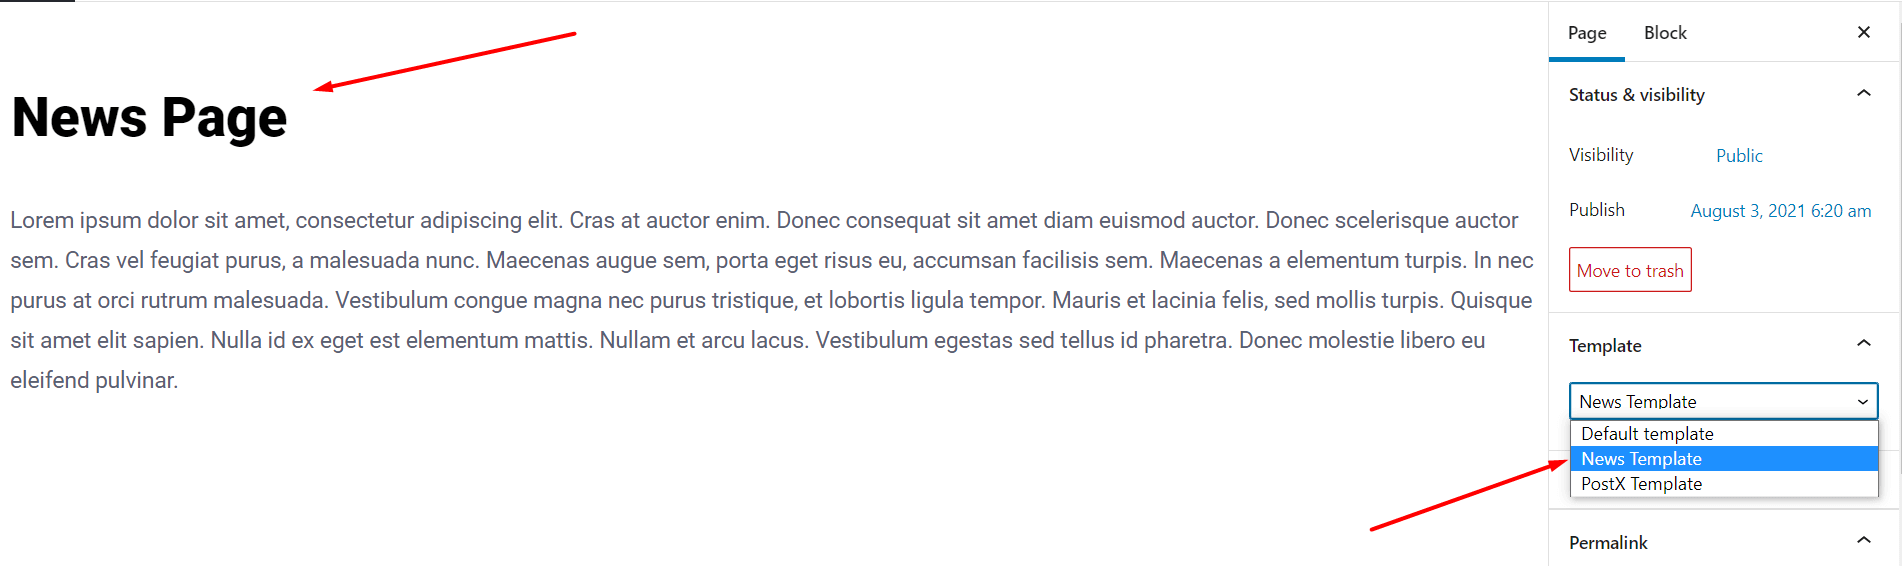
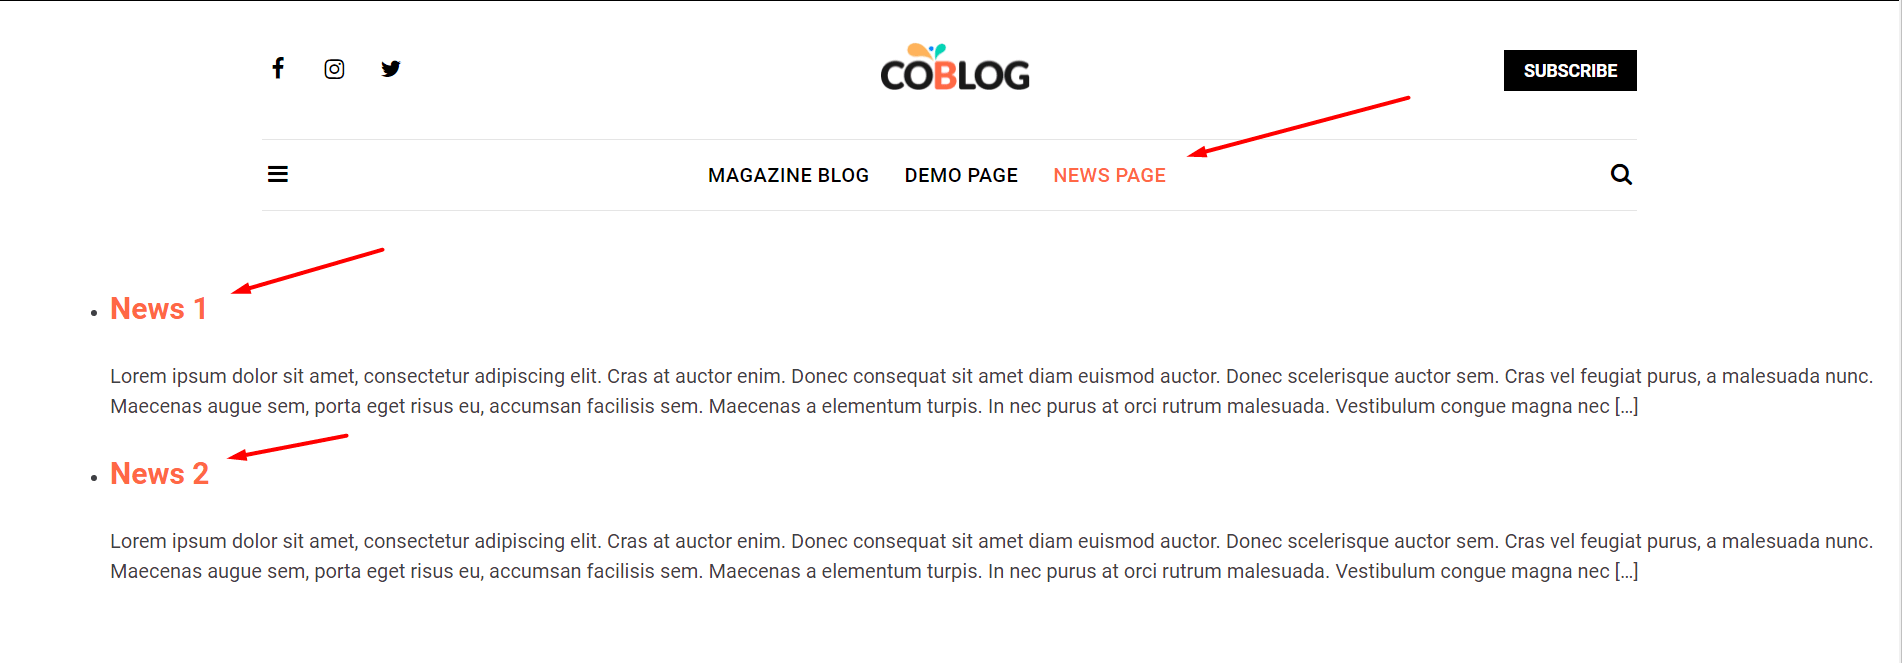
Now whenever you create a news post from the News Post Type menu, it will show under News in your WordPress site.
***The execution of the method may vary for different users. Do leave a comment if you’re having problems.
Final Thoughts
Hope you’ve learned something on how to use a WordPress Custom Post Type Plugin. As mentioned earlier, things can get tricky with the process. So, do sound off in the comments below to let us know if you’re having any problems.
Also, if you have any thoughts to share on the matter, do share them with us.


