You’ve set a sale price in WooCommerce, but where is it actually showing? And how to make it more catchy for buyers’ eyes?
For many store owners, figuring out how to properly display and highlight on-sale products feels confusing and limited.
But it doesn’t have to be 💁
To show on-sale products in your WooCommerce store, follow these steps:
- Edit the product you want to put on sale.
- Set a sale price in the Product Data.
- Optionally, schedule the sale for a start and end date.
- Save the changes, and WooCommerce will automatically display a Sale badge.
- Customize the badge style with code or a plugin, which offers design control, positioning, and even conditional visibility.
Moreover, you’ll learn how to set up, display, and customize on-sale products like a pro, plus a few tricks to boost visibility and sales. Let’s dive in 👇
Why Should You Add Products on Sale in WooCommerce?
Adding on-sale products to your WooCommerce store is a strategic move that can drive traffic, increase conversions, and boost your store’s overall performance.
Here’s why you should consider it:
- Boost sales during seasonal events: During festivals like Black Friday, Cyber Monday, or Christmas, store owners offer discounted prices on their products. It creates the urgency in the buyer’s mind and increases the sales process.
- Increase average order value (AOV): When customers see the discounted price, they add more products to their cart. It directly increases the store’s AOV.
- Move low-performing inventory: After adding a discount, the low-selling items get a boost. It helps the store to clear out the inventory.
- Convert window shoppers into buyers: Another significant benefit is that on-sale products convert potential buyers into real customers. A well-placed discount grabs visitors’ attention and changes their minds into buying the item promptly.
- Stay competitive in a crowded market: Often, promotional activities like discounted offers help you to stay ahead of the competitors.
Now that you know about the benefits of adding products on sale in WooCommerce, you should learn how to do it. Let’s go there 💪
How to Show a Product on Sale in WooCommerce [Step by Step Guide]
It’s a simple process of displaying a product on sale in WooCommerce.
You don’t need to get any additional accessories. WooCommerce’s built-in settings let you add products on sale.
Follow the step-by-step procedure below.
Step 1: Go to Product List Page
To add a product on sale, first, you need to go to the Products page from your WordPress dashboard.
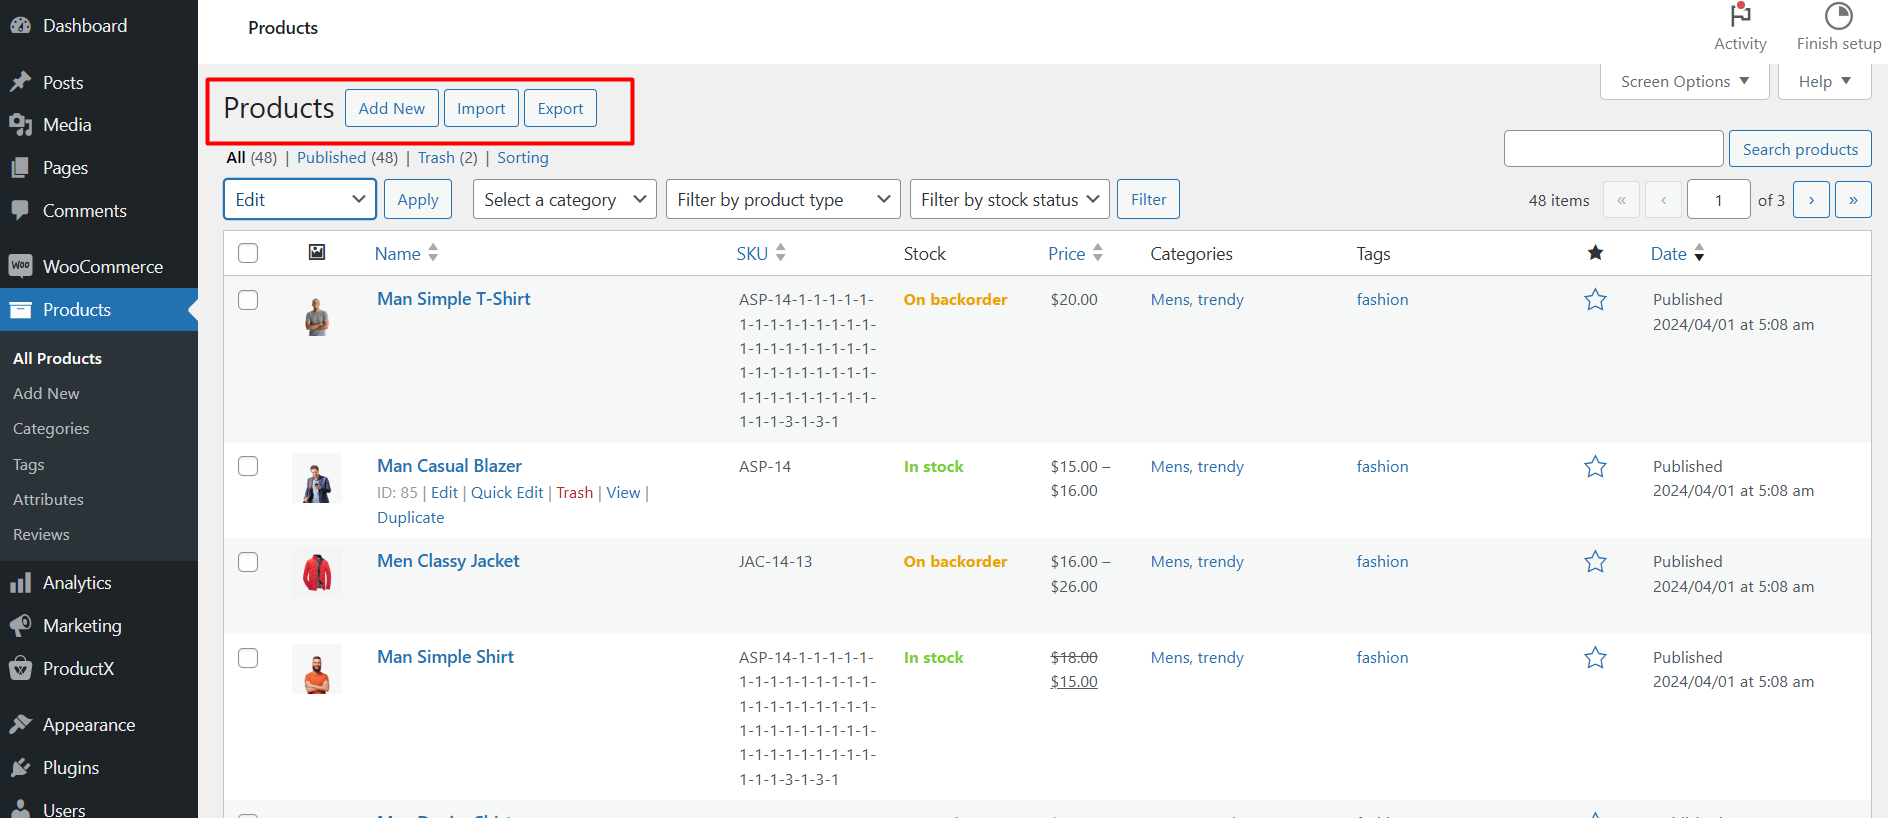
Here you will see all the products listed on your store. You can customize any product details (description, image, price, etc) by clicking the edit button.
It will take you to the product editorial interface.
Step 2: Add the Sale Price to Your Desired Product
In the editorial page, scroll down to the Product Data section. You will find the Sale Price in the General tab.
Set the value of your product’s sale price here. This sale price will be displayed for this product.
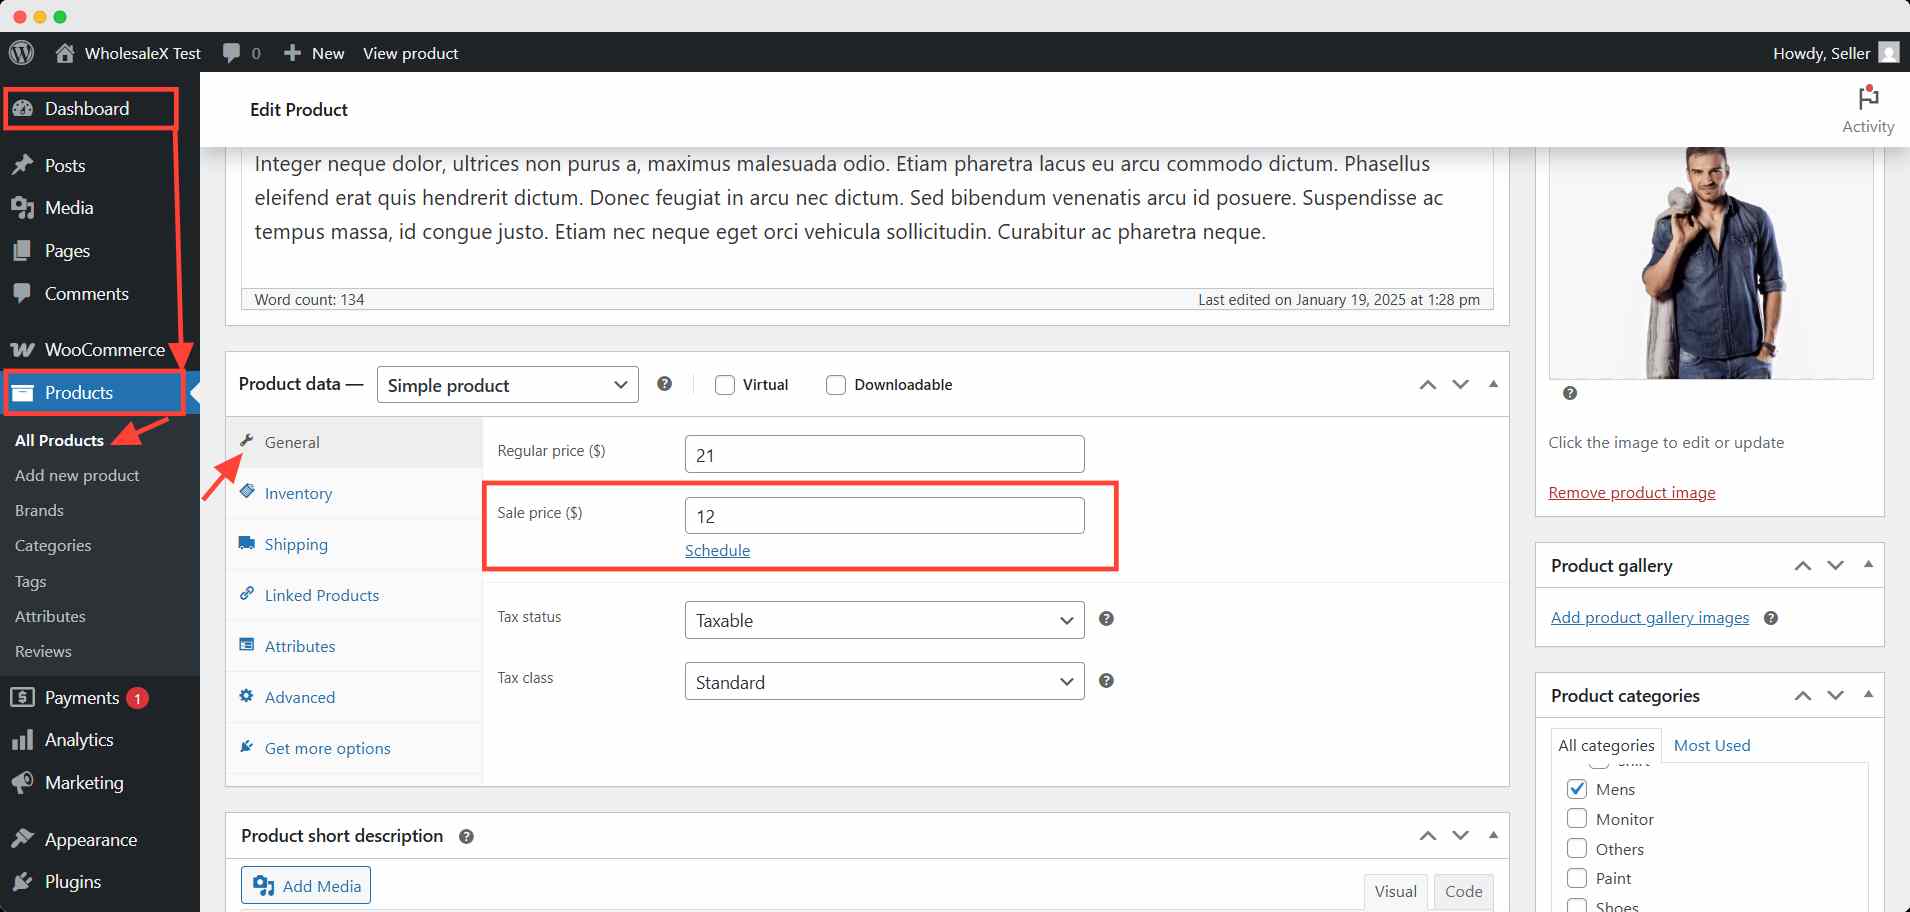
Hit the update button after finishing your changes.
You can also schedule your sales from here. Just add the schedule right below the sale price. It will create an automation for this sale price, particularly for this product.
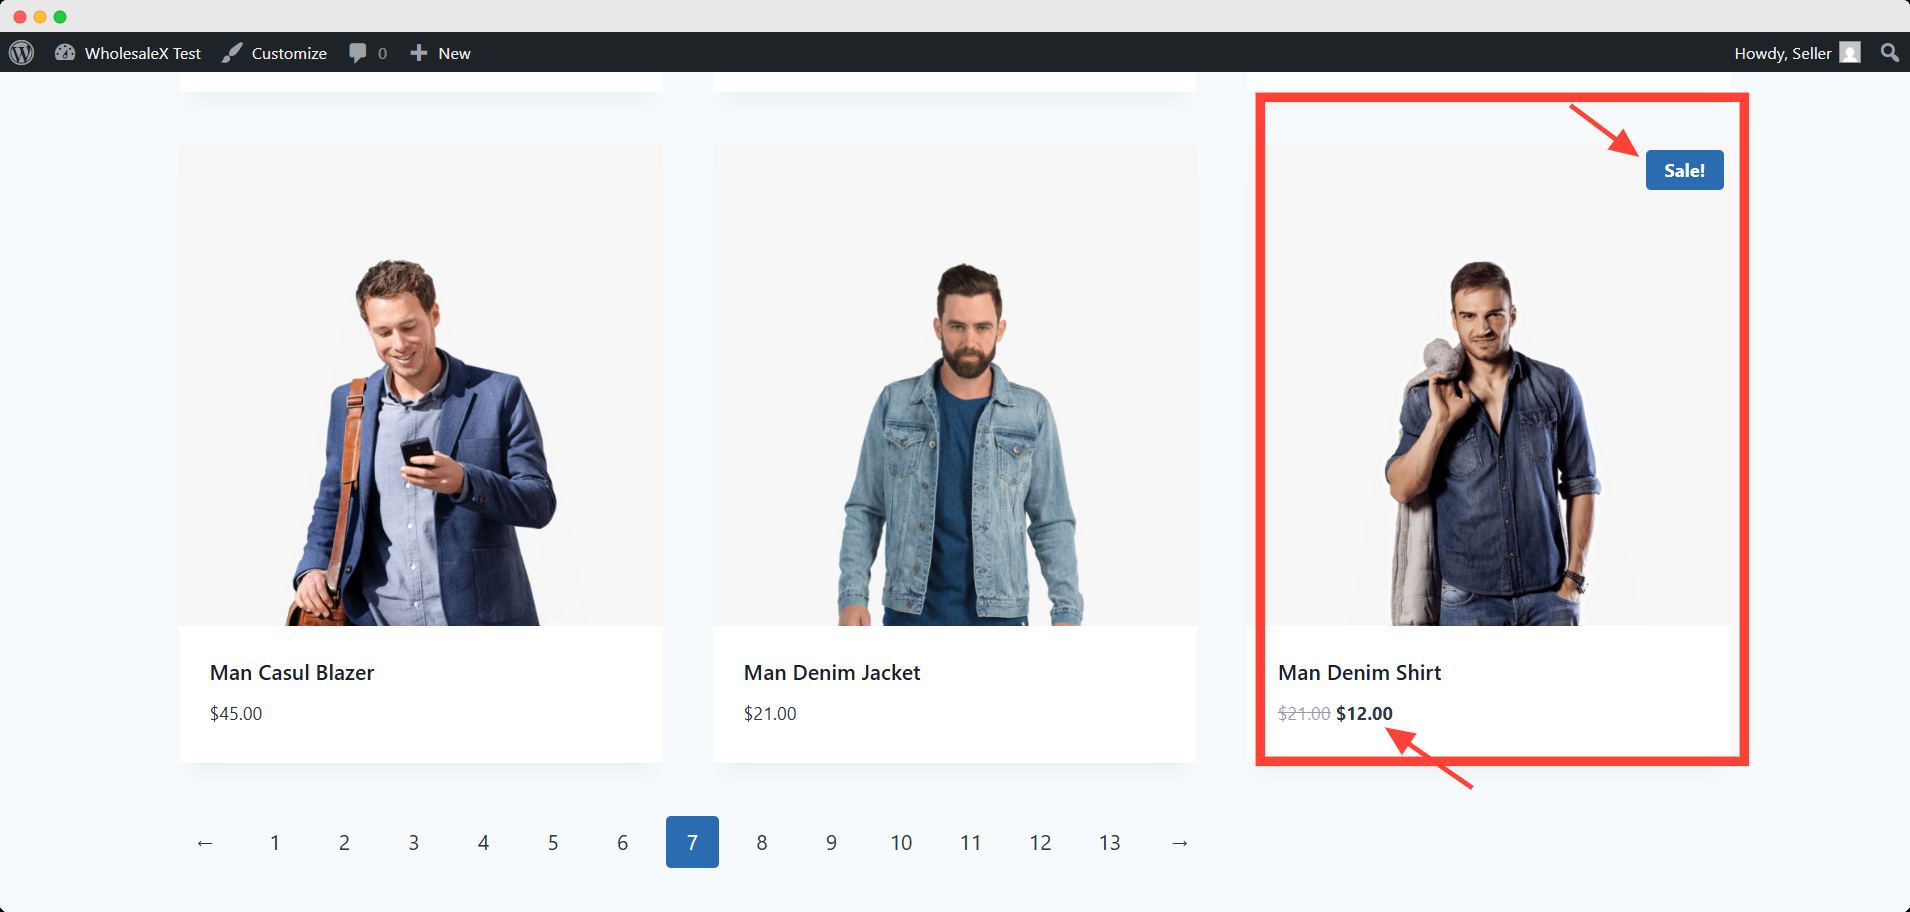
That’s it! You have set a sale price for your desired products. Your buyer will see a Sale badge on the thumbnail, also.
Can You Display them on the Home Page?
You have already set sale prices on your products on the shop page. You can also display them on your homepage. For this demonstration, we will need the help of a plugin.
There are a handful of plugins available in the WordPress repository. But for this demonstration, I will use WowStore.
It comes with numerous features to expand the default WooCommerce functionality. One of the core features is extensive control over styling.
You have to install and activate WowStore. Follow the official documentation on the installation procedure for a seamless experience.
To display on-sale products on the homepage, just follow these steps:
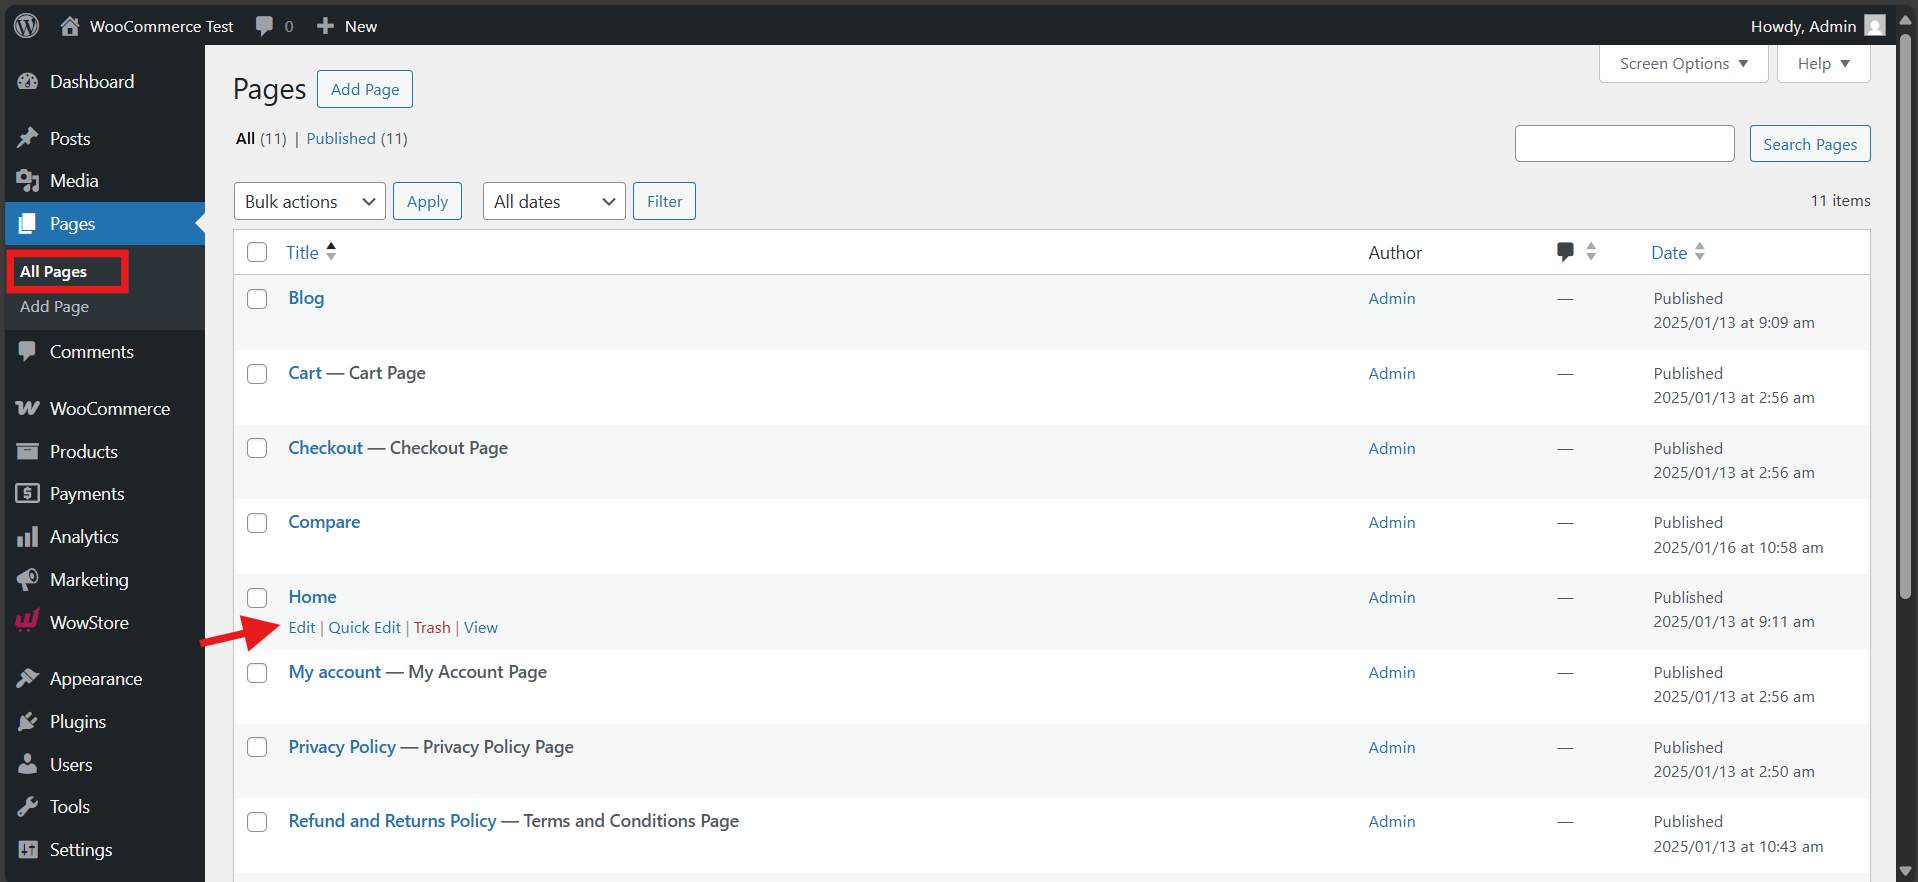
Step 1: Go to the Home Page Editor
First, you have to go to the All Pages section from the dashboard. Here you can get all the pages published or drafted.
Click edit under the home page here, and it will take you to the editorial interface. Here, you can add different types of blocks you want to show to your visitors.
Step 2: Add the Product Slider Block
Now, click the plus icon to add blocks. Find the Product Slider block of WowStore and add it.
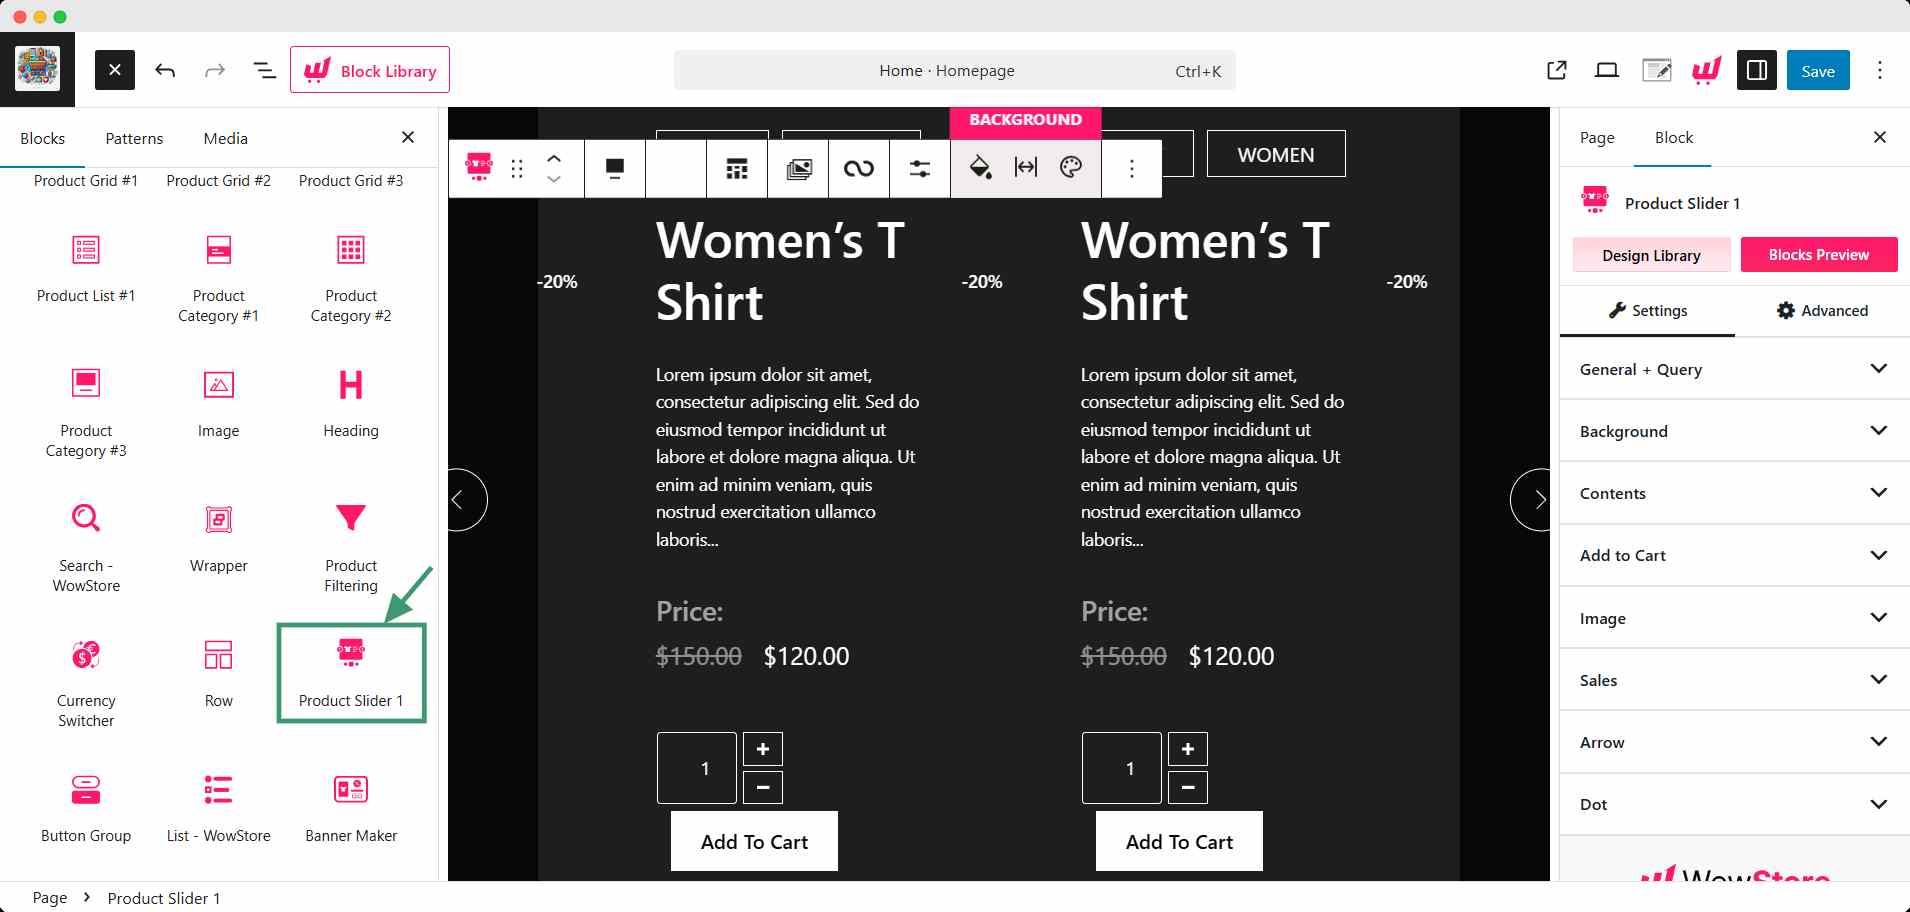
Now, you can customize this block as you see fit.
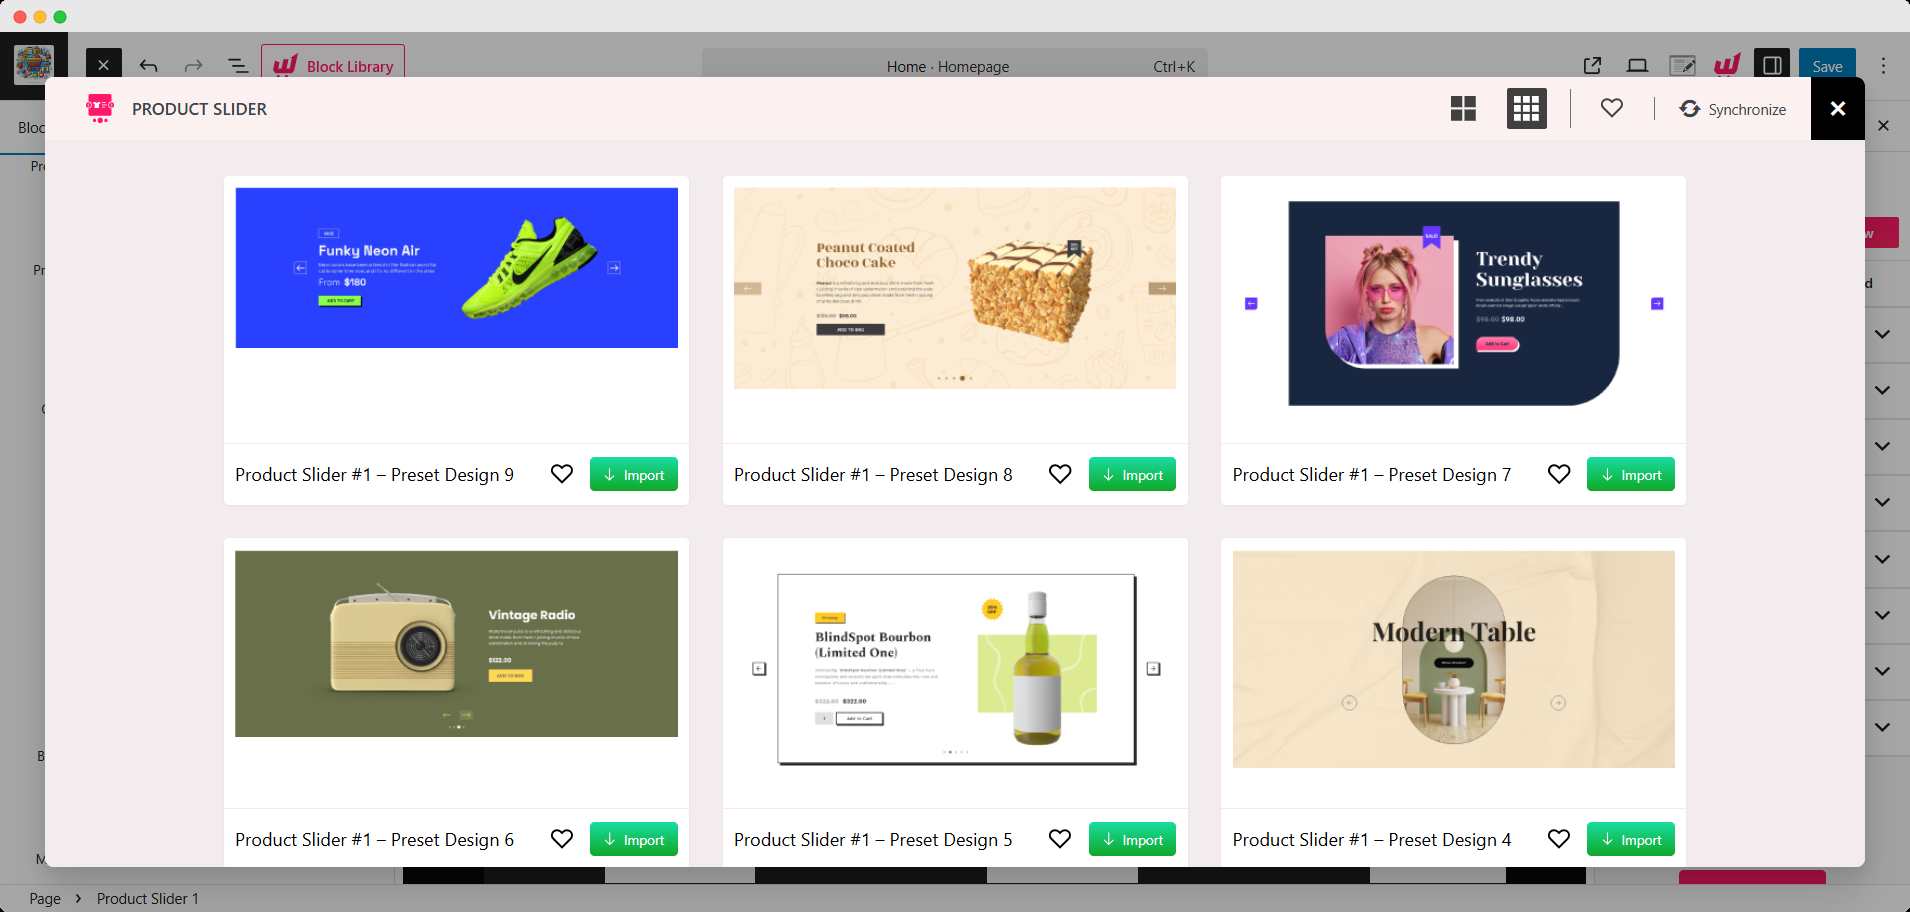
You can also select other designs from the design library in the right sidebar.
You can use the Product Grid block too for this purpose. Both block has the same customizable options, but the slider block seems more suitable for showcasing the product in a creative manner.
Step 3: Display On-Sale Products
Now, from the right sidebar, go to the General + Query dropdown option and scroll down to Query builder settings.
Here, you can find the Product status option and select the on sale. It will display only the on-sale products in the slider.
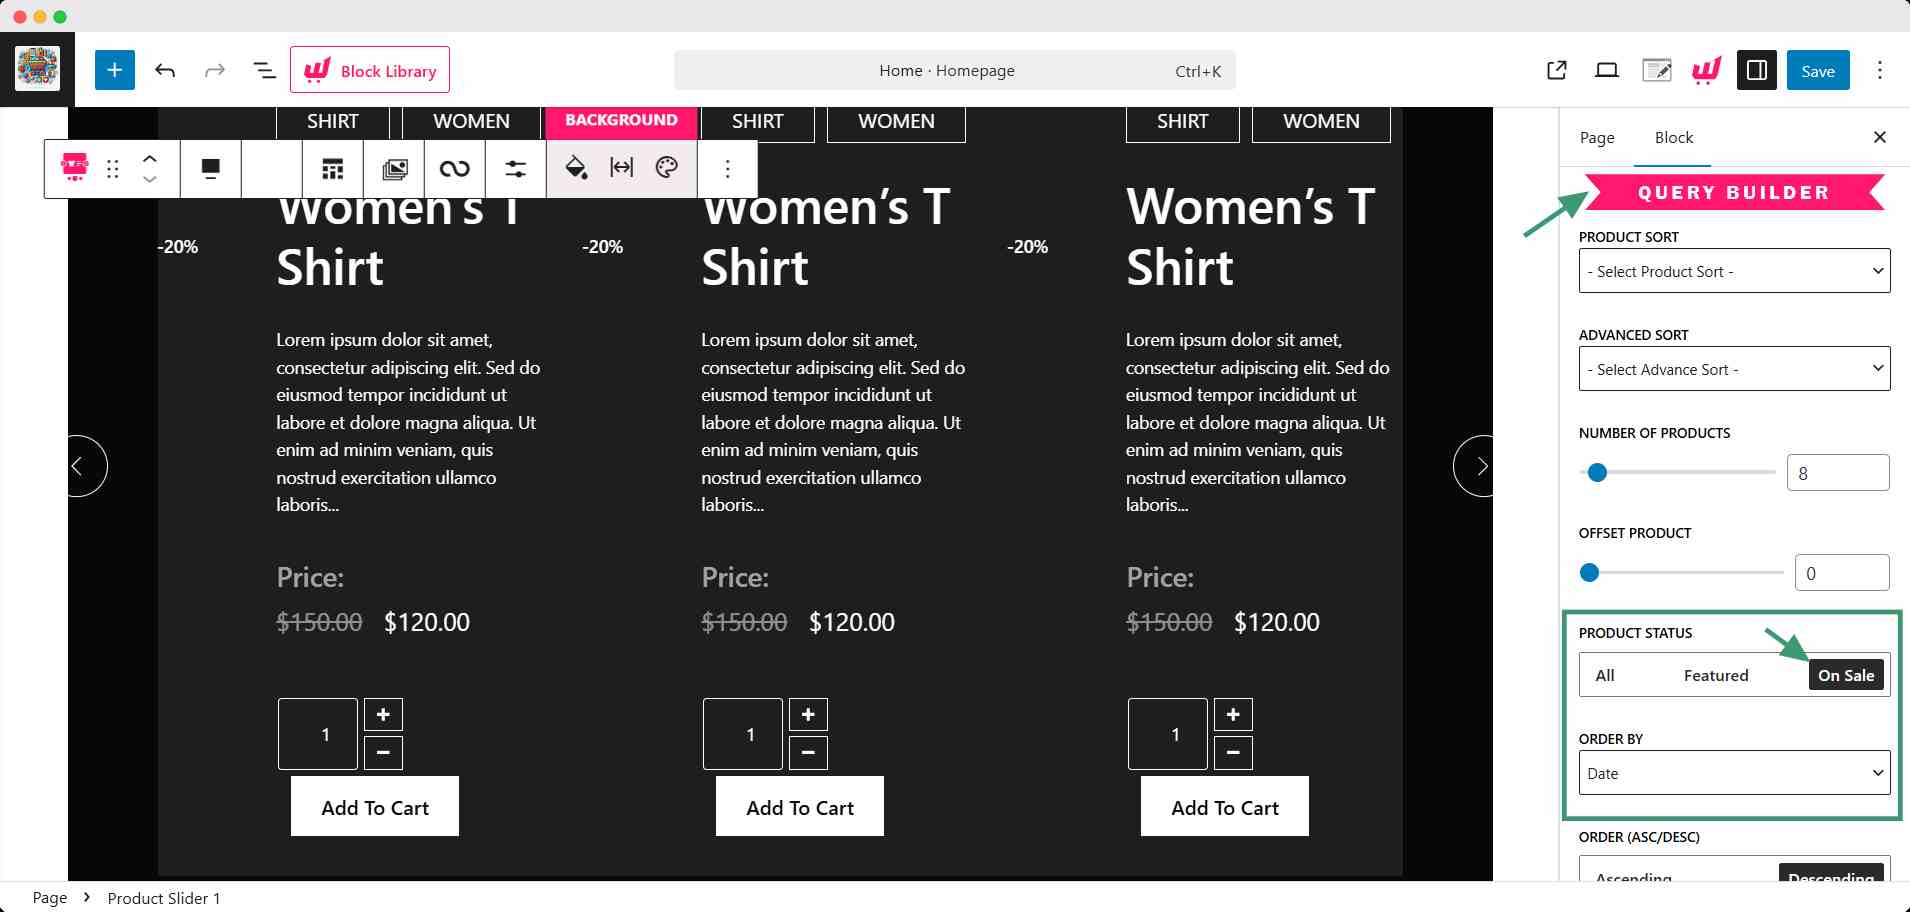
You can also reorder the on-sale products based on different criteria (Date, Title, Price, etc.) from the Order by option just under the product status.
Hit the save button after completing all the changes.
Now, you can see how on-sale products are appearing on your home page.
You can also use the same procedure with the Woo Builder templates too. This way, you can show only the on-sale products on any pages in your store.
Can You Add a Page Just for On-Sale Products?
Creating a page just for on-sale products is a unique and conversion-friendly way. It will also funnel your visitor towards a single page to enhance focus.
To create an on-sale page, you need to go to the Pages section and click the Add new page button.
Then, name that page with On-Sale Products or anything of your preference.
After that, there are two ways you can showcase your on-sale products:
- Add a Product Slider/Grid block and show only on-sale products
- Add a Product Slider/Grid block and use the query builder to sort out on-sale products
Let’s explore both ways 🔽
1. Show Only On-Sale Products
This procedure is similar to the previous section.
You need to add the product slider or product grid block and choose the on sale option for product status. It will display only those products on this page.
![How to Show On-Sale Products in WooCommerce [Starter Guide]](https://www.wpxpo.com/wp-content/uploads/2022/11/on-sale-product-page.jpg)
2. With a Product Grid Block
With the selected block, you can use the query builder settings. Here, you have to choose specific products in the product sort option.
It will give you another field to select those on-sale products one by one. It’s a manual process.
![How to Show On-Sale Products in WooCommerce [Starter Guide]](https://www.wpxpo.com/wp-content/uploads/2022/11/manual-choosing.jpg)
Now, your visitors can see only on-sale products appear on your sales page.
Can You Change the Sale Badge on WooCommerce?
The sale badge is generated by default in WooCommerce. But you can change its style, typography, position, etc.
A simple addition of custom CSS code will do the trick. Let’s see which code you need to use.
First, you have to go to Appearance>> Customize and select the additional CSS option. Then, in the given field, add the custom for styling.
![How to Show On-Sale Products in WooCommerce [Starter Guide]](https://www.wpxpo.com/wp-content/uploads/2022/11/custom-css-code.jpg)
Here’s the CSS code for you,
.woocommerce span.onsale {
    background-color: #6a5acd;
    color: #ffa500;
    font-size: 14px;
    font-weight: 600;
    padding: 6px 12px;
    border-radius: 6px;
    position: absolute;
    top: 10px;
    right: 10px;
    z-index: 10;
    box-shadow: 0 4px 6px rgba(0, 0, 0, 0.1);
    text-transform: uppercase;
}
For more control, you would need more complex custom code.
However, you can get extensive control without even needing any coding knowledge.
For that, you would need a plugin. Don’t worry, we will cover this too in the following part 😉
How to Customize the On-Sale Badge in WooCommerce without Coding
If you don’t want to involve yourself with any coding-related activities, plugins are your solution.
For customization, you won’t need another plugin for this. WowStore has your back.
Let’s see how to customize the on-sale badge in WooCommerce with WowStore.
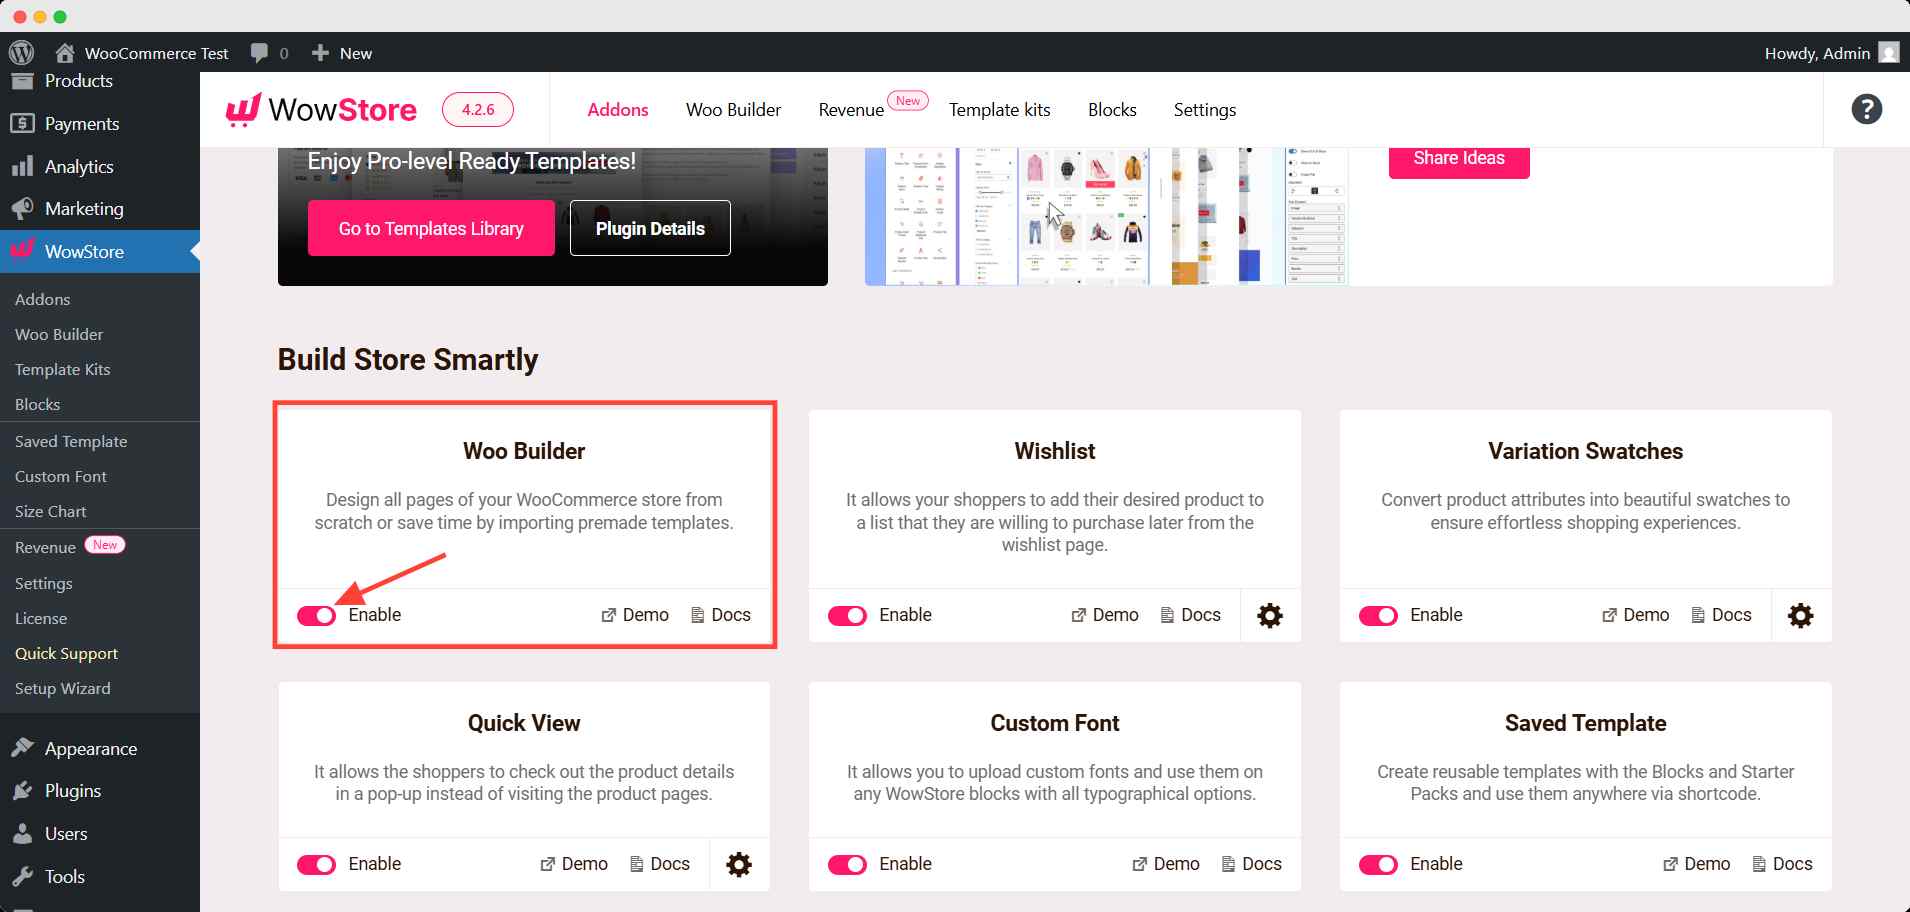
Step 1: Turn on the Woo Builder
After activating, go to the Addons page of WowStore from your WordPress dashboard. Here, you can find all the addons available in WowStore.
Turn on the Woo Builder addon. It can build all the necessary pages in your WooCommerce store with a few clicks.
Step 2: Create the Shop Page Template
After turning on the Woo Builder, you will notice that an additional page will appear on your tab. Click it.
Here, you can create, draft, and publish all the page templates for your store. To create a shop page template, go to the Shop option and click Create Shop Template.
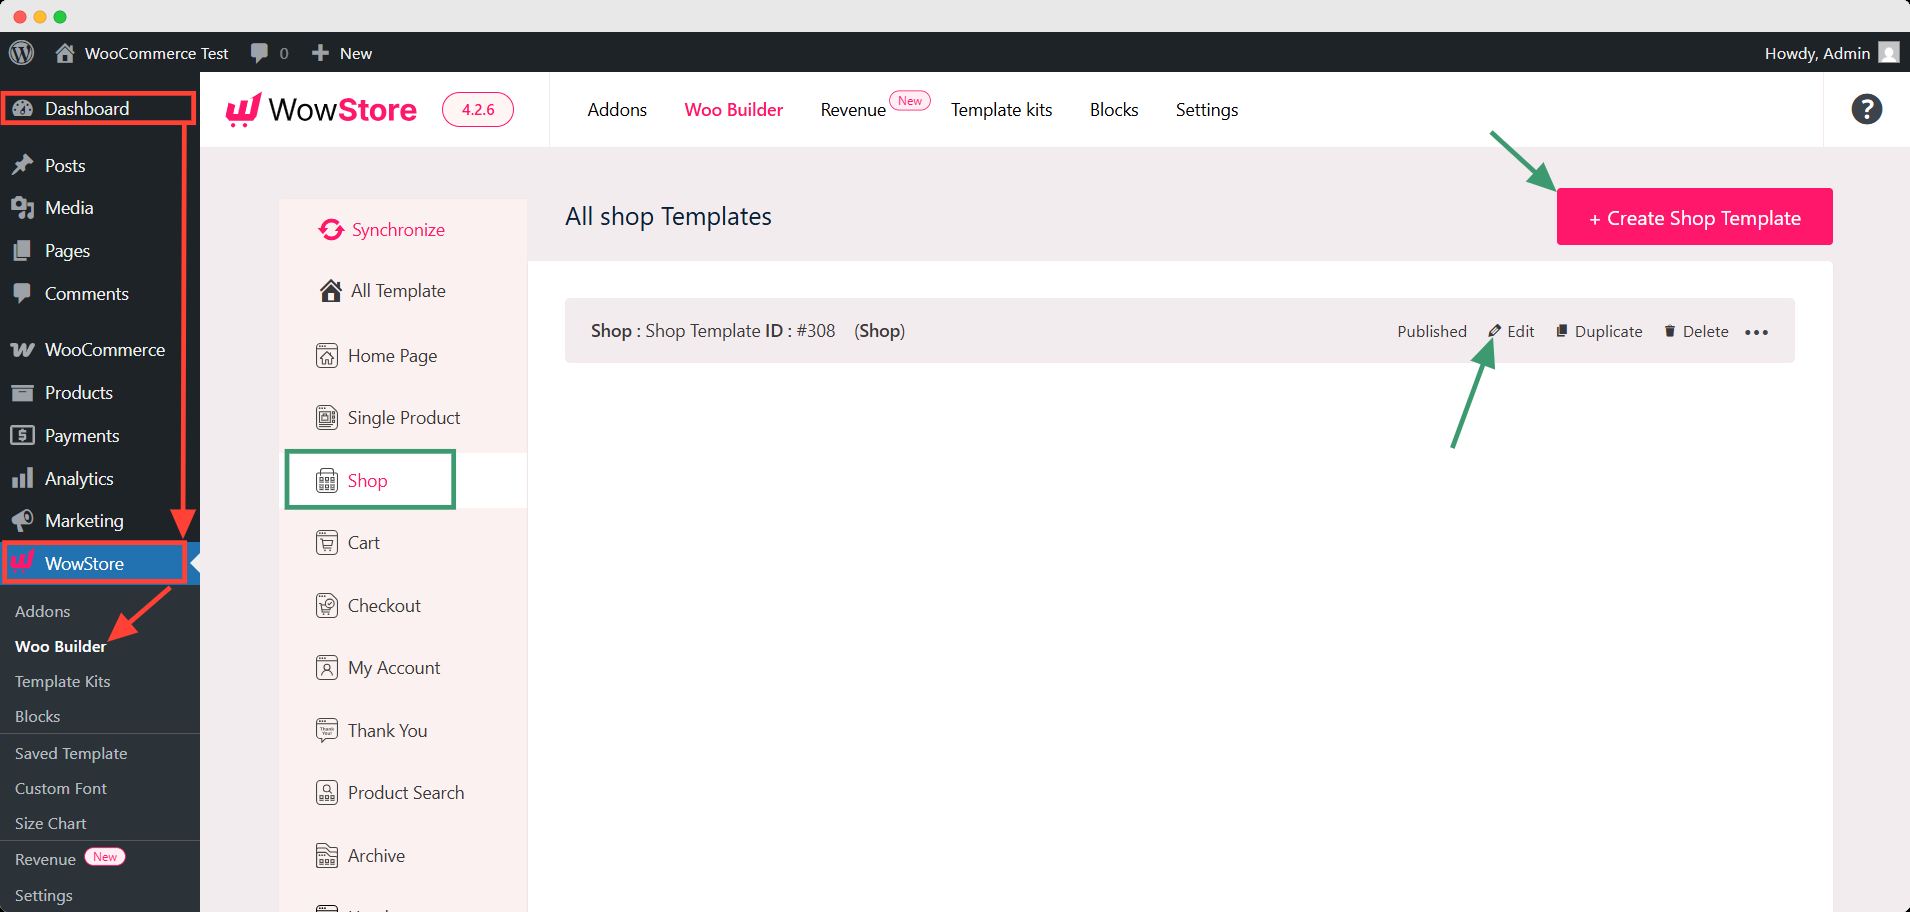
WowStore provides 10 templates on the pro version. You can choose any of these you desire.
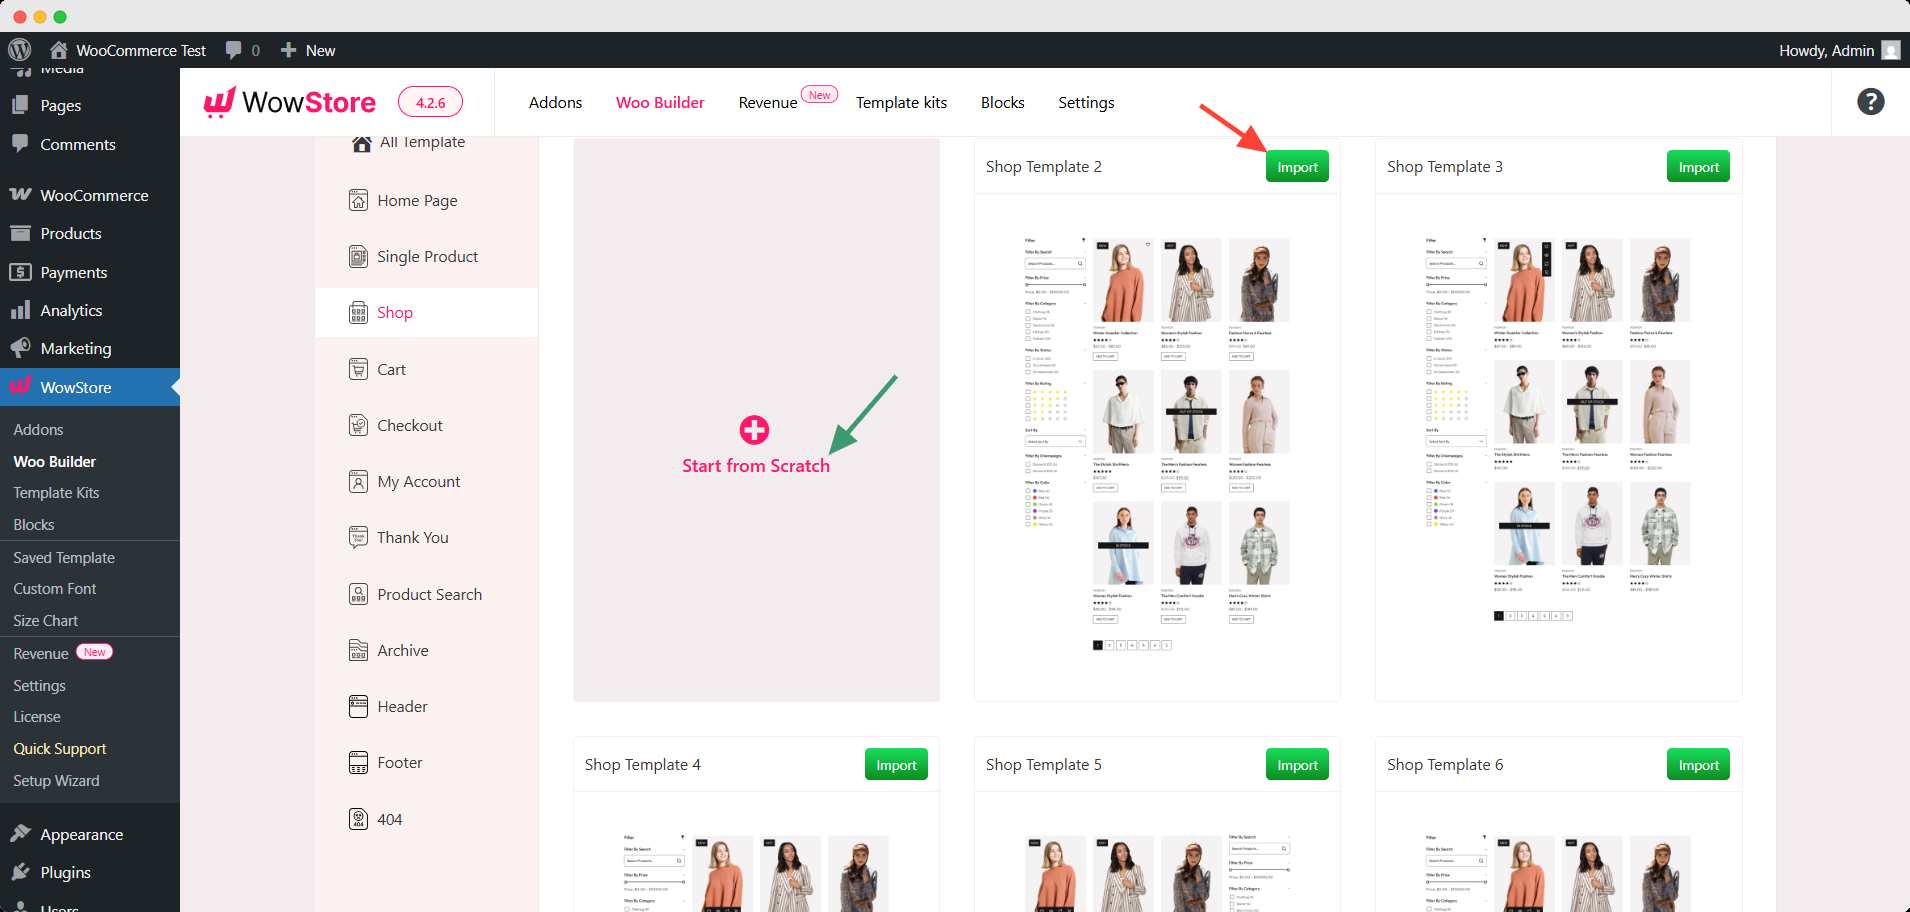
Click Import to proceed.
Pro Tips
You can also create the template from scratch. You may follow either of these 2 ways to create a shop page template.
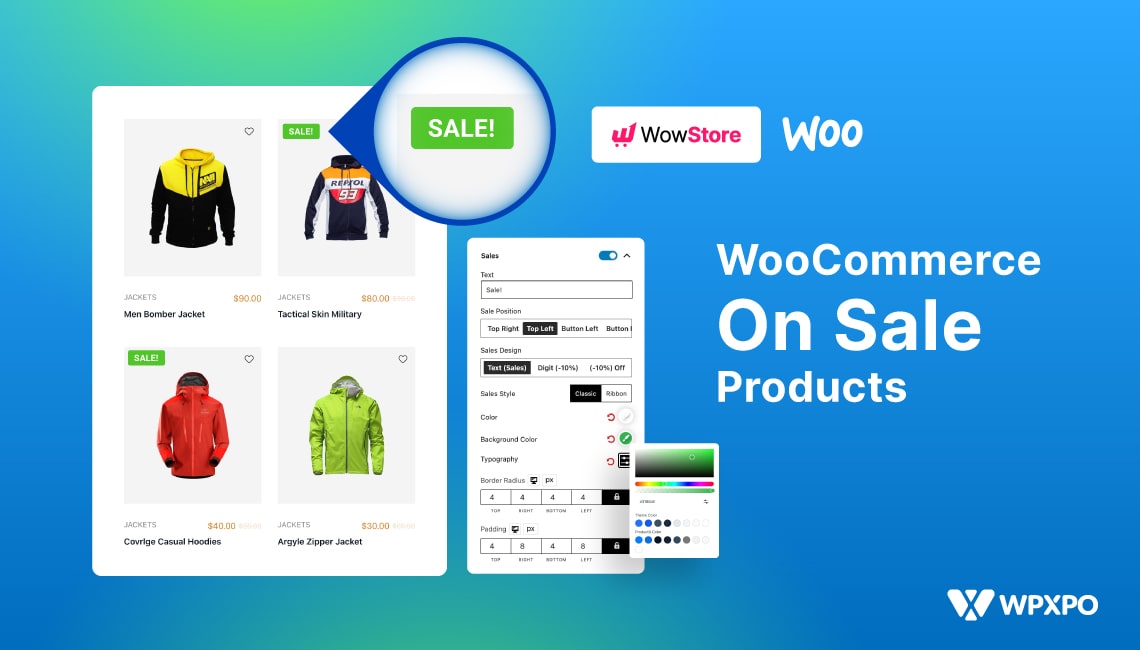
Step 3: Customize the Sale Badge on the Shop Page
When you click import, it will take you to the backend of the template. You can customize any of the designs that seem fit.
For customizing the sale badge, select the product grid and scroll down to find the sale option on the right sidebar.
As there’s a sale badge already showing, the option is turned on. To remove the sale badge from the thumbnail, turn off the option, and it will disappear from everywhere from shop page.
In the dropdown options of sale, you can customize the text, position, design, style, etc. You can even change the text & background color, typography, border radius, and padding here.
In short, every possible customization option you can get, WowStore will give you. You can also ensure multi-device responsiveness here.
Pro tips
You can get the sale option on the right sidebar directly by clicking on the sale badge. It’s more efficient. There is also a reset option along with every customizable option here.
Why WowStore?
You may wonder why I chose WowStore to begin with. I have compared other plugins with WowStore and found it easier to use than others.
You can also realize my reasons for deciding which plugin to go with from this. Here, I compiled all the relevant features for popular plugins, including WowStore.
| Feature | WowStore | Product Labels for WooCommerce | YITH Badge Management | Badge & Product Label Plugin |
|---|---|---|---|---|
| Gutenberg Block Integration | ✅ | ❌ | ❌ | ❌ |
| Dynamic Discount % Badge (Auto Calculation) | ✅ | ✅ | ✅ | ✅ |
| Hide Default WooCommerce Badge with One Click | ✅ | ✅ | ✅ | ✅ |
| Fully Customizable Badge Shapes (Circle, Tag, Banner, etc.) | ✅ | ❌ | ✅ | ❌ |
| Schedule Badge Visibility (Start & End Time) | ✅ | ❌ | ✅ (Pro) | ❌ |
| Create Badge Variations for Mobile/Desktop Separately | ✅ | ❌ | ❌ | ❌ |
| Free with Most Advanced Controls | ✅ | ✅ | ❌ (Limited in free) | ✅ |
WowStore is the first-ever WooCommerce builder for Gutenberg. While no other plugin is compatible with blocks, WowStore gives you the edge by giving extra space for customization.
However, considering the plugin is a WooCommerce store builder as a whole, if you need to customize the sale badge only, you can go with the other plugins.
Best Practices for Showing On-Sale Products in WooCommerce
Simply adding sale prices isn’t enough. To really catch your shoppers’ attention and increase conversions, you need to display those on-sale products smartly.
Here are some best practices to make your deals stand out:
1. Highlight discounts with eye-catching badges
Use custom badges that show the actual discount percentage. This makes the offer feel more valuable and increases click-throughs. You can do this easily with tools like WowStore or a product label plugin.
2. Create a dedicated deals or sales page
Make it easy for customers to find discounted items by creating a separate On Sale page. Add it to your site menu so it’s always one click away.
3. Use time-limited sales to create urgency
Add countdown timers or set expiration dates for your sales. This taps into FOMO and encourages customers to act fast before the deal disappears.
4. Feature sale items on the homepage
Add a product grid or slider showcasing limited-time sale items. This draws attention right from the start and keeps visitors engaged.
6. Use high-quality product images
Make sure your sale items look just as polished and professional as your regular listings.
Frequently Asked Questions
1. Will customers see the original and sale price side by side?
Yes, WooCommerce automatically shows both the regular price (struck through) and the sale price. It makes your pricing strategy transparent to everyone and builds authority & trust.
2. How do I highlight best-selling products?
Use the Most Sales option in the advanced sorting of WowStore’s query builder. This way, you can showcase only the most sold items on your homepage or any custom sales page.
3. Can I schedule multiple sales at once for different products?
Yes, WooCommerce allows you to schedule sales individually per product using the built-in sale price scheduler. You can schedule any product for any duration at once.
Wrapping up
Displaying on-sale products in WooCommerce is a strategy to increase engagement, conversions, and customer satisfaction.
Whether you’re running a seasonal campaign or trying to move slow stock, using custom sale badges, homepage highlights, or a dedicated sale page can make a real difference.
And with tools like WowStore, you don’t need coding skills to get full control over how your on-sale items appear. From dynamic badge designs to block-based layout control, you can set your store apart with ease.
So, start experimenting with your sales displays and turn browsers into buyers 👍