![How to Create Custom WooCommerce Thank You Pages [Ultimate Guide]](https://www.wpxpo.com/wp-content/uploads/2022/10/Thank-you-page-customizer.jpg)
When someone completes a purchase in your WooCommerce store, they land on a simple page: the “Thank You” page.
By default, it does its job, it shows a confirmation message and order details. But that’s pretty much it.
Here’s the thing: this moment right after a customer buys from you is incredibly valuable. They’re engaged, they trust you enough to spend money, and they’re more likely to take further action if you guide them. That’s why creating a custom Thank You page can be a game-changer.
Instead of saying buy with a plain “Thanks,” you can keep the momentum going – whether with upsells, referral incentives, or simply adding valuable resources.
And in this guide, we’ll cover what the WooCommerce thank you page is, best thank you page plugins, how to create a custom thank you page for your store, best way to upsell products on the thank you page. So, without further ado, let’s get started!
Key Summary:
- The default WooCommerce thank you page is basic and often wastes a valuable post-purchase touchpoint.
- A custom thank you page lets you reinforce branding, build customer loyalty, and drive additional sales.
- Best plugins for creating custom thank you pages:
- WowStore (WPXPO) – block-based builder with templates.
- WooCommerce Custom Thank You Pages (official) – per-product thank you pages
- VillaTheme Thank You Page Customizer – free drag-and-drop builder with coupon options.
- Binary Carpenter – shortcode-based solution for page builders.
- YITH Custom Thank You Page – advanced rules, templates, upsells, and coupons.
- Methods of creating a custom thank you page:
- Using the theme editor (block-based site editor).
- Using a thank you page plugin (fast, flexible, no coding).
- Using custom code (hooks or overriding templates for complete control).
- You can even add post-purchase upsells on the thank you page with plugins like WowRevenue, turning it into a revenue-boosting opportunity.
What Is the Thank You Page in WooCommerce?
In WooCommerce, the Thank You page appears right after a customer completes placing their order.
It serves three key purposes:
- Confirmation – It reassures the customer that their payment went through.
- Information – It lists order details like the order number, purchased items, and billing/shipping address.
- Next Step – It also often shows complementary products and exciting offers.
These are just common examples. But a Thank You page can do so much more when customized.
Use Cases & Examples
Here are exciting ways in which a custom Thank You page can be effective for WooCommerce stores:
- Digital products: Instead of making customers dig through their email, you can add a direct download link right on the thank-you page.
- Helpful resources: If someone buys a gadget product, you can include a quick usage guide, a video tutorial, or a blog post link about specific features.
- Event details: Instead of just confirming the ticket purchase, you can give details about the event or even suggest related events.
- Membership sites: The Thank You page can help guide the new member through logging in, accessing their dashboard, and exploring key resources.
There are many other use cases for a custom Thank You page. The key idea here is that you should not just say goodbye to your customers on the Thank You page, but rather make the interaction active for building customer relationships and increasing lifetime customer value.
Watch the video guide on creating the custom thank you page:
Methods of Creating a Custom WooCommerce Thank You Page
There are three main ways to create a Thank You page: through your theme’s site editor, with a plugin, or using custom code. Each comes with its own workflow, pros, and limitations. Let’s break them down.
1. Using Theme Settings / Site Editor
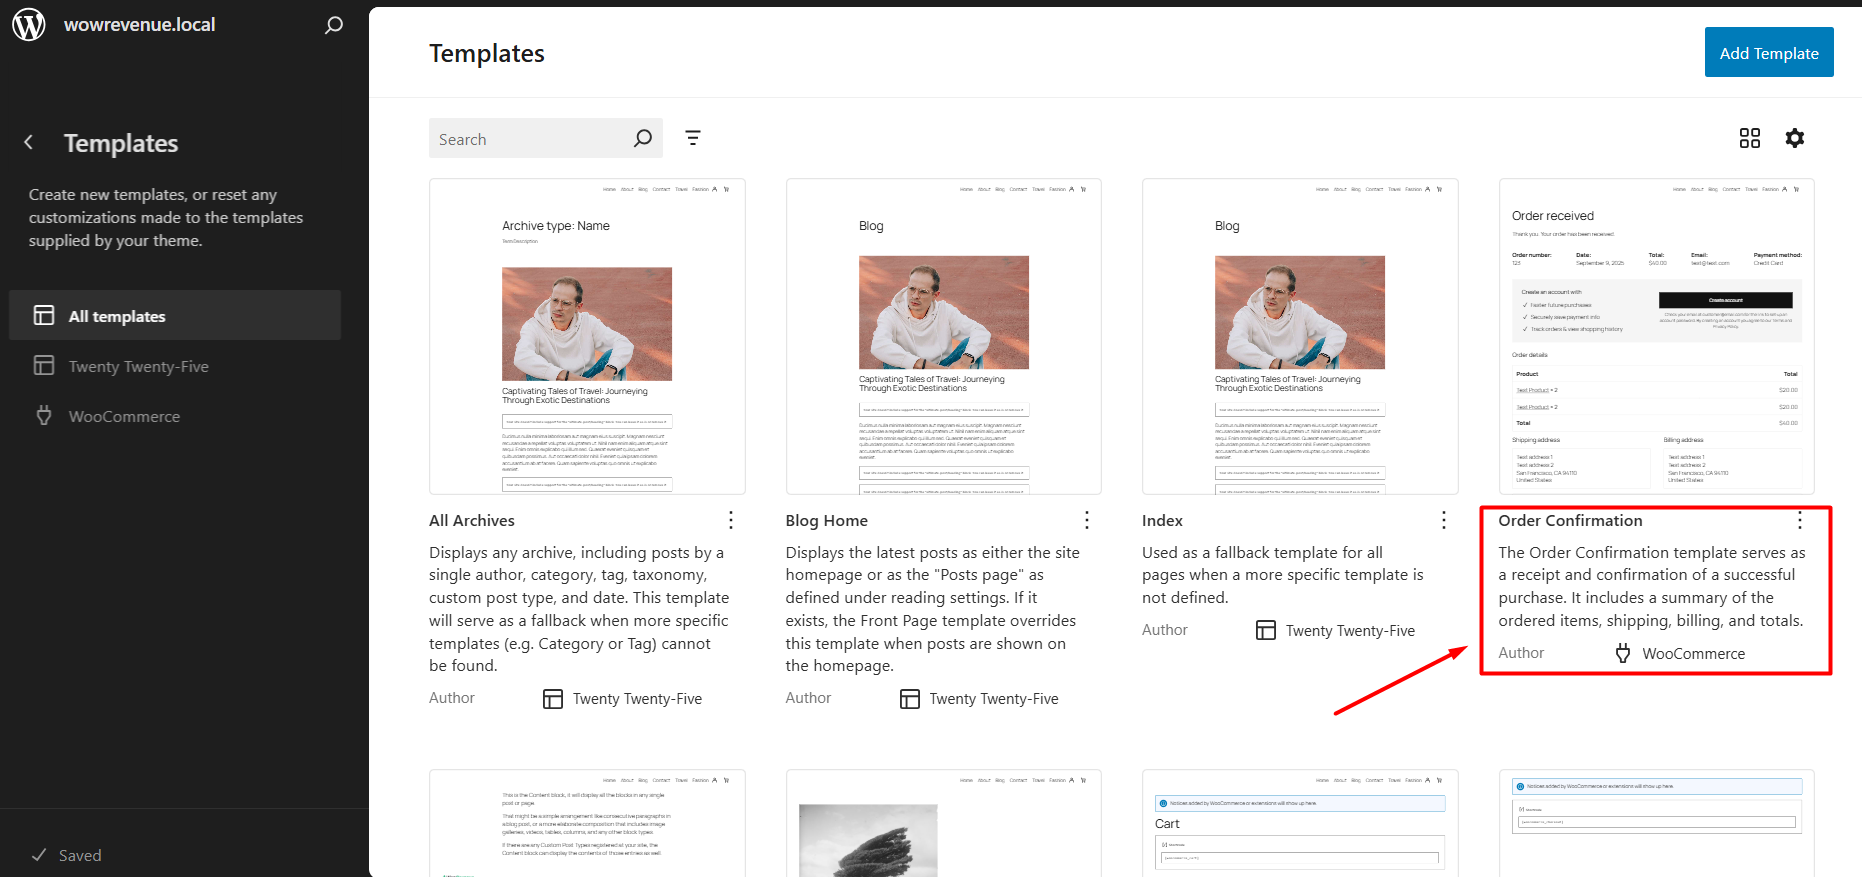
Modern WordPress themes (especially block-based ones like Twenty Twenty-Five) now let you edit WooCommerce templates directly. That means you can adjust the “Order Confirmation” page without touching PHP files.
Steps:
- Open the Site Editor: Go to Appearance → Editor in your WordPress dashboard. From here, you can see the list of templates that your theme provides.
- Locate the Order Confirmation template: Find the WooCommerce template that handles the “Order Confirmation” or “Thank You” page. Not every theme exposes this by default, but many modern ones do.
- Customize the Order Confirmation Page: Click on the template, and you will be directed to the WordPress Gutenberg editor. Here, you can insert new blocks easily to customize the page. For example, I added a notice that customers can get 5% discount on their next purchase when they use a coupon.
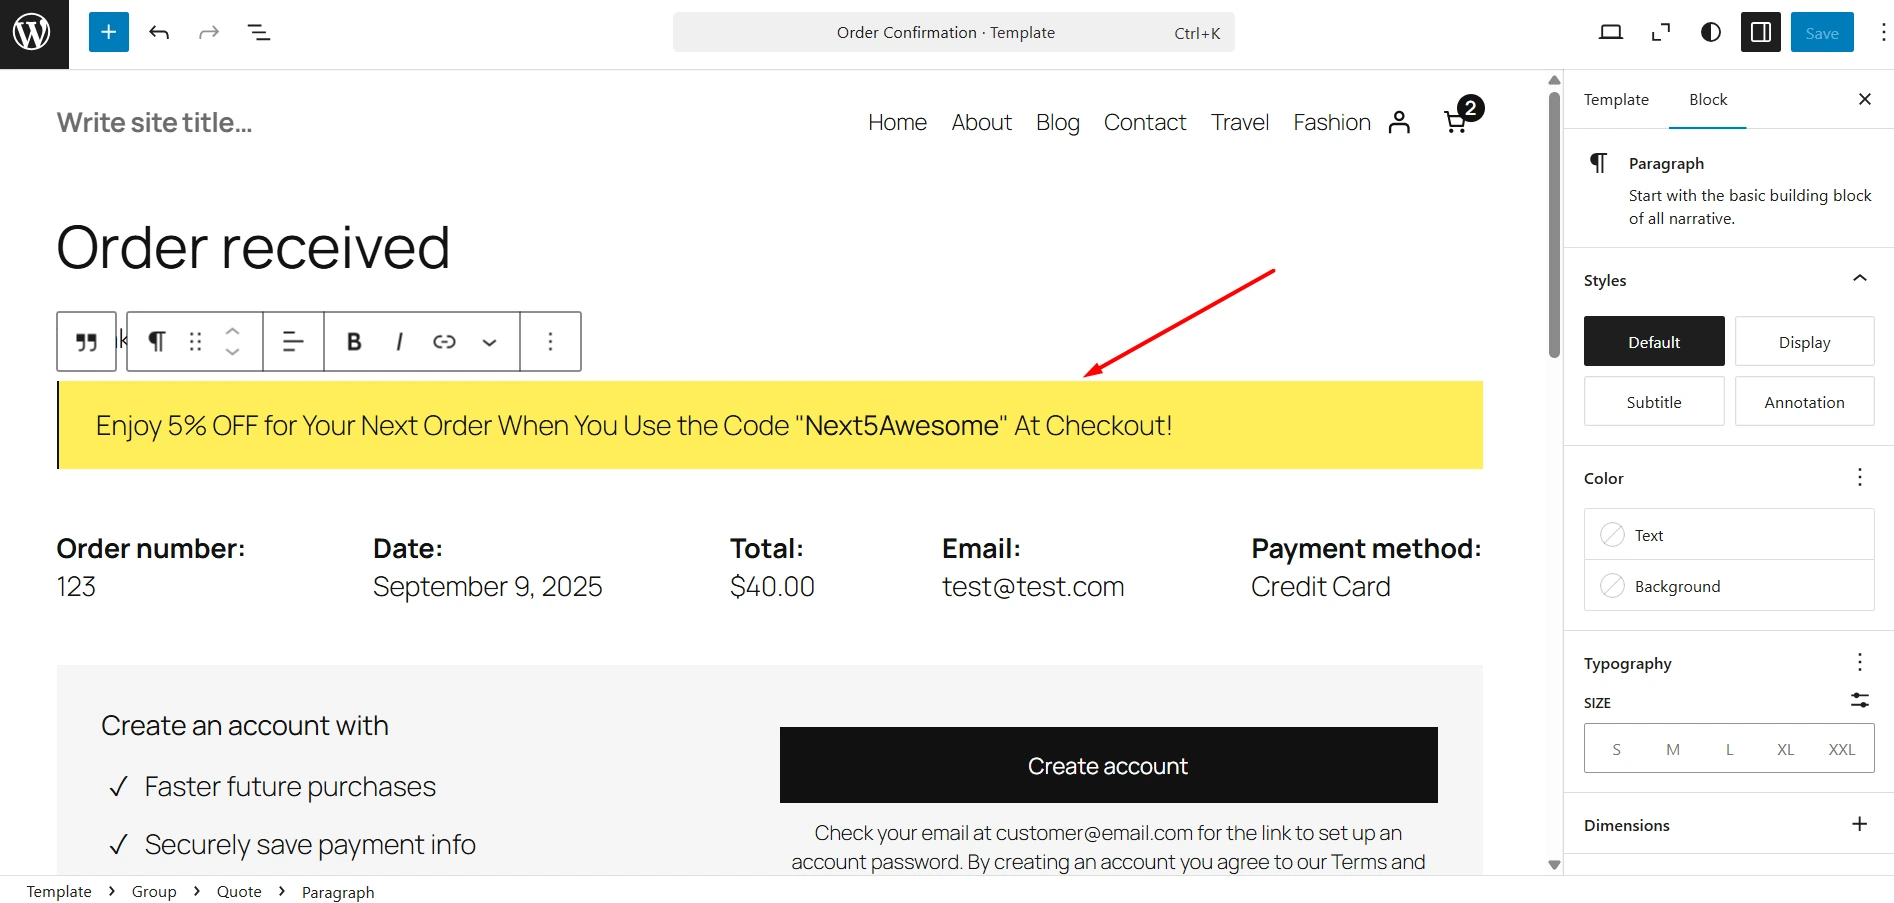
- Rearrange and style the layout: Want to highlight a specific block at the top? Drag it up. Need to emphasize order details? Make them bold or put them in a styled block. Since you’re in the block editor, you can adjust typography, spacing, and background colors with just a few clicks.
- Save and preview: Once satisfied, preview the Thank You page by completing a test order. This ensures everything displays correctly.
This method is simple and code-free. However, it’s limited by your theme – if it doesn’t allow editing this template, you’ll have to turn to plugins or code.
2. Using a WooCommerce Thank You Page Plugin
Plugins are the most popular option because they combine ease of use with advanced customization. They let you create beautiful, feature-rich Thank You pages without coding.
Steps:
- Install your plugin of choice: Options include WowStore, YITH Custom Thank You Page, WooCommerce’s official extension, or VillaTheme Customizer. Each plugin comes with its own strengths—WowStore for block-based templates, YITH for rule-based conditions, and VillaTheme for a free drag-and-drop builder.
- Choose a template or start fresh: Many plugins include pre-designed Thank You page templates. For example, WowStore lets you import a polished template in one click, which you can further customize to create a beautiful order confirmation page.
- Customize the content and design: Add or rearrange blocks: Thank You message, order details, coupon codes, or even a video message from your brand. Style the page by adjusting colors, fonts, and spacing so it feels aligned with your brand identity.
- Add dynamic elements: Plugins make it easy to insert personalized details, like the customer’s name or the specific product purchased. You can also add smart upsell sections, newsletter sign-ups, or referral programs.
- Save and test thoroughly: Complete a test order to check that all the elements display correctly. Look for mobile responsiveness, coupon functionality, and upsell links to ensure nothing breaks the checkout flow.
This method is perfect for store owners who want maximum impact with minimal effort. The only trade-offs are plugin costs (for premium versions) and the extra responsibility of keeping another extension updated.
3. Using Custom Code
For those comfortable with PHP, hooks, and child themes, custom coding can offer good control over the Thank You page.
It’s flexible enough to handle anything – from personalized messages to advanced layouts. However, it does carry risks if not done carefully.
The most common approach is to use WooCommerce hooks such as woocommerce_thankyou or woocommerce_before_thankyou.
By adding custom functions to your theme’s functions.php file, you can insert extra content like order-specific messages, product recommendations, or even conditional coupons based on the order value.
Shortcodes also come in handy here, letting you display dynamic details such as order info or product tables wherever they make sense.
Pro Tip: Learn the steps to create reusable blocks with shortcodes.
If you want more advanced customization, you can override the thankyou.php template by copying it into your child theme. This gives you the freedom to rearrange elements, remove sections, or add new ones like banners, videos, or custom HTML.
Make sure to always work within a child theme so WordPress updates don’t erase your edits, and keep backups in case something goes wrong.
Best Custom Thank You Page Plugins for WooCommerce
As you have seen, we have explained three methods to create custom thank you pages. The one we recommend is using a dedicated plugin for a personalized thank you page.
Here’s a quick view of the key features for the best custom thank you page plugins:
| Plugin | Key Features |
| WowStore (by WPXPO) | All-in-one store builder with ready-made templates for Thank You Pages, offers block-based customization, drag-and-drop WooCommerce builder, order details/payment/address blocks. |
| Custom Thank You Pages (Official Extension) | Unique Thank You page per product, upsell suggestions, onboarding, newsletter signups. |
| WooCommerce Thank You Page Customizer (VillaTheme) | Drag-and-drop builder, coupons, upsell products, product sliders, social media integration. |
| Custom Thank You Page (Binary Carpenter) | Uses shortcodes to work with any page builder (Elementor, Divi, Beaver Builder, etc.). Simple and lightweight. |
| YITH Custom Thank You Page | Unlimited pages based on product/category/payment method, 6 templates, upsell/coupon options, “order again” button, printable PDF. |
Step-by-Step Guide to Create A Fully Custom Thank You Page
Now you know some of the best plugins that can help you create a customized thank you page. In this section, we will use the WowStore plugin – it’s a WooCommerce blocks plugin that lets you design beautiful store pages, such as the thank you page.
So, without any further ado, let’s take a look at the step-by-step process.
Step 1: Install & Set Up WowStore
First, we will need to install and activate the WowStore plugin. The installation is just like any other plugin.
Simply go to your WordPress dashboard’s plugin section and search for WowStore. Click on Install and Activate it to get started.
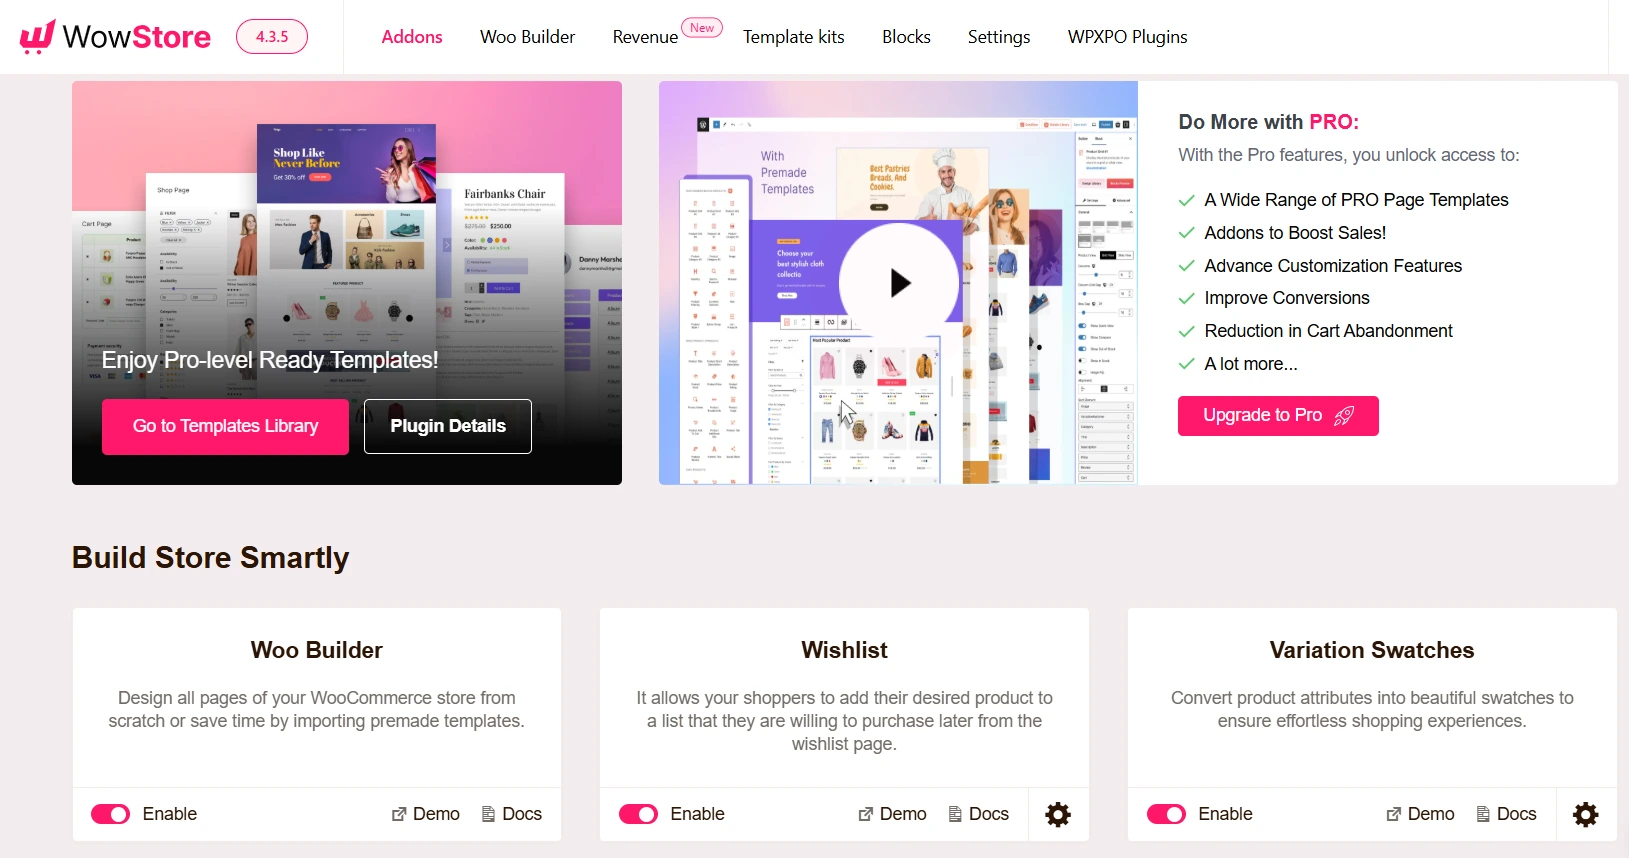
Now navigate to the WowStore dashboard. You will see its awesome list of addons and features. Simply find the Woo Builder addon and make sure it is enabled before creating the thank you page.
Step 2: Creating the Thank You Page with Templates
First, I’ll show you the easiest way to create a custom thank you page with the WowStore WooCommerce builder.
From the WowStore dashboard, navigate to the Woo Builder. Then click the “+ Create Template” button. This will move you to the thank you page template selector.
You will see the option to “Start from Scratch” and a library of premade templates. From these templates, choose the one that you like and click the “Import” button.
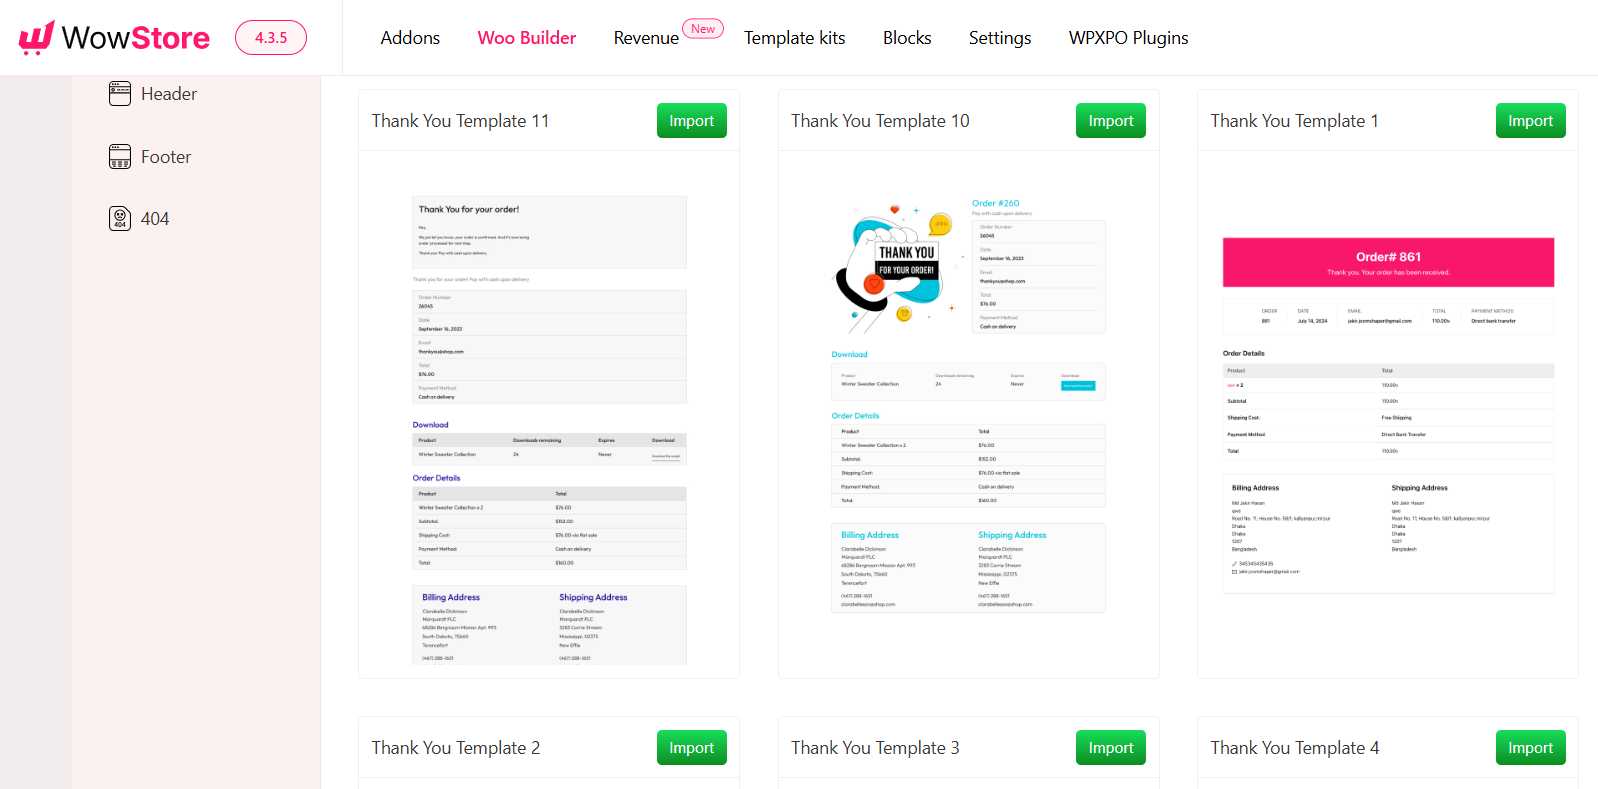
Now, you’ll see the backend editor of a beautiful thank you page. The page template is made with multiple building blocks (Gutenberg blocks). You can customize each block from its subsequent settings panel.
But the premade templates are created in a way that you won’t need any customization at all.
All you have to do now is publish the template. And, you’re done! Now, whenever a customer completes their purchase, they will see this beautiful thank you page.
Step 3: Create the Thank You Page from Scratch
You have seen the process of creating the order confirmation page using templates. But what if you want to customize each setting yourself?
From the template selector page, click on the option called “Start from Scratch”. And you’ll see the backend editor of a beautiful thank you page.
Now, let us click the “Toggle block inserter” real quick. It will display all the blocks you can use including WowStore’s builder blocks.
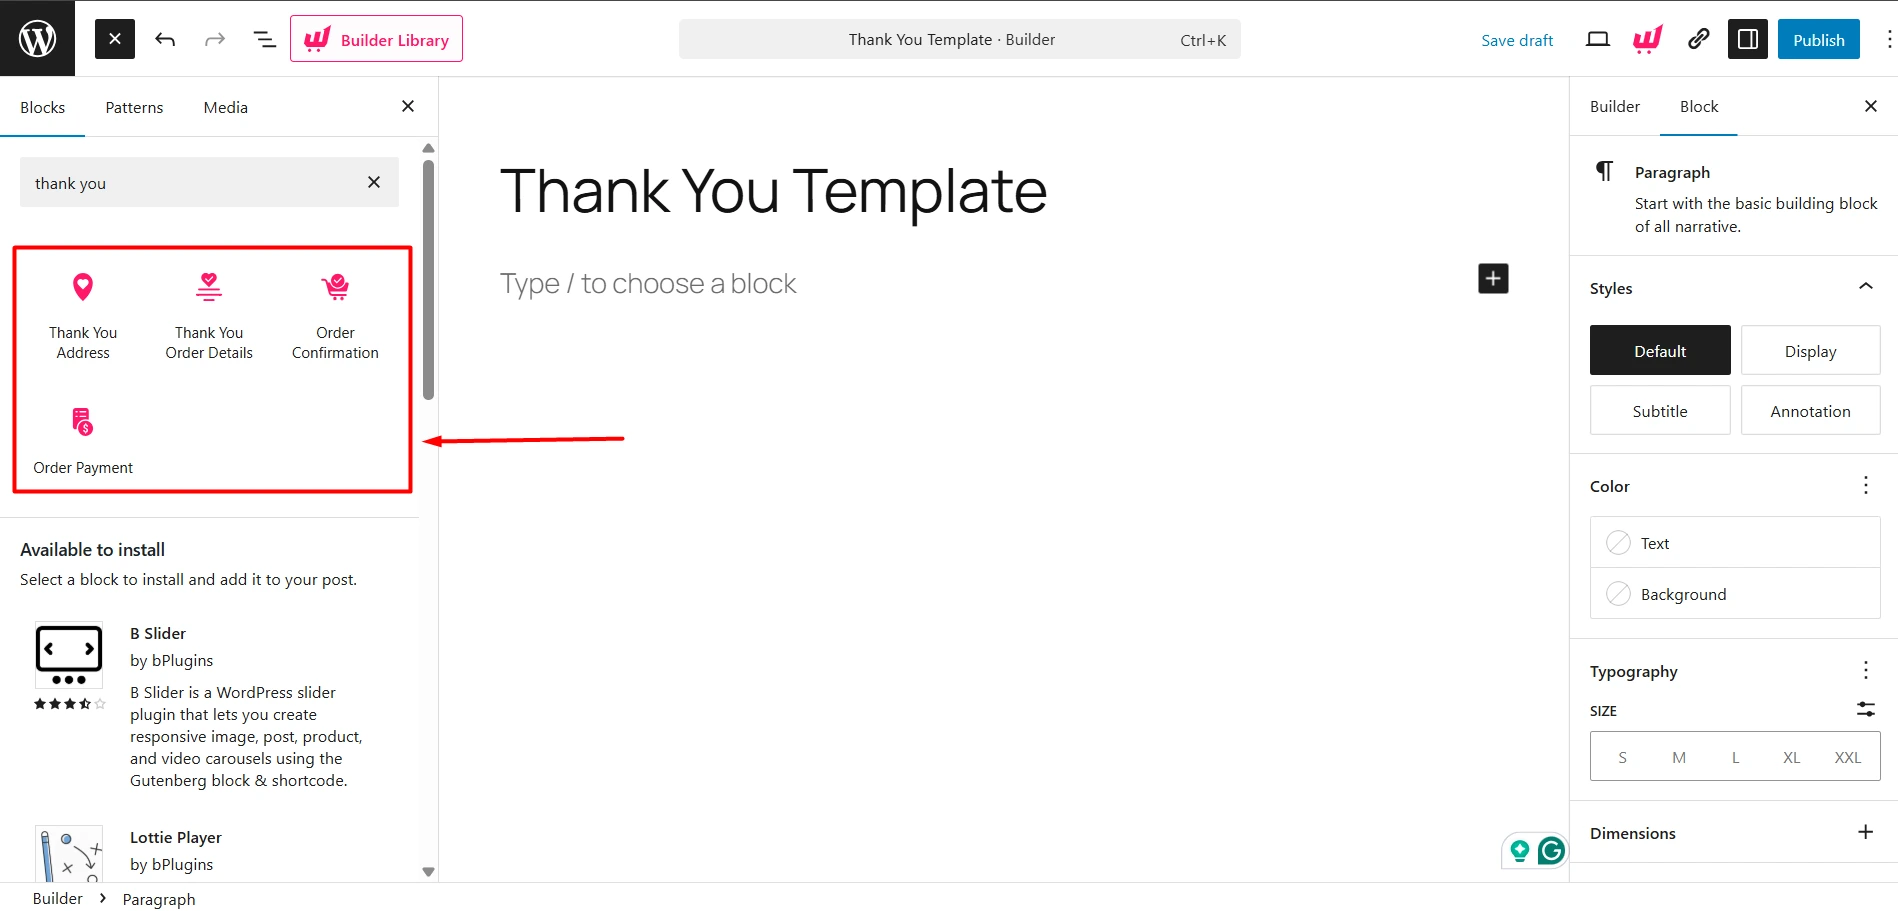
I’ll add the blocks with the following sequence to make it look natural.
Search with the term “Thank You” and you will find 4 blocks in it. These are the 4 blocks I’ll use to create a custom thank you page template.
- Order Confirmation Block
- Thank You Order Details Block
- Order Payment Block
- Thank You Address Block
Step 4: Customize the Thank You Page
In this step, I’ll show how you can customize your thank you page. I added 4 blocks in the previous step, and mentioned that each block has its own customization option.
For example, let’s discuss the Order Confirmation Block’s settings. This block shows the order ID and a thank you message.

You can disable the heading, and that will stop showing the order ID. You can change the text, color, typography, and alignment. Also, you’ll get a slider to adjust spacing.
Similar to this block, you can also make changes to the other blocks. I recommend exploring each one’s settings and applying the design that fits your store’s design.
What Are the Essential Elements of an Ideal Thank You Page?
A compelling Thank You page is not limited to just “Thanking” but rather smartly promotes products for better sales. Here’s a list of elements you should ensure when creating a custom thank you page.
Here’s what to focus on:
- Personalised thank-you message – Avoid robotic text; customize your message to the customer’s purchase. For instance, “Thanks for upgrading your kitchen with our cookware set!” feels more genuine than “Thank You for your order.”
- Order confirmation and details – Provide a summary of the order number, items purchased, quantities, and a download link for digital products. This reassures the customer that their purchase was successful.
- Redirects or related products – Suggest complementary products or redirect customers to other sections of your site. Upsells and cross‑sells are powerful because customers are still in a buying mood.
- Offer a prize or coupon – Reward customers with a voucher or coupon for their next purchase.
- Referral or share incentive – Encourage customers to refer friends or share their purchase on social media by offering a reward.
- Useful content – Provide relevant information such as product care instructions, assembly guides, or links to blog posts. This shows you care about the customer’s post‑purchase experience.
- Clear call-to-action (CTA) – Conclude with a CTA that directs customers toward the next step, such as signing up for a newsletter, downloading a guide, or returning to your shop.
In addition, make sure that the page is responsive so it looks great on mobile devices. You may want to add your social media icons for engagement and include a button to print or save the order confirmation as a PDF. These small features can make a huge difference to ensure a positive customer experience.
Does Creating a Custom Thank You Page Benefit Your Store?
So, naturally, you might ask: do I really need a custom Thank You page? Can’t I use the default Thank You page that WooCommerce shows based on my theme?
The answer is Yes and No. Let’s explore the facts more..
Limitations of the Default WooCommerce Thank You Page
I will be honest with you, the default page isn’t broken – it isn’t just very exciting.
It says: “Thank You. Your order has been received.” Then it shows the order summary.
That’s it. No personality. No upsells. No chance to deepen the relationship.
Yes, you could try editing the core thankyou.php template file in WooCommerce, which we will discuss in later sections. However, that step is a bit risky and requires technical expertise.
Benefits of a Custom Thank You Page in WooCommerce
Let’s see how a custom Thank You page can be beneficial for your store.
– Build Stronger Relationships
A personalized Thank You message makes customers feel appreciated. Something as simple as:
“Thanks, Sarah! Your kitchen upgrade starts today with our cookware set.”
This is way better than a robotic “Order #548 received.”
– Encourage Repeat Purchases
When someone’s already in the buying mood, it’s the perfect time to show related products.
Example: if a customer buys running shoes, you can display socks, fitness wear, and other complementary products.
This is a great way to upsell naturally, which feels helpful, not pushy.
– Offer Rewards and Coupons
Who doesn’t love offers? Adding a discount code for their next purchase can encourage them to return.
You could say: “Thanks for your order! Use code THANKYOU10 for 10% off your next purchase.”
It not only boosts loyalty but also increases repeat sales.
– Boost Word-of-Mouth Marketing
Customers are more likely to share positive experiences right after purchase.
You can add a referral incentive: “Refer a friend and get $5 off your next order.”
Or include social share buttons with a friendly note: “Show off what you bought on socials – and get an exclusive 10% discount for next order!”
– Provide Helpful Resources
Sometimes what customers need isn’t another product – it’s guidance.
On the Thank You page, you can link to a blog post, a how-to video, or FAQs.
For example, if you sell gardening products, you can refer to helpful resources, how-to videos, or blog posts you have written.
This shows you care about their success with your product, not just the sale.
– Create a Polished, Branded Experience
A well-designed Thank You page reinforces your brand identity.
Colors, fonts, tone, and images all contribute to giving a strong last impression.
Think of it as the difference between a plain, boring page and a thoughtful, branded follow-up.
Can You Do Upsell On WooCommerce Thank You Page?
Yes, you can upsell on Thank You page of WooCommerce with the WowRevenue plugin – a product bundles plugin with smart upsell features.
The thank you page is one of the best places to add upsells because customers are still in buying mode. They’ve just trusted your store enough to make a purchase, which makes them more receptive to offers that feel relevant and valuable.
With WowRevenue, you can create powerful post-purchase upsell campaigns directly on the WooCommerce thank you page.
Here’s how it works step-by-step:
- Step 1: Create a Post-Purchase Upsell Campaign: Install WowRevenue and visit its dashboard, and click Create Campaign. Choose the Normal Discount option, which is flexible enough for most upsell strategies.
- Step 2: Configure Basic Campaign Settings: Give your campaign a clear name and select Thank You Page as the display location. Choose how the offer will appear – inline on the page, as a pop-up, or as a floating bar.
- Step 3: Set Trigger Products: Decide for which products the upsell should appear. You can trigger it for all products, specific products, or by product categories.
- Step 4: Set Your Upsell Items: Select the products you want to upsell. Add discounts, set quantity rules if needed, and enable urgency features like countdown timers.
- Step 5: Design Your Upsell Offer: Customize the look of your upsell offer to match your store’s branding. Adjust typography, colors, spacing, and button styles. Preview your design in real time and choose between grid or list layouts for product display.
Once published, customers will see your upsell offer right after completing their purchase. This makes the thank you page not just a place to say thanks – but a real opportunity to increase your average order value.
Summing Up
The Thank You page might feel like a small detail in WooCommerce, but it’s actually a golden opportunity.
Instead of ending the journey with a bland receipt, you can use this page to:
- Show genuine gratitude.
- Confirm the order with clarity.
- Suggest upsell products.
- Offer coupons or referral incentives.
- Share valuable content.
Whether you use your theme’s site editor, a plugin, or custom code, the goal is the same: to give customers a memorable final impression.
Do it right, and your Thank You page won’t just close a sale – it will open the door to stronger relationships, repeat purchases, and long-term loyalty.