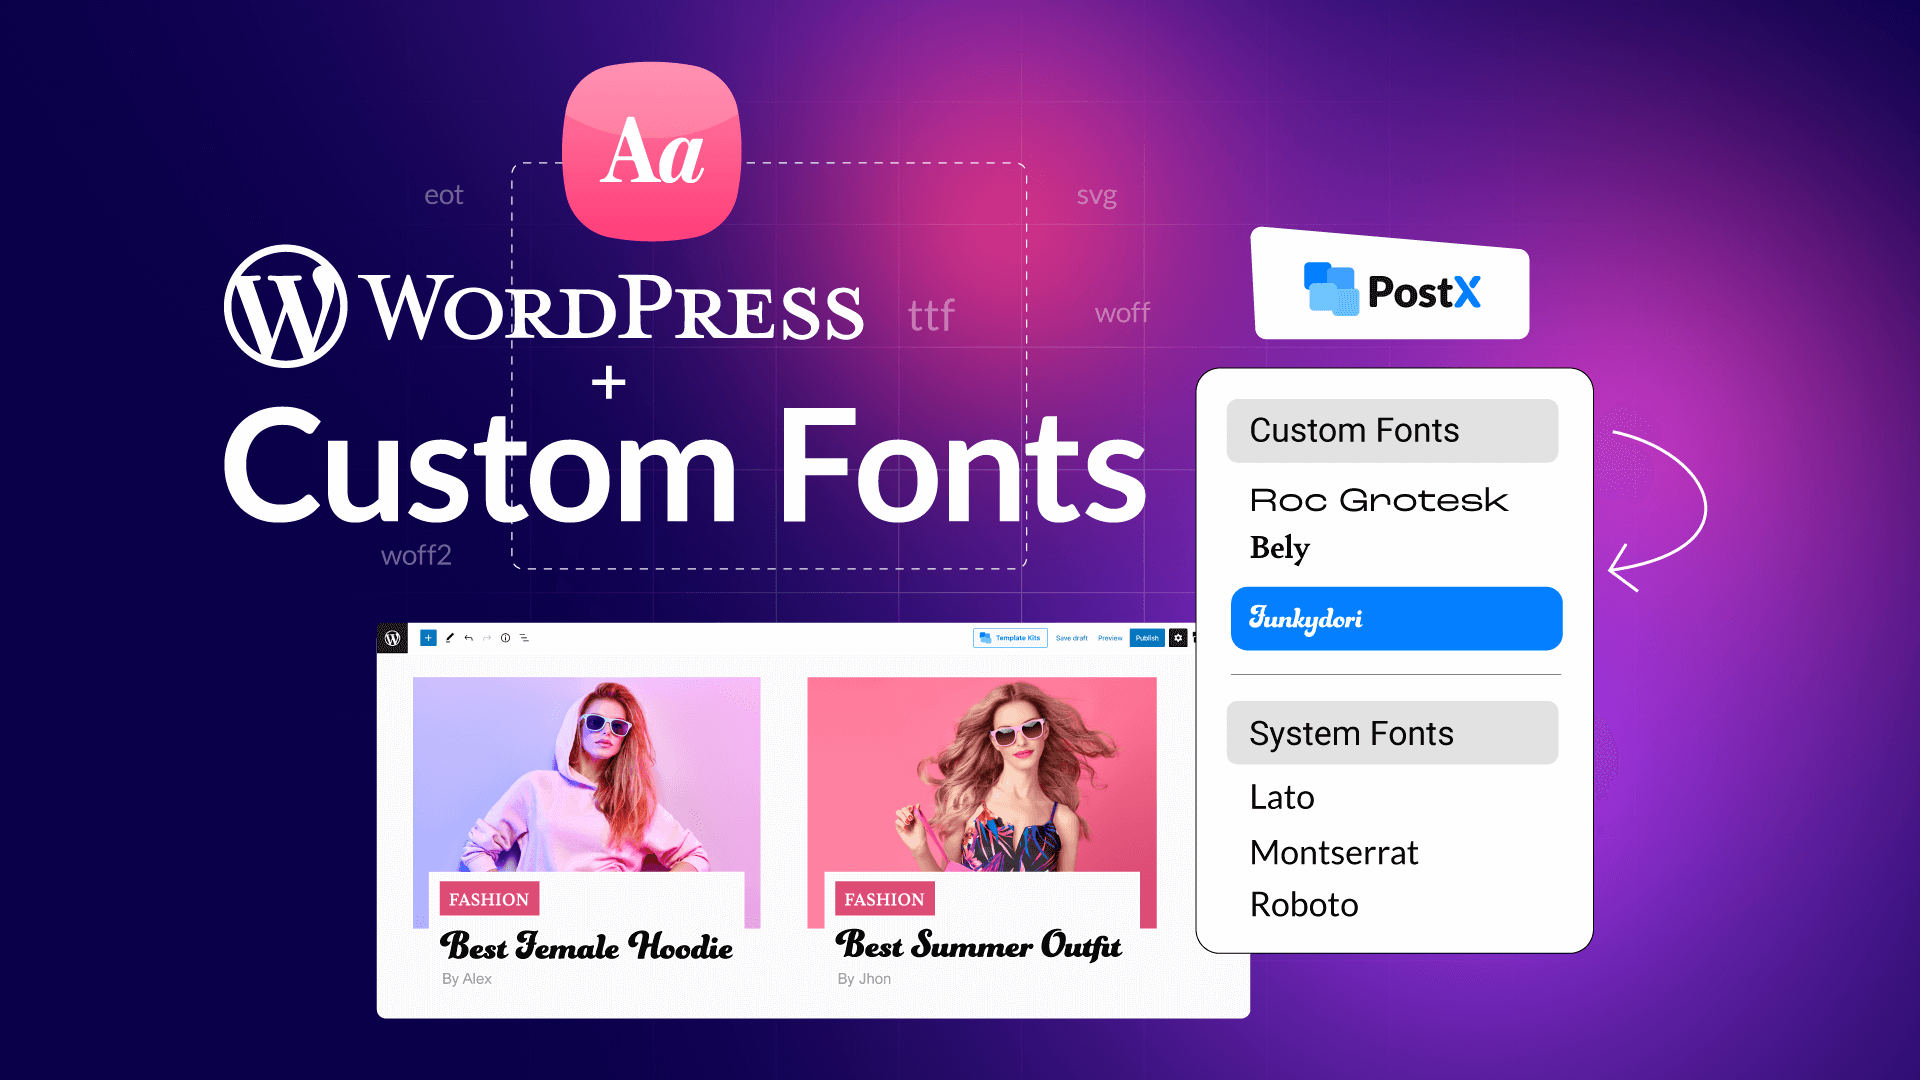
Typography plays a crucial role in shaping your website’s identity. The right font can make your brand feel professional, trustworthy, and unique.
On the other hand, the wrong one can make even a beautiful design look inconsistent. That’s why learning how to add a custom font in WordPress is an important step for any website owner who wants to stand out.
By default, WordPress themes come with a limited set of fonts, often relying on standard web-safe options or Google Fonts. But what if you want something that perfectly matches your brand’s personality? That’s where custom fonts come in.
In this guide, you’ll learn two simple ways to add a custom font to your WordPress site —
- Using a plugin (the quick and beginner-friendly way), and
- Using the block theme editor setting (without a plugin)
Whether you’re a designer fine-tuning brand identity or a blogger looking to make your site more readable and unique, this tutorial will help you apply custom typography smoothly and confidently.
Why Use Custom Fonts in WordPress?
Custom fonts do more than just change how text looks. They define your brand’s personality and influence how visitors feel when they land on your site.
With custom fonts in WordPress, you can create a consistent, professional look that instantly sets your website apart.
Aesthetic Benefits
Using unique fonts for WordPress helps establish a visual identity. For example:
- A bold sans-serif font can make your website look modern and confident.
- A script or handwritten font adds a creative or personal touch.
- A classic serif font can convey elegance and authority. Perfect for editorial or business sites.
The right typography ensures your design and content speak the same visual language.
Functional Benefits
Beyond looks, custom fonts improve readability and user experience. By choosing clear, well-optimized fonts:
- Your content becomes easier to scan and digest.
- Visitors stay longer and engage more.
- You can highlight key sections with contrasting font styles or weights.
In short, custom fonts in WordPress blend style with substance, enhancing both your site’s appearance and usability.
Font Sources Beyond Google Fonts
While Google Fonts is the most popular choice, there are several alternative font sources for WordPress that offer greater variety and style.
👉 Adobe Fonts (Typekit): A premium service with thousands of professional fonts. You can easily integrate Typekit fonts in WordPress using an API or plugin for seamless syncing.
👉 Font Squirrel: A trusted platform offering free, high-quality fonts with commercial licenses. Perfect for designers who want safe and flexible font options.
👉 Custom Font Repositories: If you have branded or purchased fonts, you can self-host them for complete control over style, licensing, and performance.
Exploring these alternative font sources lets you craft a more distinctive and consistent visual identity for your WordPress site.
Method 1: How to Add a Custom Font to WordPress Using a Plugin
Adding custom fonts with a plugin is the easiest and most beginner-friendly approach. You can upload, preview, and apply fonts across your site without touching a single line of code.
Let’s start with a quick look at some of the best custom fonts plugins for WordPress.
Best Plugins for adding custom fonts in WordPress
| Feature | PostX | Custom Fonts – Host Your Fonts Locally | Use Any Font | Custom Font Uploader |
|---|---|---|---|
| Upload Custom Fonts | ✅ Yes, TTF/WOFF2/WOFF supported | ✅ Yes, local upload | ✅ Yes, TTF/OTF/WOFF supported |
| Google Fonts Integration | ✅ Built-in, live preview | ❌ No | ⚠️ Limited |
| Live Preview | ✅ Yes, real-time | ❌ No | ✅ Yes |
| Typography Control | ✅ Advanced block-based styling | ❌ Basic CSS assignment | ❌ Minimal styling options |
| Ease of Use | ⭐⭐⭐⭐⭐ | ⭐⭐⭐ | ⭐⭐⭐⭐ |
TL;DR – Why PostX is the Best Option
PostX stands out because it combines custom font uploads, global typography control, Google Fonts integration, and live preview all in one plugin.
Unlike the other options, you can manage fonts per block, see real-time changes, and maintain a consistent, professional design without extra plugins or coding.
For anyone serious about typography, PostX is the most complete and user-friendly solution.
Step-by-Step Guide to Add Fonts in WordPress with a Plugin
Using PostX, you can quickly add and manage custom fonts in WordPress without touching code. Follow these simple steps:
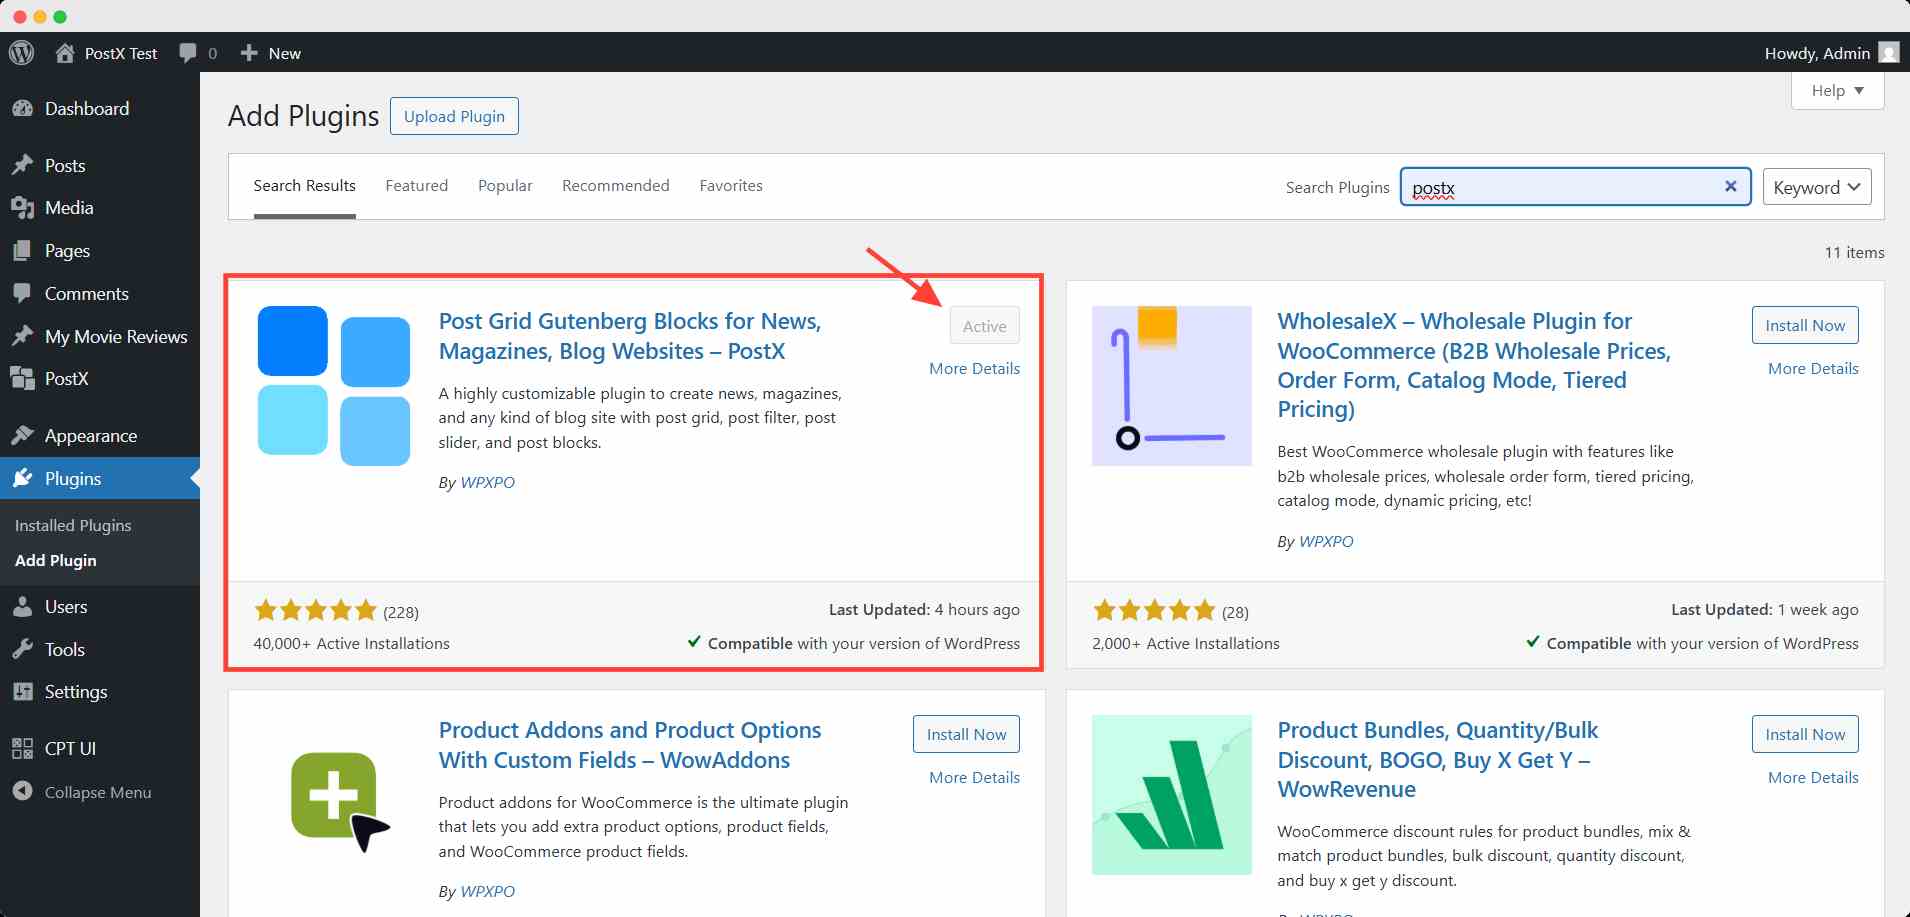
Step 1: Install and Activate PostX
Go to your WordPress dashboard → Plugins → Add New. Search for PostX. Click Install Now and then Activate.
Step 2: Turn on the Custom Font Addon
Go to the PostX dashboard. Here you will find several addons. Turn on the Custom Font addon.
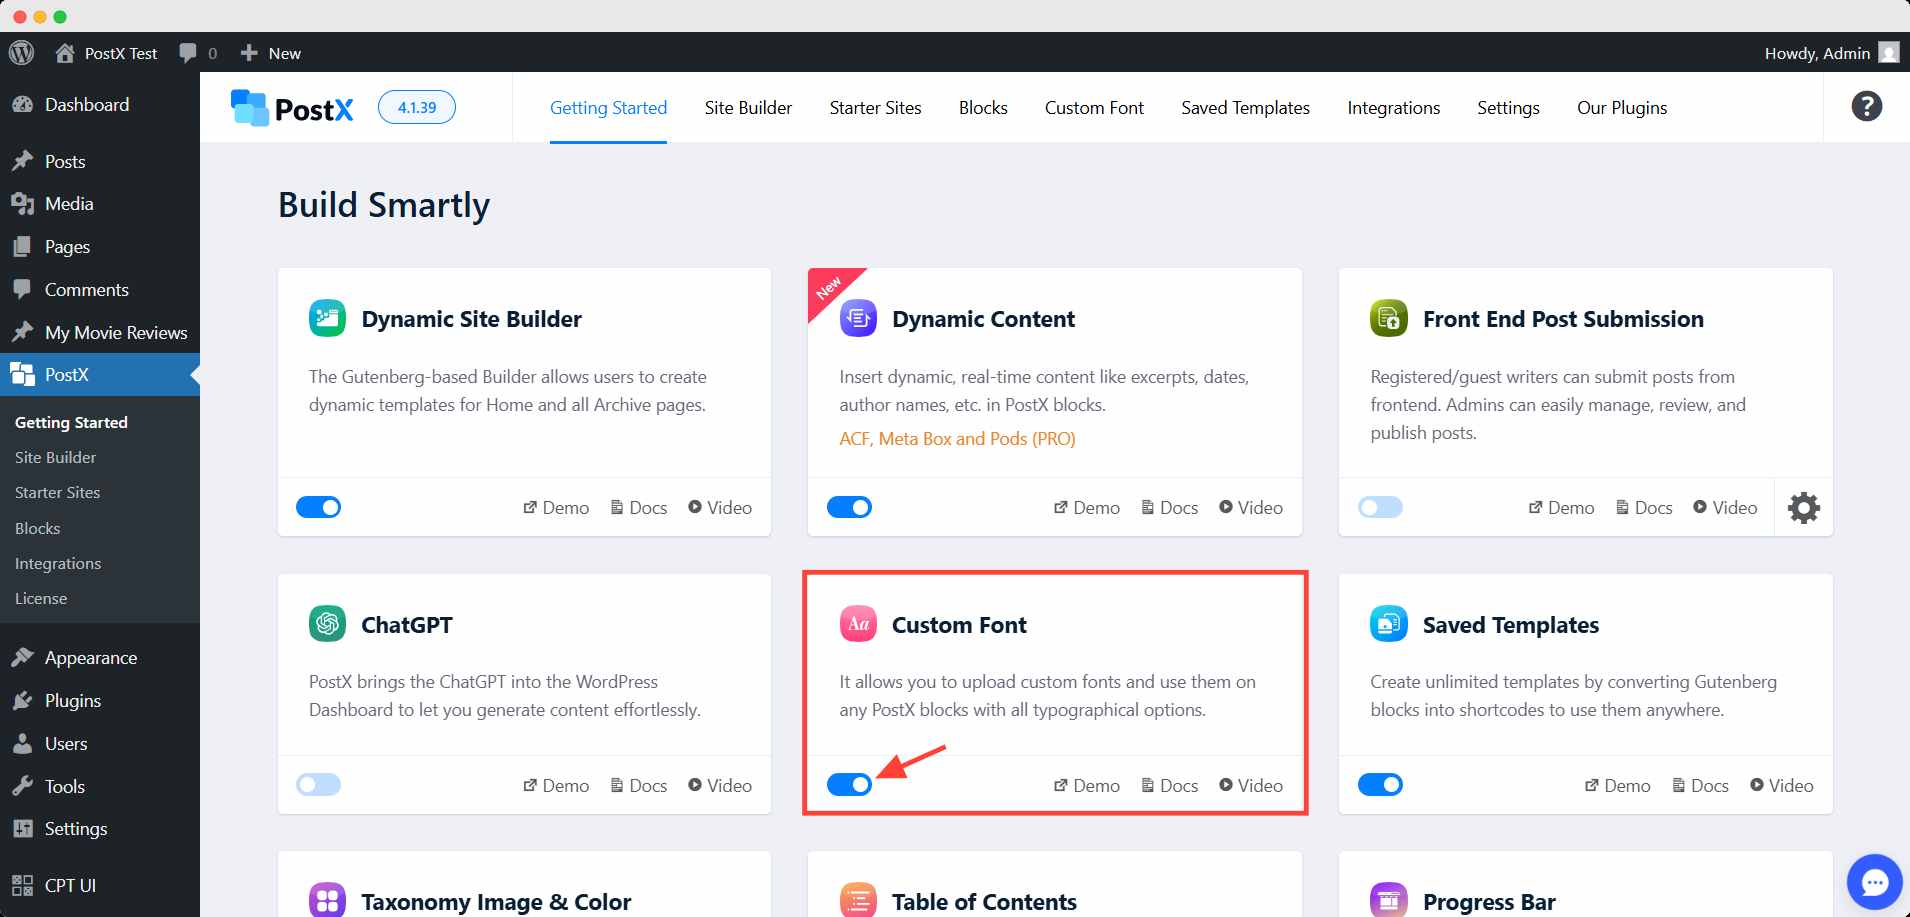
Turning on the addon will add an option for a custom font in the dashboard menu.
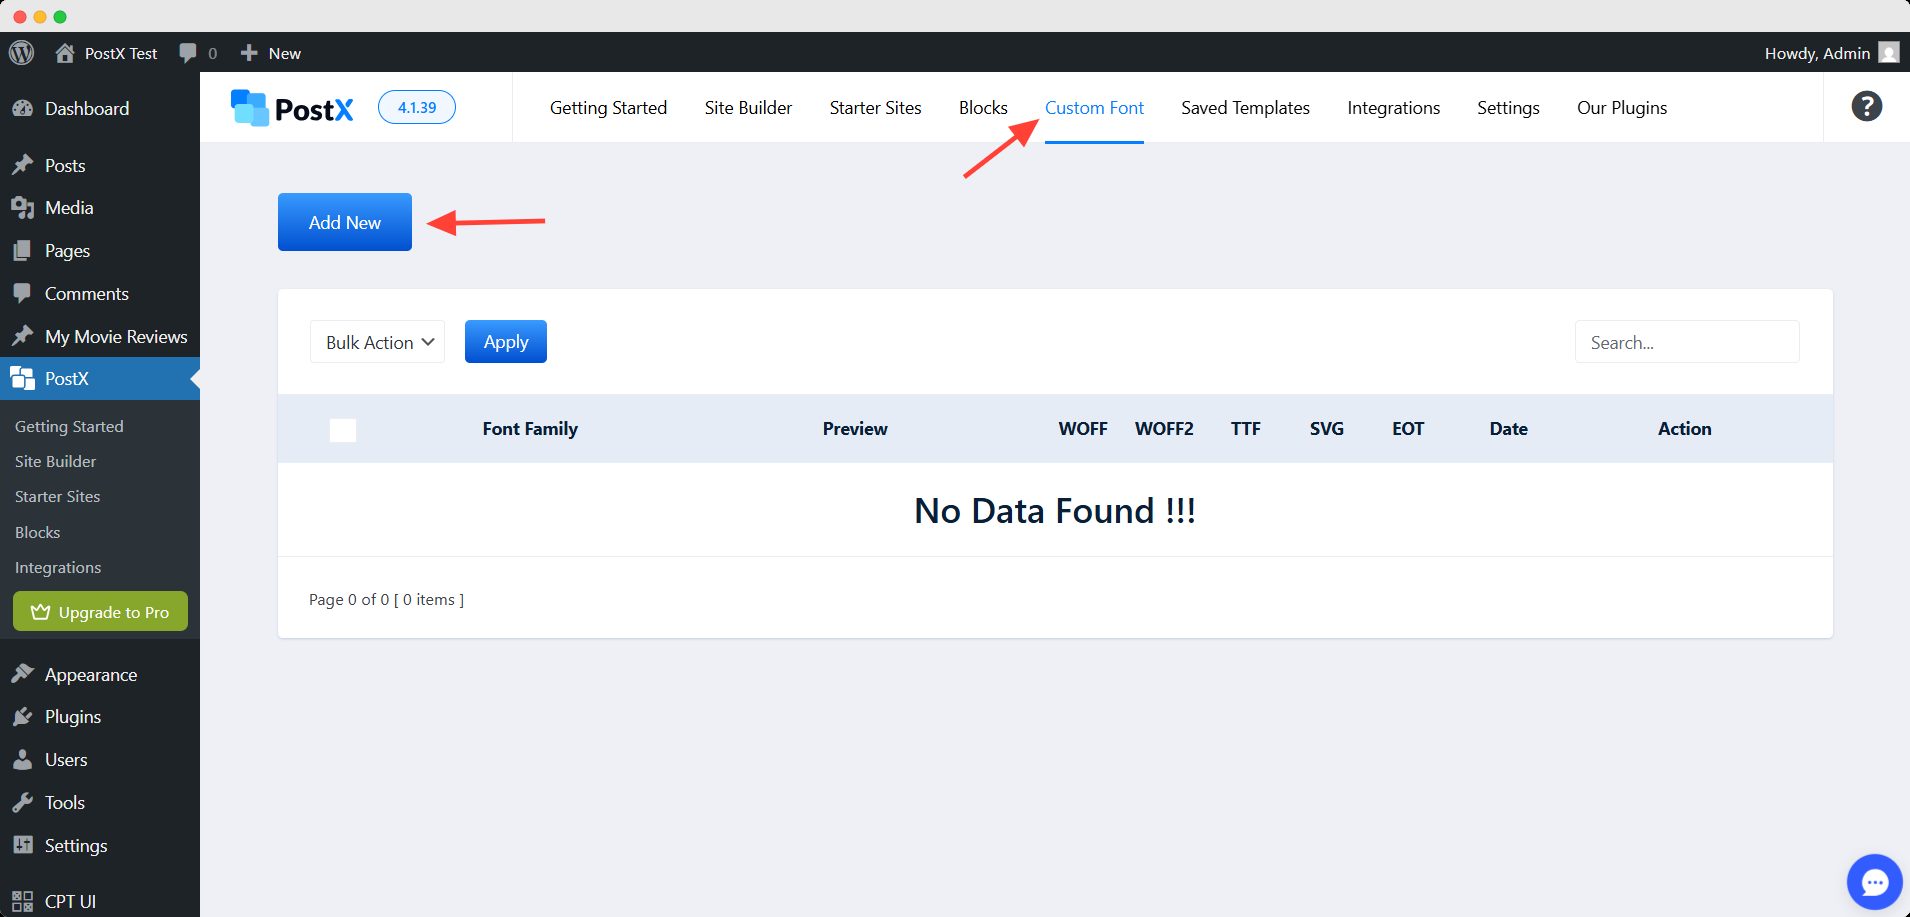
Step 3: Add a new custom font
Now, go to the custom font menu and click the add new button. This will take you to a new interface where you can upload the font file and create the necessary variations.
You can choose a weight for variation and then upload the custom font file. PostX supports 5 types of file formats for uploading. They are: WOFF, WOFF2, TTF, SVG, EOT.
You have to convert any other format into one of these before uploading.
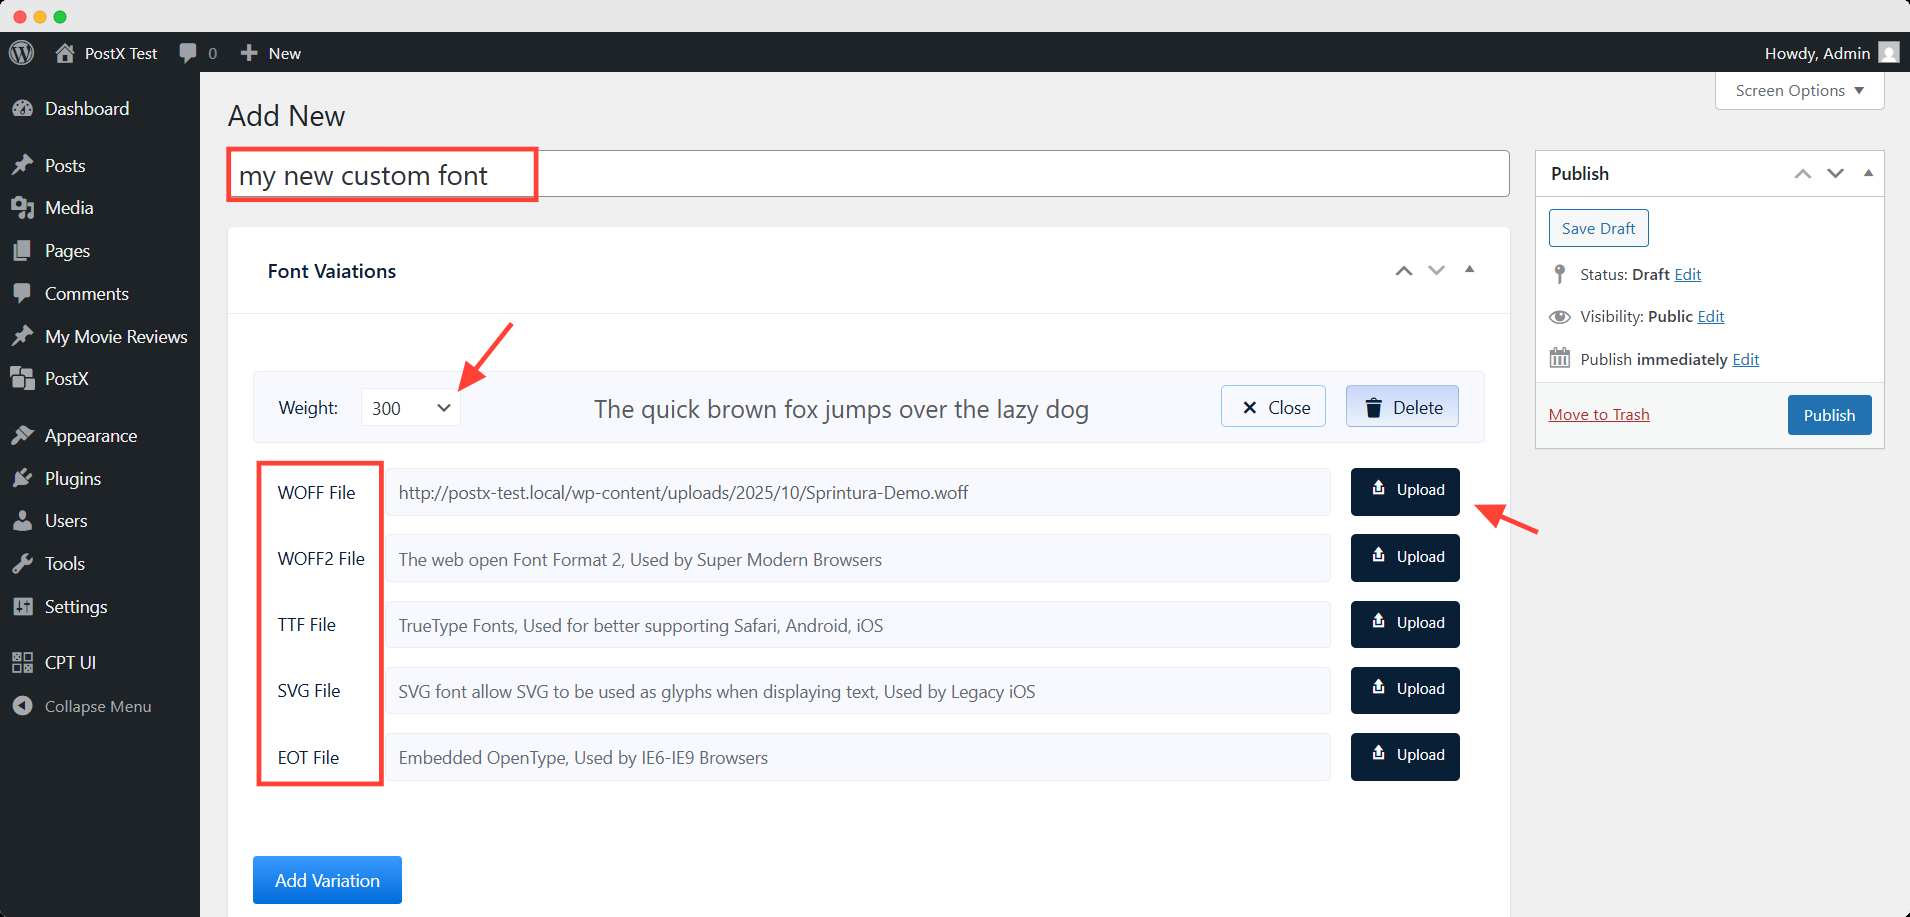
In this way, you can create multiple variations based on the weight.
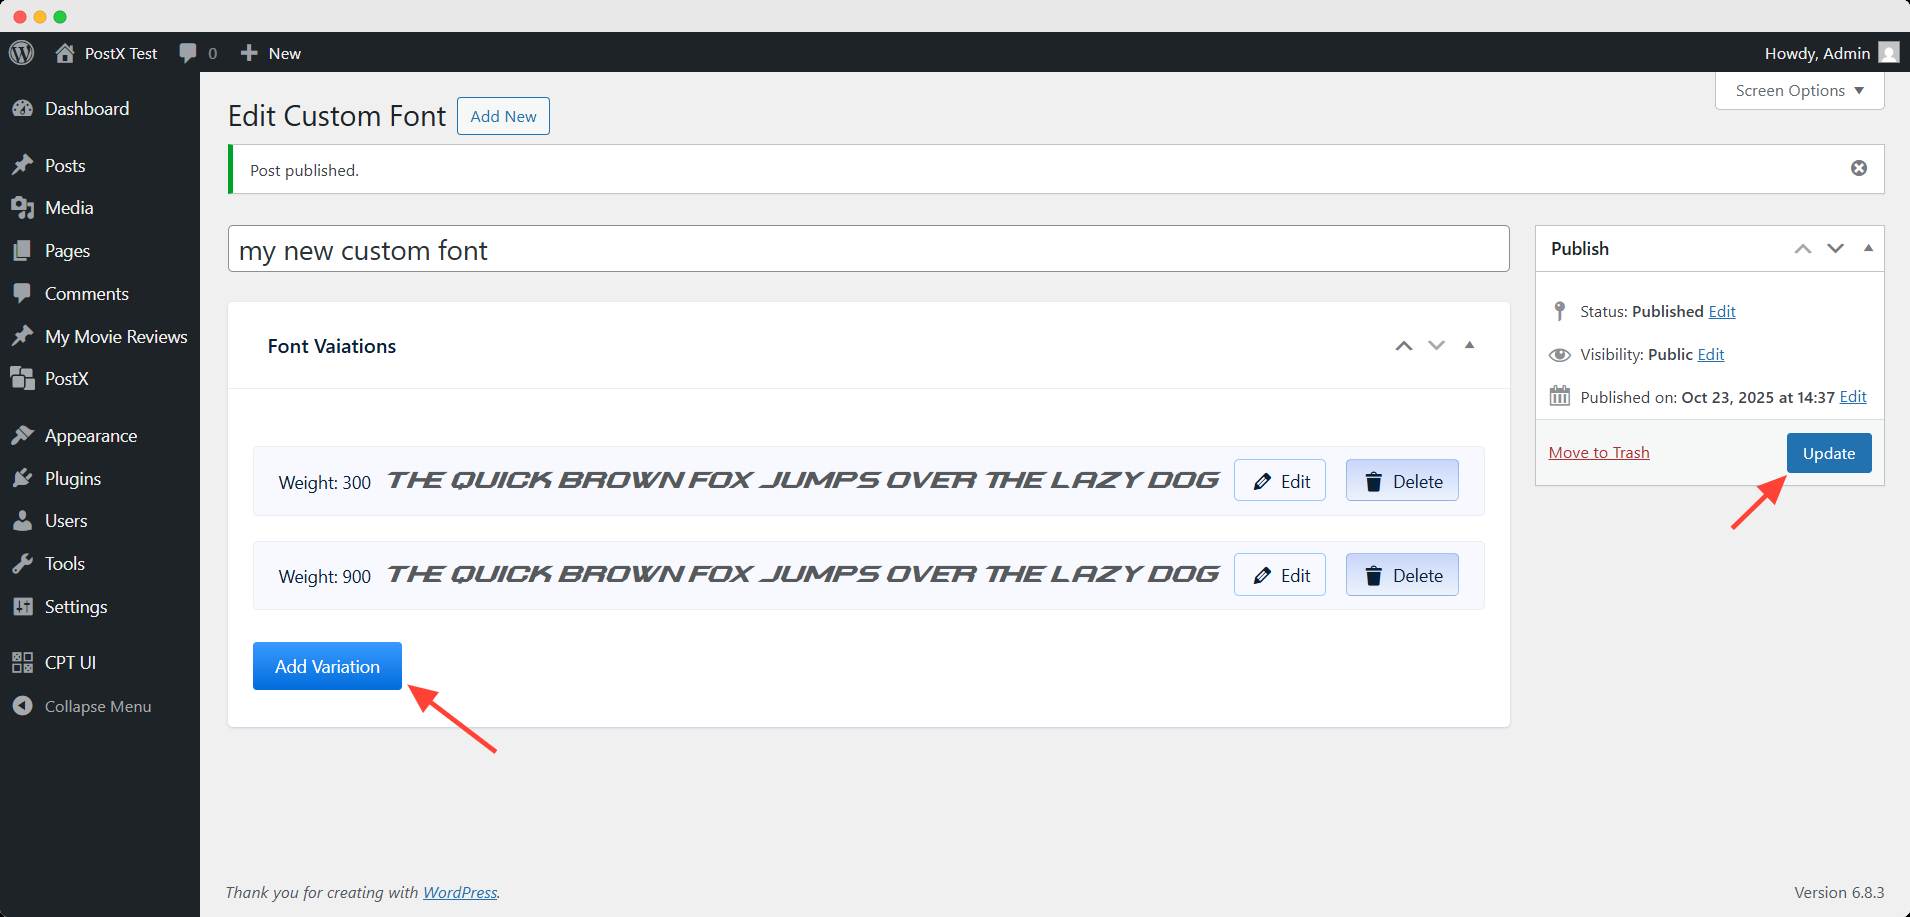
Step 4: Publish the added font
After creating the variations, you have to publish/update the font for use. You can find the added font in any of the Postx’s grid, list, or slider block. Basically, the blocks that show posts of your site.
How to use the newly added font
Go to the editorial interface of any of the blocks mentioned above. Select the block and scroll down to the title section in the right sidebar.
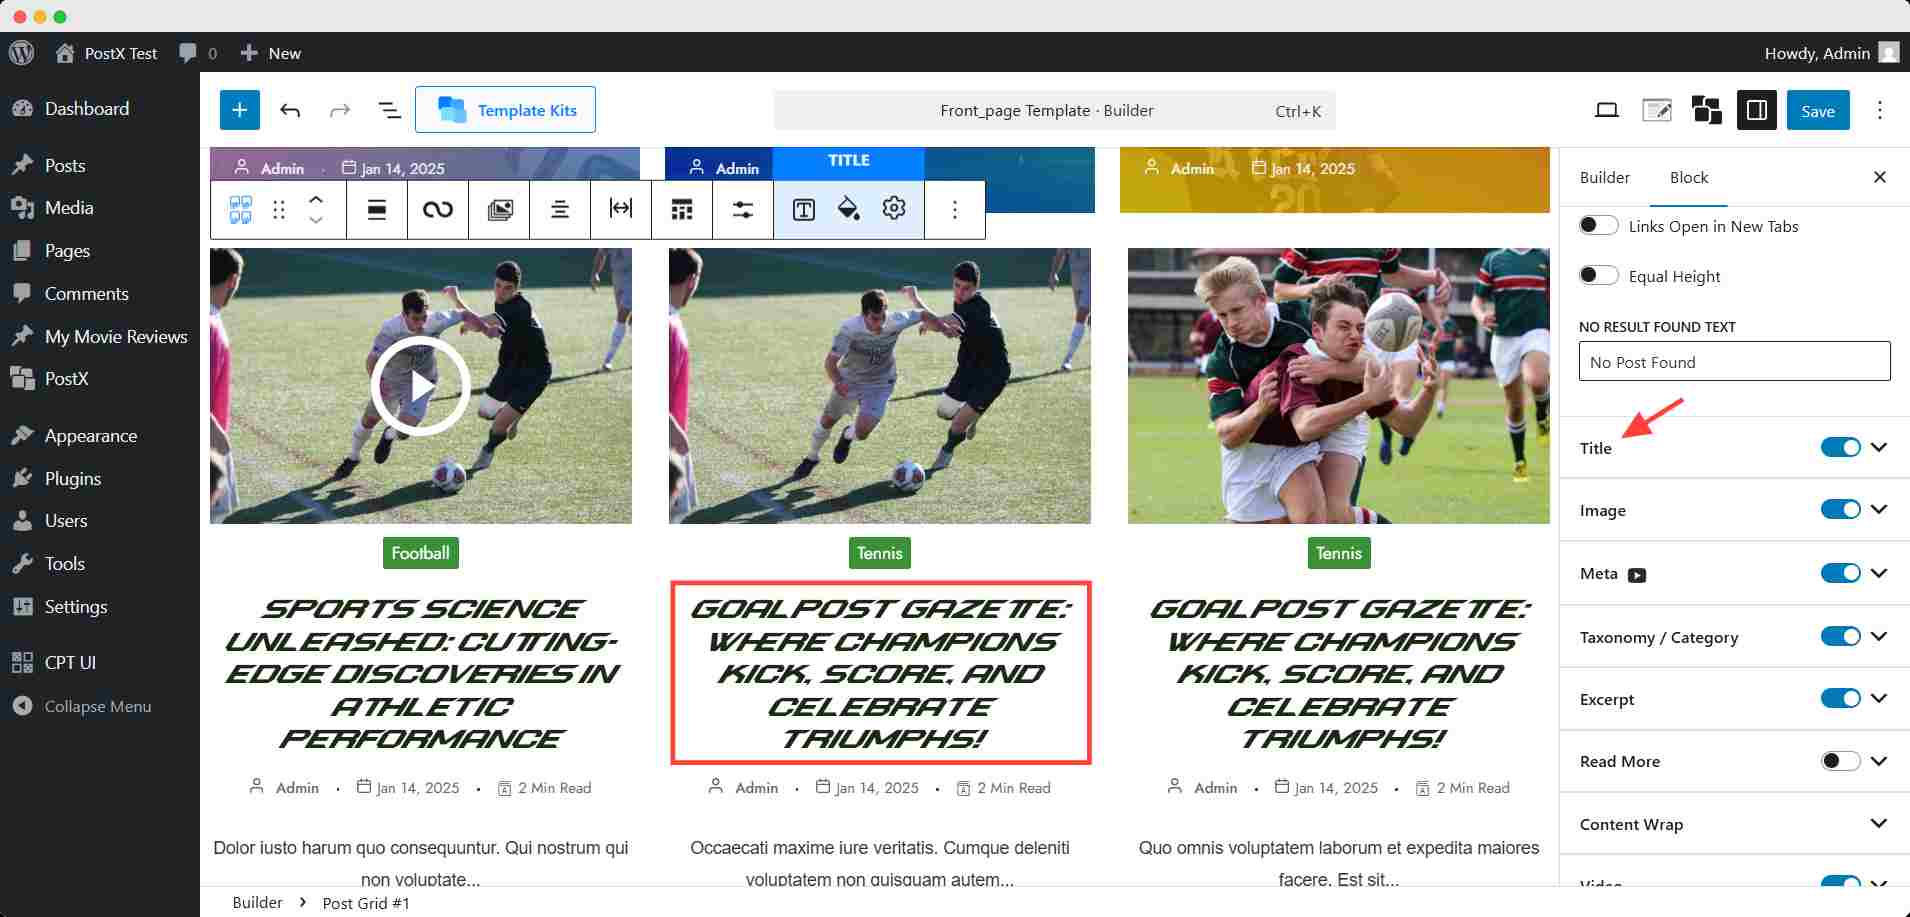
Expand the section, and you will find the typography setting. Click on the setting.
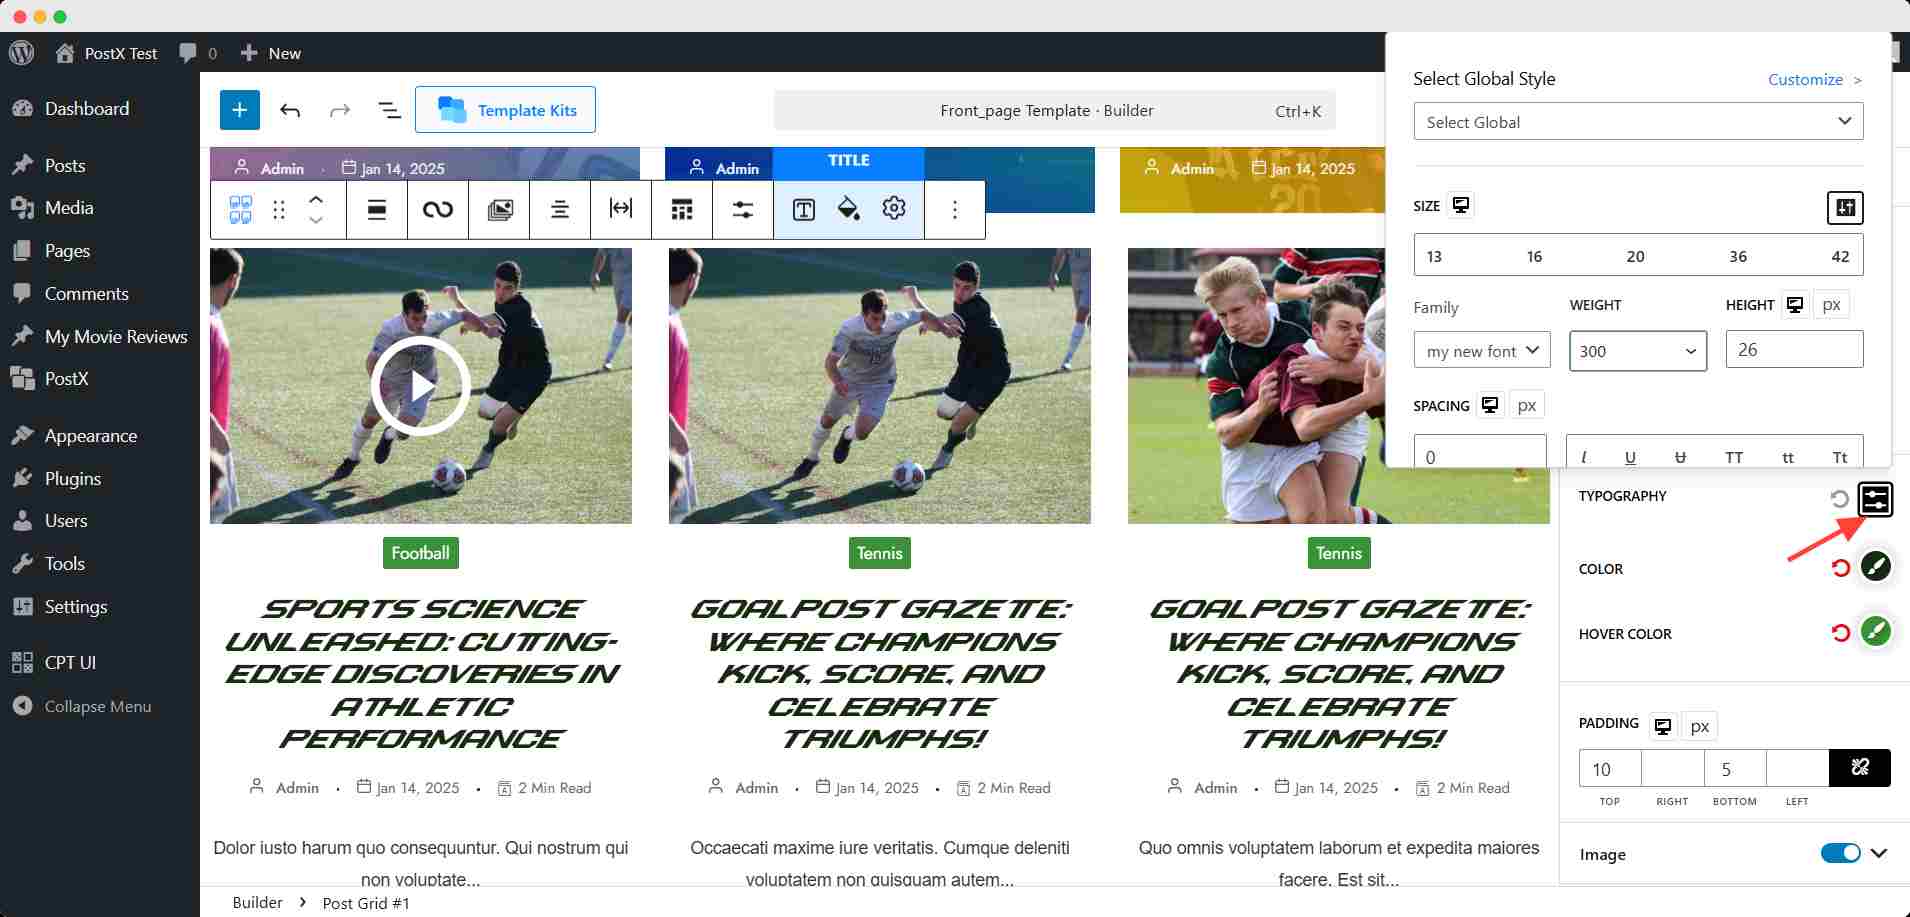
Here, you will see a dropdown option named font family. Click to open the dropdown. You will find your custom font in the very beginning.
You can also set the variation from the weight dropdown. Your created variation of weight will be listed here.
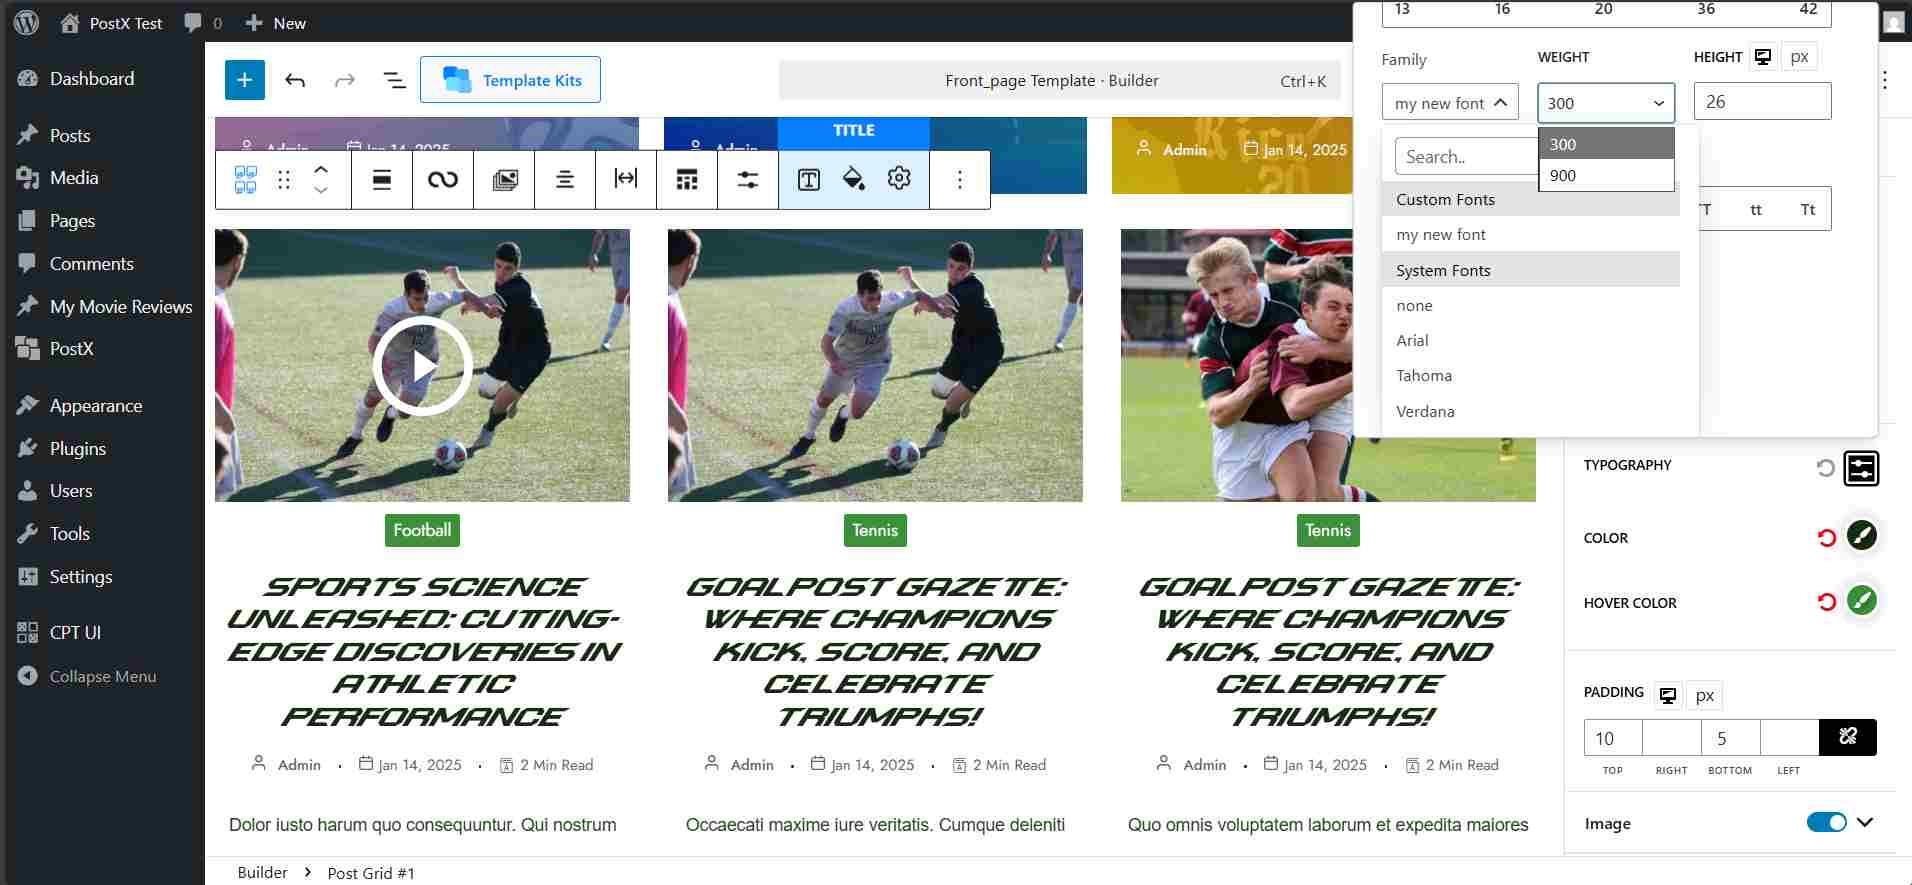
This way, you can change the default font to your newly added custom font.
💡 Pro Tip:
You have to change the font for each block. There’s no dynamic way to change the typography of one block, and it applies to sitewise.

Method 2: How to Add a Custom Font to WordPress Without a Plugin
If you prefer not to install extra plugins, you can easily add a custom font without a plugin using the built-in Site Editor in block themes. This method is quick, code-free, and ideal for users who want more design control directly from the WordPress dashboard.
Here’s how to do it:
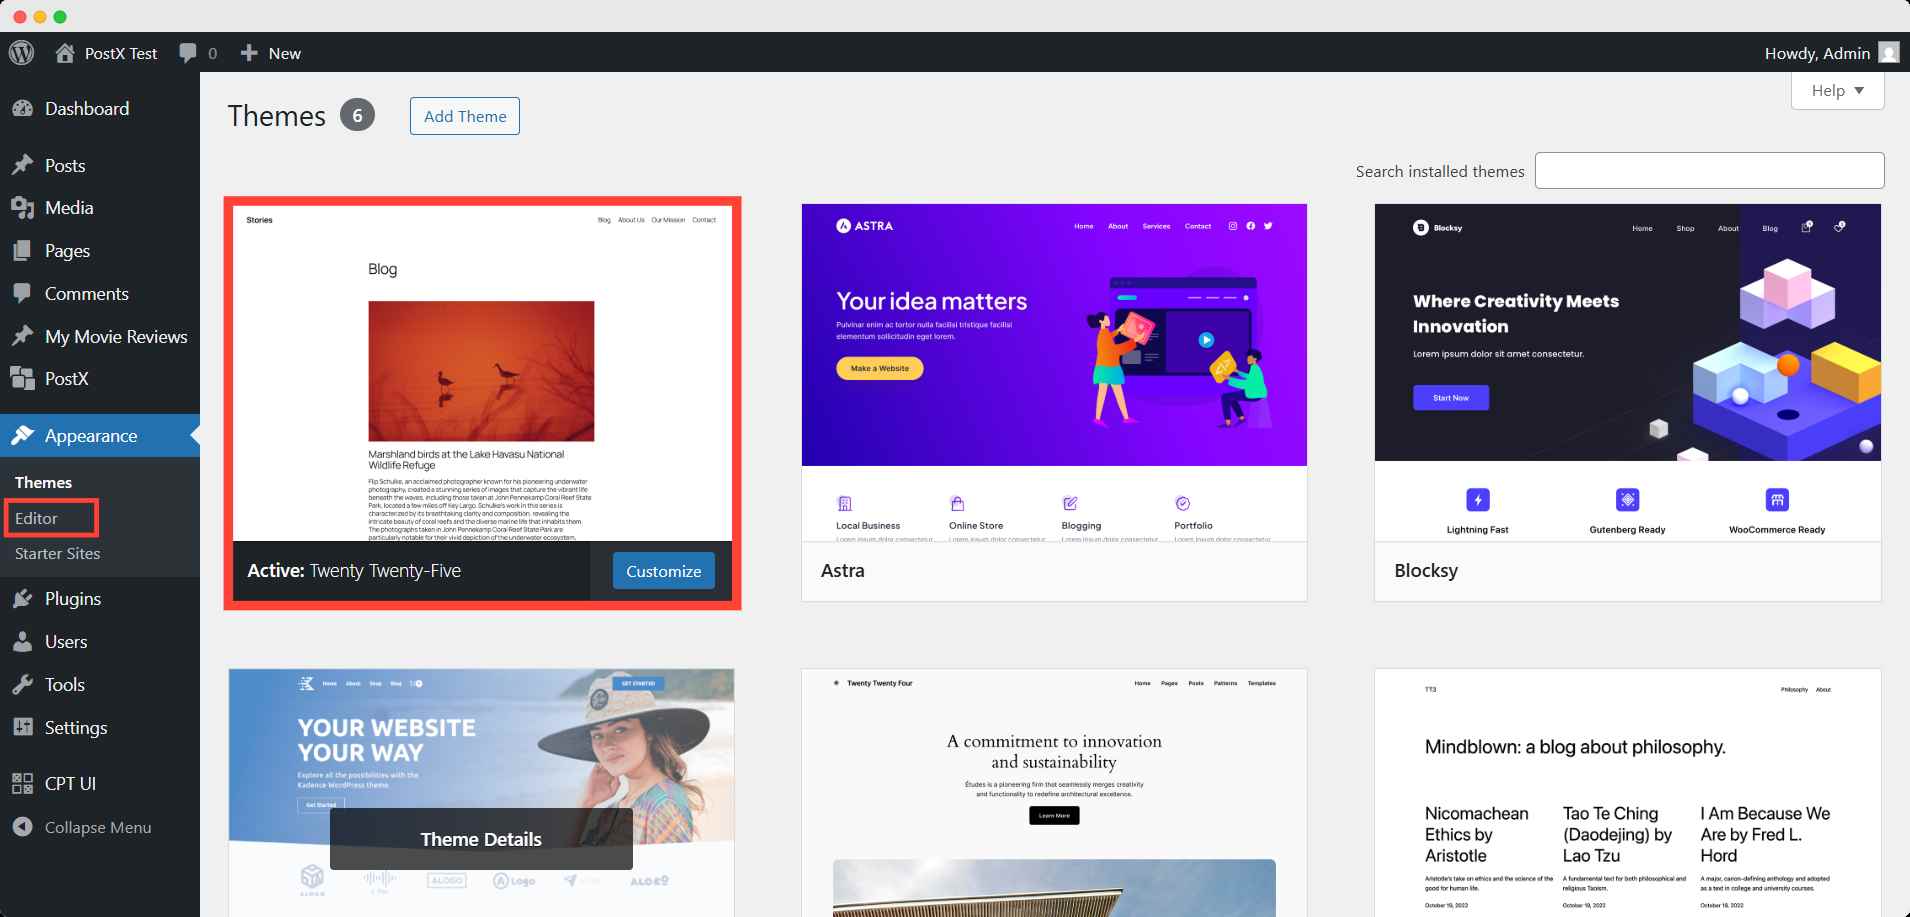
Step 1: Open the Site Editor
Go to your WordPress dashboard → Appearance → Editor (Site Editor). This opens the full-site editing interface available in block themes.
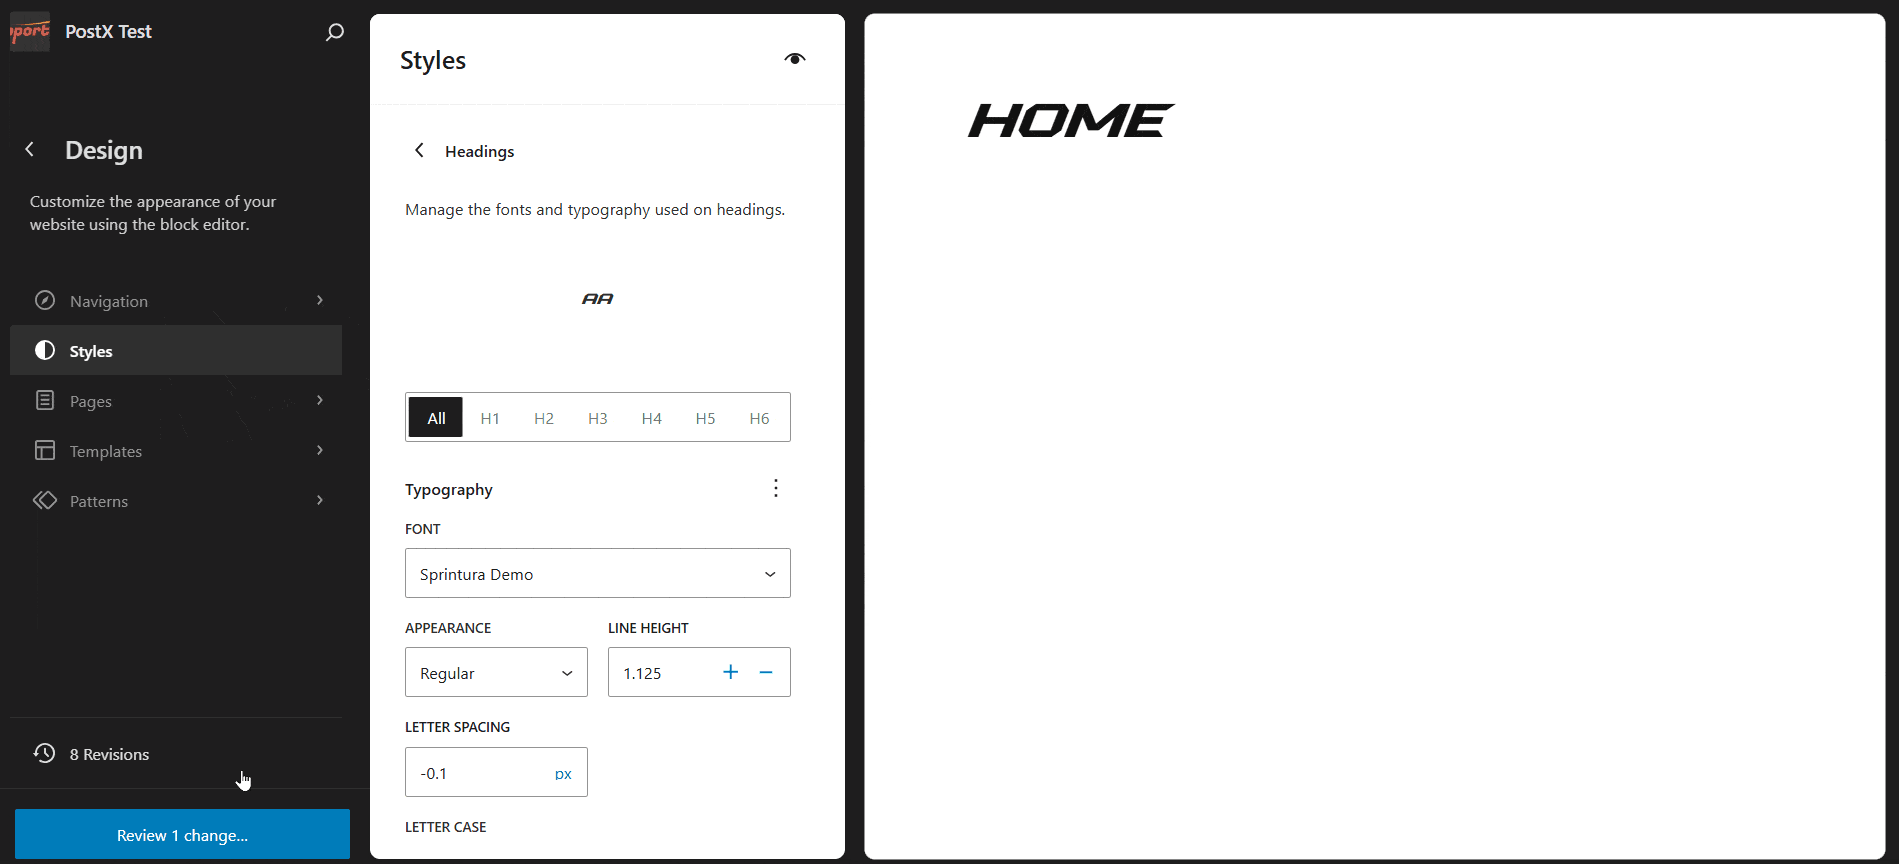
Step 2: Access the Typography Settings
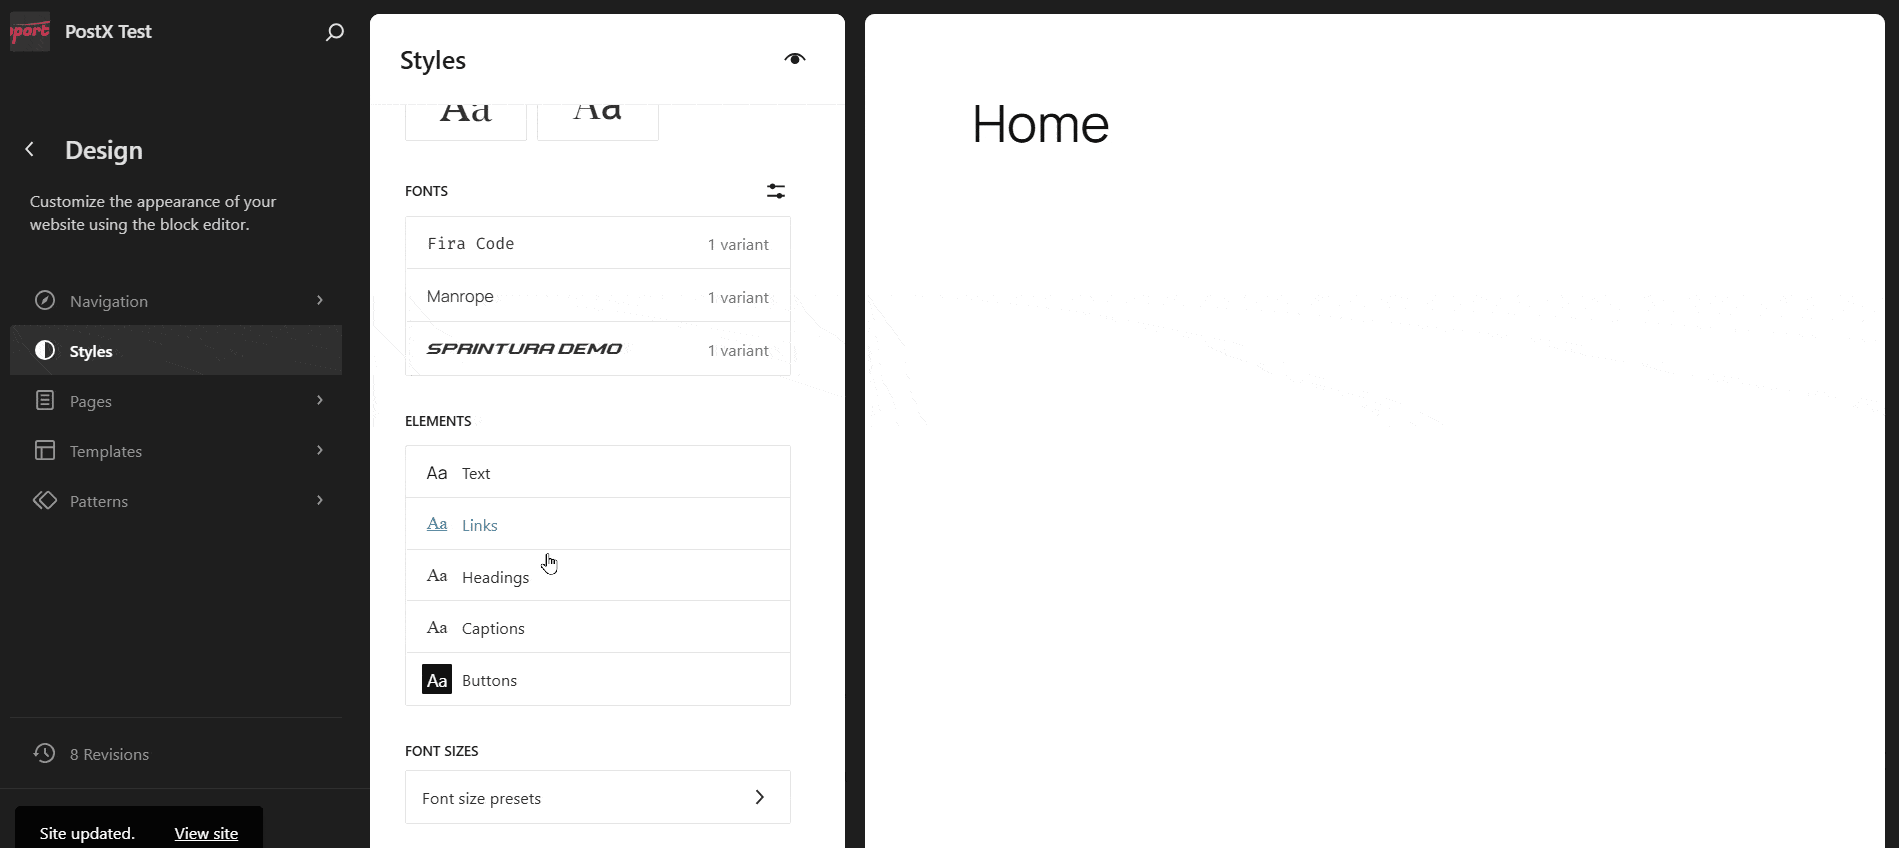
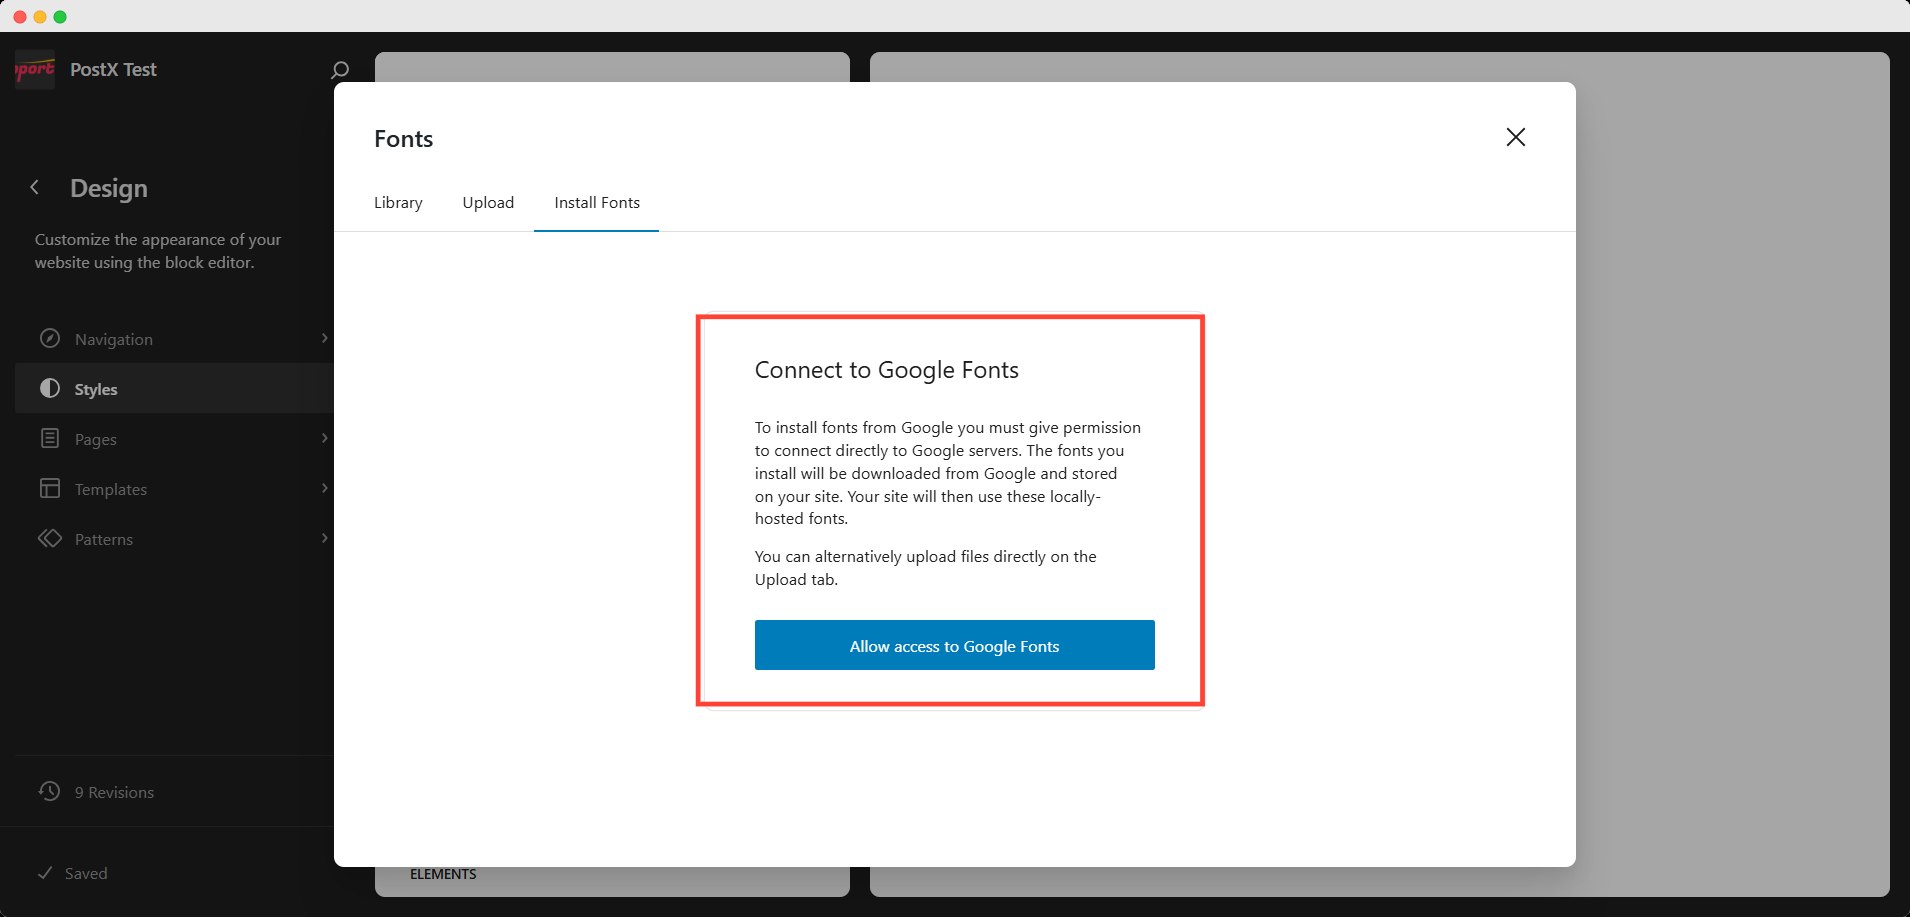
In the left sidebar, click Styles (the half-filled circle icon). Then select Typography → Manage Fonts icon to open your site’s font library.

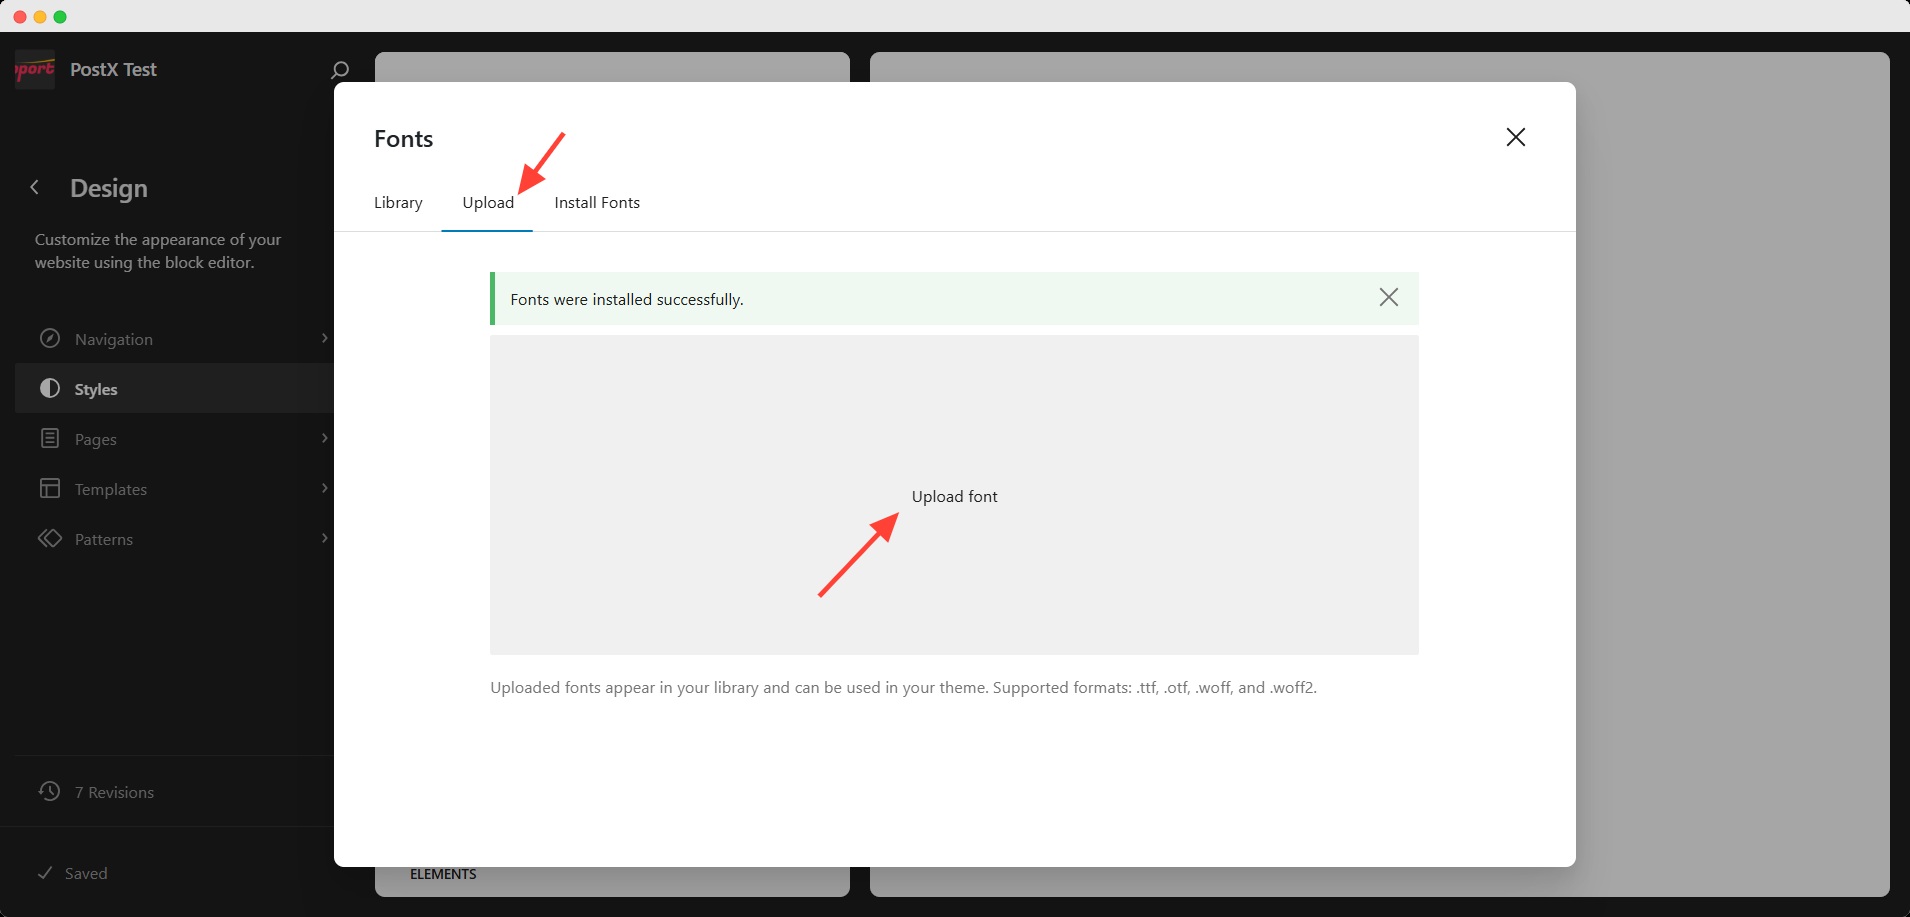
Step 3: Upload Your Custom Font
Go to the upload section and upload your font file in ttf, otf, or woff2 format.
Step 4: Assign the Font to Elements
Choose where you want to use the font, for example, Headings, Text, or Buttons. Select your uploaded font from the dropdown list.
Step 5: Save changes
Click Review changes in the bottom-left corner and save the changes.
You can also use this same method to add Google Fonts to WordPress by downloading them from Google Fonts and uploading the files manually.
Troubleshooting: Common Issues with Custom Fonts
Even with proper setup, custom fonts may sometimes misbehave. Use the table below to quickly identify and fix custom fonts in WordPress based on the issue you’re facing.
| Issue | Possible Causes | Fix / Solution |
| Font Not Displaying on the Website | • Incorrect file path in @font-face • Missing font formats (only .ttf used) • Cache or CDN serving old styles | • Verify file URLs in CSS • Include multiple formats (.woff2, .woff, .ttf) • Clear browser and site cache after upload |
| Fonts Loading Slowly | • Large font files • Too many font weights/styles • External font hosting is slowing load | • Use compressed .woff2 format • Load only needed weights • Self-host fonts locally for better performance |
| Font Conflicts with Caching or Optimization Plugins | • Caching/minification delaying font load • CSS loading order conflicts | • Exclude font CSS from minification • Temporarily disable optimization plugins • Use the “Preload Fonts” option if available |
| Incorrect CSS Rules | • Conflicting or generic CSS selectors • Inline styles overriding font CSS | • Keep @font-face in a global stylesheet • Use specific selectors (body, .site-title, etc.) • Test in browser inspector to confirm font source |
SEO and Performance Optimization for Custom Fonts
Custom fonts can greatly enhance your website’s look, but if not optimized, they may slow down loading speed and affect SEO.
Since fonts are render-blocking resources, they can delay text visibility, impacting both user experience and search rankings. That’s why it’s essential to optimize custom fonts in WordPress for the best balance between design and performance.
Here are key strategies to improve font performance in WordPress:
- Use Modern Font Formats
Choose the .woff2 format whenever possible. It offers better compression and faster loading compared to .ttf or .otf. Most modern browsers support it fully. - Limit Font Variants and Weights
Only load the styles you actually use, for example, Regular, Bold, and Italic. Loading multiple unused weights or subsets increases page size unnecessarily. - Self-Host Fonts for Better Control
Hosting fonts locally ensures faster delivery and eliminates external dependency issues from third-party servers like Google or Adobe Fonts. - Preload Important Fonts
Add a <link rel=”preload”> tag in your header for primary fonts. This tells browsers to fetch them earlier, reducing layout shifts and improving perceived speed. - Use System Fonts for Body Text
For content-heavy sections, consider system fonts (like Arial, Roboto, or Georgia). They load instantly and maintain a clean reading experience. - Combine Fonts Efficiently
Avoid using too many font families. Two or three well-paired fonts are enough to maintain hierarchy and reduce HTTP requests. - Lazy-Load or Swap Fonts
Apply the font-display: swap; property in your CSS. It ensures text remains visible while fonts load, improving Core Web Vitals and SEO for custom fonts.
By following these steps, you can optimize custom fonts in WordPress without compromising style. A fast-loading, visually consistent website not only delights visitors but also performs better in search results.
Conclusion
Typography defines how your content feels, and adding the right fonts can completely transform your WordPress site’s personality.
Now that you know how to add a custom font in WordPress, you have two simple paths to choose from:
- Use a plugin like PostX for an easy, no-code setup.
- Using the block theme editor setting
Both methods let you create a consistent, polished look that aligns perfectly with your brand. Just remember to balance creativity with performance, optimize font files, limit variants, and use modern formats to keep your site fast and search-friendly.
Experiment with different custom fonts in WordPress, find combinations that reflect your brand voice, and make your content more enjoyable to read. And once you’ve found your perfect typography style, share your experience with the community. Your insights might inspire someone else’s next design upgrade.
FAQs
Can I use any font as a custom font in WordPress?
While WordPress offers a wide selection of custom fonts, you can also upload your own fonts in various formats like WOFF, WOFF2, TTF, SVG, and EOT using plugins like PostX. However, ensuring you have licensing rights for the fonts you upload is important.
Will using custom fonts affect my website’s loading speed?
Custom fonts can add load time to your website, especially if you have multiple custom fonts or large font files. Optimizing your font files and implementing caching techniques is essential to minimizing any negative impact on loading speed.
Do custom fonts work across all devices and browsers?
Custom fonts can be used across different devices and browsers. However, choosing fonts with good cross-browser support is recommended, and ensuring they are responsive to maintain a consistent visual experience across various screen sizes and devices is recommended.
Are there any limitations to using custom fonts in WordPress?
While using custom fonts in WordPress offers numerous benefits, it’s important to consider a few limitations. Some custom fonts may not support all languages or characters, so ensure the fonts you choose are compatible with your website’s content requirements. Additionally, using too many custom fonts can negatively impact performance and may not be optimal for user experience.
For more helpful tips, stay connected with our LinkedIn Newsletter.


