Want to offer free shipping in your WooCommerce store but not sure how to set it up properly?
You’re not alone. Many store owners want to attract more customers with free shipping, but they get stuck trying to configure the right settings in WooCommerce.
Here’s a quick look at how to set up free shipping in WooCommerce:
- Enable shipping zones in WooCommerce settings
- Add a shipping method to a zone
- Choose Free Shipping as the method
- Set a condition (optional)—like minimum order amount or coupon requirement
- Save changes and test your checkout
In the rest of this guide, I’ll walk you through each of these steps in detail, plus tips on showing free shipping for specific products and using plugins for more control.
What is Free Shipping in WooCommerce?
Free shipping in WooCommerce is a built-in shipping method that allows you to offer zero-cost delivery to your customers. You can enable it for specific regions, products, or order conditions, like a minimum purchase amount or a coupon code.
It’s a powerful way to improve conversions and reduce cart abandonment, especially for price-sensitive shoppers.
The best part? You don’t need any extra plugins to enable free shipping in WooCommerce—it’s already available in your shipping settings.
What are The Benefits of Free Shipping?
Offering free shipping isn’t just a nice gesture—it’s a proven way to boost your store’s performance. Here’s how:
- Increases Conversions: Many shoppers abandon carts when they see unexpected shipping fees. Free shipping removes that friction.
- Improves Customer Satisfaction: Everyone loves free delivery. It creates a more positive checkout experience and encourages repeat purchases.
- Encourages Larger Orders: Setting a minimum amount for free shipping motivates customers to add more to their cart.
- Gives You a Competitive Edge: If your competitors charge for shipping, offering it for free can help you stand out.
- Boosts Marketing Campaigns: You can run promotions like Free Shipping Weekend or pair it with discount codes for extra impact.
In short, free shipping is one of the simplest ways to reduce bounce rates and increase customer loyalty, especially if you configure it strategically.
According to Wharton marketing professor David Bell, many customers find the offer of saving $6.99 more attractive than a $10 discount.
According to research, more than 50% of online buyers add items to their cart to qualify for this attribute, and more than 90% of online buyers are more likely to make additional purchases when this feature is available.
Step-by-Step Guide: Setting Up Free Shipping in WooCommerce
Setting up shipping in WooCommerce is a straightforward process. The same is true for free shipping. To set up free shipping in your WooCommerce store, you need to follow four steps:
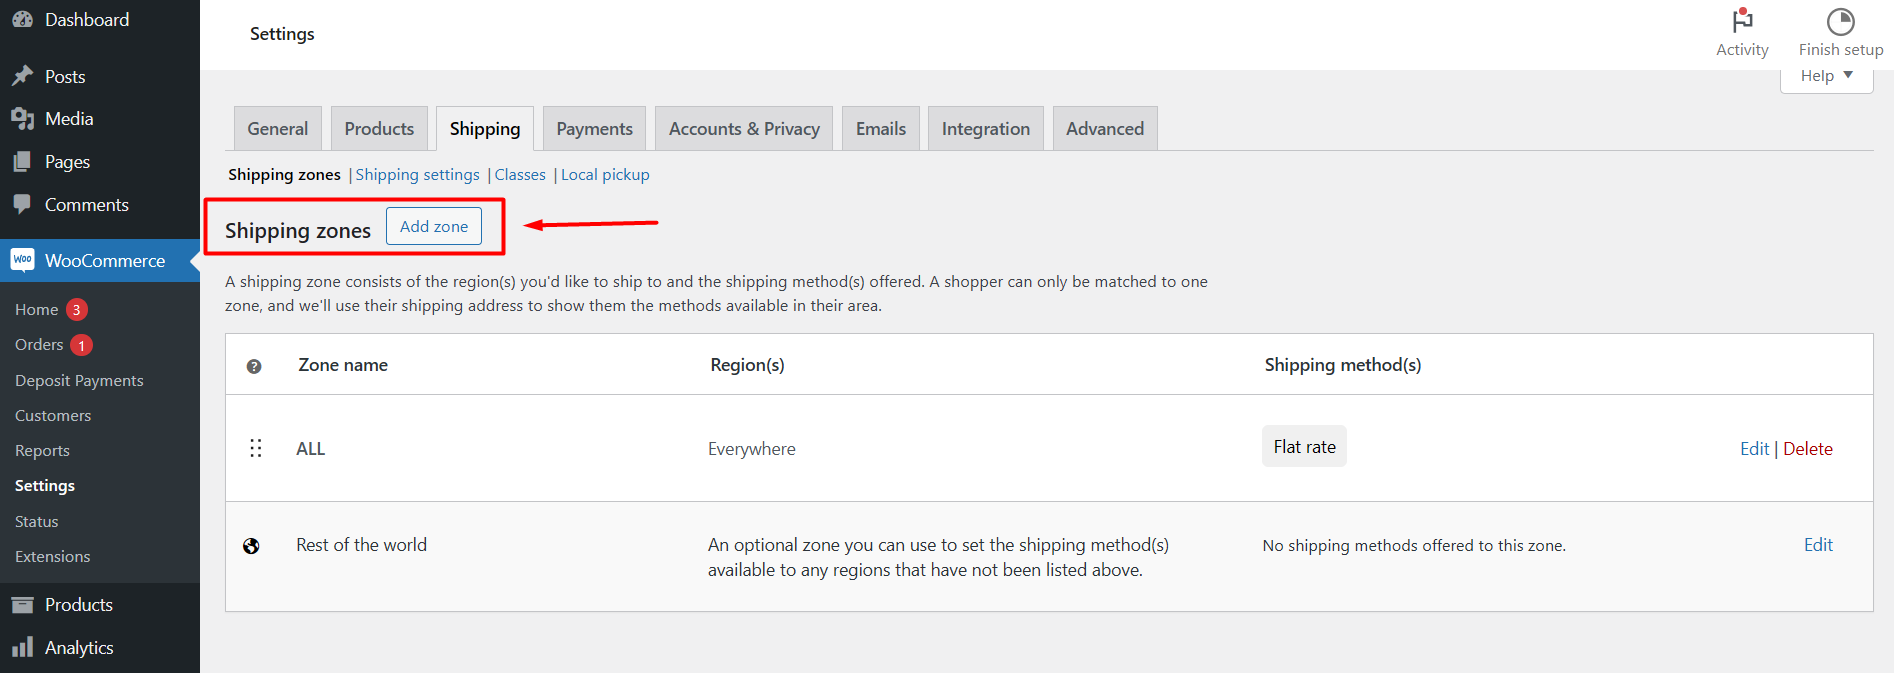
Step 1: Setting up the Shipping Zone
First, you need to go to WooCommerce, then click on the Settings option. In the settings, you will get the Shipping tab.
By selecting this, you will see Shipping zones at the top. Now, click on the Add zone button.
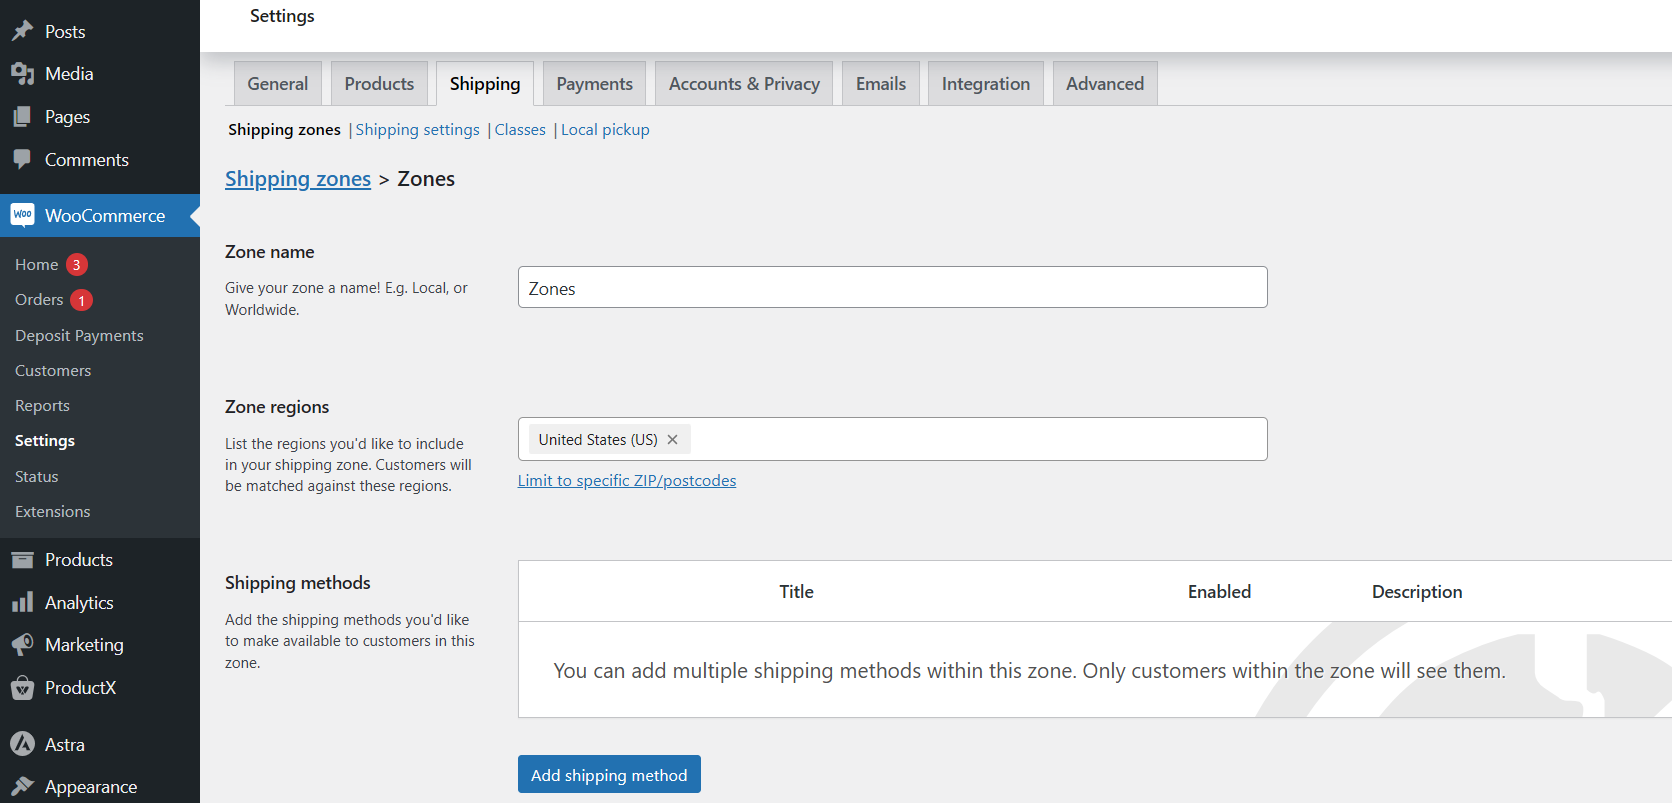
Step 2: Creating Zone Information and Shipping Method
After reaching the Add zone page, it will show you three options, including:
- Zone name: This is the name that you will use for unique identification on your store for this feature.
- Zone regions: Type your preferred location where you want to sell your products without shipping charges. You can type and select multiple locations worldwide.
- Shipping methods: In the shipping methods zone, you will find a button named Add shipping method at the bottom.
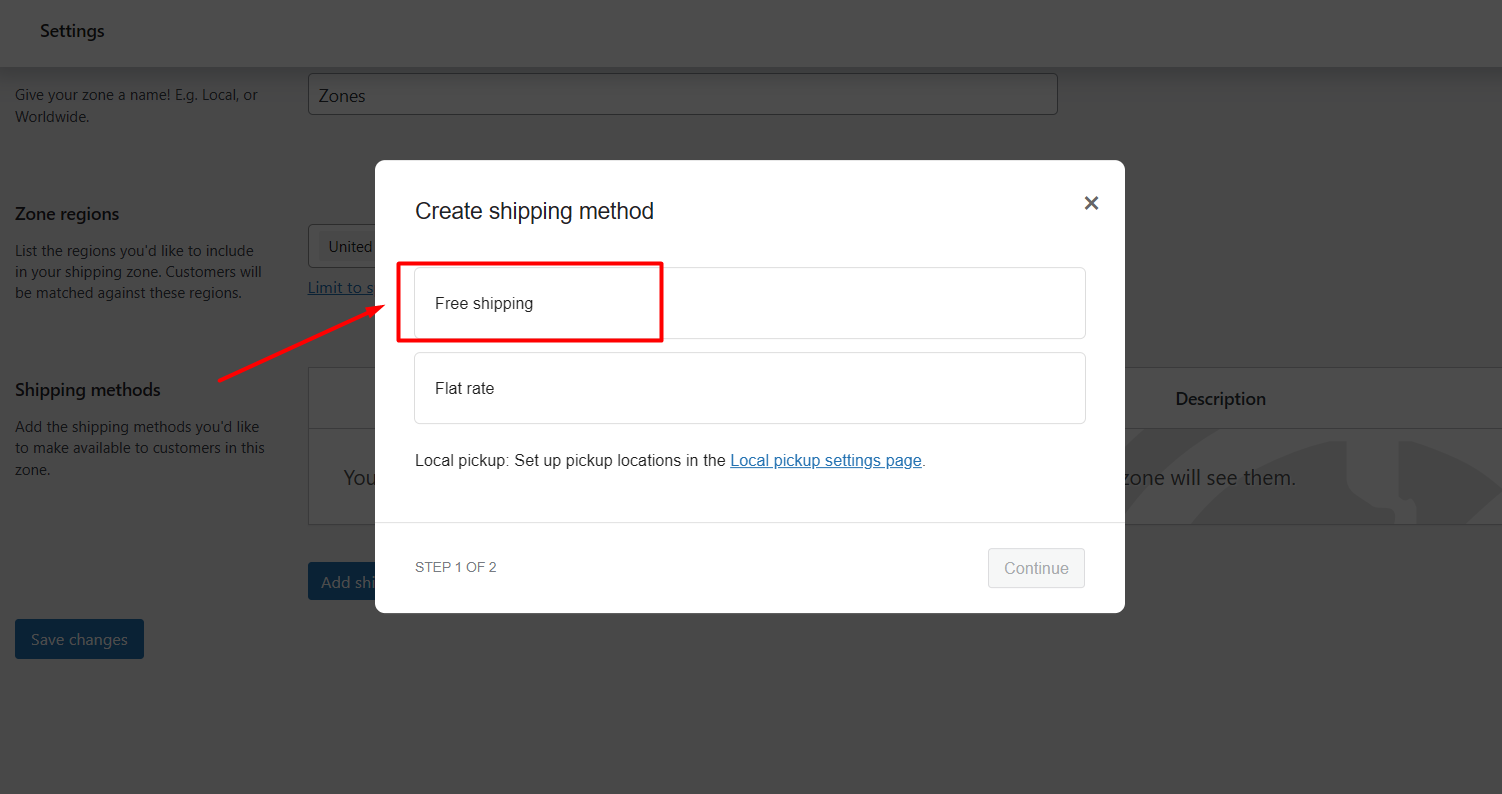
Step 3: Adding Free Shipping as a Shipping Method
To set this as a shipping method, click on Add shipping method. It will show you three preferences, which are:
- Free shipping- for enabling shipping without any charge.
- Flat rate- to set the shipping price with standard rates.
- Local pickup– by selecting a specific location, customers can receive products with or without charges. (You can set up local settings in a separate tab.)
We need to select the first option from the three options.
Finally, hit the Continue button to complete this step.
Step 4: Selecting the Requirement for Free Shipping
Now, a box will be visible with the headline Set up free shipping. From there, you can set the requirements for this attribute.
In the Free shipping requirements, you will get different choices, which are:
- No requirements: When you set this, the customer will get a shipping without any charge.
- A valid free shipping coupon: Customers will qualify for this if they have a coupon provided by your store.
- A minimum order amount: Buyers need to spend a certain amount of money on your store to avail of this offer.
- A minimum order amount or coupon: You can set this option to provide chargeless shipping for the customers by purchase price amount or by a coupon; they can unlock the opportunity by fulfilling any of the requirements.
- A minimum order amount and a coupon: To grab this, the customers must fulfill both conditions. Customers need a valid coupon and a fixed purchase amount set by the store owner.
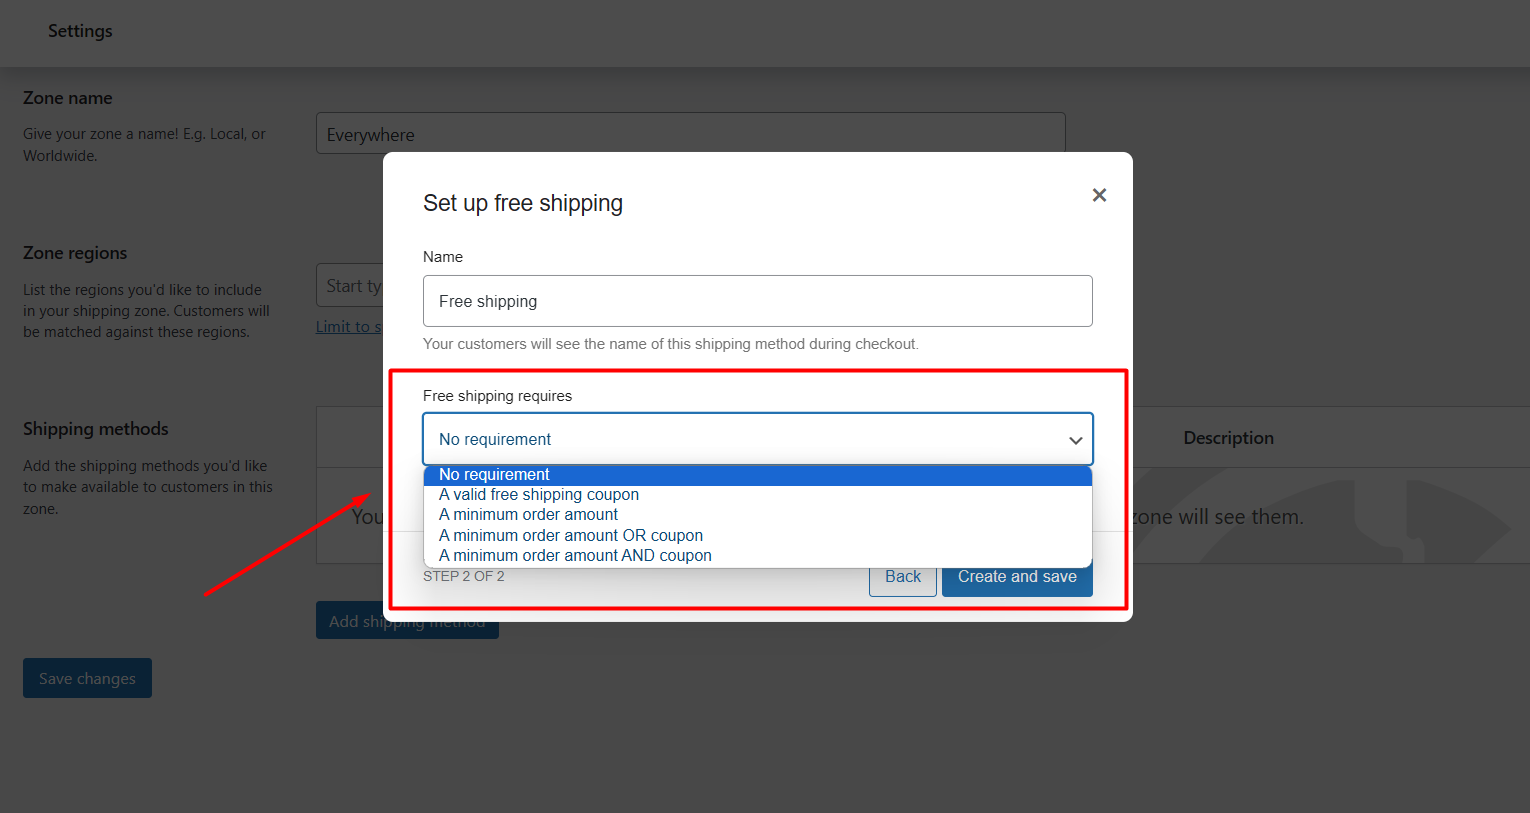
Now, select your desired option by which your customer will get charged lower shipping cost. For now, I am selecting the No requirements option.
Now, you can see the output by adding products to your cart page.
Congratulations, this feature is ready in your store!
How to Set Up Free Shipping Based on Order Amount?
To avail this opportunity, the order amount depends on the requirement you are setting.
While configuring the free shipping, you can set the requirement of the minimum order amount. Just like step 4 of setting up free shipping, select the mentioned option.
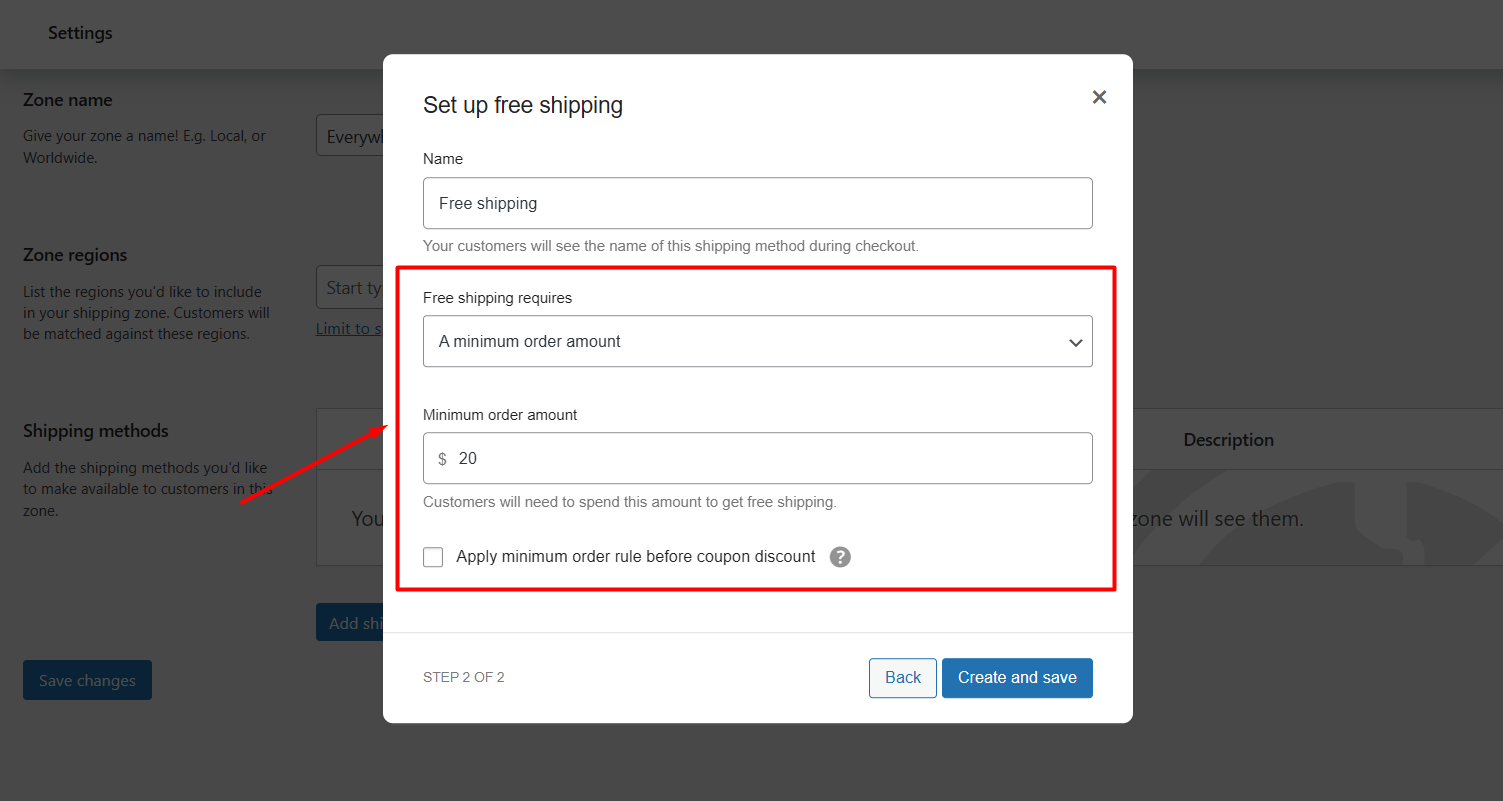
After that, provide the minimum purchase amount as per your preference.
How to Create A Valid Free Shipping Coupon in WooCommerce?
With a coupon, you can avail of chargeless shipping, and it is so easy in WooCommerce, depending on the requirement you set. So, let’s see how it works.
Like the settings discussed in the earlier section, choose the valid free shipping coupon option this time.
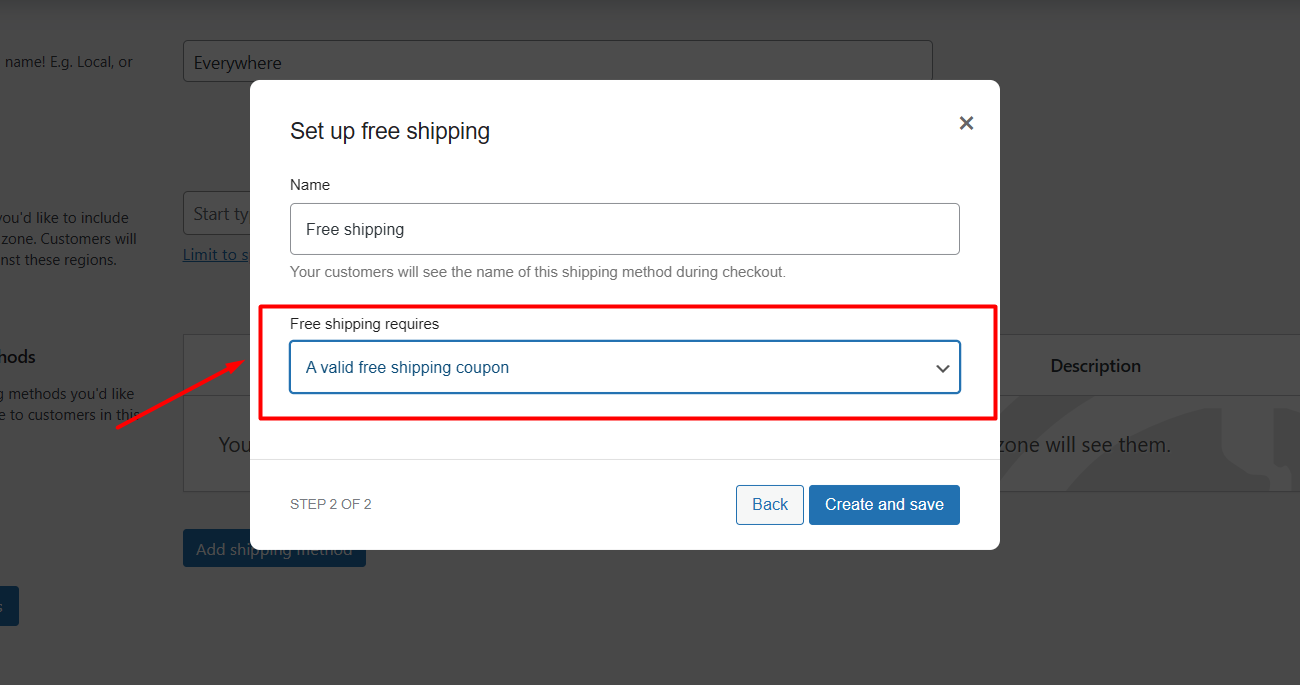
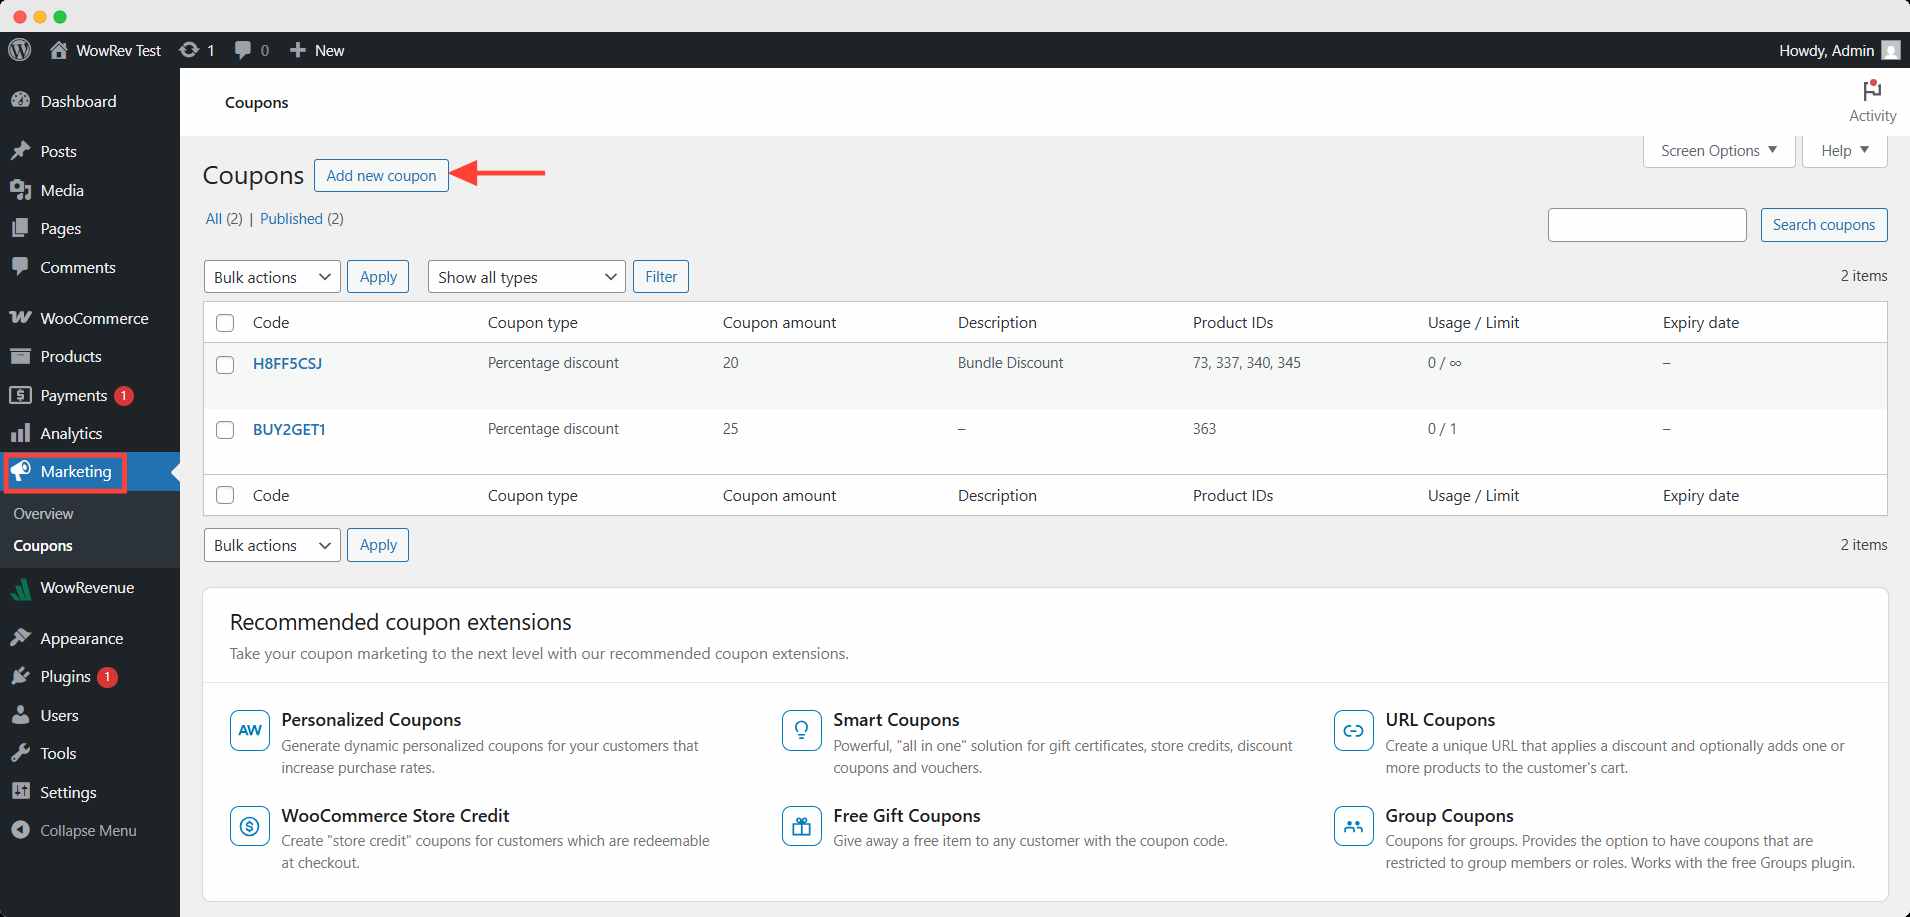
Now you have to create a coupon for free shipping. For that, go to Marketing ➡️ Coupon and click the Add New Coupon button.
Then you will appear on the coupon editorial interface. Here, you have to add a coupon code and description (optional).
Next, choose the fixed cart discount type in the general tab of the coupon data. Check the box to allow this to be active for free shipping. Hit the publish button after finishing the setup.
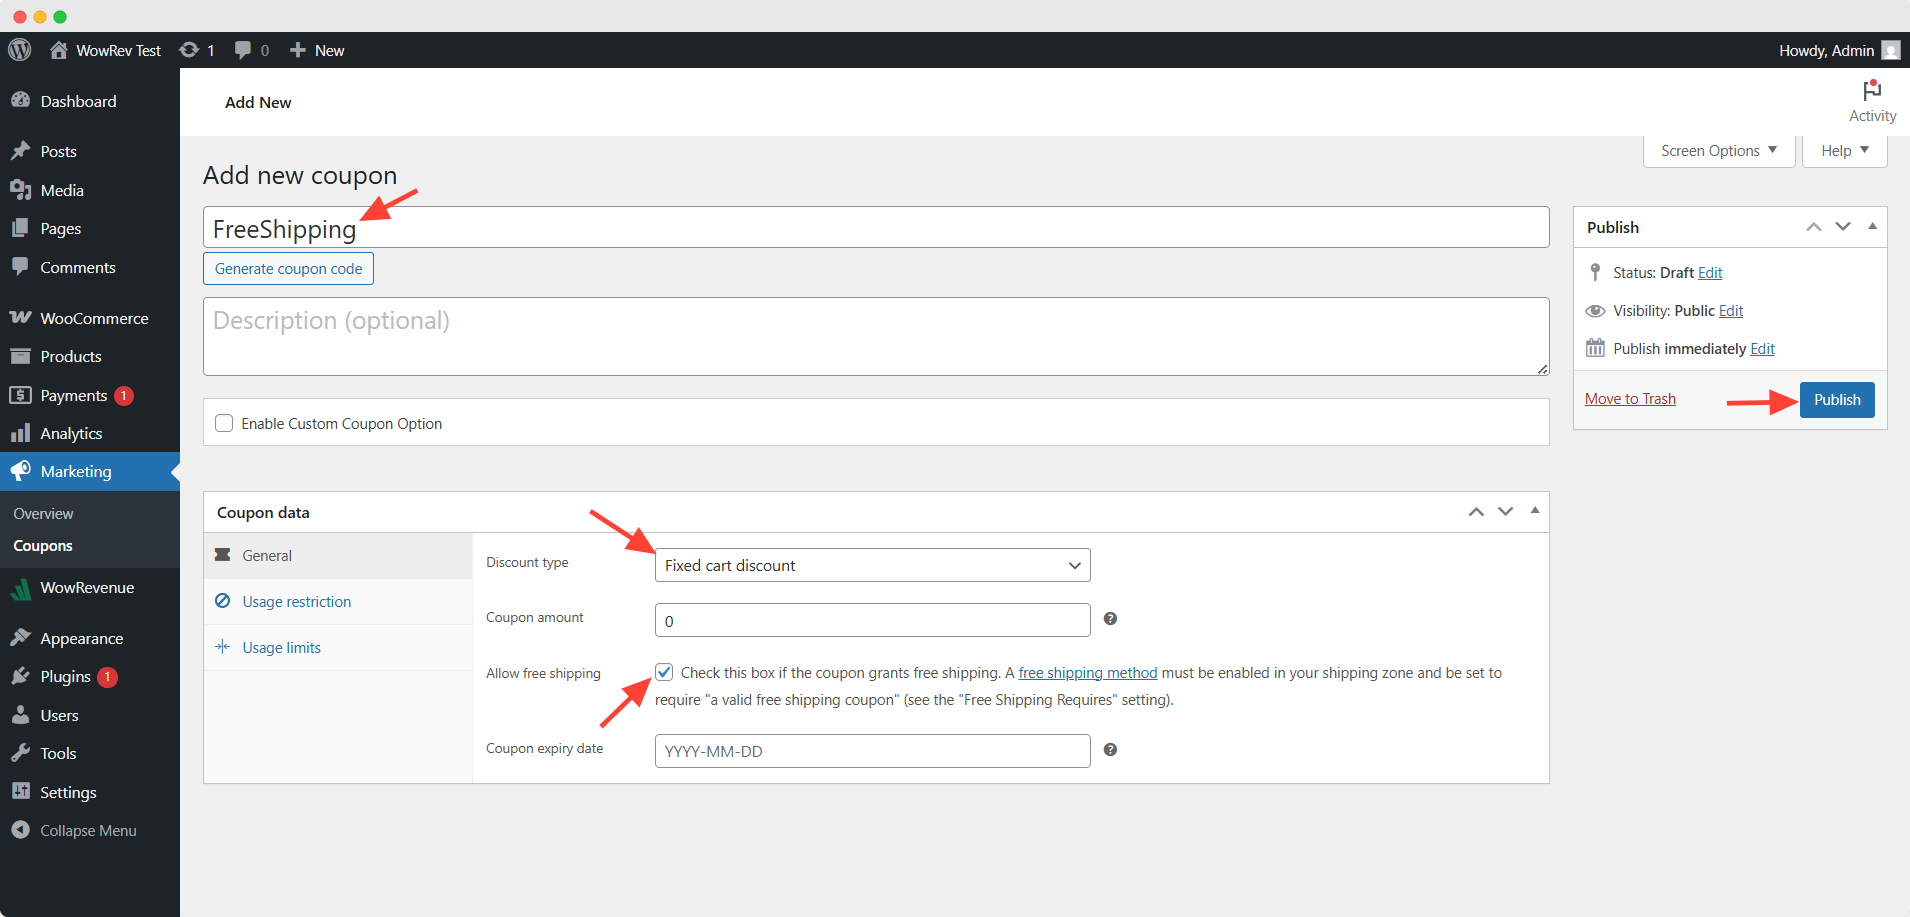
Now, any customer can qualify for it using a valid coupon.
How to Set Up Free Shipping for Specific Products in WooCommerce?
Setting up shipping without charge for specific products is also possible in WooCommerce. For that, you need to use shipping classes. Because we can not use the shipping method directly for the specific products.
We can create different classes based on our products, like Free shipping as a class for specific products, Heavy as a class where more shipping rate than the normal shipping rate, and other classes based on our products.
You can do this easily by following these 3 steps properly:
Step 1: Creating Shipping Classes
Creating a shipping class is very easy; you need to go to the WooCommerce Settings option from the dashboard. Now, select the Shipping option.
In the shipping tab, you will get the Classes option; click it.
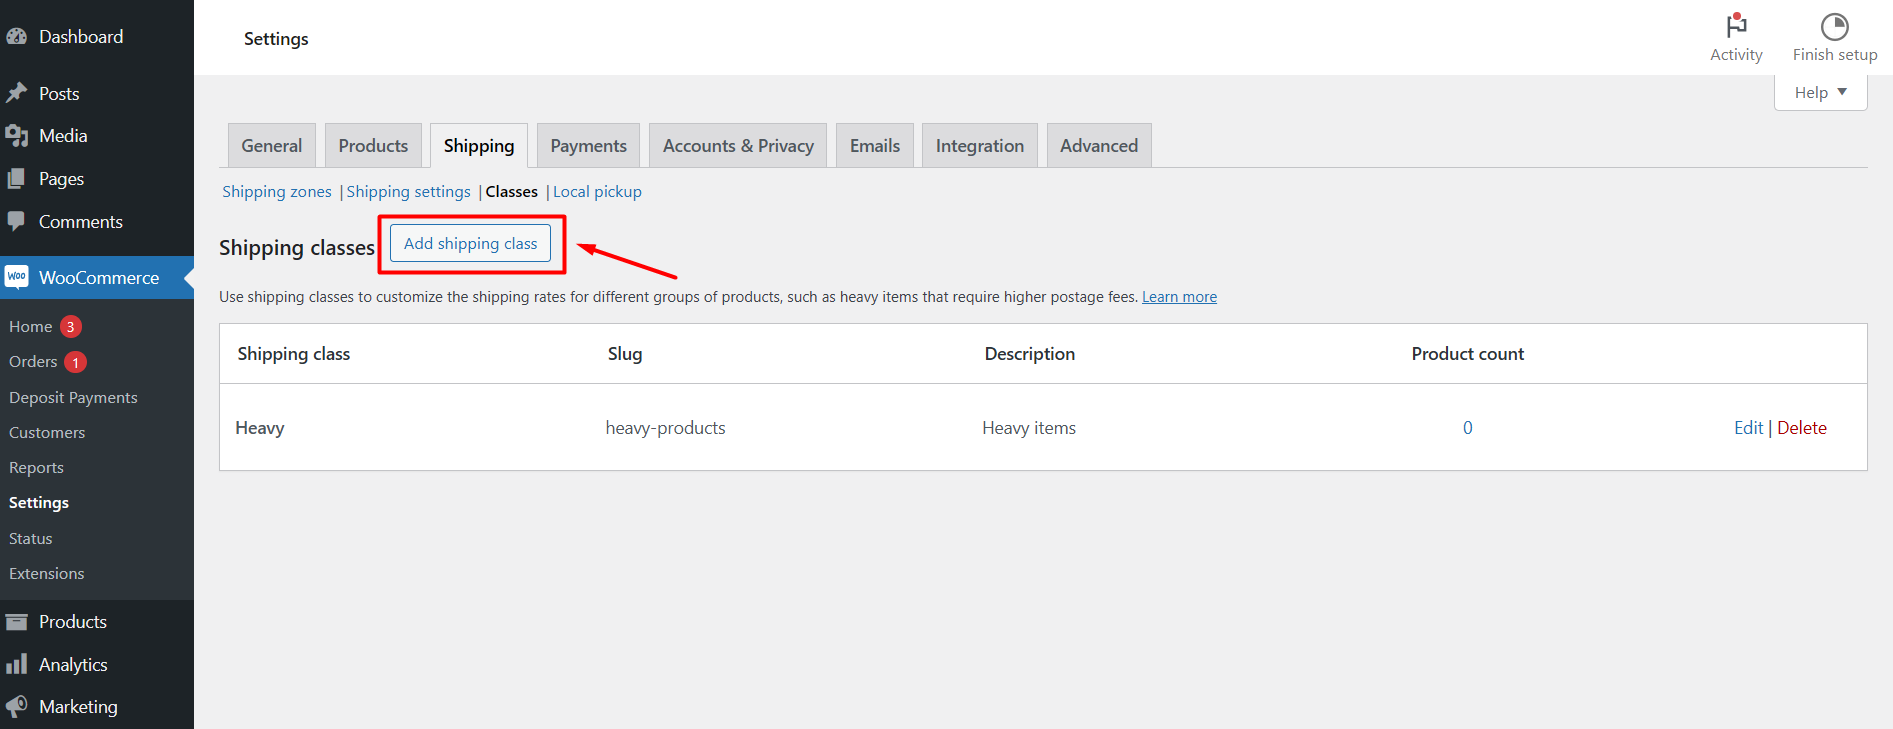
Click the Add shipping class button, and a box will be visible with options including shipping class, slug, and description.
In the shipping class box, name the class as Free Shipping. In the description box, you can outline your specific requirements.
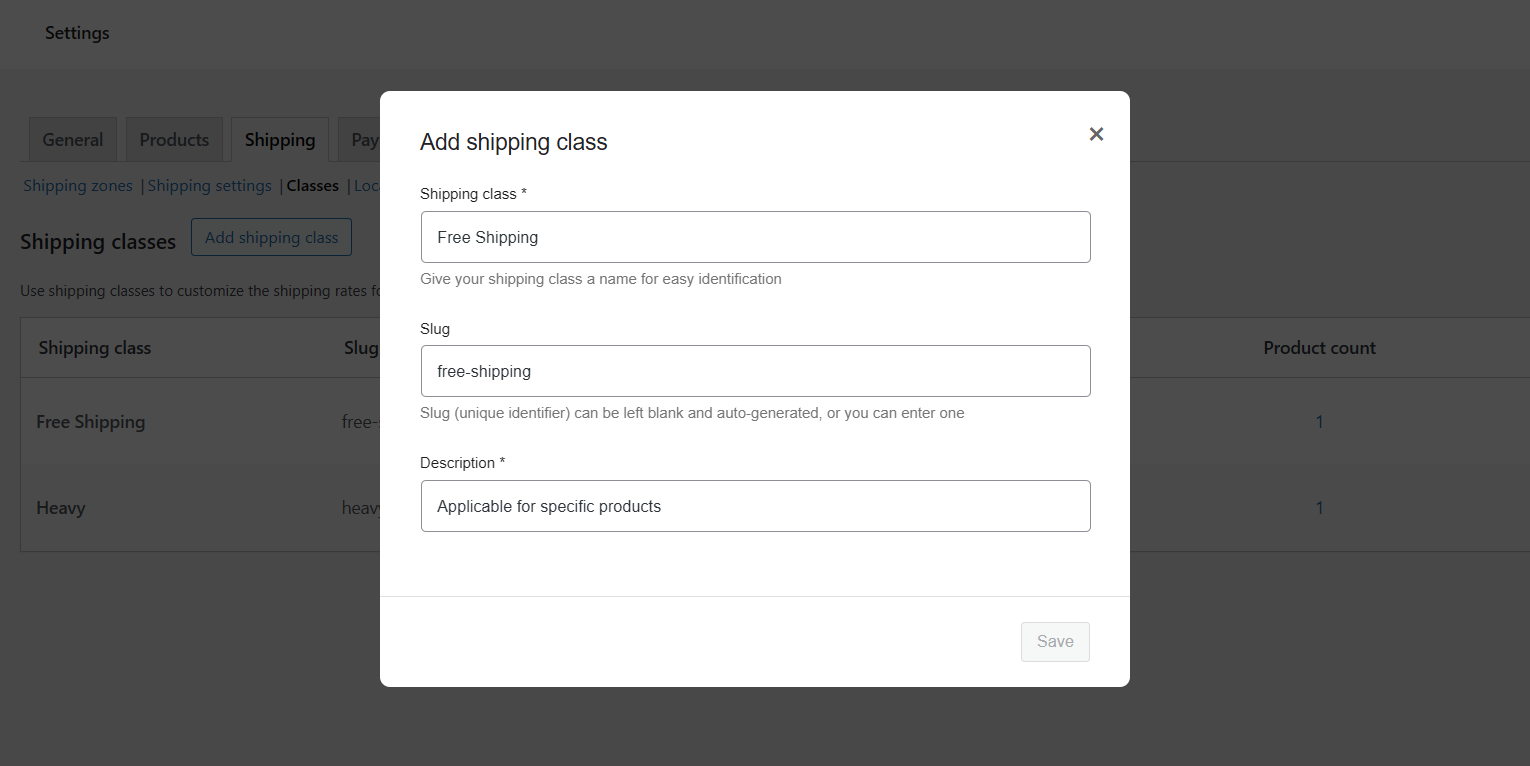
Hit the save button after configuring. Now, there’s an active class named free shipping.
Step 2: Configuring the Shipping Method
For the configuration of the shipping method, you need to go to the Shipping Zone.
Then, click on the Add shipping method to set the shipping method. Select the Flat rate option as the shipping method and press the Continue button.
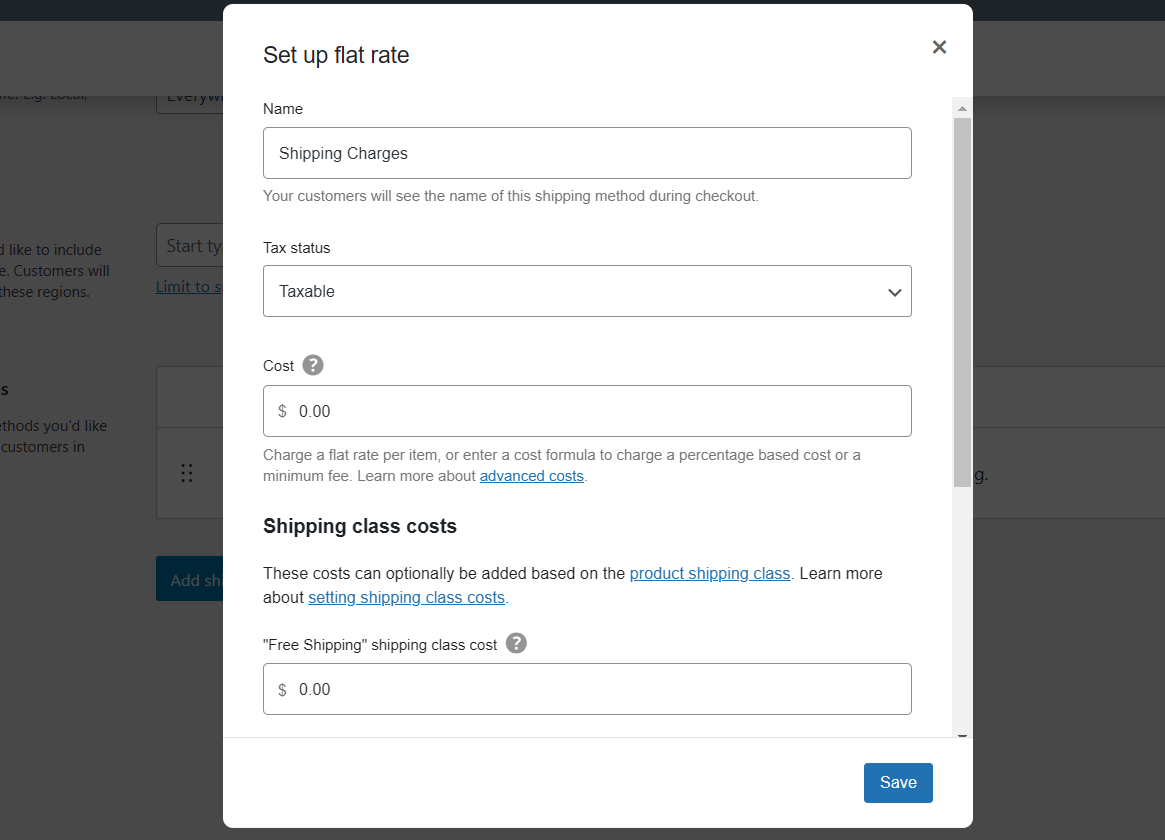
Shipping class costs
Here, we can set the price rate for the shipping classes that we have created. We are controlling all the shipping charges from this section. As we have only created a class named Free shipping, it is showing here. If we add 2/3 more classes, they will also appear here.
- Free Shipping shipping class cost– As we have named it a free shipping class, we will use zero (0) as the cost.
- No shipping class cost– So, other products that will not be under the free shipping class will show this cost as the shipping charge (I have set 10$ as an example for other classes of products, excluding the free shipping class).
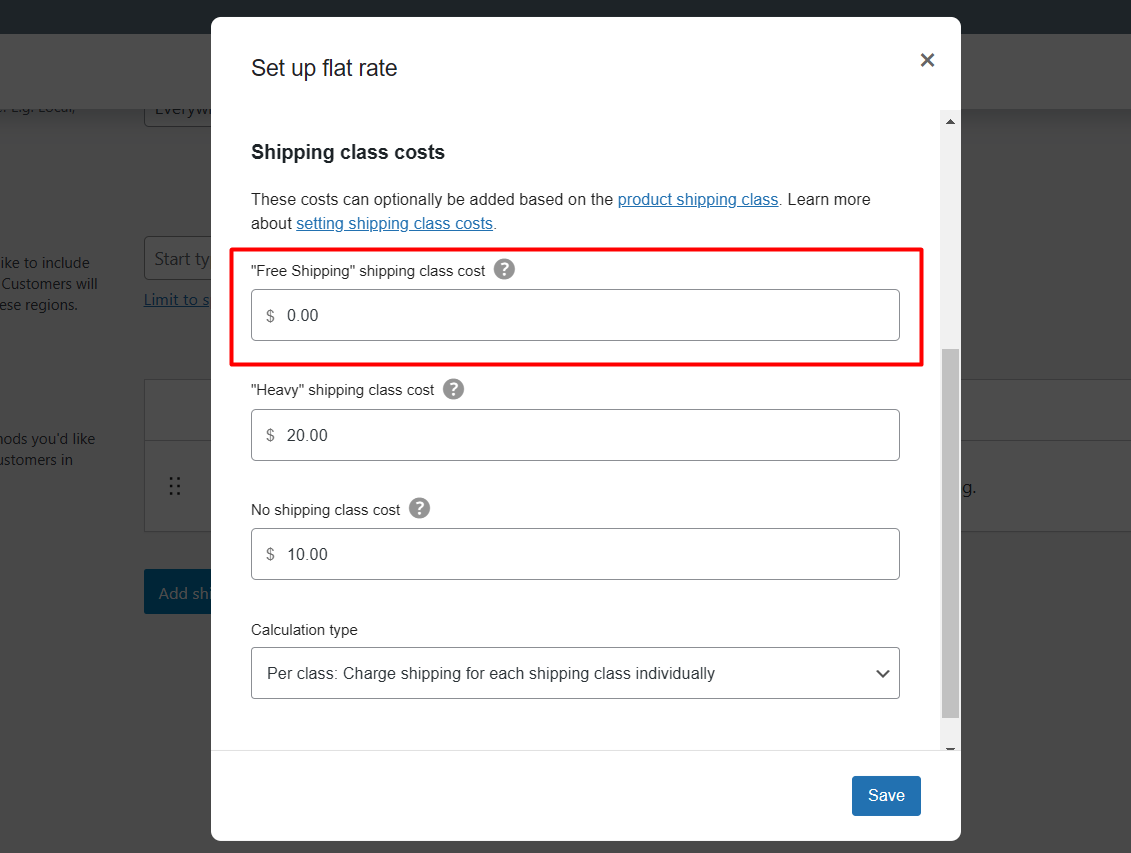
In the Calculation type box, select the first option, which is Per class: Charge shipping for each shipping class individually. Click on the Create button to complete these steps.
Want to turn more visitors into customers?
Use WowShipping to simplify shipping rates and checkout in WooCommerce, so buyers complete their orders without hesitation.
Step 3: Adding Free Shipping to Specific Products
Now that we have configured the Shipping method with the required class. Now we need to add the specific product to a class.
To do this, go to your All products list from the products list of your WooCommerce. Select the specific product that you want to make available as a shipping charge-free product in your store. Click on the Edit button of the specific product.
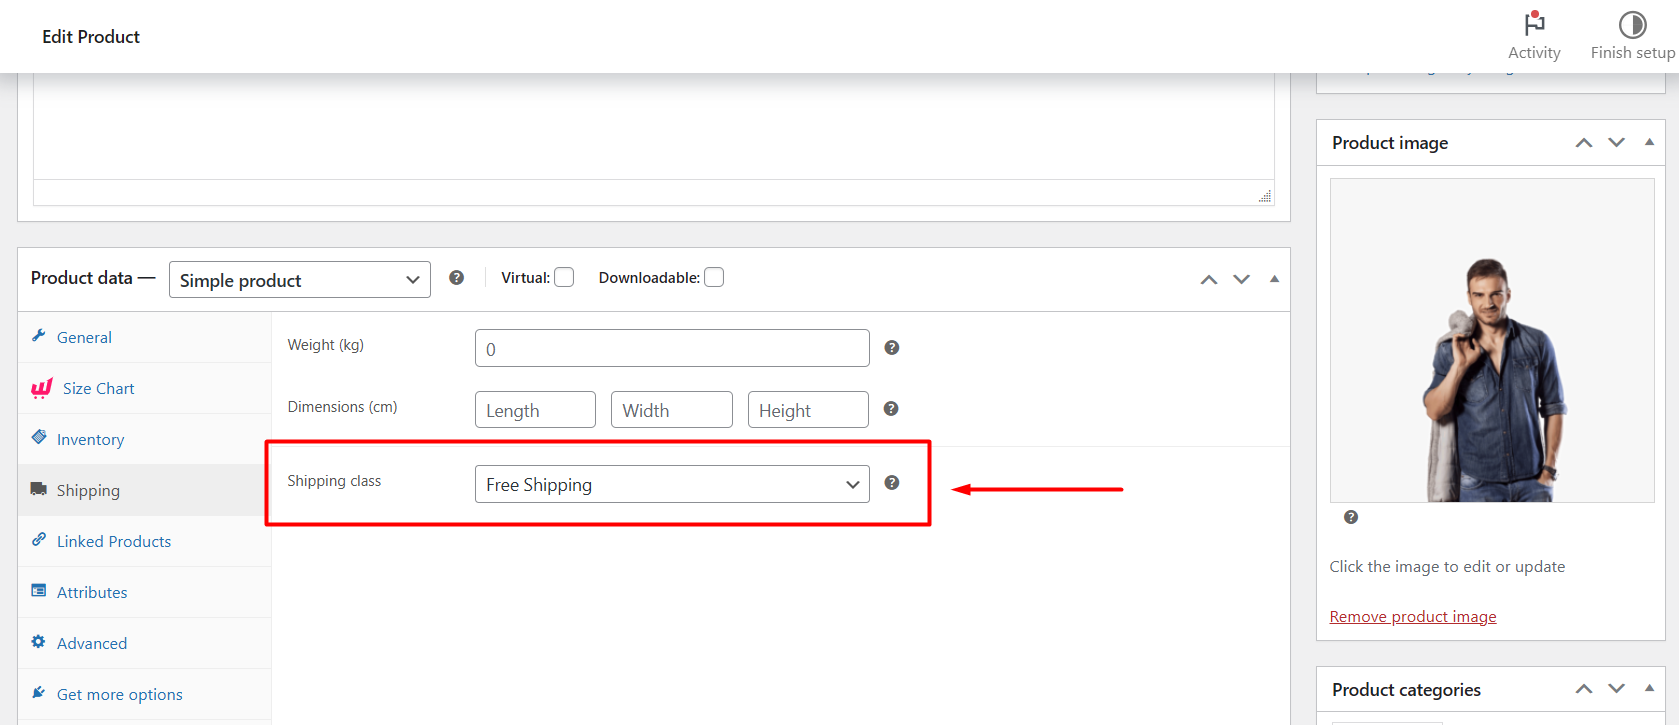
In the Product data section, you will find the Shipping option on the left side. Click on that, and it will show you three options, where the last option is Shipping Class.
Choose Free shipping from the box. Now, update the changes.
Now, add the specific product to the cart, and you can see the result.
You can also offer free shipping based on your buyers’ user/role. To do that, you need to use WholesaleX and restrict the free shipping option for specific users.
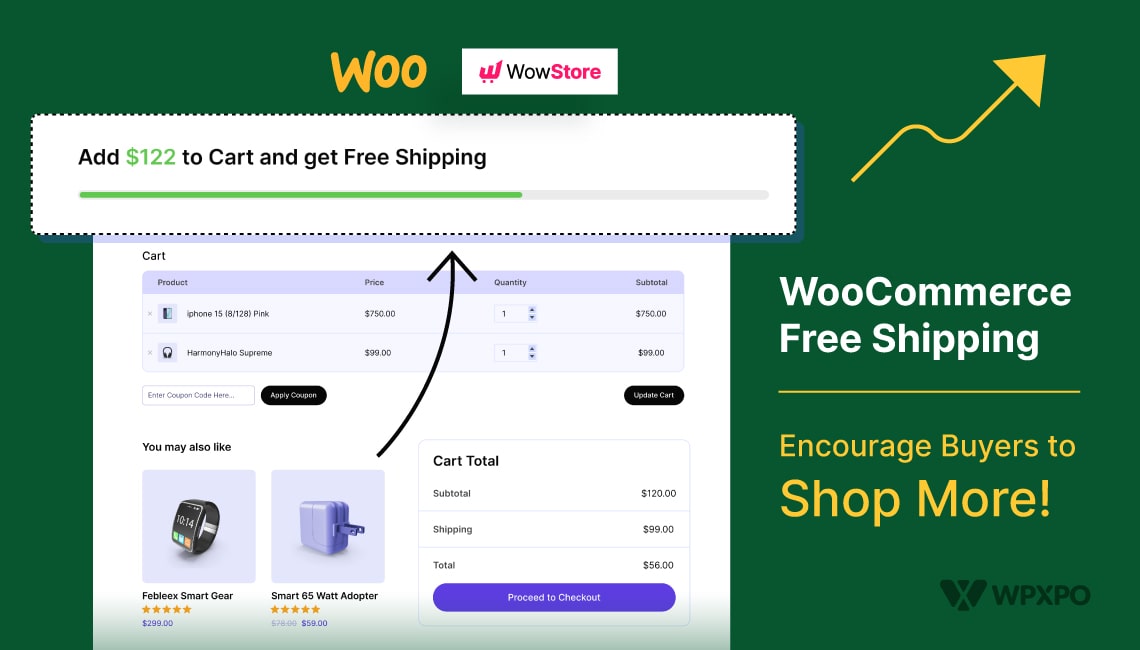
Can you Set Up a Free Shipping Bar in WooCommerce?
Yes, but WooCommerce doesn’t have any built-in settings to display a free shipping bar. To add such a bar, we have to install an additional plugin.
There are several plugins for creating a free shipping bar. Let’s compare some popular plugins that can offer us such a feature.
| Feature | WowRevenue | WowStore | WPC Free Shipping Bar |
|---|---|---|---|
| Free Shipping Goal Tracker | ✅ Yes – Real-time progress bar | ✅ Yes – Visual progress updates | ✅ Yes – Simple progress bar |
| Page-level display | ✅ Available (product, cart, checkout etc.) | 🚫 Not Available | 🚫 Not Available |
| Progressive Goal Tracking | ✅ Yes (Live cart progress updates) | ✅ Yes (Based on cart subtotal) | ✅ Yes |
| Design Customization | ✅ Fully customizable (text, style, layout) | ✅ Moderate styling options | ⚠️ Limited styling (font & color only) |
| Dynamic Messaging | ✅ Yes – Updates based on cart total | ✅ Basic conditional messaging | 🚫 Static message only |
| Mobile Optimization | ✅ Fully responsive | ✅ Responsive | ✅ Responsive |
| Scheduling/Time-based Display | ⚠️ Available in the pro version | 🚫 Not Available | 🚫 Not Available |
| Integration with Sales Rules | ✅ Seamless with discount/BOGO campaigns | 🚫 Not applicable | 🚫 Not applicable |
| Plugin Type | Marketing automation + promotion plugin | WooCommerce store builder | Standalone free shipping plugin |
| Ease of Use | ⭐⭐⭐⭐ Intuitive UI with visual editor | ⭐⭐⭐ Simple, but less flexible | ⭐⭐ Basic, straightforward |
It seems WowRevenue offers the best free access among the free shipping bar plugins. Let’s see how to add a free shipping bar using WowRevenue.
Before going through the step-by-step process, first, we have to install and activate the plugin. The official documentation on the installation process will be a great assistance if you need it.
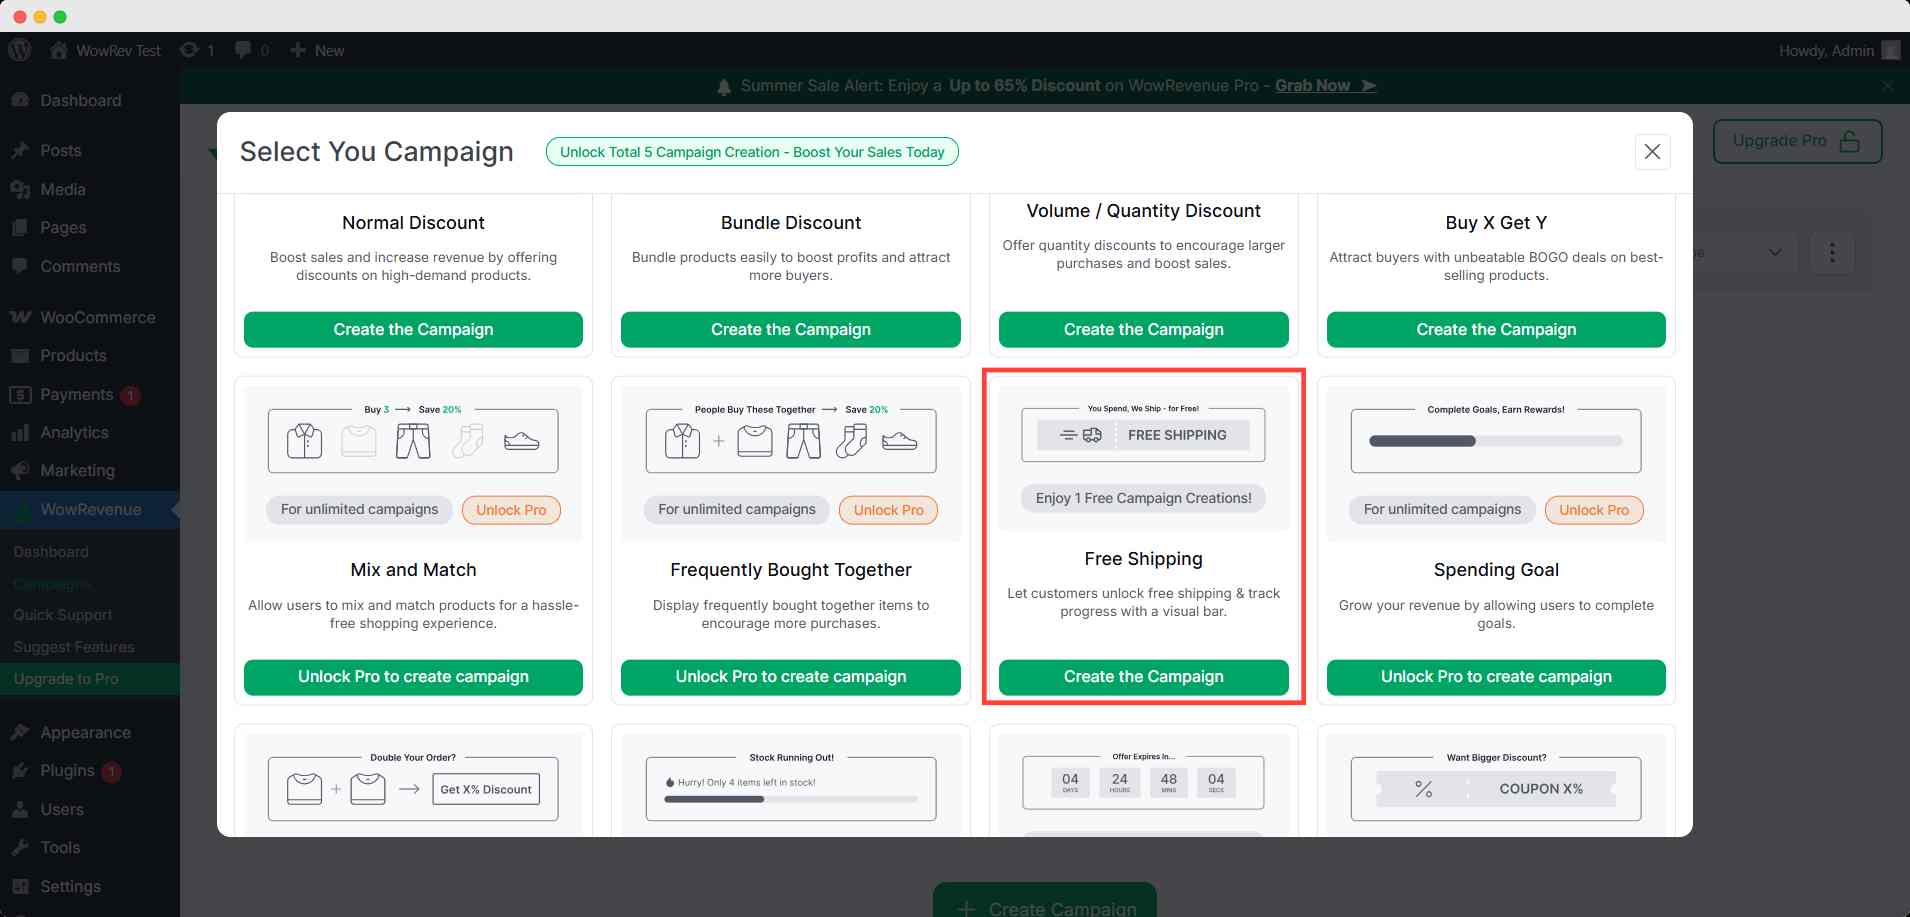
Step 1: Create a new campaign
First, we clicked the WowRevenue menu in the WordPress dashboard. It took us to the plugin dashboard. Here, we noticed a Create Campaign button and clicked it.

Then an interface popped up to let us choose which campaign we want to create. It allowed us to create a free shipping bar for free, so we took the opportunity.
Step 2: Set the basic configuration
After creating the campaign, we appeared on the campaign building page. First, we set a name for this campaign and chose the pages to display this bar.
We chose the cart page, checkout page, and product page. Then we set which display we should show. We chose the drawer mode for the cart page for this instance.
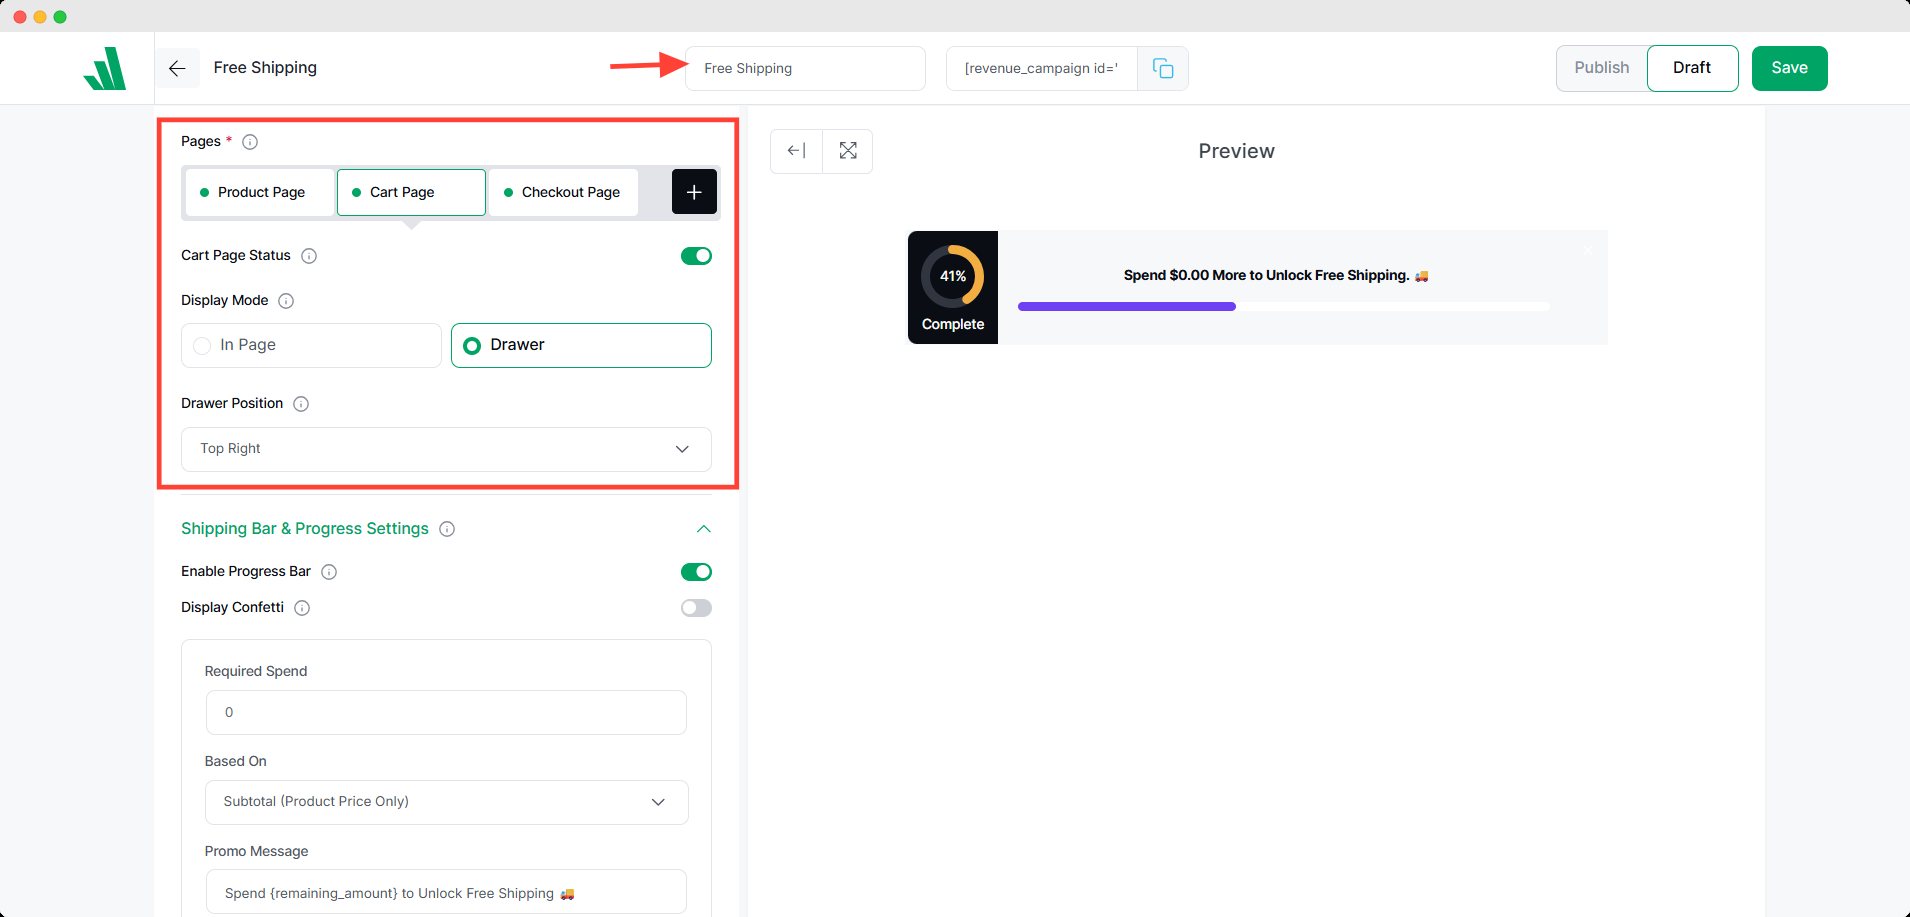
We also have to select the position of this bar on the selected page.
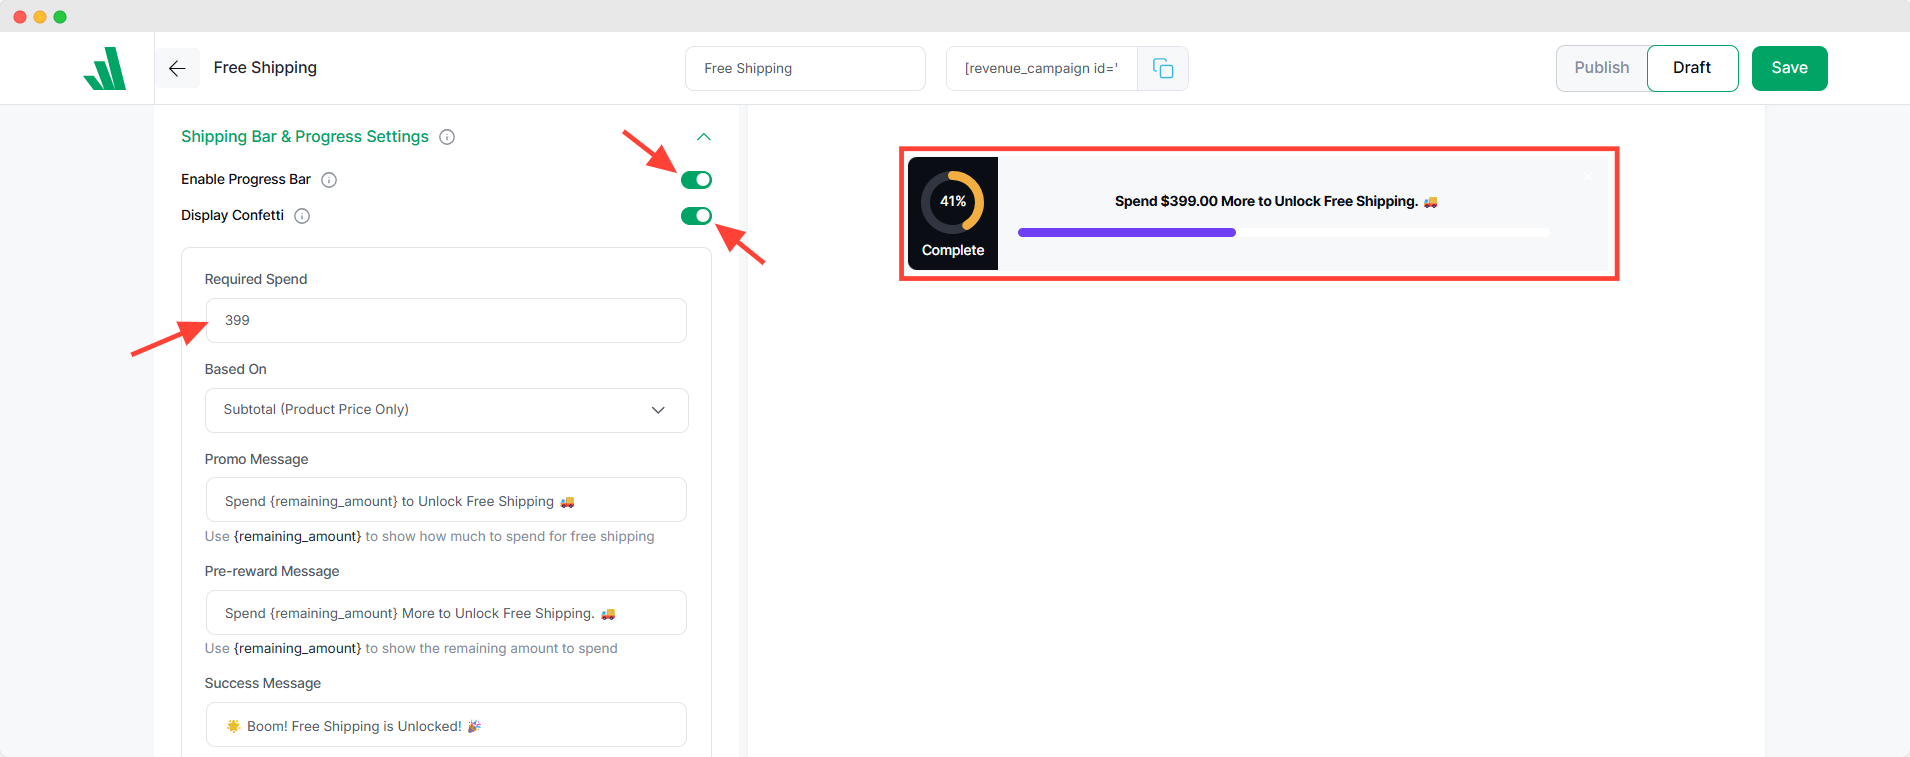
Step 3: Shipping Bar & Progress Settings
Now we have to set the progress bar behavior. We turned on the progress bar and confetti for visual stimulation.
We also set the required amount to achieve this free shipping to motivate customers to purchase more items. The promotional messages are dynamic and functional, beautifully.
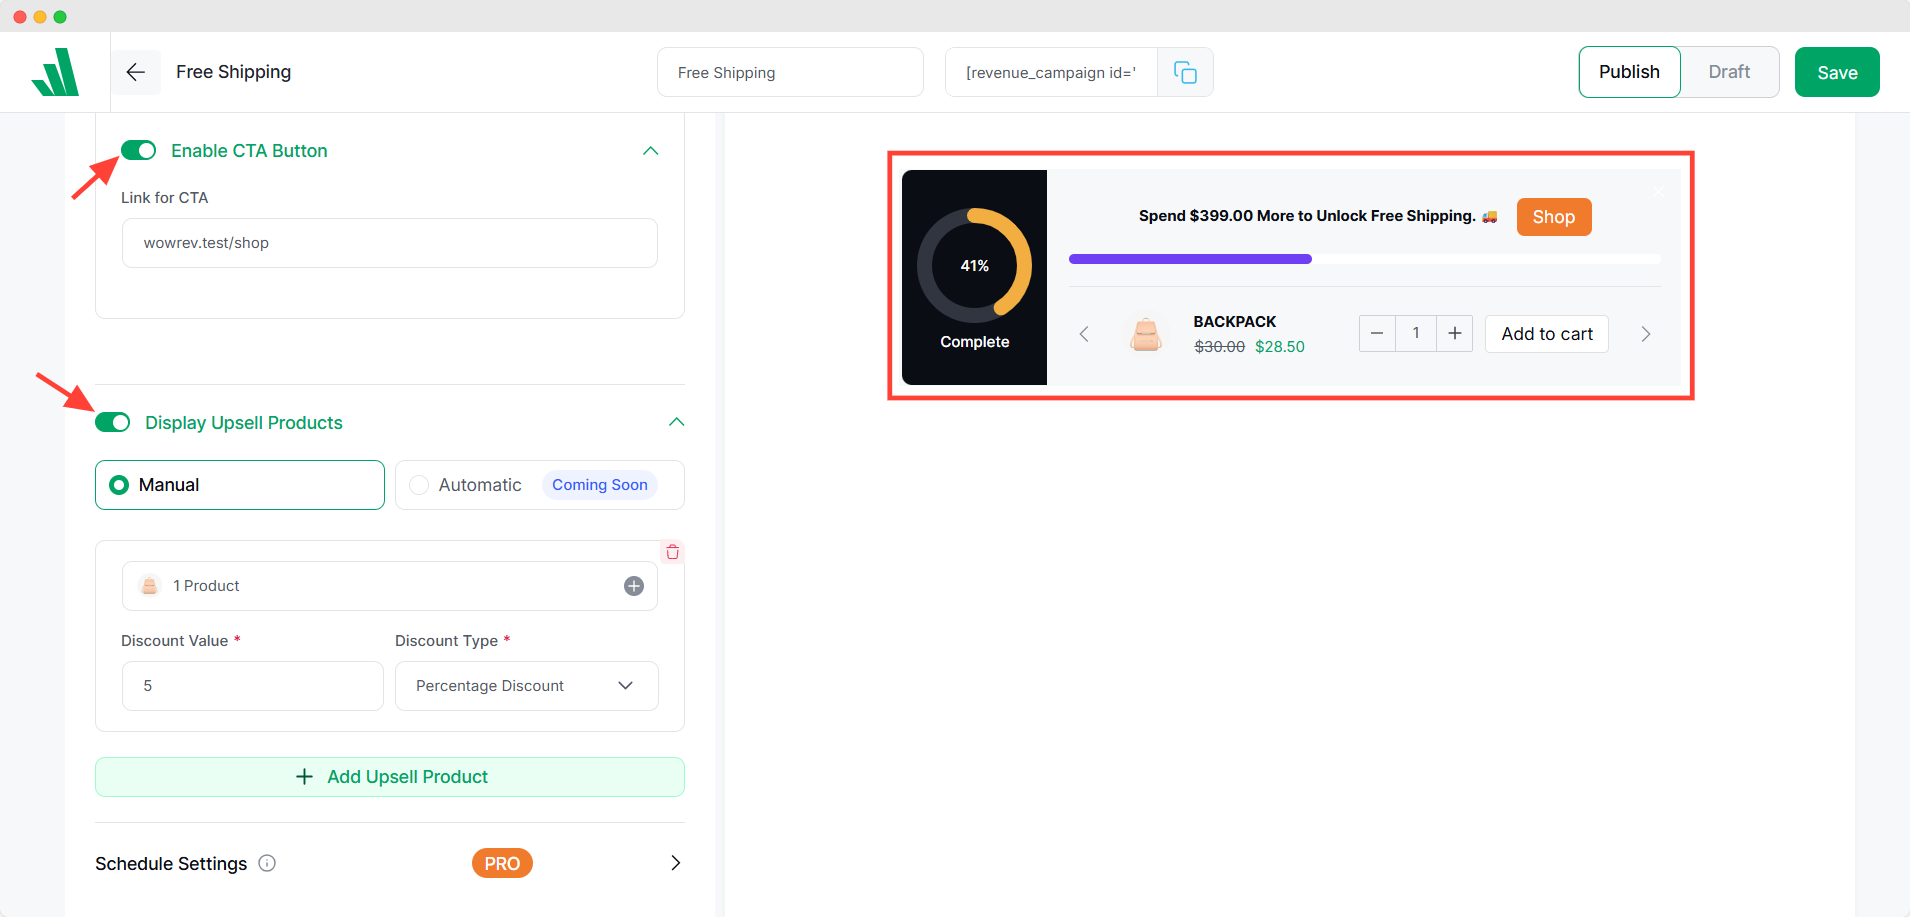
Step 4: Add upsell products and CTA button
Next comes the marketing opportunity. We can add upsell products in the bar and a CTA button to nudge the consumer to buy our preferred product.
There’s also an option to offer a discount to motivate the customer more.
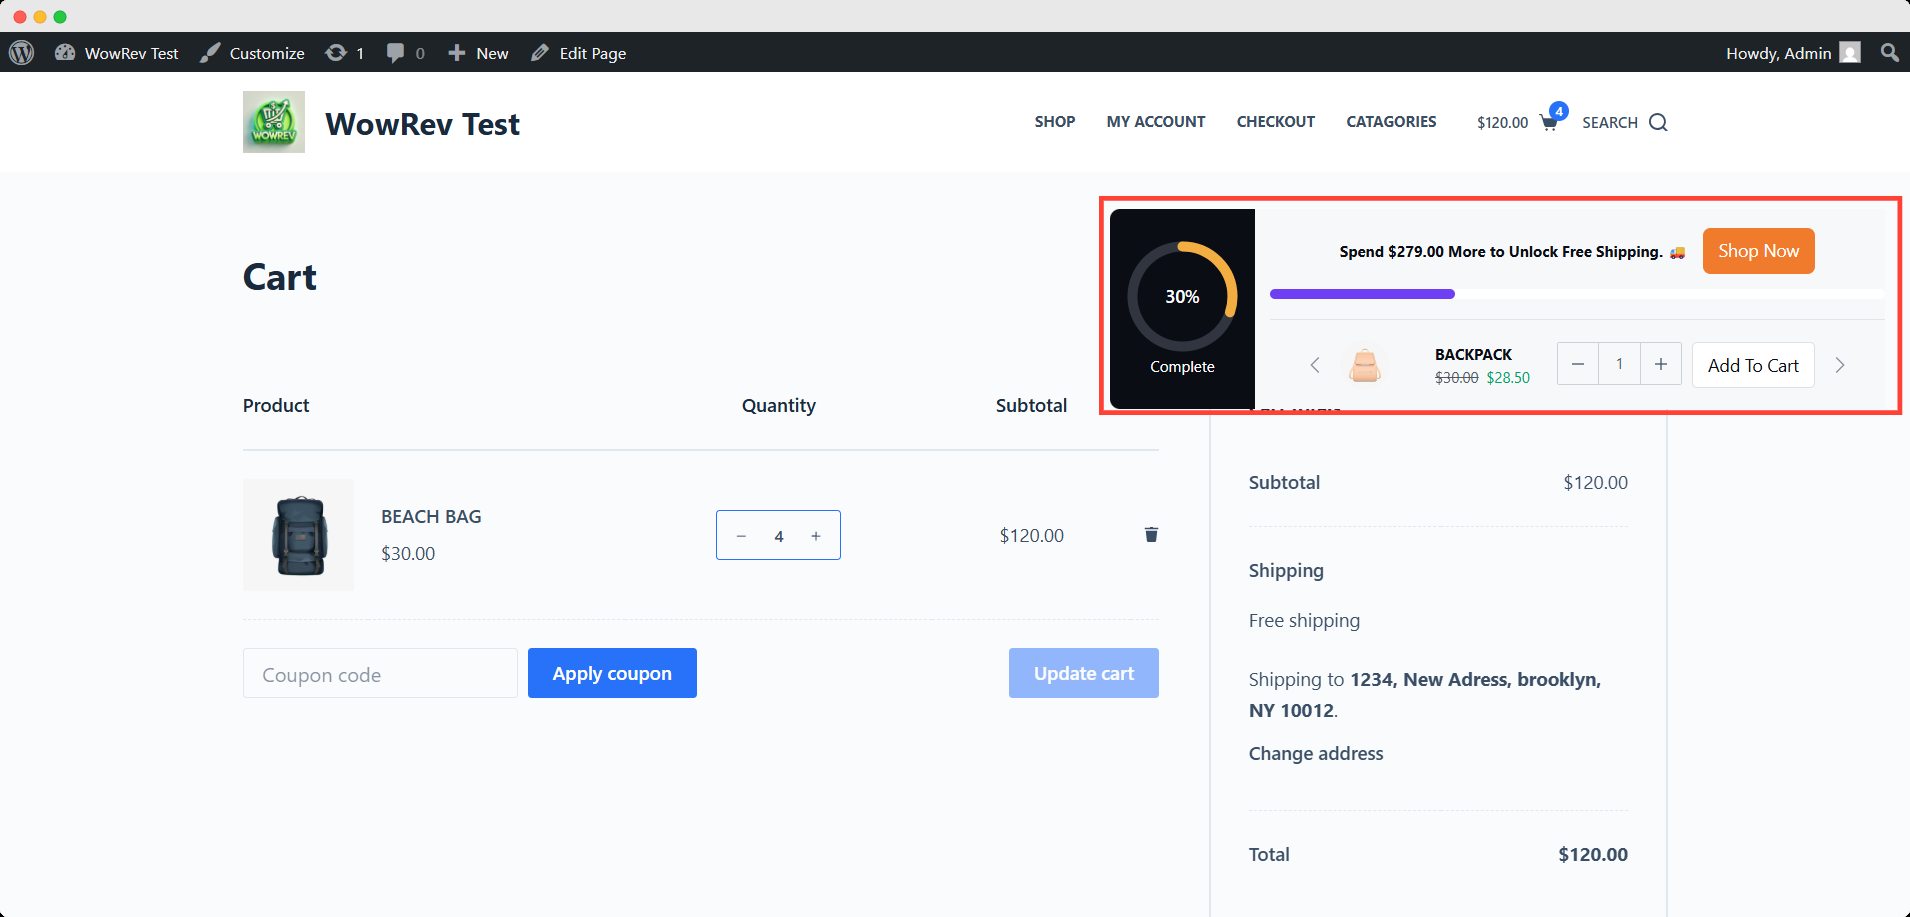
That’s it, we finished configuring the campaign by hitting the Publish and Save buttons. Here’s how it appears on the cart page.
Conclusion
We hope this blog post is helpful for you, and now you can set up free shipping using all possible criteria. It’s time to do it yourself and encourage your customers to place orders sooner rather than later.
And, don’t forget to make the best use of the free progress bar to boost your earnings. Please feel free to share your feedback and suggestions by commenting in the section below.

