Creating a seamless checkout experience is crucial for any WooCommerce store. But how can you ensure your checkout page is optimized for conversions?
The checkout page can make or break your customer’s decision to buy. To maximize sales, your WooCommerce checkout page must be visually appealing and highly functional.
A well-designed checkout page not only boosts conversions but also enhances customer satisfaction.
This article will teach you how to create a high-impact checkout page template in WooCommerce within minutes.
Let’s get more people to buy from your store!
What Is a Checkout Page Template?
Imagine you’re shopping on Amazon. You pick items to buy and click the “Proceed to Checkout” button. Then, you’re taken to a page where you enter your shipping address, choose a payment method, and review your order before buying. This is the checkout page you just visited!
When you use a pre-designed layout for this checkout page, it’s called a checkout page template. This template streamlines the process of completing a purchase. It ensures every customer has a user-friendly and consistent experience.
A checkout page template in WooCommerce includes elements such as:
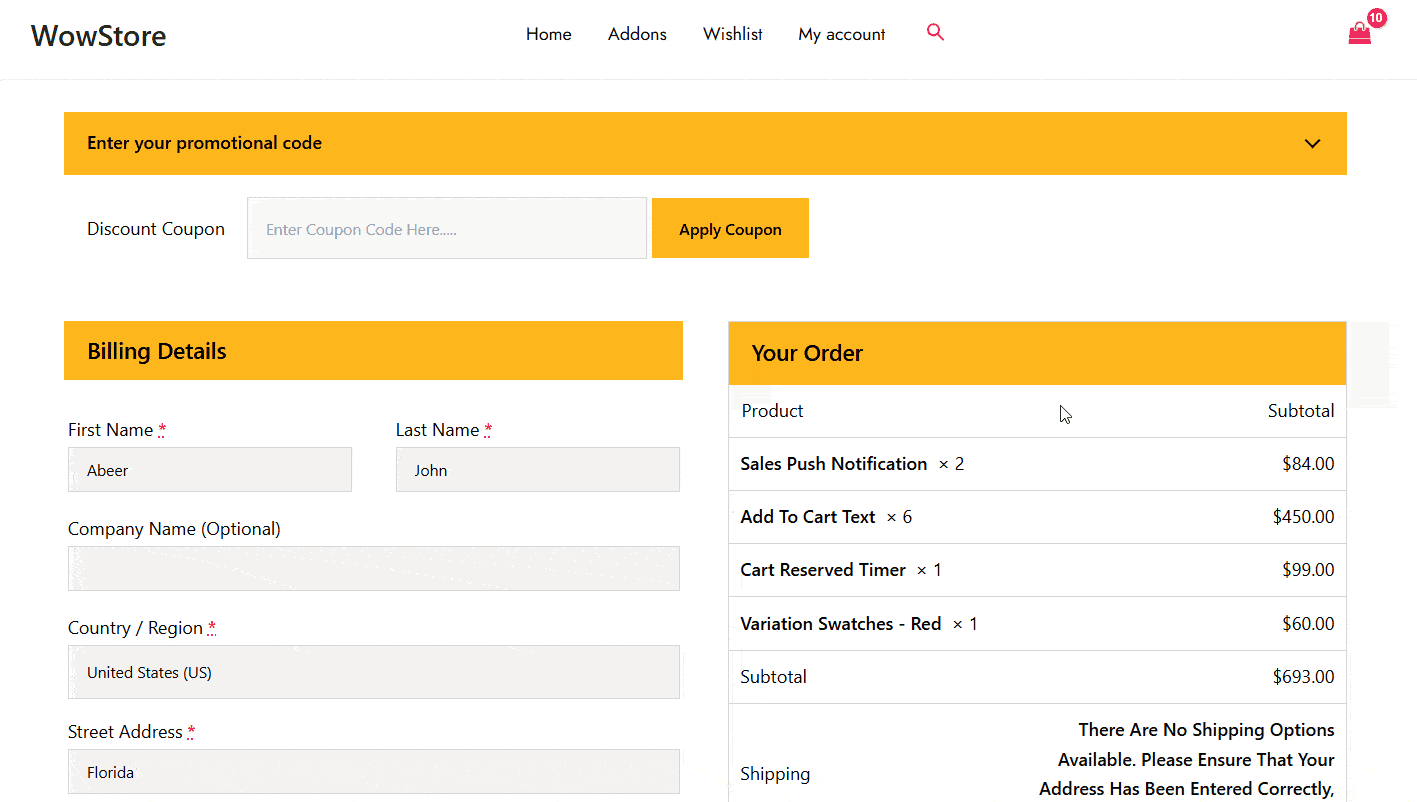
- Customer Information: A Field for collecting the customer’s details.
- Shipping Details: A display of shipping methods and costs.
- Payment Methods: A list of payment gateways.
- Order Summary: A breakdown of the items purchased.
Optional Elements:
- Order Notes: A section to leave special instructions.
- Coupon Field: A field for entering discount codes.
- Security Badges: A trusted symbol to reassure customers.
- Gift wrapping options: An option for requesting gift wrapping.
- Progress Indicators: A progress bar during checkout.
You can customize the checkout page template to match your brand. This will help your customers feel more confident and comfortable on your website.
Why is Creating a Checkout Page Template Important in WooCommerce?
By default, WooCommerce provides a basic checkout page that may not effectively boost revenue. In this case, creating a custom checkout page template offers several benefits, such as:
✅ Better User Experience: A well-designed checkout page template makes the purchasing process smoother. It also boosts customer satisfaction.
✅ Security Assurance: Templates designed with security in mind help reassure customers. They ensure that personal and payment information is kept safe.
✅ Boosts Conversion: A well-optimized template can guide users more effectively through the payment process. This can lead to increased conversions.
✅ Error Reduction: A well-designed template can minimize errors during the checkout process. This helps reduce customer frustration and support requests.
✅ Better Insights: Structured templates make it easier to track user behavior and identify bottlenecks. It helps in improvements for better performance.
✅ Brand Consistency: Consistent design across the checkout page ensures a seamless look and feel. It reinforces brand identity and trust.
✅ Mobile Responsiveness: A responsive checkout page template adapts to various devices including smartphones and tablets.
✅ Customization Flexibility: Pre-made templates offer customization options. They allow businesses to tailor the checkout experience to their specific goals.
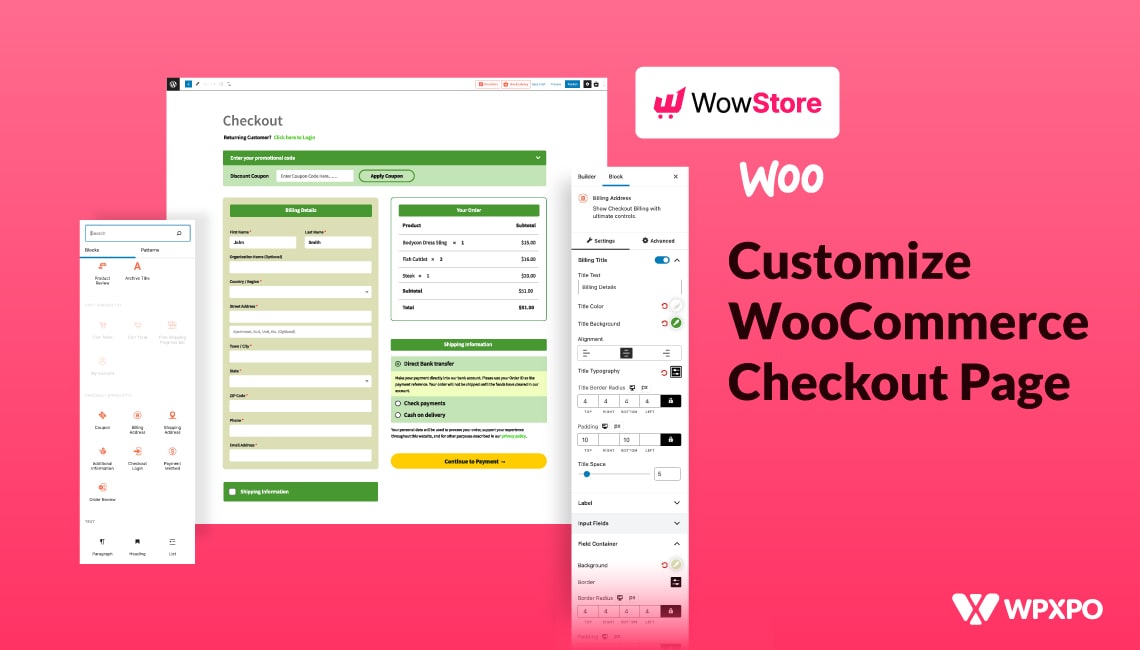
Create a Checkout Page Template in WooCommerce with WowStore (Step-by-Step)
Let’s walk through a five-step process to create a checkout page template in WooCommerce. I recommend using WowStore for this task.
WowStore is a Gutenberg-first Woo builder. It provides top-notch functionality and design options essential for creating a high-impact checkout page.
To begin, install and activate WowStore from the WordPress’s plugin section.

Video Tutorial
Before we go with the process, here’s a video for a visual understanding. Feel free to check it out!
ProductX is now WowStore! Please don’t get confused by the name change.
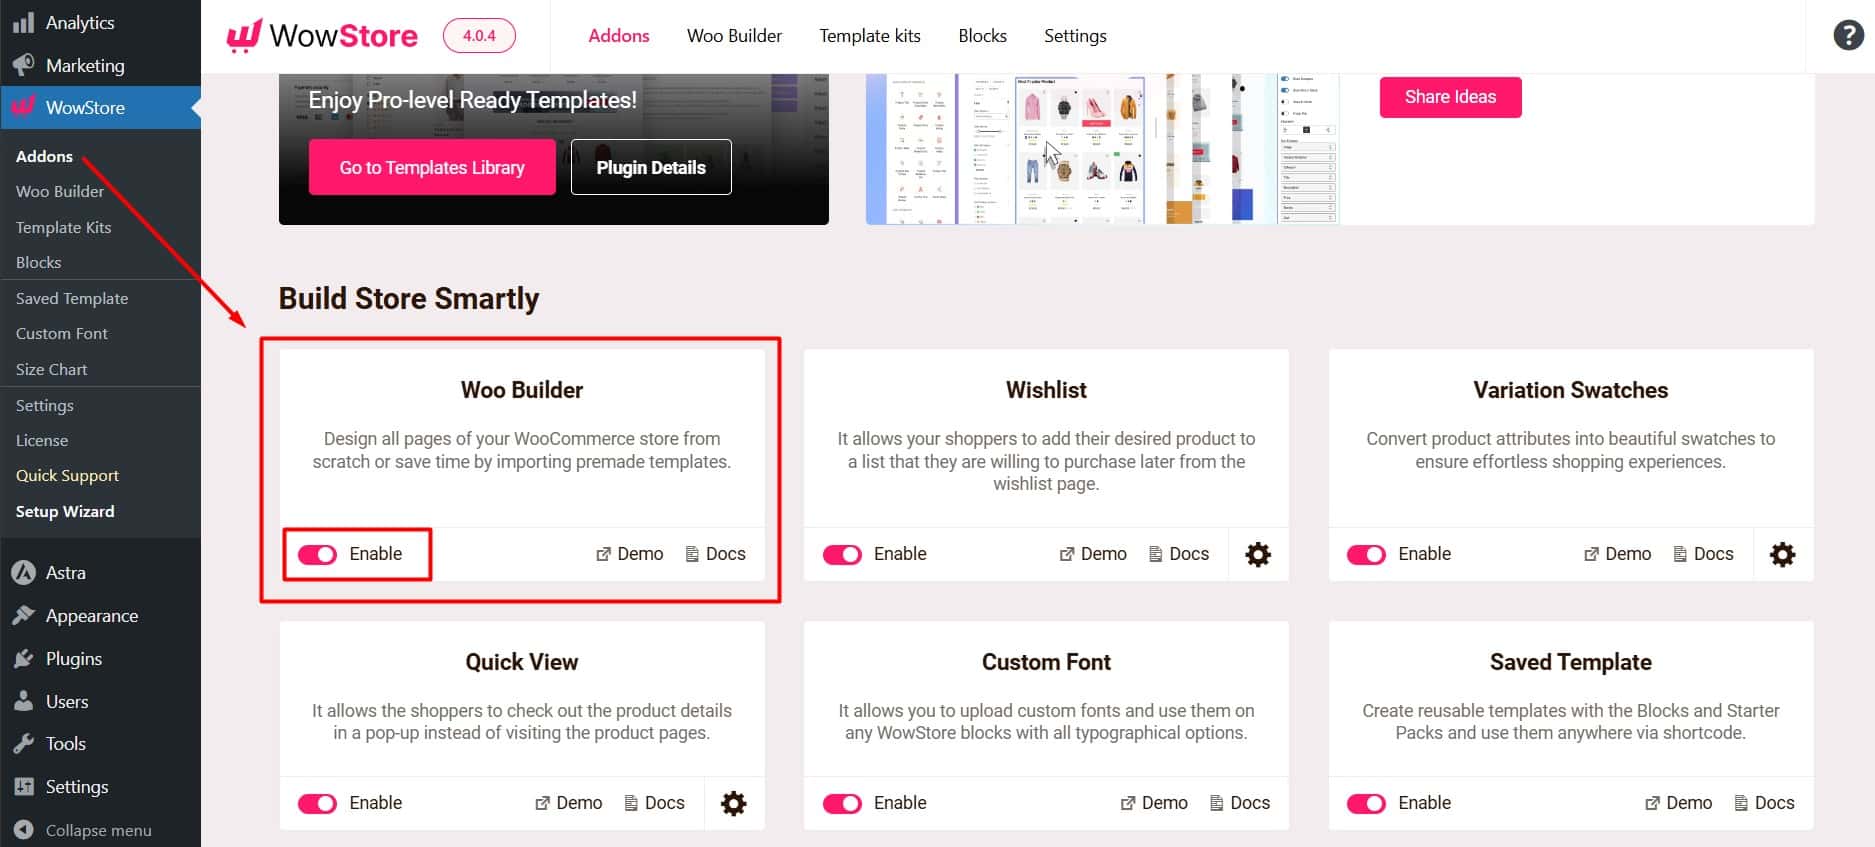
Step 01: Enable Woo Builder
From the WordPress dashboard, head over to the Addons section in WowStore, and enable “Woo Builder”.
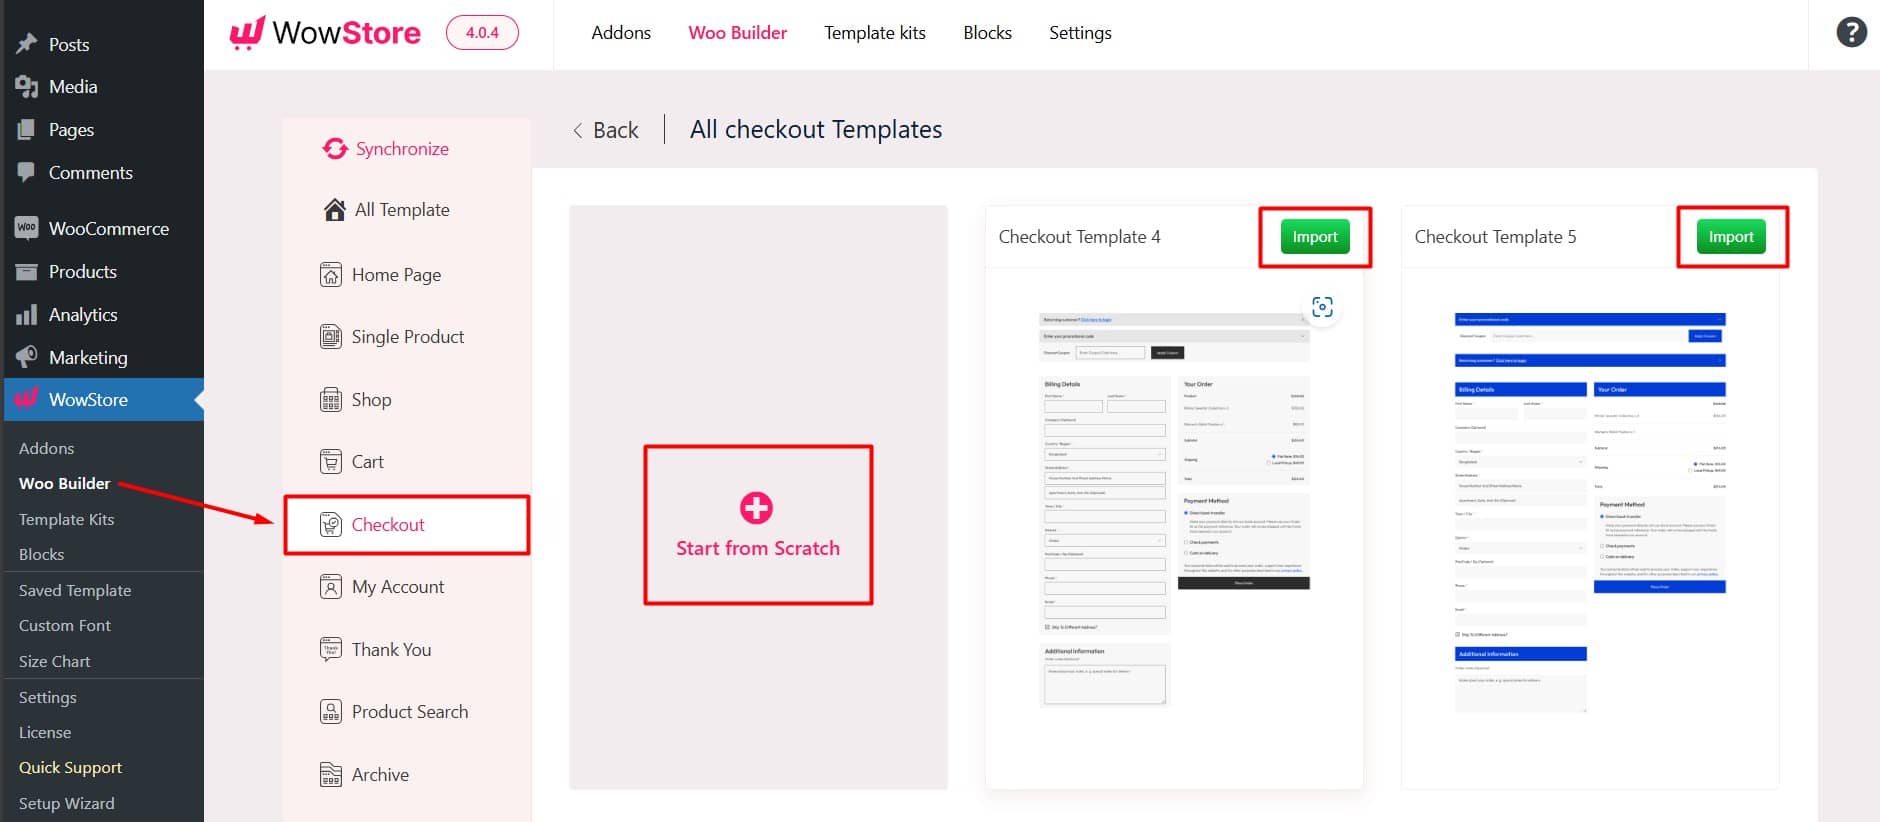
Step 02: Create A Checkout Page Template
To create a checkout page template, navigate to WowStore > Woo Builder > Checkout.
You can create the template in two ways:
- Import a Pre-made Template or
- Start from Scratch
Step 03: Add Required Blocks
After creating the Checkout page template, it’s time to set it up. If you chose a pre-made template, you’re already ahead. If you decided to start from scratch, follow these steps below:
- Plan your Checkout Page layout
- Add Rows based on your plan
- Add blocks to each Row
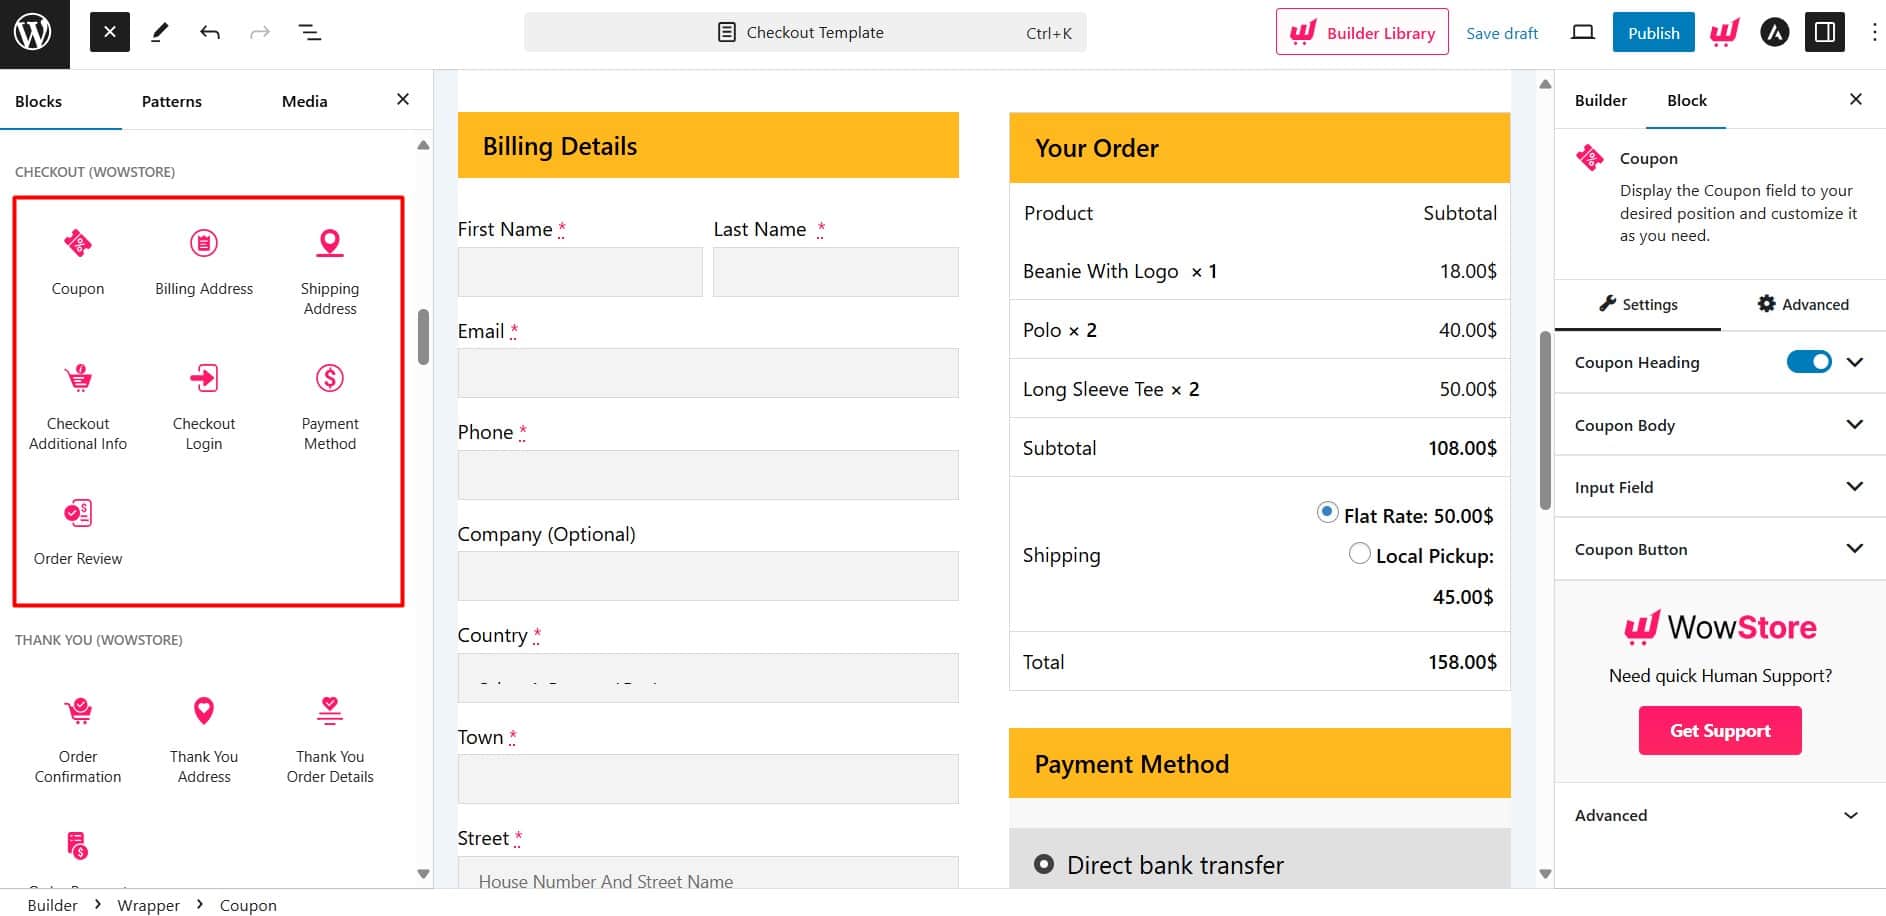
To simplify the process, I’ve included a dedicated section for the checkout page blocks. These are:
- Coupon
- Checkout Login
- Billing Address
- Order Review
- Payment Method
- Shipping Address
- Checkout Additional Info
Let’s explore each block in the next step!
Step 04: Design and Customize
You’ve already created the checkout page template. Now, move on to design and customization. We’ll dive deeper into the features and functions of each block.
🔑 Checkout Login
This is a login field for returning customers with the remember me checkbox.
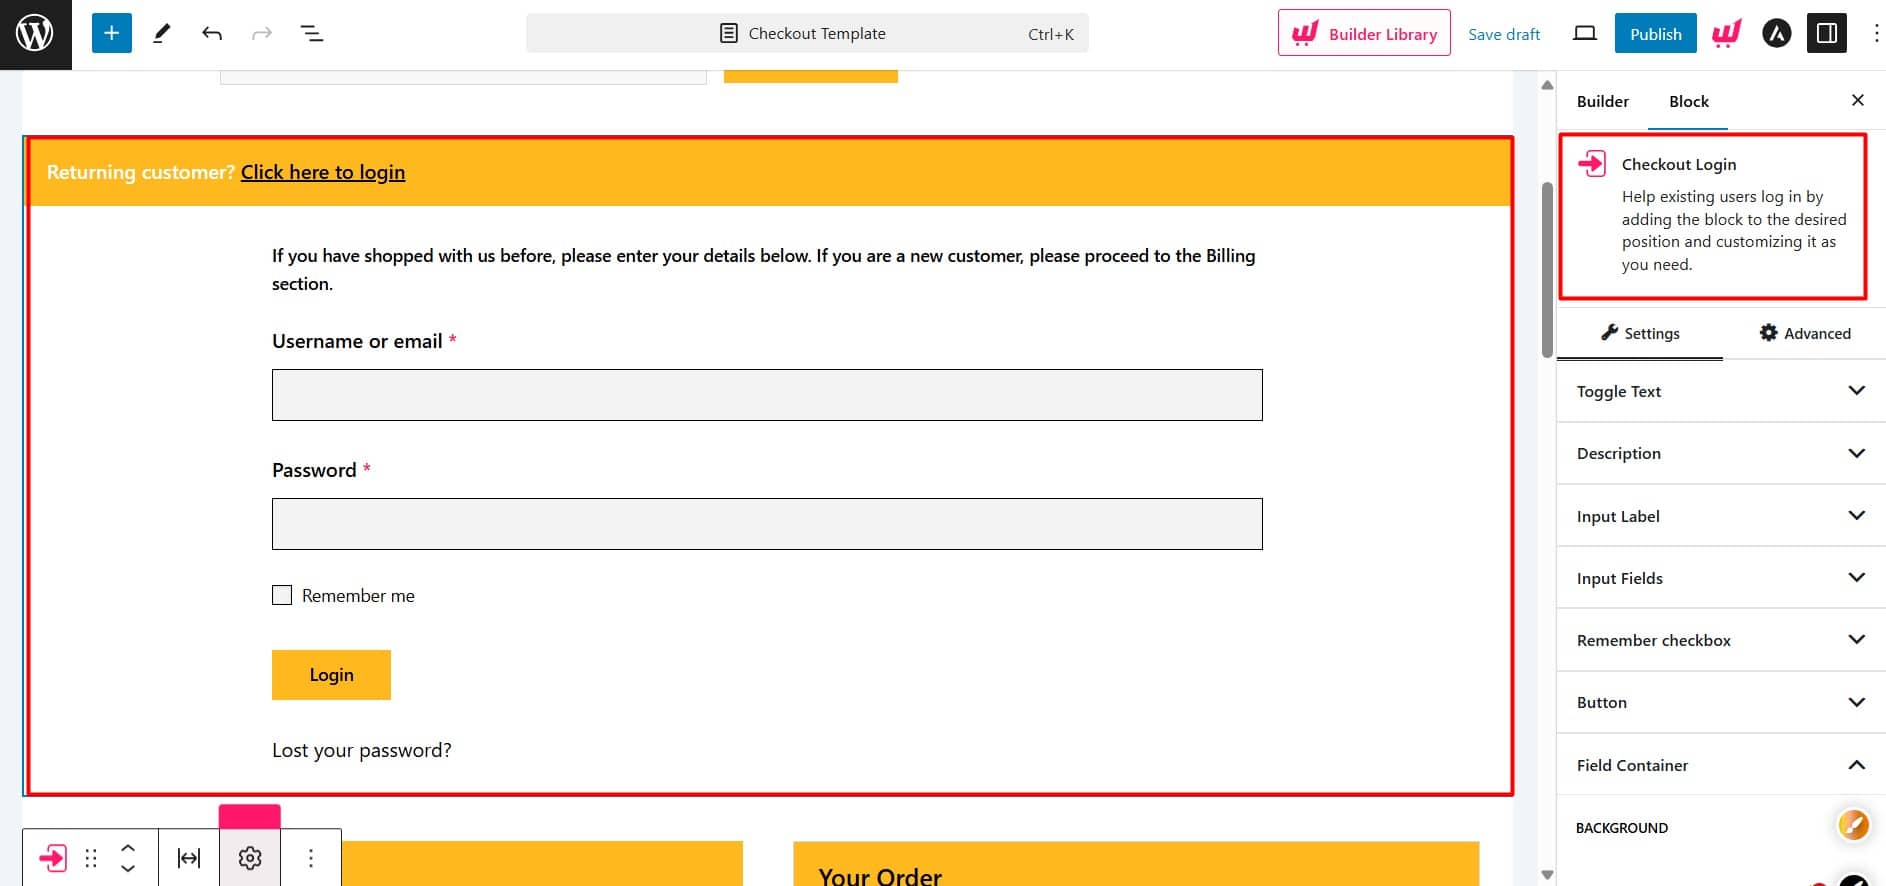
Here you’ll find the following customization settings:
- Toggle Text (Settings to customize every sort of typography)
- Label (Change the color and size of labels)
- Input Fields (Change color, background, and typography for both normal and focused view)
- Button (Change the color and size of buttons)
- Description (change the typographies of the description)
- Remember the checkbox (Customize the color and typographies)
🏠 Billing Address
This block is mandatory for collecting customers’ billing information.
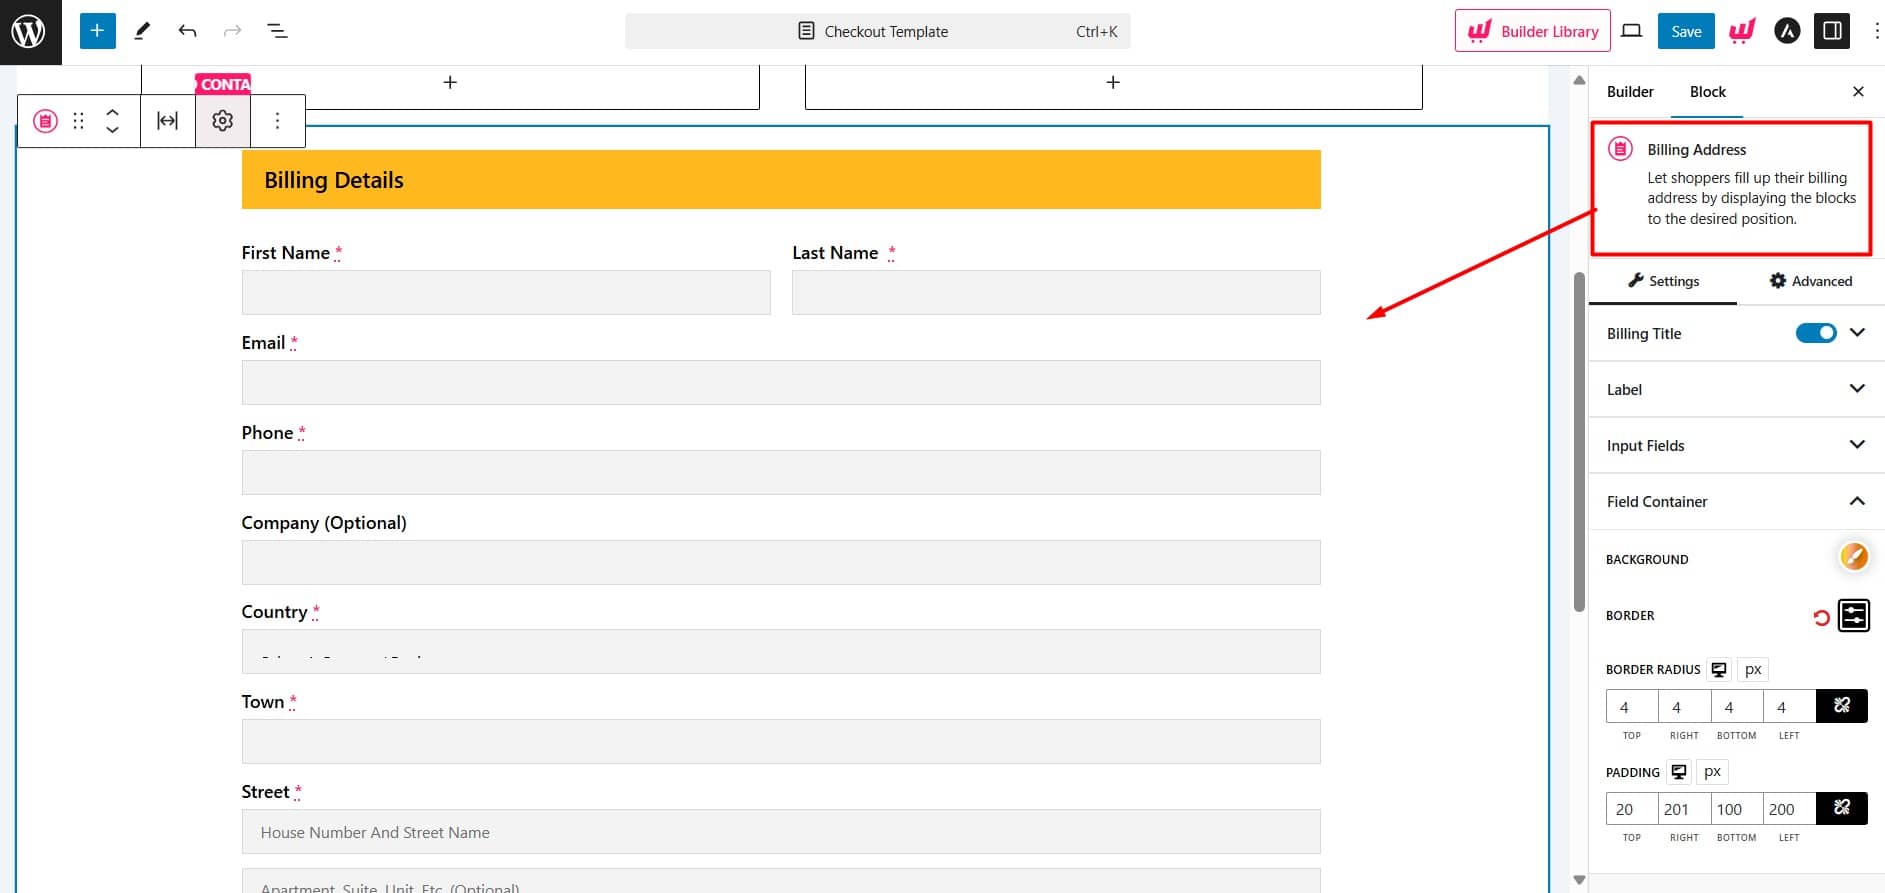
Here you’ll find the following customization settings:
- General (Show/Hide title)
- Billing Title (Change texts, colors, and other typographies)
- Label (Change the color and size of labels)
- Input Fields (Change color, background, and typography for both normal and focused view)
📦 Shipping Address
Sometimes customers have a different shipping address from their billing address. Therefore, this block is essential for collecting shipping information.
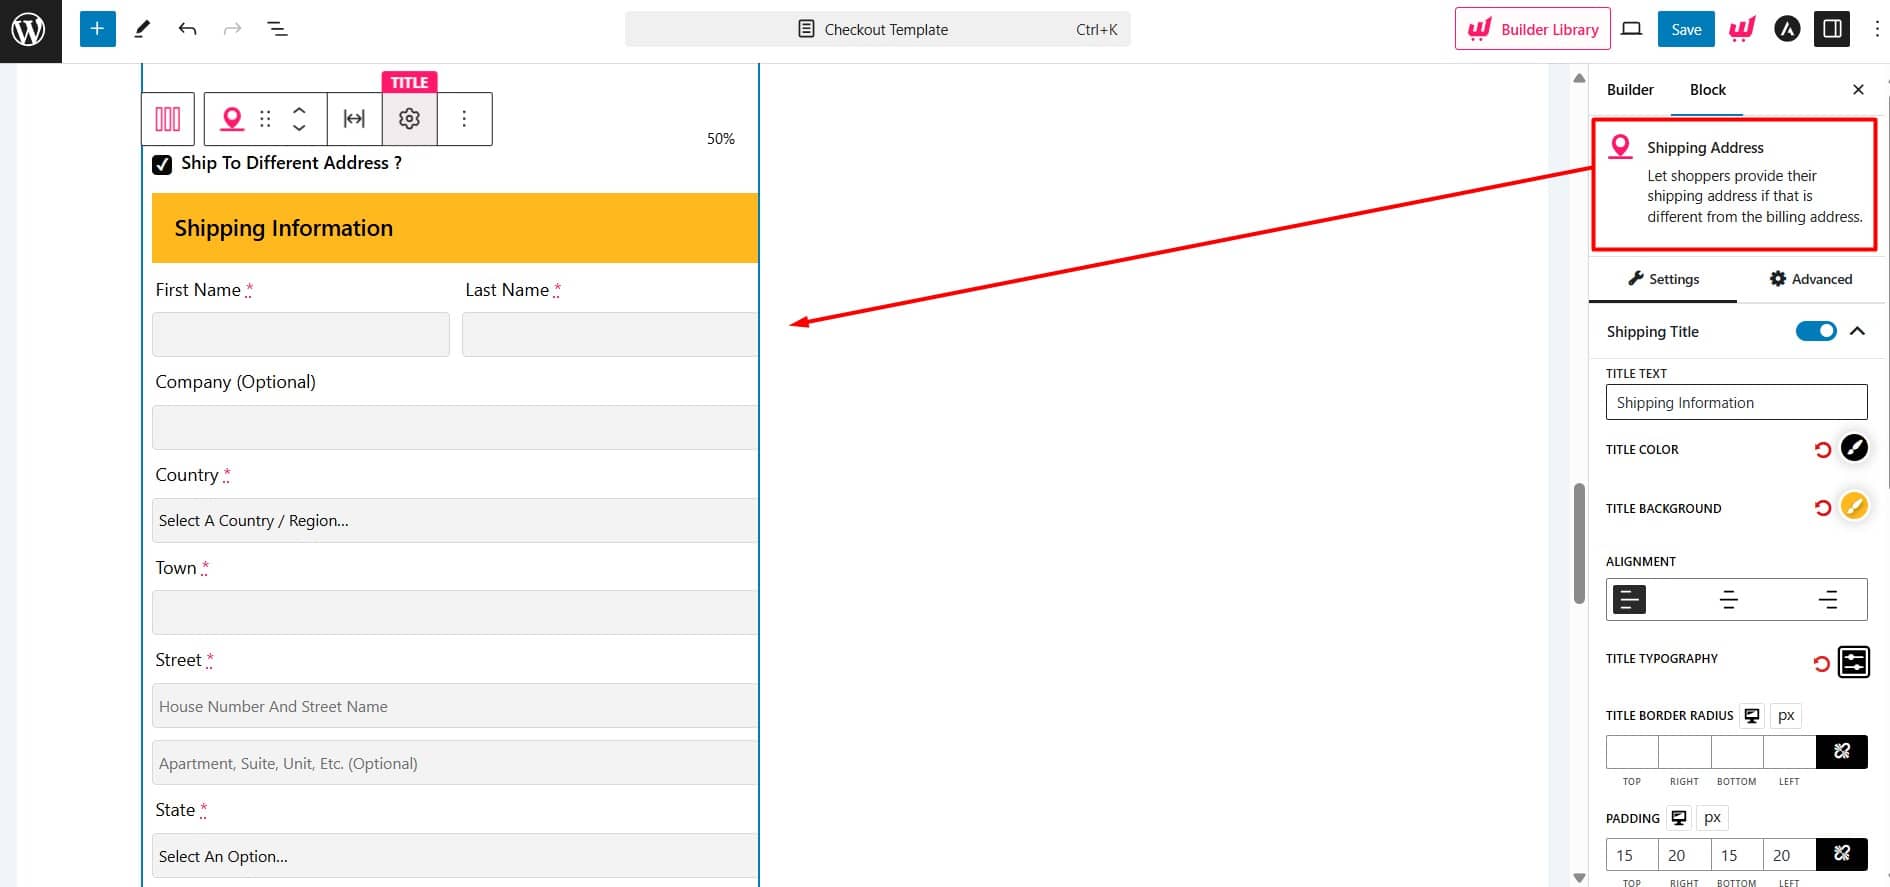
Here you’ll find the following customization settings:
- General (Show/Hide title)
- Shipping Title (Change texts, colors, and other typographies)
- Ship to Different Address checkbox (Change texts, colors, and other typographies of the tickbox)
- Label (Change the color and size of labels)
- Input Fields (Change color, background, and typography for both normal and focused view)
📄 Checkout Additional Info
This is a Textarea field where customers can add specific instructions or requests for their purchases or deliveries.

Here you’ll find the following customization settings:
- General (Turn on/off Title)
- Title (Change the text, color, background, and other typographies)
- Label (Change the color and size of labels)
- Text Area Field (Change color, background, and typography for both normal and focused view)
🔍 Order Review
This block allows customers to review their cart before finalizing their purchase. It helps ensure customers can verify their selected items, quantities, and prices.
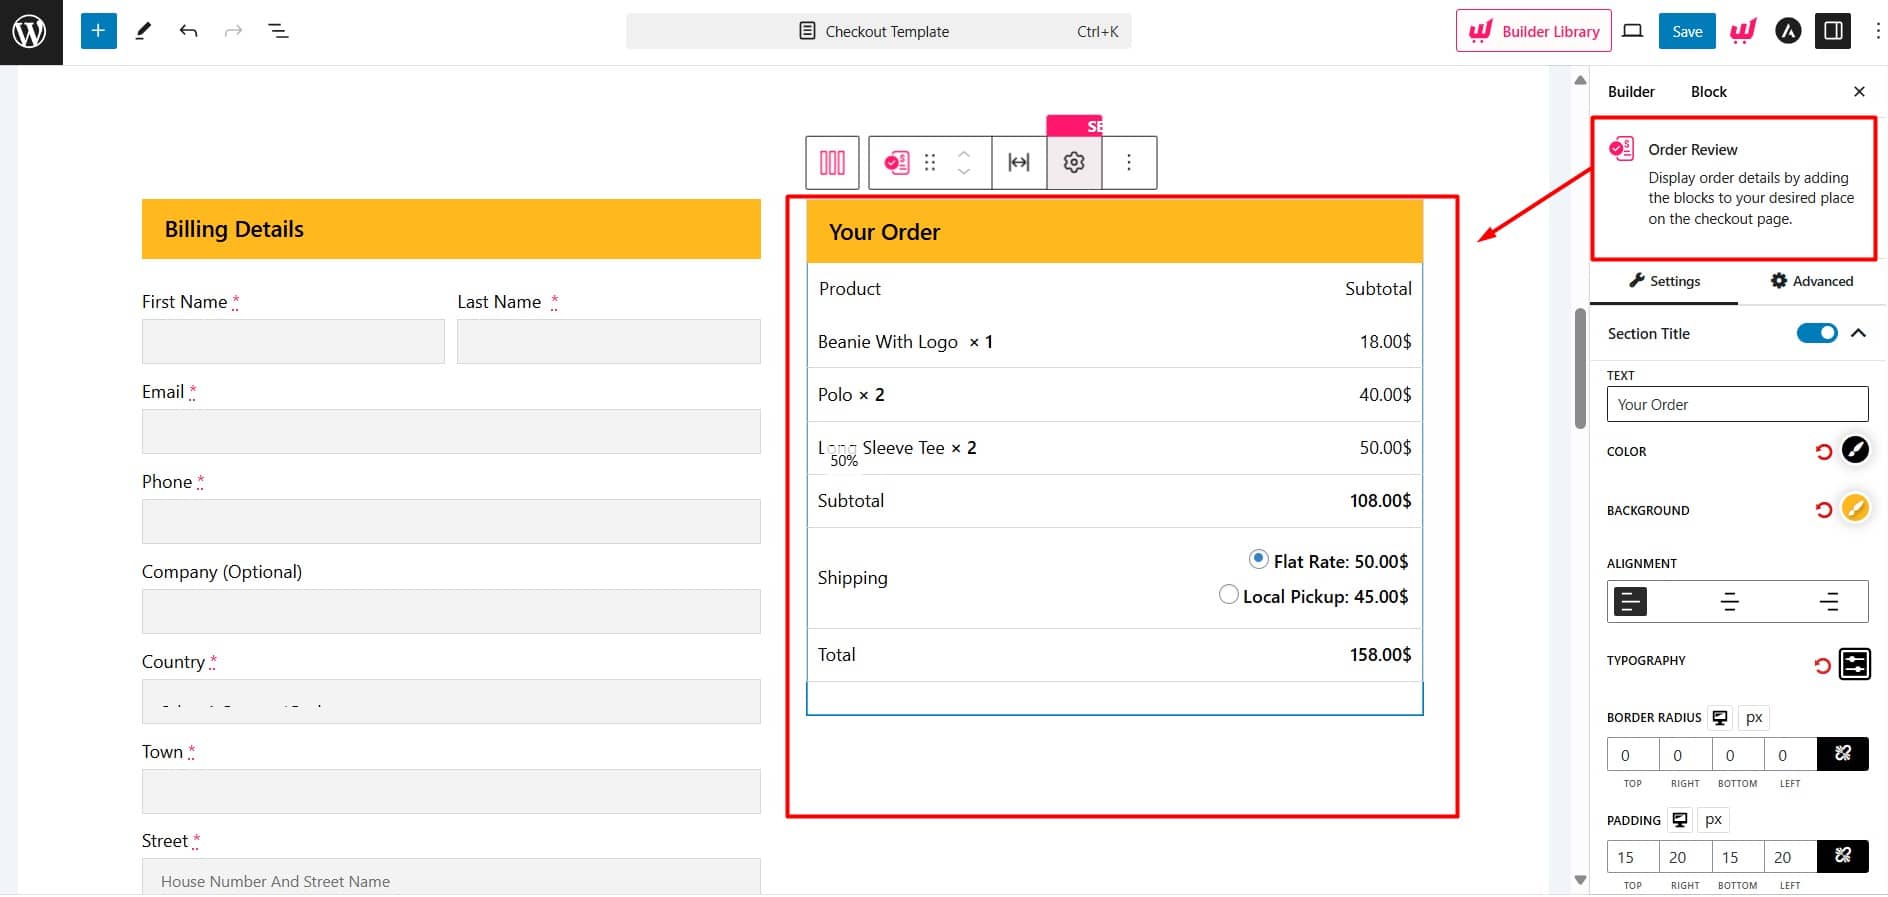
Here you’ll find the following customization settings:
- General (Turn on/off the Section Title Option)
- Section Title (Change the text, color, alignment, and other typographies)
- Table Heading (Change the text and other typographies of the headings of this block)
- Table Body (Change the typographies of the body of this block)
- Total (Change the typography of the total part of this block)
✂️ Coupon
This block allows customers to enter discount codes or coupons. By receiving discounts, customers feel they are getting more value for their money. This boosts sales and enhances satisfaction.
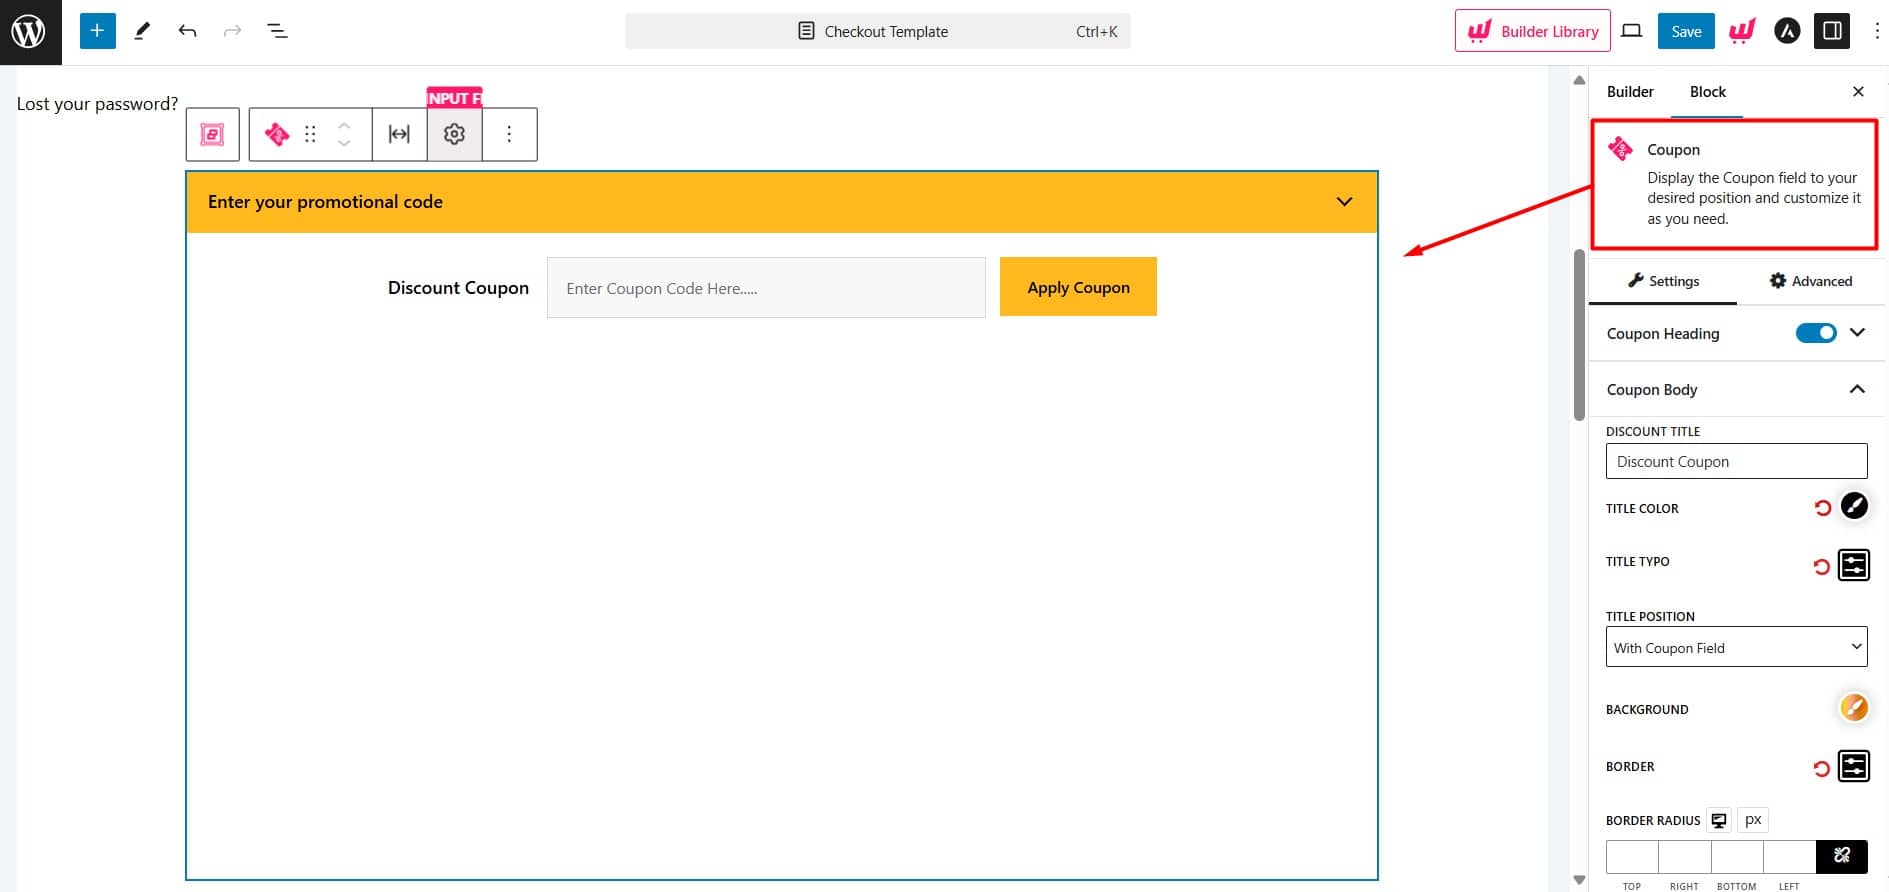
Here you’ll find the following customization settings:
- Coupon Heading (Change the text and other typographies of the heading)
- Coupon Body (Change the typographies of the body of this block)
- Input Fields (Change color, background, and typography for both normal and focused view)
- Coupon Button (Change positions, texts, and other typographies)
💳 Payment Method
This block usually displays the payment options. You can add or remove payment gateways, and even customize the appearance to match your brand.
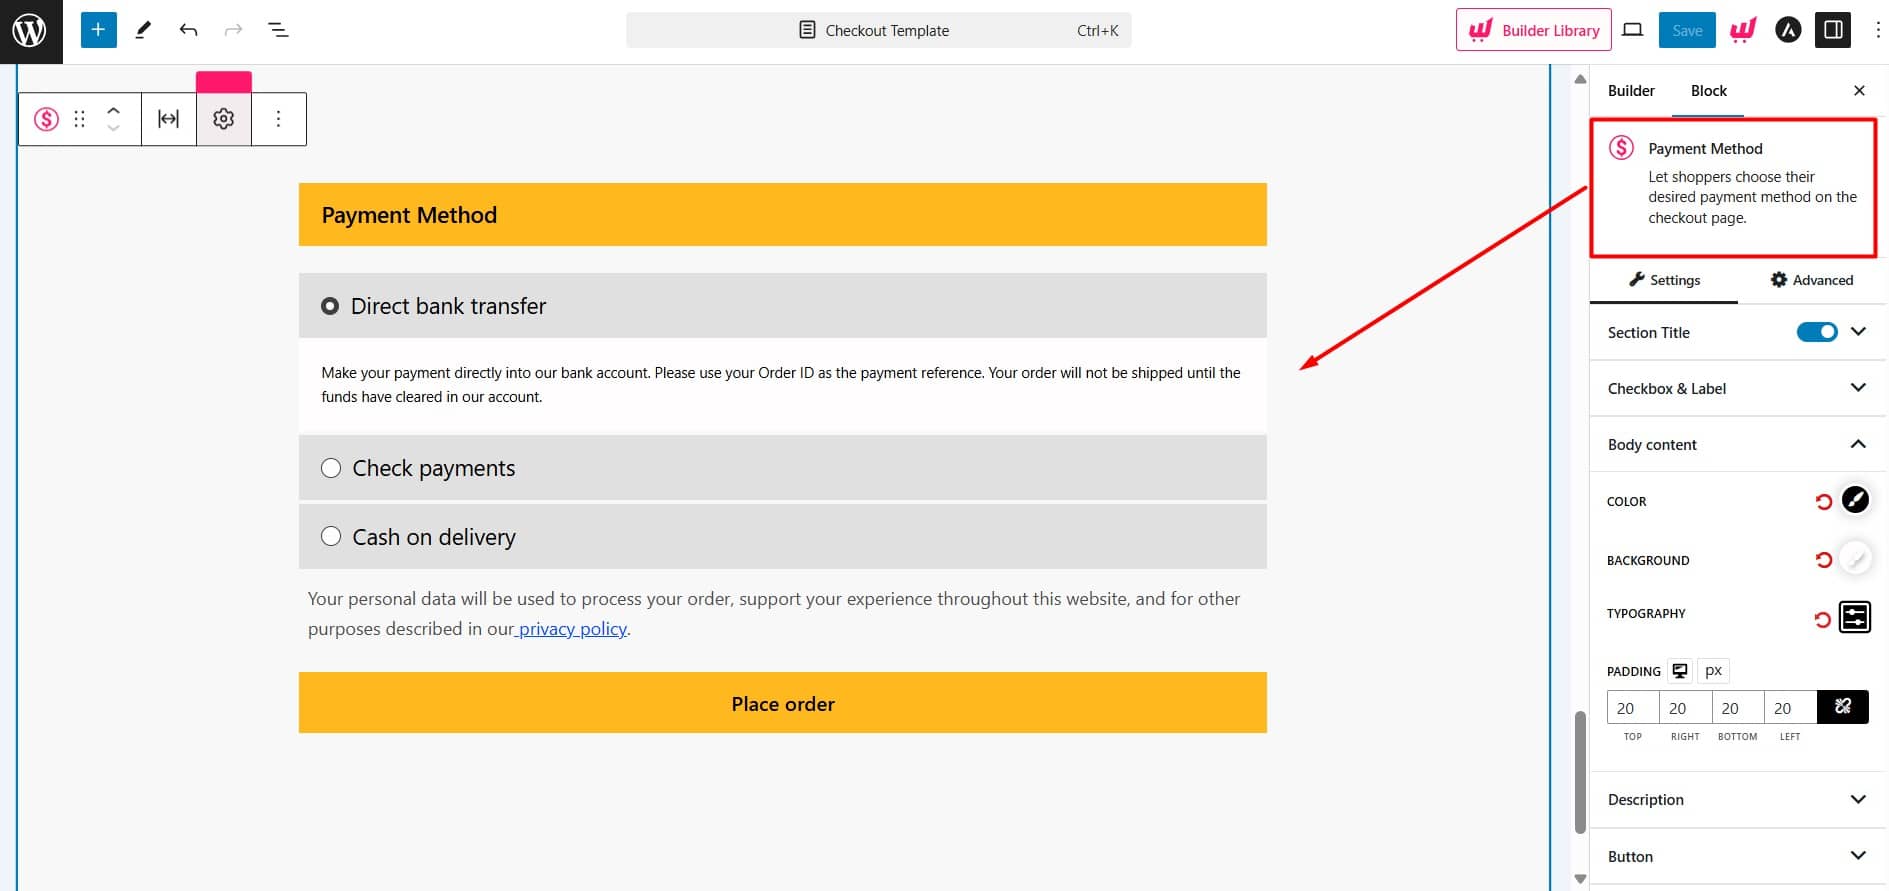
Here you’ll find the following customization settings:
- General (Turn on/off the Section Title Option)
- Section Title (Change the text, color, alignment, and other typographies)
- Checkbox & Label (Change color, background, and typographies)
- Body content (Change the typographies of the body contents of this block)
- Button (Change the color and size of buttons)
- Description (change the typographies of the description)
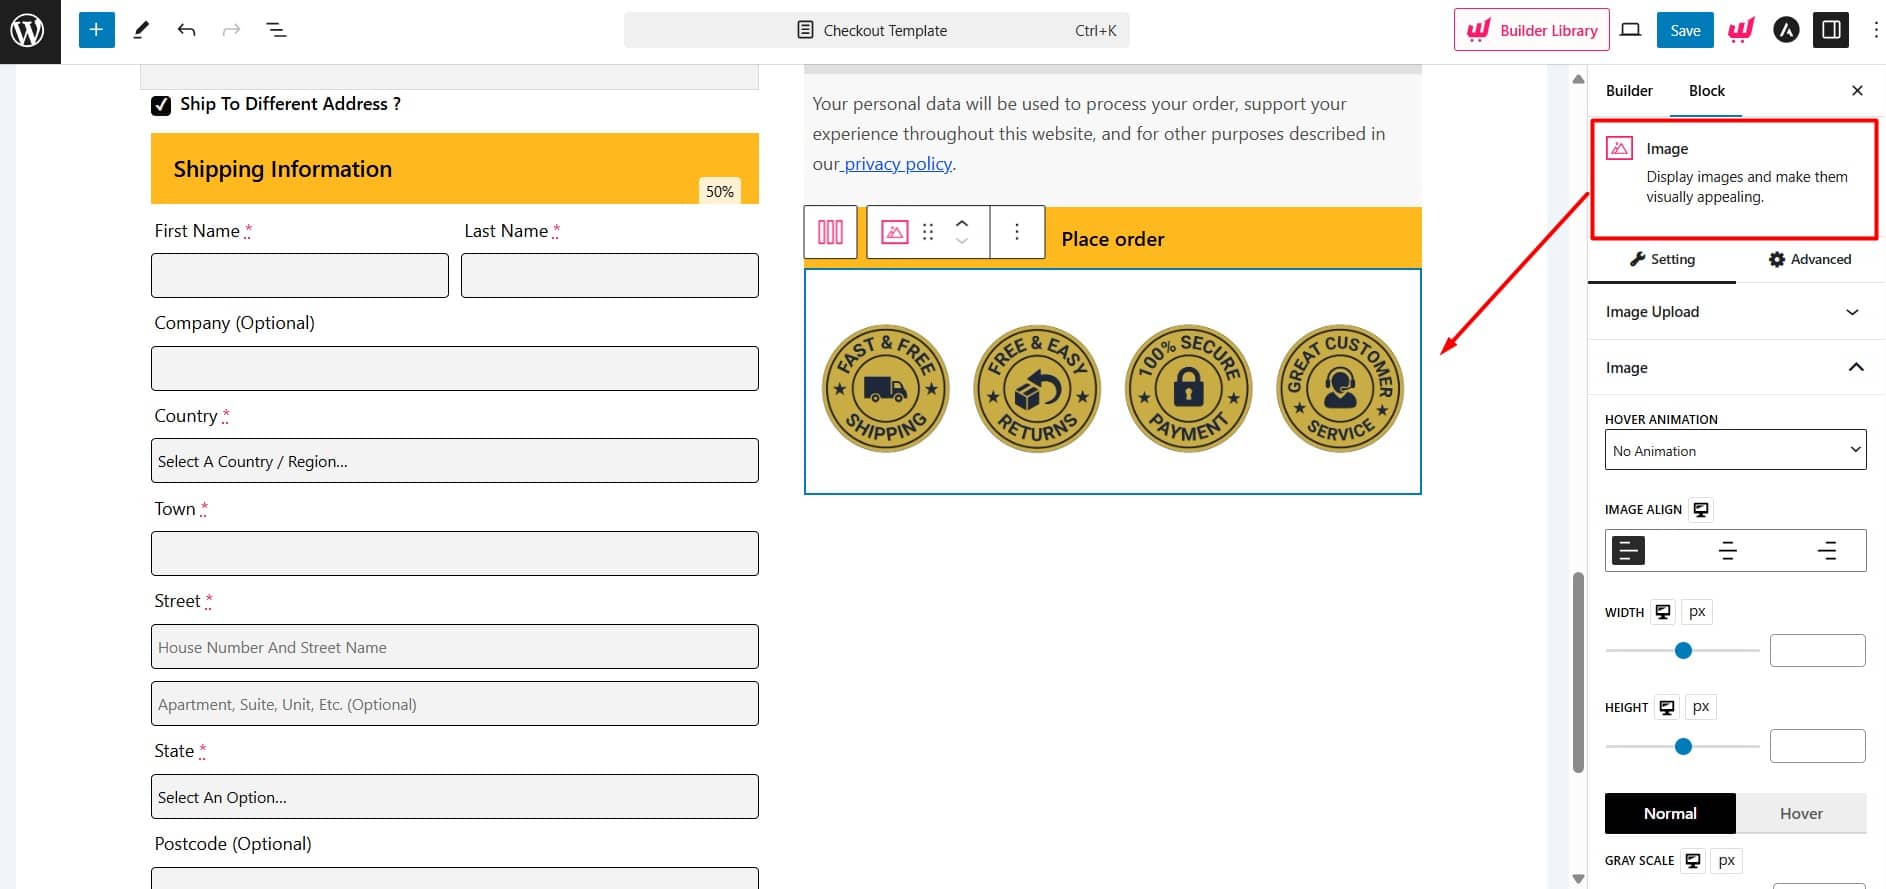
⭐️ Bonus: Trusted Badges
This block helps customers feel confident and secure when purchasing from you. You can add an image block with a security badge image. Next, adjust the spacing and padding slightly to complete the setup.
Step 05: Publish and Shine!
Once you’re happy with the customization, click publish to see your new checkout page. If needed, make more changes to perfect it. We get the following checkout page template. You can create an even better design!
As you can see, WowStore’s Woo Builder simplifies the process of creating a checkout page in WooCommerce. It also offers extensive customization options to enhance the impact.
Craft a Highly Impactful Checkout Page! (Proven Tips)
Now that you know all about creating a checkout page template in WooCommerce. Let me share some proven tips to make it highly impactful for your online store.
✨ Offer Guest Checkout: Let people buy things without needing to create an account. It makes shopping quick and easy.
✨ Accept Multiple Payments: Give customers different payment options, like credit cards, PayPal, or other methods they prefer.
✨ Offer Free Shipping: Provide free delivery, so shoppers don’t have to worry about extra costs.
✨ Avoid Hidden Charges: Be transparent about all costs from the start. So there are no unexpected fees when it’s time to pay.
✨ Mobile-focused design: More people are using mobile devices nowadays, So, it’s essential to ensure your website runs smoothly on smartphones.
✨ Minimize Required Fields: Only ask for essential information during checkout. This way, customers can complete their purchases faster.
✨ Keep It Clean and Simple: Make sure your website looks clean and feels simple. This helps visitors navigate your site without confusion.
✨ Add Trust Badges: Display security badges or trust symbols just below the place order button. This shows customers that your store is safe and reliable.
✨ Autofill Forms for Registered Users: Help returning customers checkout faster by automatically filling in their details. This makes their shopping experience seamless.
✨ Display Order Summary: Show a clear summary of everything in the cart before payment. This way, customers know exactly what they’re buying.
✨ Invalid Input Alert: Notify customers immediately if they’ve entered something wrong. This helps customers to correct it right away and avoid delays.
Start Creating a Checkout Page in WooCommerce!
The checkout page is crucial as the final stage of a purchase journey. So, it deserves your dedicated attention.
In this article, I explain the checkout page template and its role in boosting conversions. I also provide a step-by-step guide for creating a polished checkout page using WowStore. Additionally, I share tips to make a noticeable impact on your online store.
All of these efforts are worth reducing abandoned carts and increasing your revenue.
Happy crafting!
Feel free to explore our YouTube Channel to find useful videos. Also, let’s connect on Facebook and X (formerly Twitter) for exciting updates!