I’ve been running a sports-focused blog for a while now — built it from scratch with a clear goal: to cover everything related to sports and athletics. My categories were well-structured: football, cricket, baseball — each with its own dedicated environment and tone.
But here’s the twist: I’m also a massive movie buff. I love reviewing films, and naturally, I wanted to publish my reviews too. That’s when I hit a roadblock 😕
Mixing movie reviews into a sports blog felt off. The categories, the tone, the structure — nothing aligned.
I didn’t want to clutter the clean structure I had worked hard to build. So, for a while, I hesitated.
Then I discovered custom post types and custom taxonomies in WordPress. With them, I could create a completely separate environment just for movie reviews, without interfering with my sports content.
But here’s the catch: setting it up wasn’t easy. I struggled a lot. From countless tutorials to trial-and-error testing, it took serious effort to get it right.
That’s exactly why I’m writing this blog — to share what actually worked.
To create and show a custom taxonomy in WordPress the right way, you’ll need to:
✅ Create a custom post type
✅ Add a custom taxonomy for those posts
✅ Display both on the frontend properly
If you’re also looking to publish multi-dimensional content on the same WordPress site, whether it’s product reviews, recipes, or movies like me, this guide will save you hours of frustration.
Let’s move forward 👏
What is Custom Taxonomy?
A custom taxonomy in WordPress is a way to create your own categories or tags to organize custom content. It is a classification system for custom post types or even standard posts.
For example, if you run a movie website, you could create custom taxonomies like Genre (Action, Comedy) or Director (Nolan, Spielberg).
Reasons for Using Custom Taxonomy in WordPress?
When your content outgrows the basic categories and tags, custom taxonomies step in to provide clarity and control. Here’s why they matter:
- Better Organization: Group posts in ways that fit your content, like by topic, product type, or location.
- Improved User Experience: Visitors can easily find related content, keeping them engaged longer.
- SEO Boost: Search engines love structured content. Custom taxonomies enhance crawlability and internal linking.
- Supports Custom Post Types: Perfect for content like portfolios, products, or events with tailored groupings.
- Scalable Structure: Keep content organized as your site grows.
- Professional Look: Create custom archive pages and filters that match your site’s design.
How to Create a Custom Taxonomy in WordPress
Everything in WordPress can be created and displayed by default settings or coding, or the easiest way — a Plugin.
We will explore the easiest way for you to create and display the custom taxonomy. For this demonstration, I have used the Custom Post Type UI.
It provides an easy-to-use interface to create, edit, and manage custom post types and taxonomies.
REMEMBER: You need to create a custom post type to display the custom taxonomies. It’s a prerequisite.
Before going to the step-by-step guideline, you need to install and activate the plugin. To do that, simply search for Custom Post Type UI in the WordPress repository and find the plugin by Webdevstudios.
Install and activate the plugin; it will appear on your WordPress menu.
Now, let’s go see how to create and display the custom taxonomies.
Step 1: Create a Custom Post Type
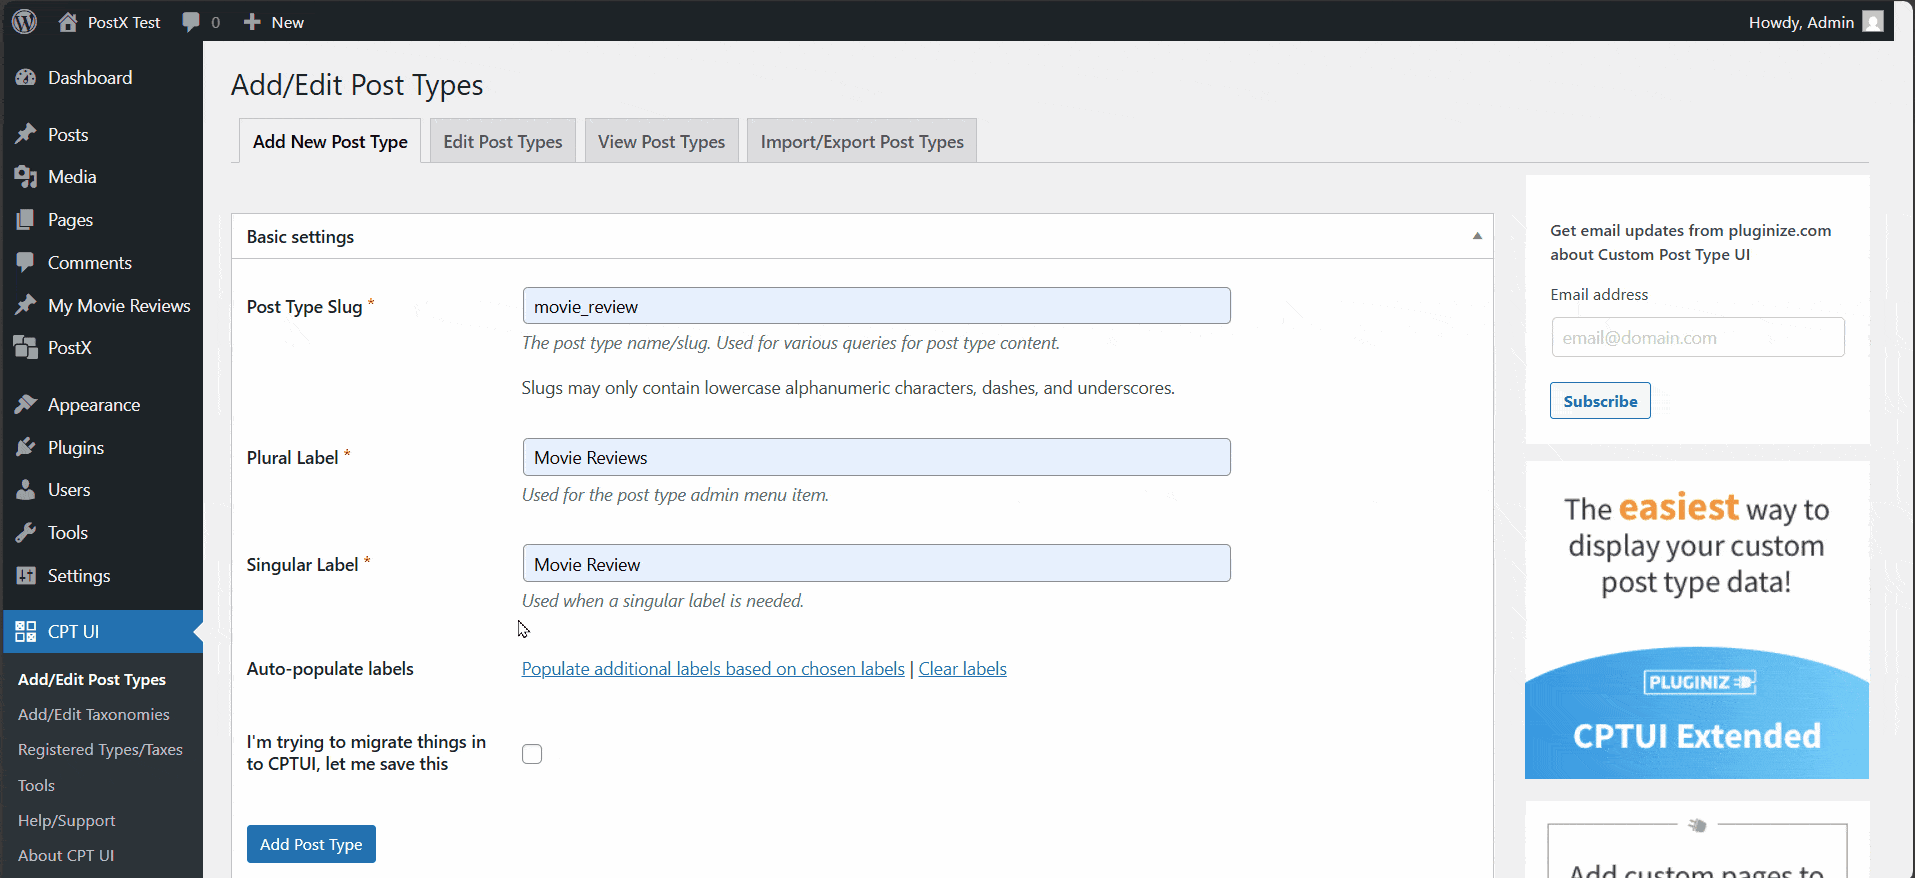
To show the custom taxonomies, first, you need to create a custom post type. To do that, go to CPT UI >> Add/Edit Post Types.
Here you can add new post types, edit, and manage them. To add, simply set the post type slug, plural label, and singular label.
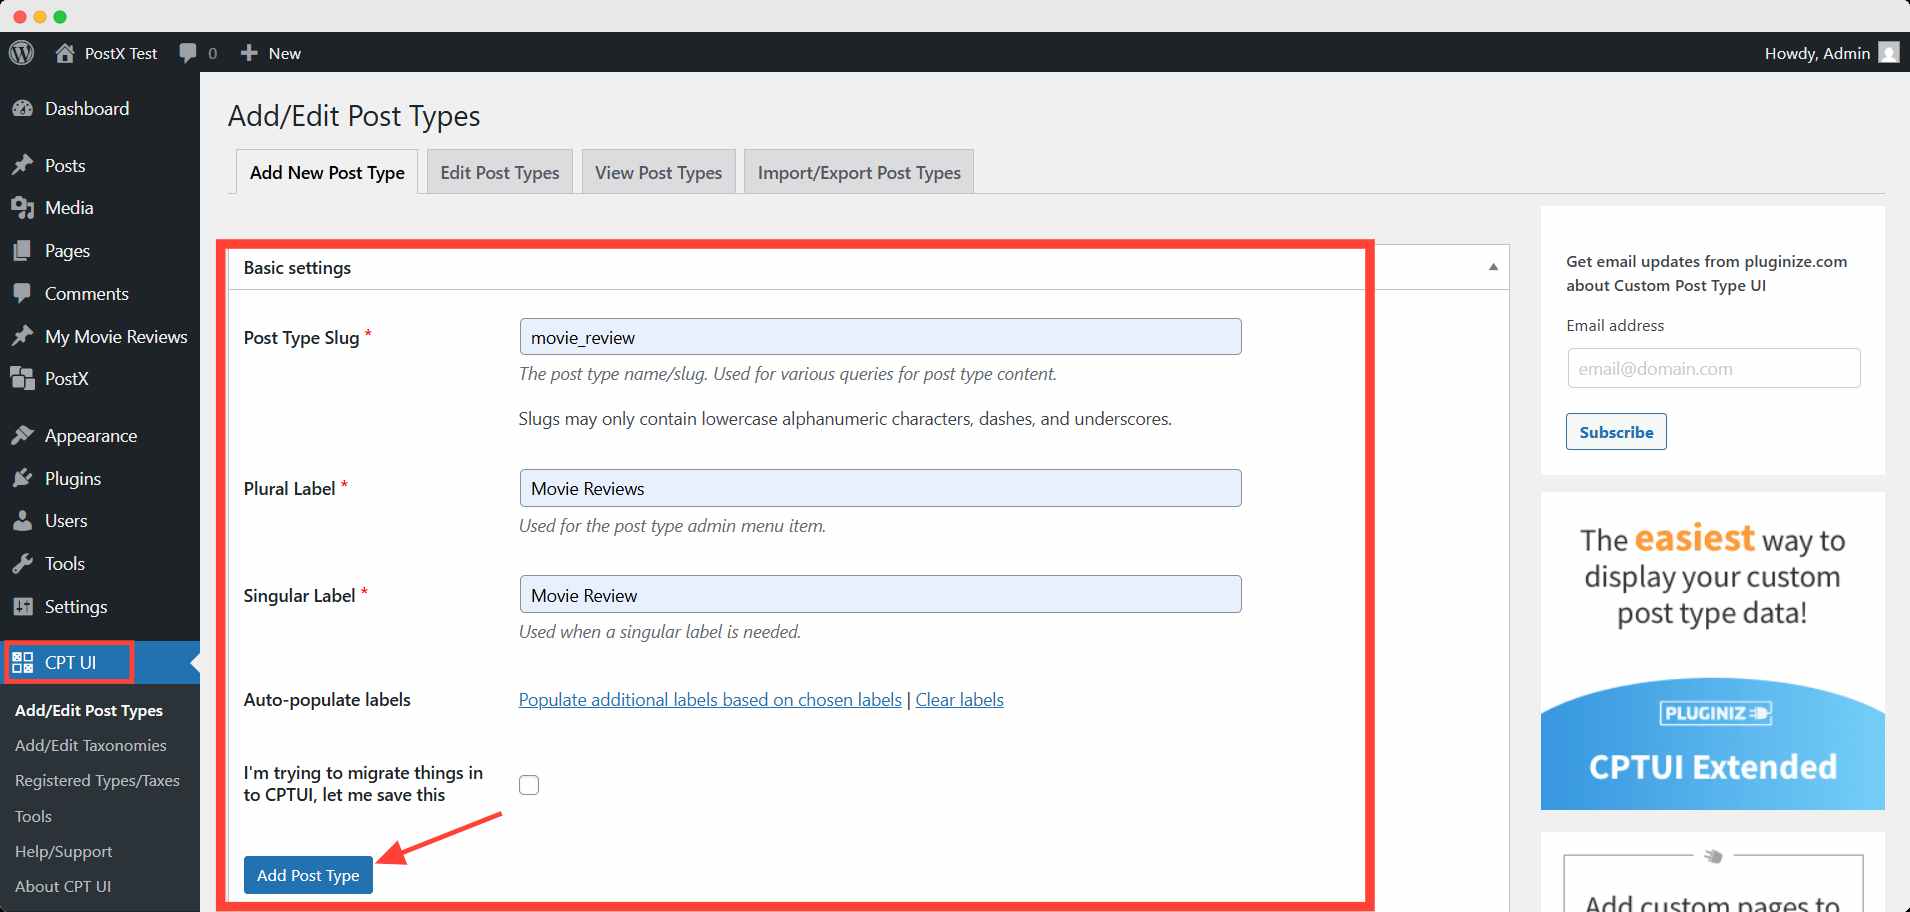
Then click the auto-populate labels to fill in the additional labels automatically. This way, you can skip the additional labeling of each item manually.
In the settings option, you can enable/disable any particular setting by setting true or false. By default, the necessary items are set as true.
After completing all the settings, hit the add post type button at the end.
💡 Pro tips
Set the Hierarchical option to true. It will act as a category selection for custom posts. False will make it act like tags.
Step 2: Create the Custom Taxonomy
At the very end of the custom post settings, you will notice an option to select the Taxonomies. If there were no custom taxonomy, the option would be limited only to WordPress’s built-in tags and categories.
After creating a custom taxonomy, it will appear in this section to select. To do that, go to CPT UI >> Add/Edit Post Taxonomy.
Like creating a custom post type, you have to fill in the taxonomy slug, plural label, singular label, and auto-populate labels.
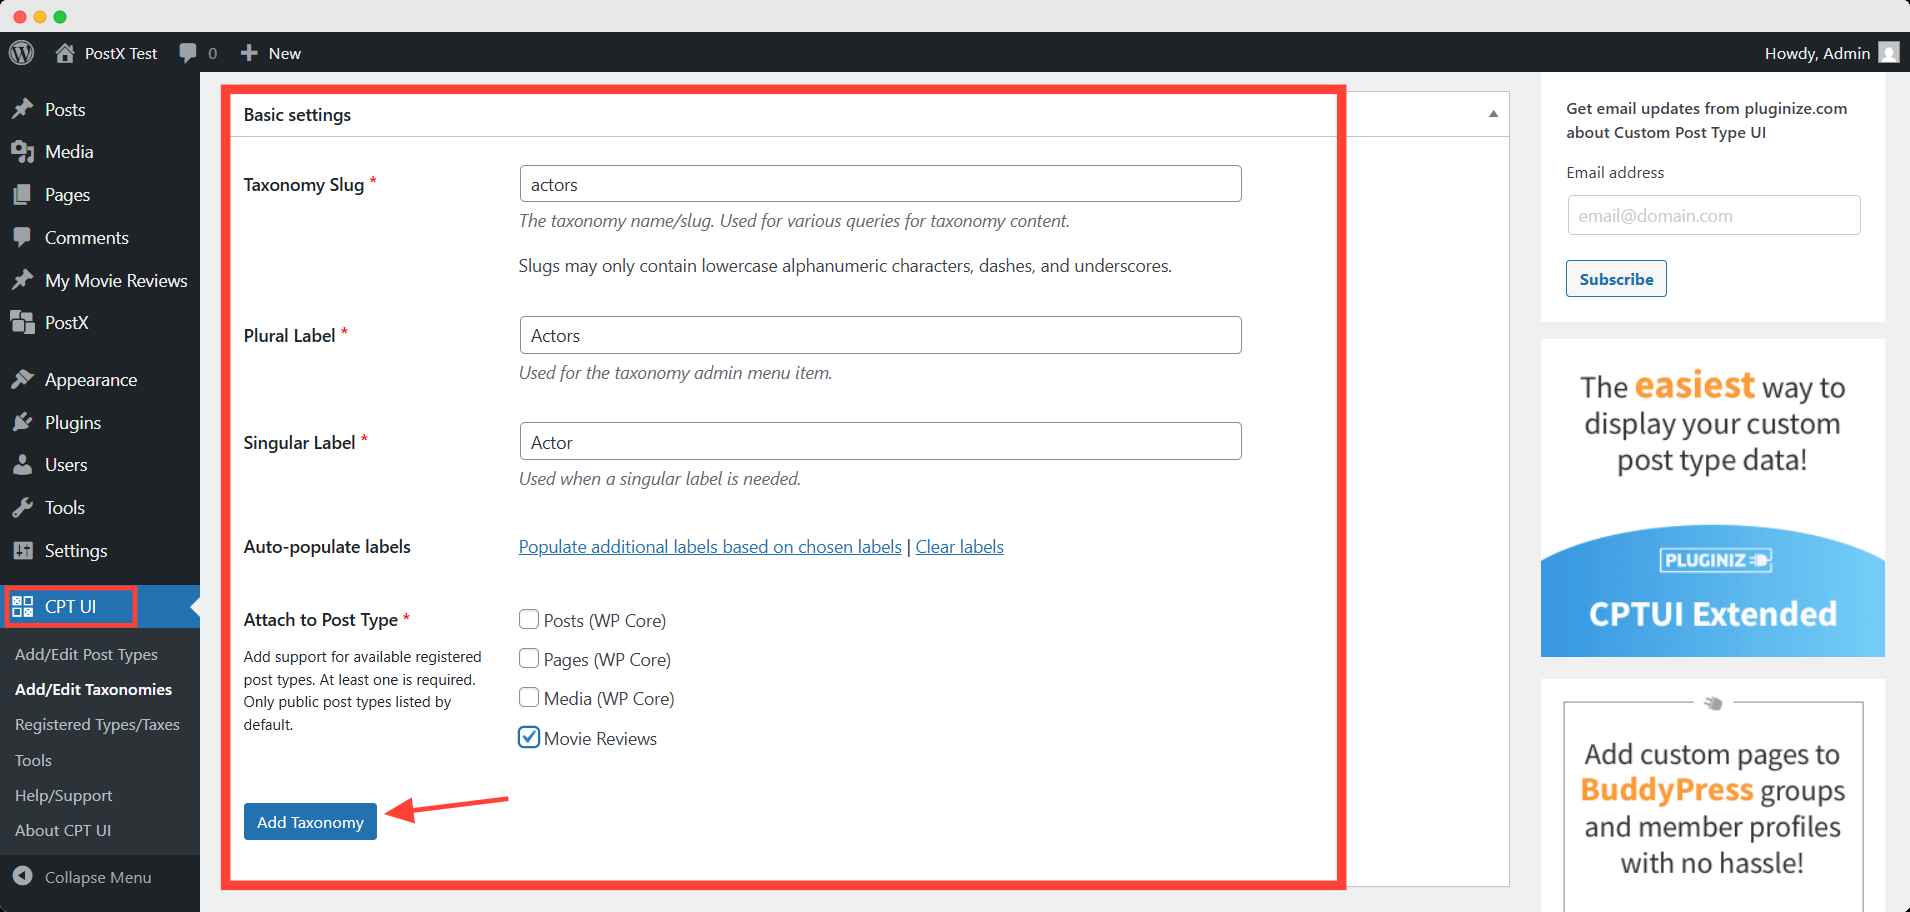
The unique setting of taxonomy is Attach to Post Type. Here, you can choose where this taxonomy will be applied. As I have already created a custom post type named Movie Reviews, it will appear in this option.
Now, similar to custom post creation, you can set the configuration by choosing true or false. Click the save taxonomy button after completing all the settings.
Step 3: Add Custom Taxonomy to Custom Post Type
Now I can go back to edit the custom post type and select the Genre as preferred taxonomy.
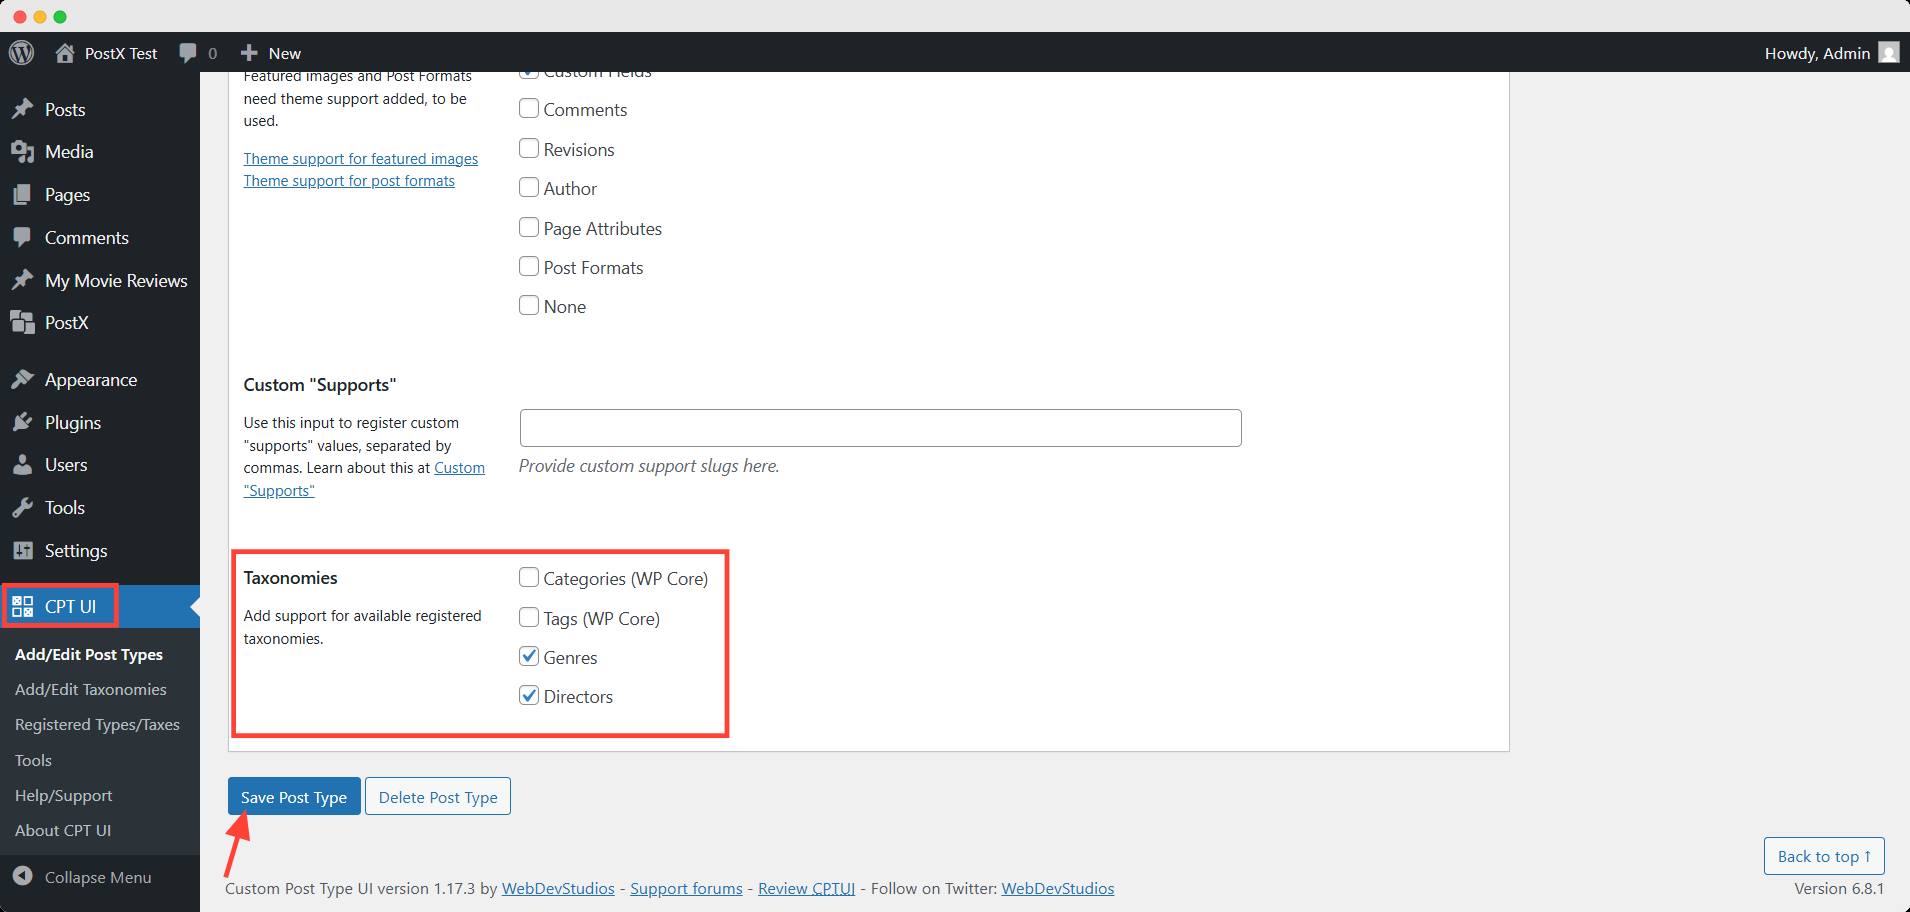
This way, you can add custom taxonomies to custom posts on your site.
Now you can add custom posts for Movie Reviews just like any other blog post. It will appear for the custom post type pages.
How to Display Custom Posts on WordPress?
I have faced many more struggles in showing the custom posts than creating them. I have gone the extra mile researching the easiest way to display them in my own way.
Let’s see how I did it ⏬
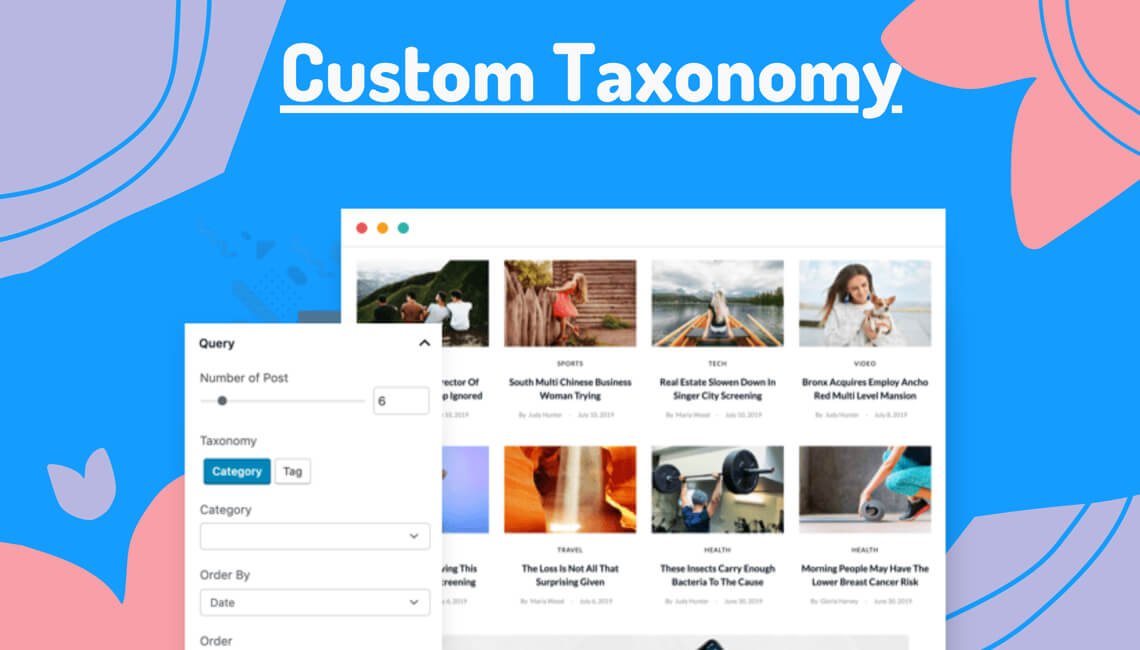
I used the PostX – Gutenberg blocks-based post grid plugin. The main reason for choosing it is its extensive control of displaying the post in my desired style.
At first, you need to install and activate the plugin from WordPress. You can follow the official documentation for a smooth installation process.
Now that you’ve got the plugin, let’s guide you through my process.
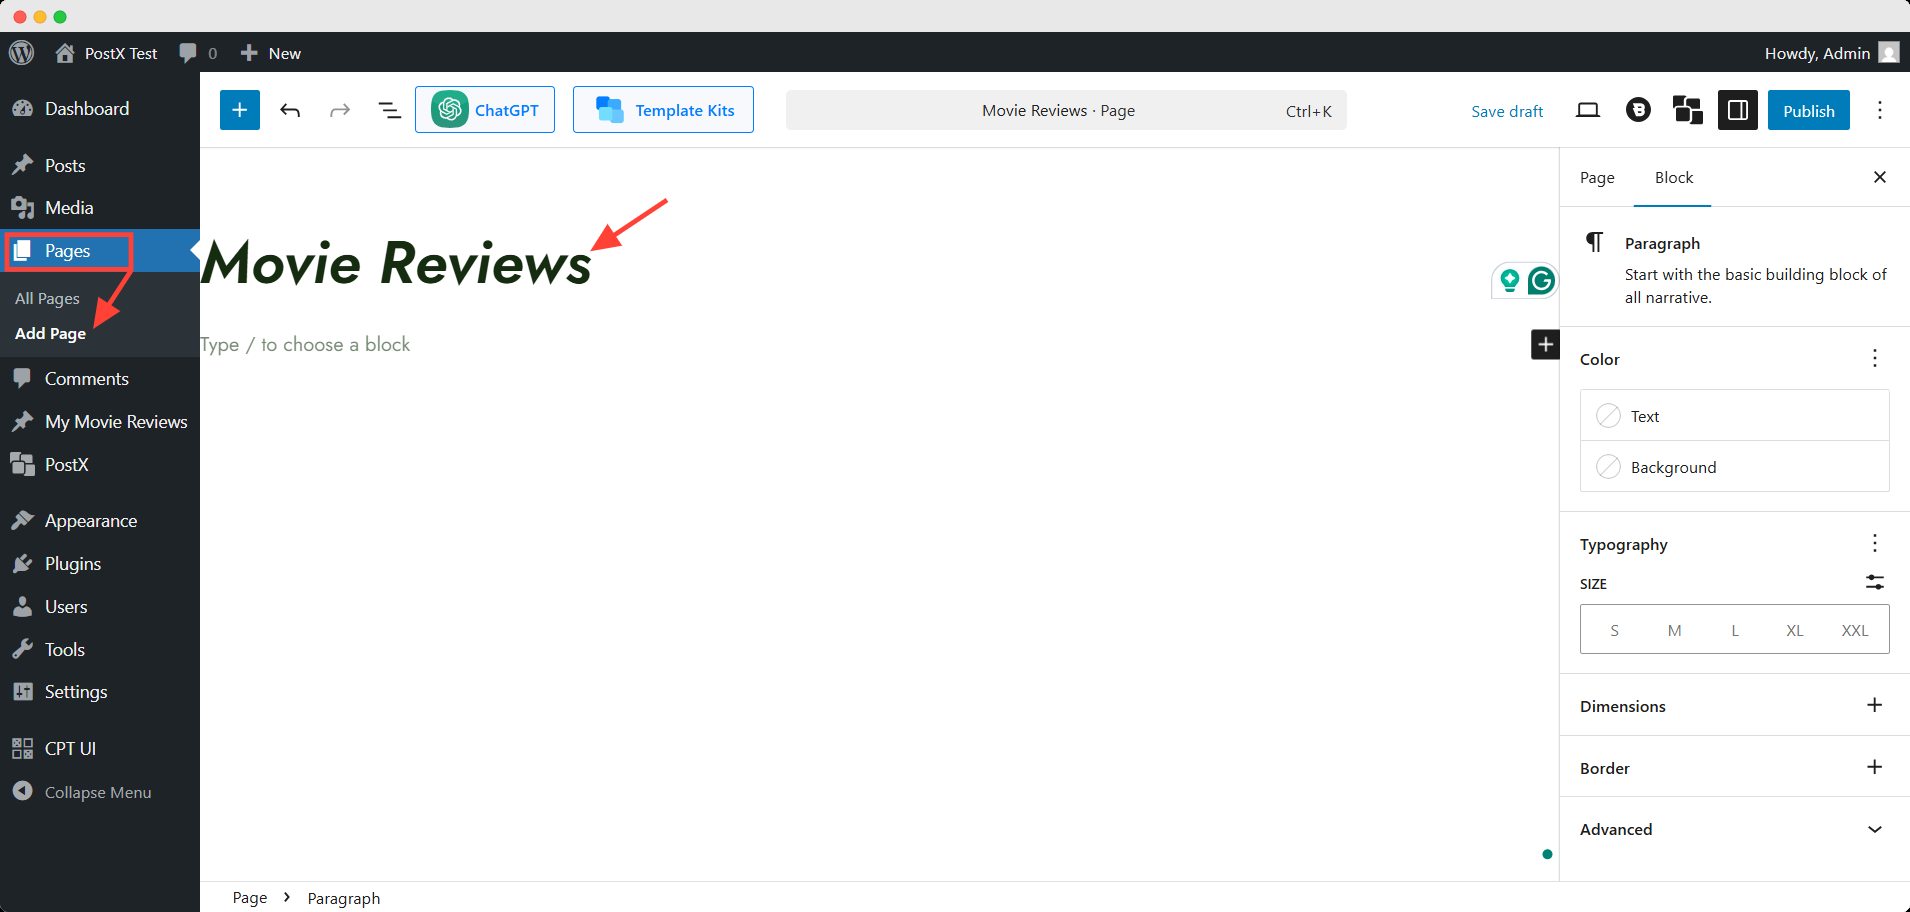
Step 1: Create a Page only for Custom Posts
First, you need to create a separate page to show the custom posts only. Go to Pages >> Add Pages.
Here, you have to set the name for the page. For Instance, I set the name Movie Reviews for my custom posts.
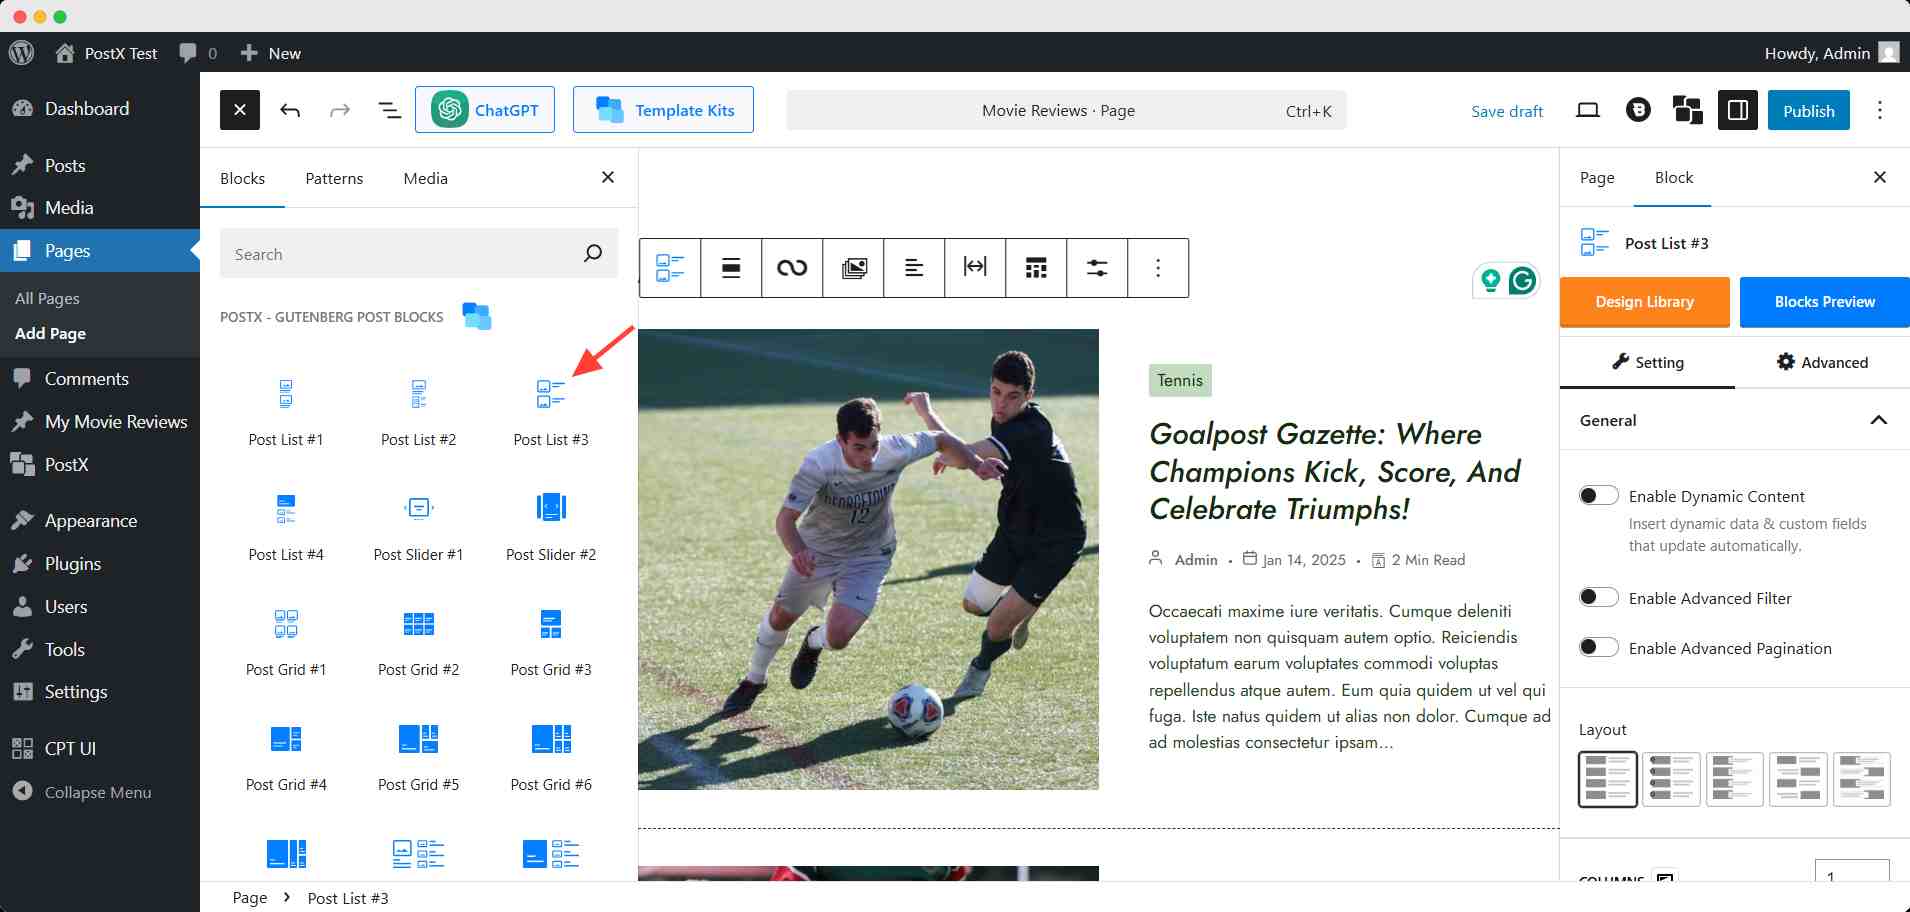
Step 2: Add a Post Grid/List Block
Now, you need to show the custom post on this page. Go to the + icon in the upper left corner to add a block.
By default, WordPress offers a Gutenberg block named query loop to fetch the custom posts here. But it allows you to just show the posts, not much else.
You should use PostX’s blocks — post grid or list, module, or even a post slider. I have chosen the post list block for the structure.
Step 3: Use the Query Builder to Bring Custom Posts on the New Page
After adding the block, select it and head over to the right sidebar. Scroll down in the general settings and find the query builder option.
In the post type sources field, select the created custom post type from the dropdown option.
Here, I chose Movie Review to show them on this page.
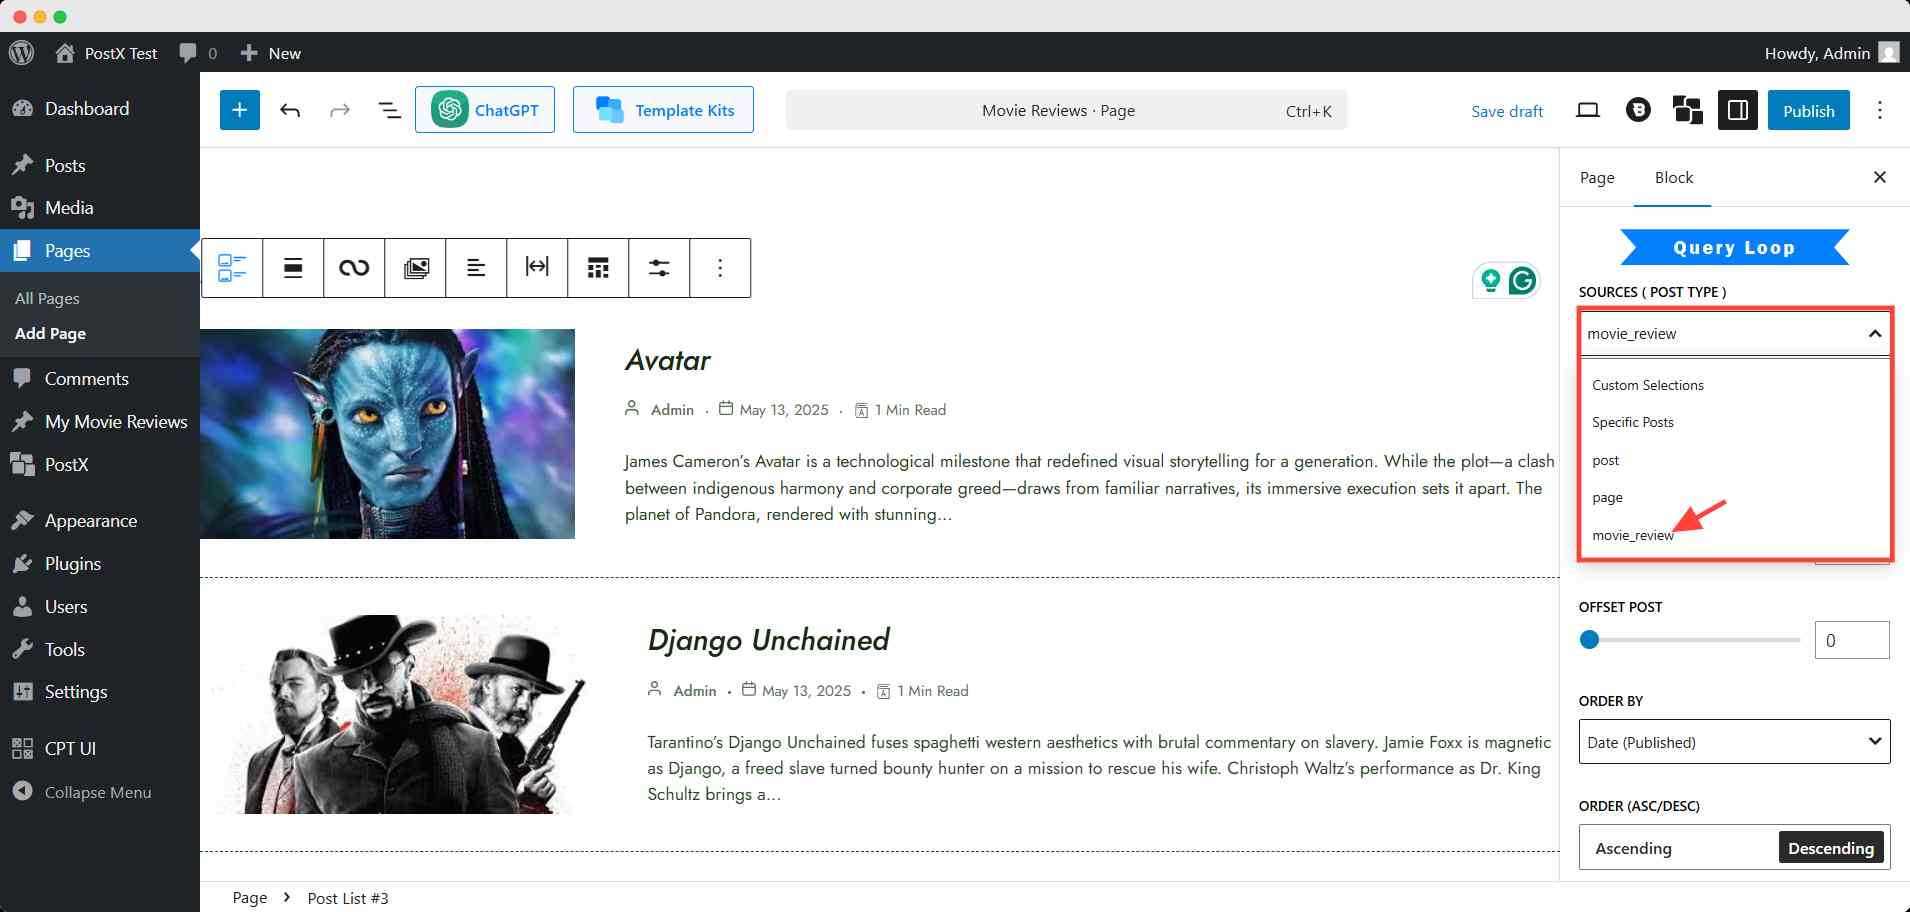
This will fetch all the custom posts you have on your site. You can further configure other settings like the number of posts per page, order, alignment, etc.
How to Display Custom Taxonomies on Custom Posts
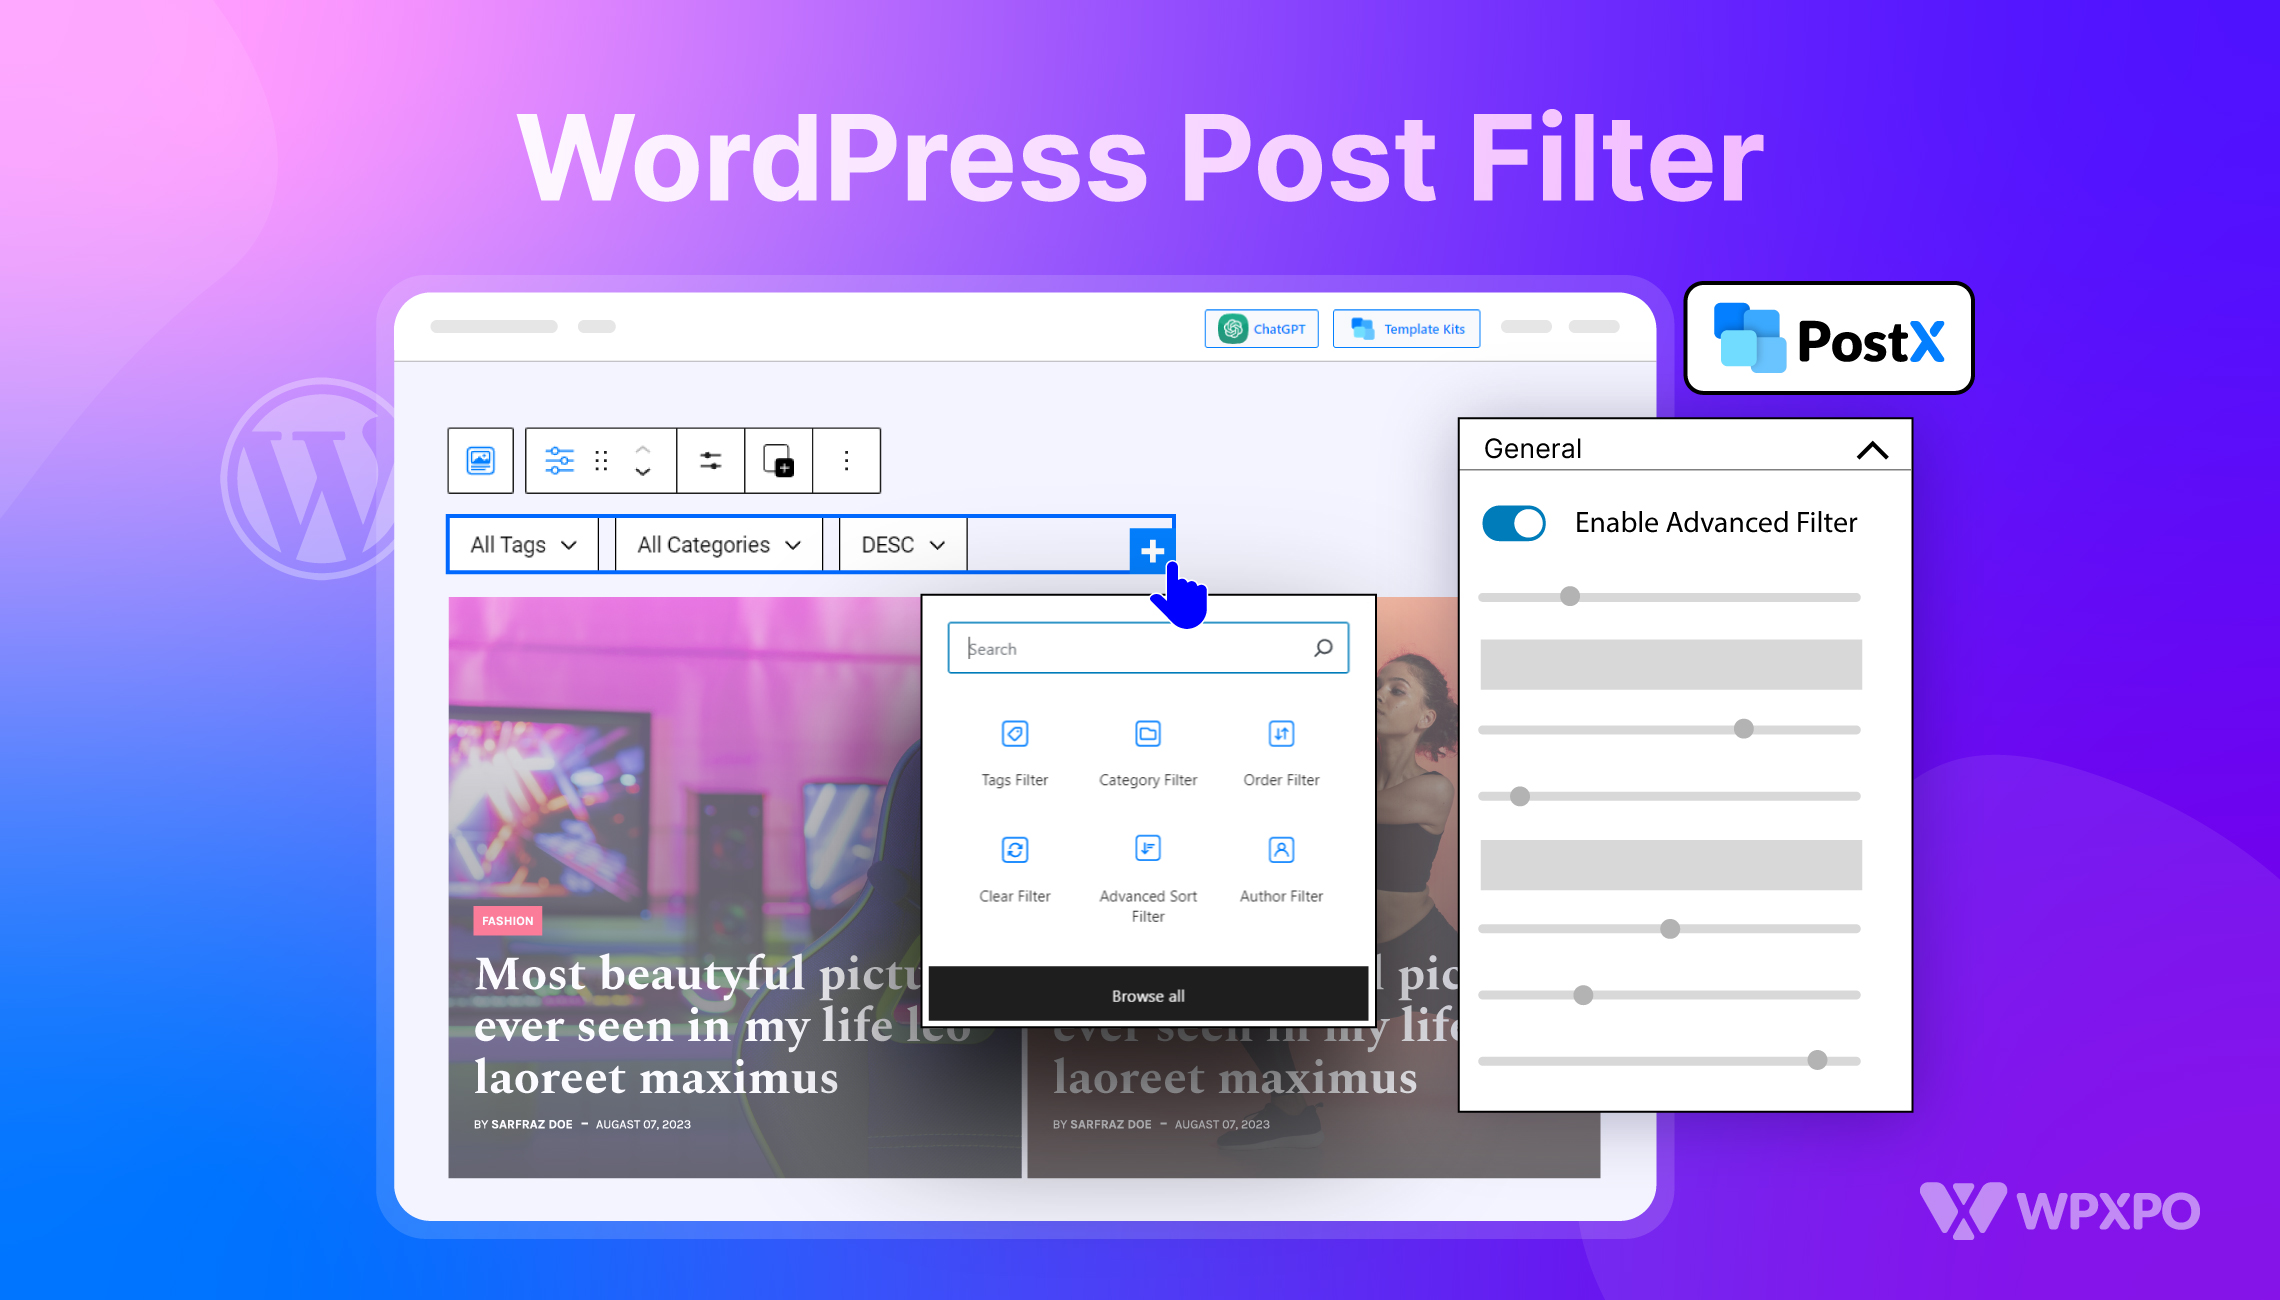
You can display custom taxonomies in various ways and places by using PostX. Let’s go through each possible way.
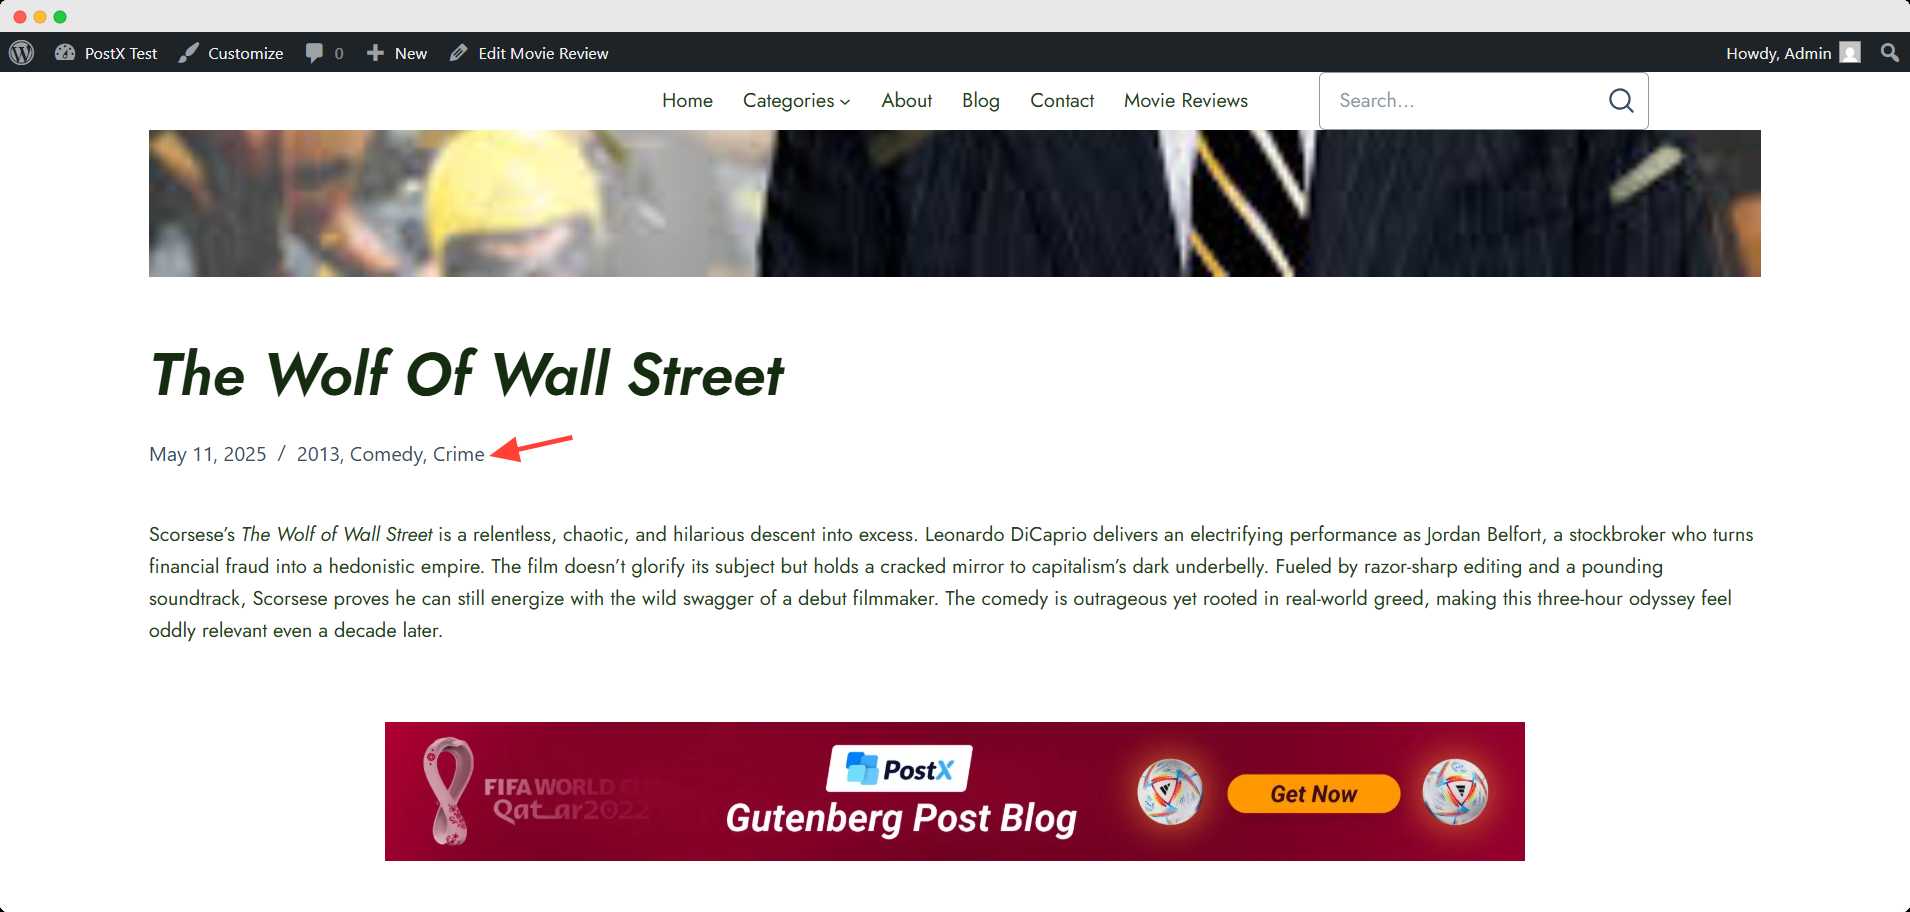
- On a custom post as meta
You can show the created custom taxonomies on your custom posts in the meta. It works like a default category/tag — appears on the meta field.
Select the genre of the movie review posts while editing. Then save/publish the post and view it on the frontend.
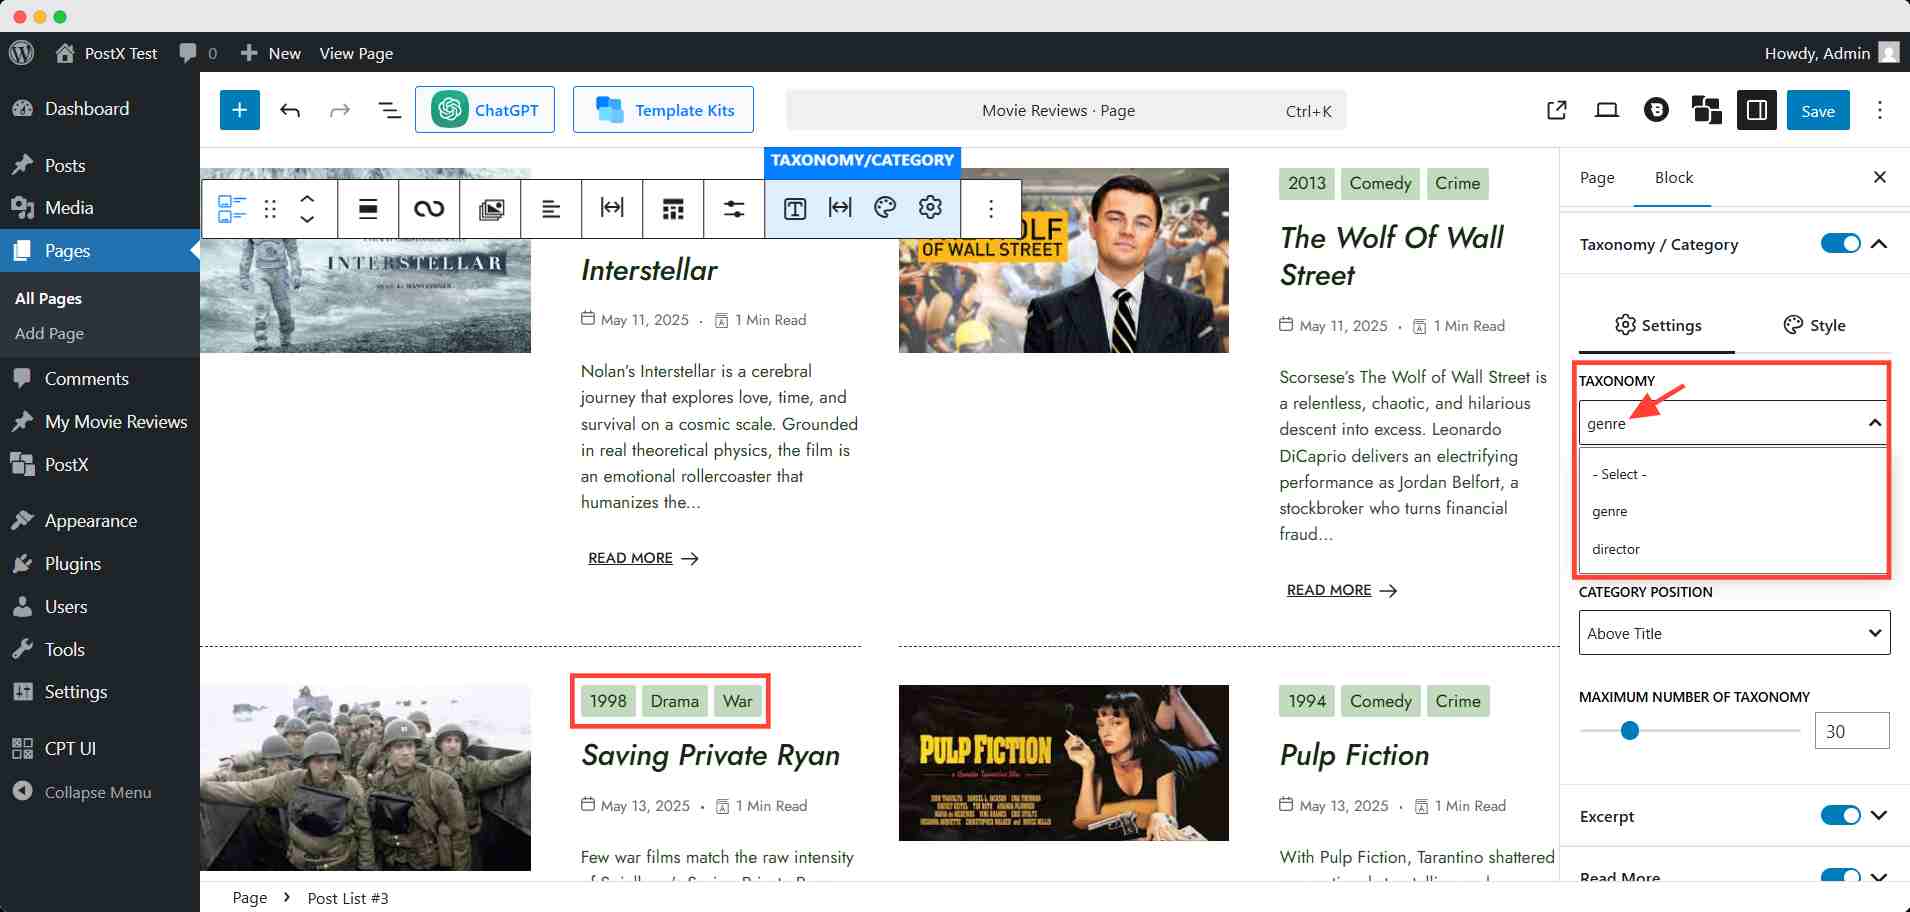
- On a post grid/list as taxonomy
In your post grid/list setting, find the option named Taxonomy/Category. Turning it on will show the attached category and tags to each post.
For custom posts, you have to select custom taxonomies from the taxonomy dropdown field. You can also customize the style and position from here.
- As a taxonomy section at the beginning of a page
PostX offers you an additional display option for custom taxonomies on your page. To do that, add the Taxonomy block of PostX.
Head over to the right sidebar and find the taxonomy query option. Here you can choose which genre will be displayed.
Select custom from the query type dropdown option. Then, in the taxonomy type dropdown option, select your custom taxonomy, which is genre in this instance.
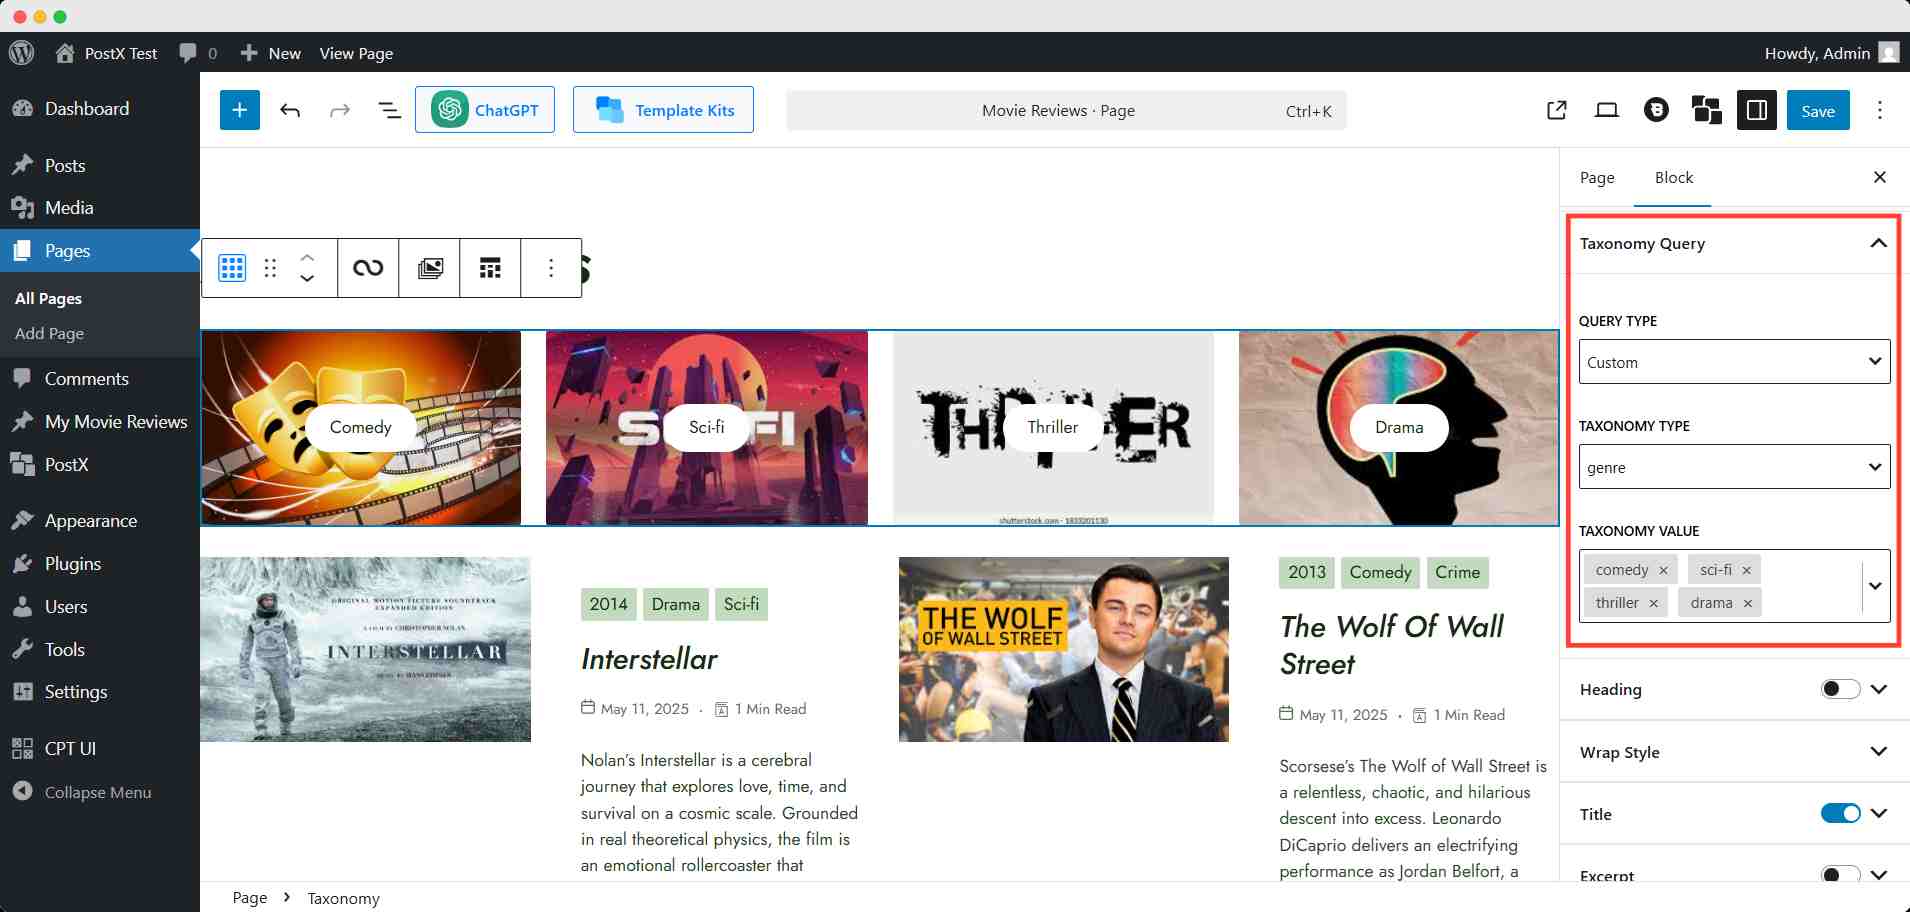
In the taxonomy value field, you can choose the genre that will appear. It will highlight the selected genre to your visitors.
💡 Pro tips
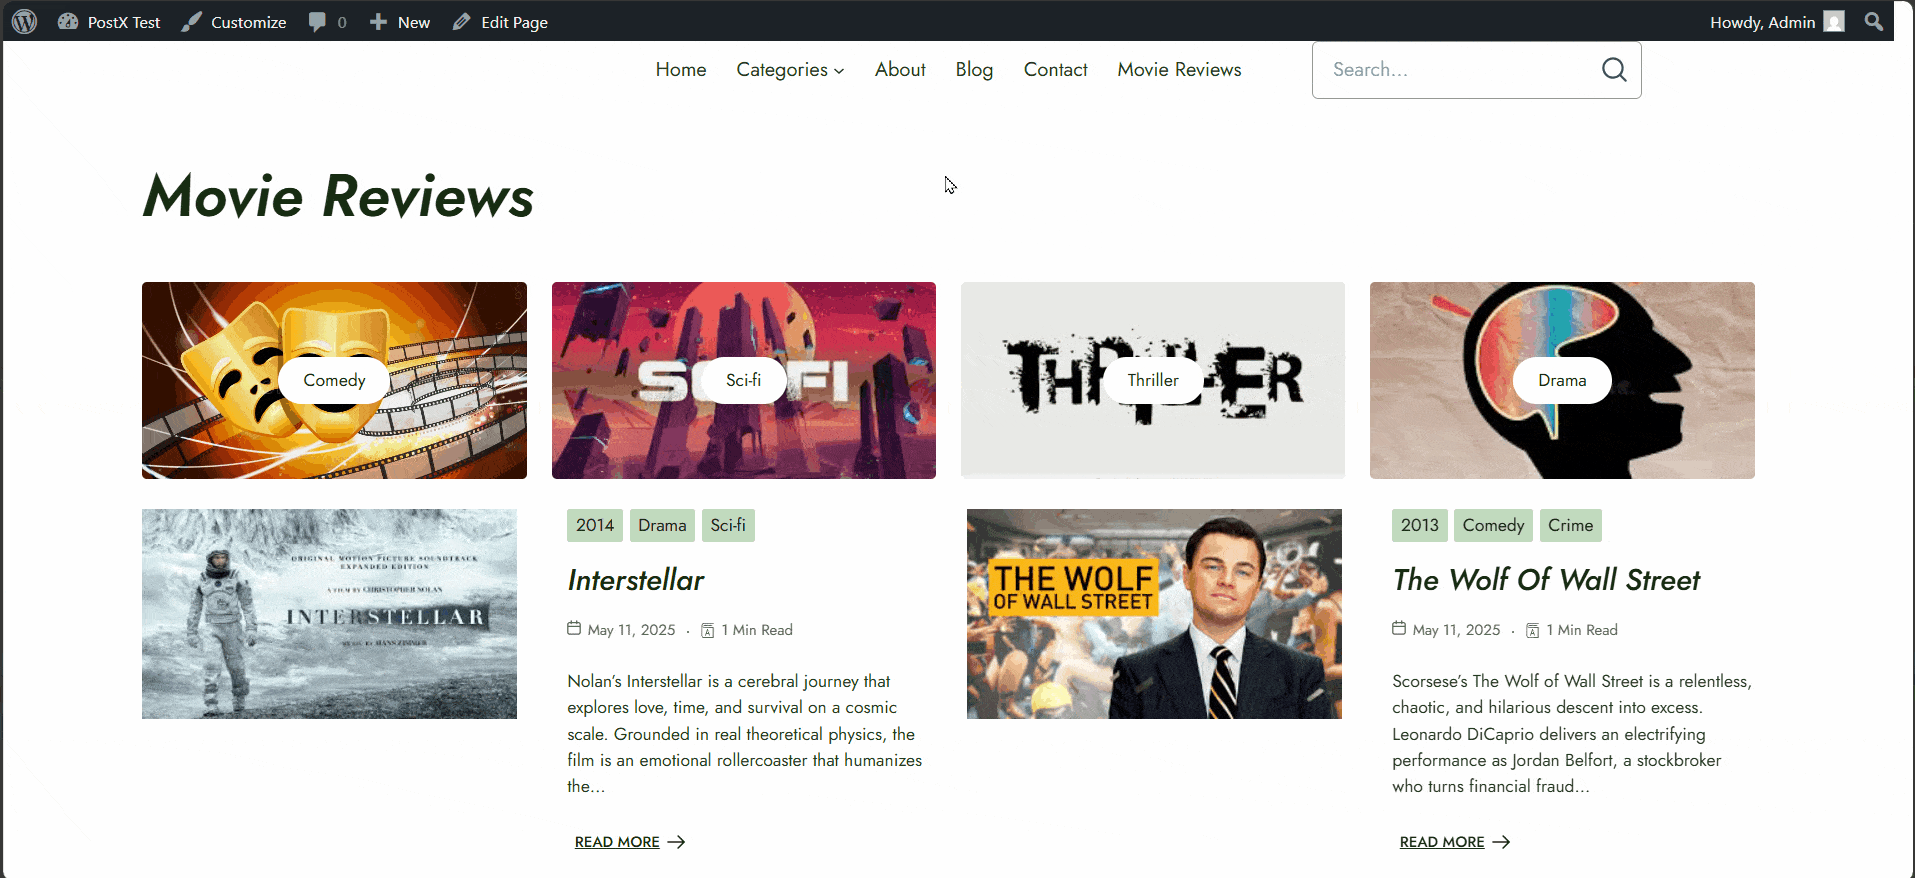
You should add an image or color to each taxonomy here. It will improve the visual of your page and enhance the visitors’ experience.
Finally, let’s see how it looks on the frontend.
Bonus: Tips & Tricks for Using Custom Taxonomy
Now that you’ve successfully created and displayed your custom taxonomies, here are a few tips that can take your setup to the next level:
Keep Slugs Simple and SEO-Friendly
Use lowercase letters and hyphens when creating a taxonomy slug. Avoid using underscores or capital letters. A clean slug improves SEO and keeps your URLs readable.
Use Hierarchical Taxonomies for Better Filtering
If you want to create a structure like Genre > Action > Scorsese, make your taxonomy hierarchical. This helps both users and search engines understand the content hierarchy better.
Enable REST API Support
Enable Show in REST API when creating taxonomies. This ensures your taxonomy shows up in the Gutenberg editor and is available for any future REST-based integrations.
Display Taxonomies with Style
Use plugins like PostX or Kadence Elements to show your custom taxonomies exactly where you want — above titles, under meta info, or in a sidebar. Style them to match your site design.
FAQs
Will my custom taxonomy work with Gutenberg?
Absolutely! Just make sure you enabled Show in REST API when creating the taxonomy in CPT UI. Once enabled, it will appear in the Gutenberg sidebar when editing posts.
Is it safe to modify taxonomy names later?
Changing the labels is safe and won’t affect anything. However, don’t change the slug after it’s in use – doing so will break existing links and data. If you must, be sure to update all references and reassign terms properly.
Can I attach a custom taxonomy to regular blog posts?
Yes, you can also attach custom taxonomies to WordPress’s default post types, like Posts or Pages, by selecting them in the CPT UI settings.
Why is my custom taxonomy not showing in the custom post type?
WordPress doesn’t show custom taxonomies on the frontend by default. You’ll need to either:
- Add it manually via code or
- Use a plugin like PostX or Kadence Pro Elements to hook and display them where you want.
Final Words
Custom taxonomies in WordPress are a game-changer when it comes to organizing content that goes beyond the basics.
Whether you’re running a movie review site, a product catalog, or a recipe blog, custom taxonomies let you structure everything your way.
With the help of plugins like CPT UI and PostX, you can set them up without touching a single line of code. And more importantly, you can display them exactly how you want.
So, go ahead — give your content the structure it deserves! 💪