Using WooCommerce is the best choice if you are just starting your eCommerce journey. The most interesting thing is that it automatically creates all essential pages upon installation. You just need to set your payment & shipping methods, add products and you are good to start selling.
However, the default WooCommerce pages are not properly optimized. So you might not get the sales that your stores deserve. So you may need to tweak the pages to get the best results.
But the sad part is that WooCommerce offers little to no major customization options. So what to do?
The best possible way to craft user-focused and conversion-focused product pages is to create a custom product page template in WooCommerce. It allows you to get full control over the product pages and optimize them for better user experiences and conversions.
But the question is, how to create a custom single product page template in WooCommerce?
Here are the two best possible ways of creating custom single-product page templates in WooCommerce:
Step 1: Install WowStore – WooCommerce Builder
Step 2: Start Creating a Product Page Template
Step 3: Choose a Premade Desing or Start from Scratch
Step 3: Customize the Template According to your Preference
Step 4: Set Conditions and Publish the Template
What is a Single Product Page Template in WooCommerce?
WooCommerce Single product page template is a predefined page structure. By following this structure the individual products are displayed on specific pages. You can find the product page template in the WooCommerc’s template directory.
How WooCommerce Templates Work?
It will be easier for you to understand if you already know about the WordPress template structure hierarchy as it works similarly.
Once you install WooCommerce, all the template files come with it. WooCommerce has specific templates for all it like, archive pages, shop pages, and product pages. So when someone has only pages, the site displays the product/information according to the designs of the templates.
WooCommerce has only one template for archive and product pages. However, you are free to create custom templates for specific products or specific archive pages. You can learn more about it from the template structure and overriding template guides by WooCommerce.
Why Should We Customize WooCommerce Product Pages?
Before going into the in-depth explanation of customization, let’ see why it is necessary to customize the product pages. There are many reasons for which you may want or you should customize the pages. Check out some of the reasons below:
Create Brand Identity: The first and most important reason for which you want to customize the product pages is the look of the pages. The default pages are so dull that they impact your brand negatively. So, the product pages should be well-organized and visually appealing to make a better brand identity for your store.
Ensure Better User Experience: Another important reason is that, you should offer your buyers a smooth shopping experience. Otherwise, you could lose potential customers. Make sure the shoppers are seeing what they want to see. Help them to make better buying decisions and attract them towards the call to action. Ensuring these experiences is not possible without altering the product pages.
SEO Optimization: If you want to increase your ROI the most effective way is to increase your organic traffic. You can’t do that without optimizing your product pages for search engines. By customizing the default pages you can ensure better user experiences. In this way, you are providing your shoppers with exactly what they are looking for and making the buying journey easier for them. So, you can apply the holistic SEO approach to your WooCommerce store.
Increase Conversion Rate: Only having a gorgeous product page isn’t enough to grow your business. Besides the above-mentioned things, you should also focus on increasing the conversion rate. How?
One of the best ways to increase the conversion rate is to optimize the product pages. For that, you should enable Wishlist, Comparison, Sticky Cart, Stock Progress Bar, etc product pages. Not only that, but you can also display upselling products as related products increase the average order value of your WooCommerce store. But without customizing the default pages you can’t enable any of the mentioned functionalities.
Choosing the best Plugin for Custom Product Page Templates
As I already said, WooCommerce doesn’t let you create custom templates by default. So you need to use additional plugins to achieve your goal. But which plugin you should use there are so many options. Don’t worry I have personally tasted all popular solutions and come with two of the best plugins. Let’s explore them:
WowStore – WooCommerce Builder
WowStore is an all-in-one solution for creating and managing WooCommerce stores with ease. It extends the default WooComerce functionalities with all essential features.
However, the main attraction of the plugin is its WooCommerce Builder. It is the first-ever builder that was developed for Gutenberg.
Elementor Page Builder
If you don’t want to use Gutenberg, then Elementor would be the best choice for you. It is an all-in-one building tool. And, you can also use it to create custom templates for your WooCommerce store.
Why Should You Choose WowStore?
If you want to keep using Gutenberg, WowStore would be the best choice for you. It not only does the WooCommerce Builder but all other essential features that are required to create an ideal online store. Still, thinking about whether it is the right choice or not?
Check what developers have to say about it –
WowStore was built by keeping in mind that the users don’t have to invest in any other plugins. This single plugin is more than enough to build a visually stunning online store and boost earnings.
Jakir Hasan
We aimed to offer the best WooCommerce solution for all. We are still in continuous Development to keep it bug-free and up-to-date. When it comes to WowStore, user’s satisfaction is our main priority.
Anik Biswas
How to Create WooCommerce Single Product Page Template Using WowStore Templates
As I have already mentioned, WowStore allows you to build custom pages using premade design or from scratch. So, let’s explore creating and customizing a custom template using premade designs.
Step 1: Turn on WooCommerce Builder
To start using the Builder addon, we have to turn it on. For that:
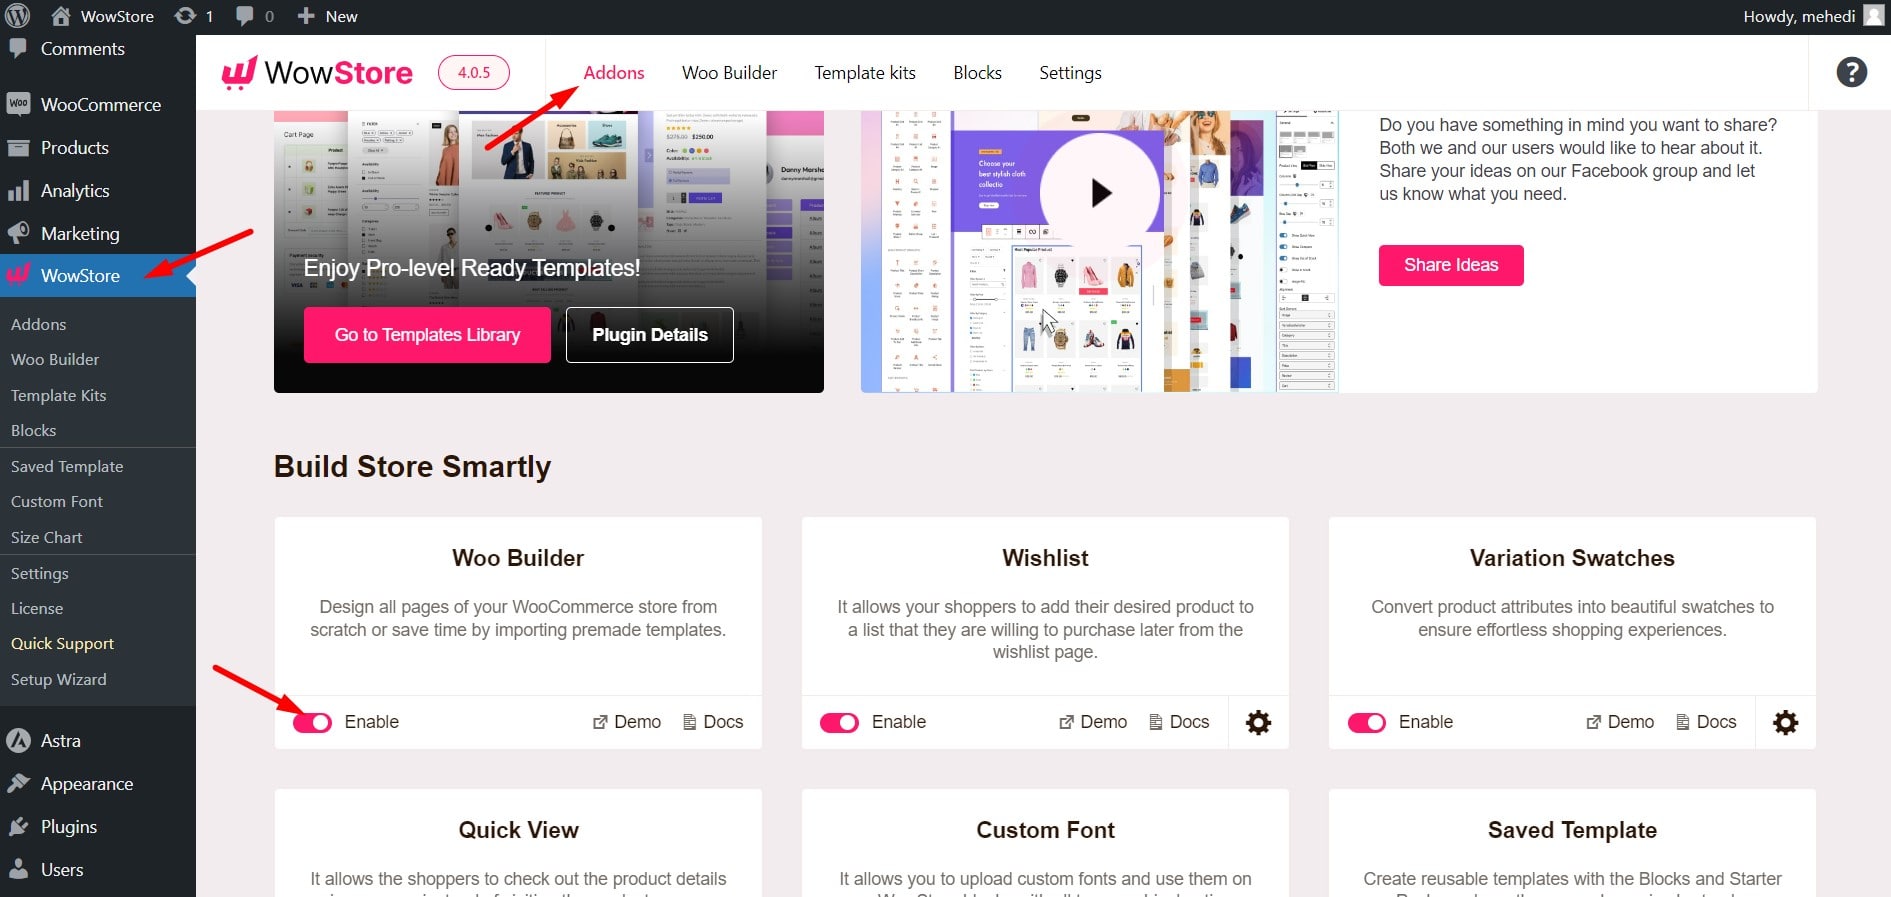
- Go to the All add-ons section of WowStore from your WordPress dashboard
- Enable the WooCommerce builder addon
Step 2: Start Creating a Product Page Template
We are now starting to create a custom product page template. Again, you just have to create it once – it will show up on all your product pages:
Once enable the addon, you will see a new Builder section added along with all other sections of WowStore. And, now you can start creating a single product page template. For that:
- Go to the WowStore WooCommerce Builder Section
- Click on Single Product to create a template
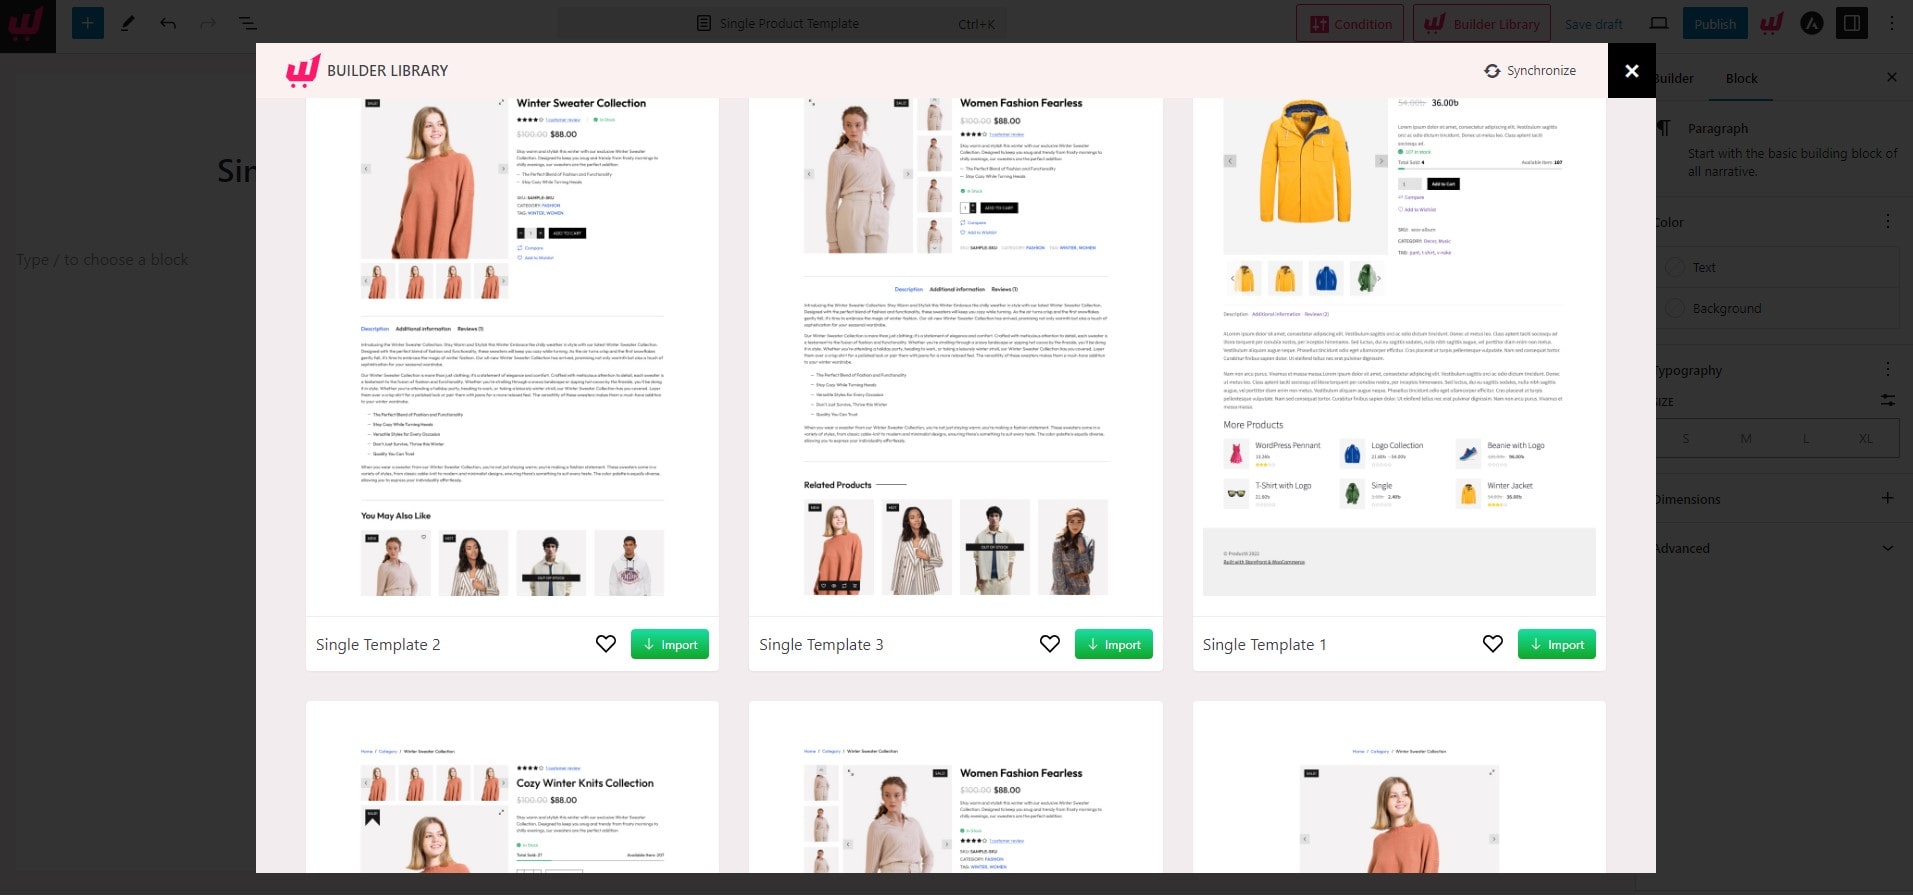
- Explore and choose a template by clicking on the import button

Step 3: Choose Your Desired Template
After selecting the template type, you will be taken to the editor. Here you can see the conditions page. So you can change the conditions early – before starting to build a template. Or you can ignore it for now by clicking on the cross button and setting it later while publishing.
Let me explain all the available conditions so that you don’t get confused.

All Single Products/Products: You need to choose this option if you want to make a WooCommerce single product template page for all the products of your WooCommerce store.
Product Tag: If you want to make the template show products with specific tags then choose this option and select your desired product from the drop-down.
Product Category: There are two options here. One, you can show the page template for specific product categories. Or, if you have a major category and use the template to show products in the child category, then you can choose “In Child Product Categories”.
After selecting the desired condition, save the condition.
Step 4: Customize and Publish
Here, you can see, that the template we have just imported has been added to the page. Now, we can publish how it is. Or, we can also customize it if required. As all of our product page templates are built using blocks we can customize each of the sections as we want. Once you click on any of the blocks, you will the available customization settings on the right side.
I will discuss the customization further in the next section. For now, let’s publish it, and let’s see how the product pages look now.

How to Change the Product Page Template
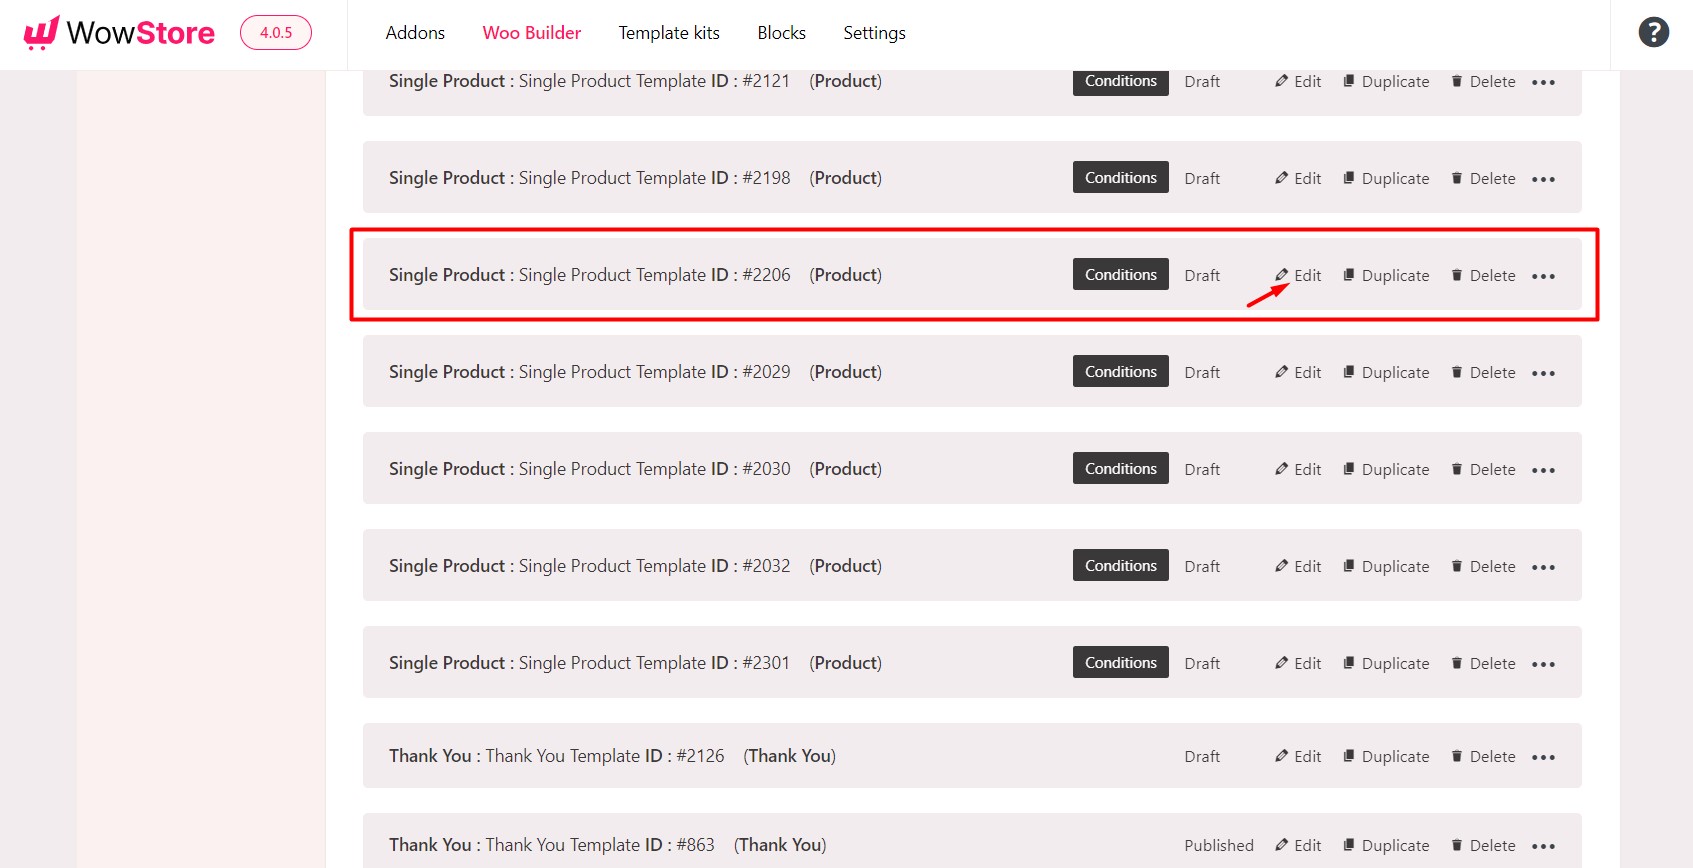
If you are not satisfied with the template you can also change it whenever you want. To change the product page template go to WowStore >> WooCommerce Builder from your WordPress dashboard.
Here, you will see all the templates that you have created. As we want to change the template of product pages we need to click on the edit button located along with the single product.
Now, we need to select the existing template using CTRL + A and remove it using the Backspace button.
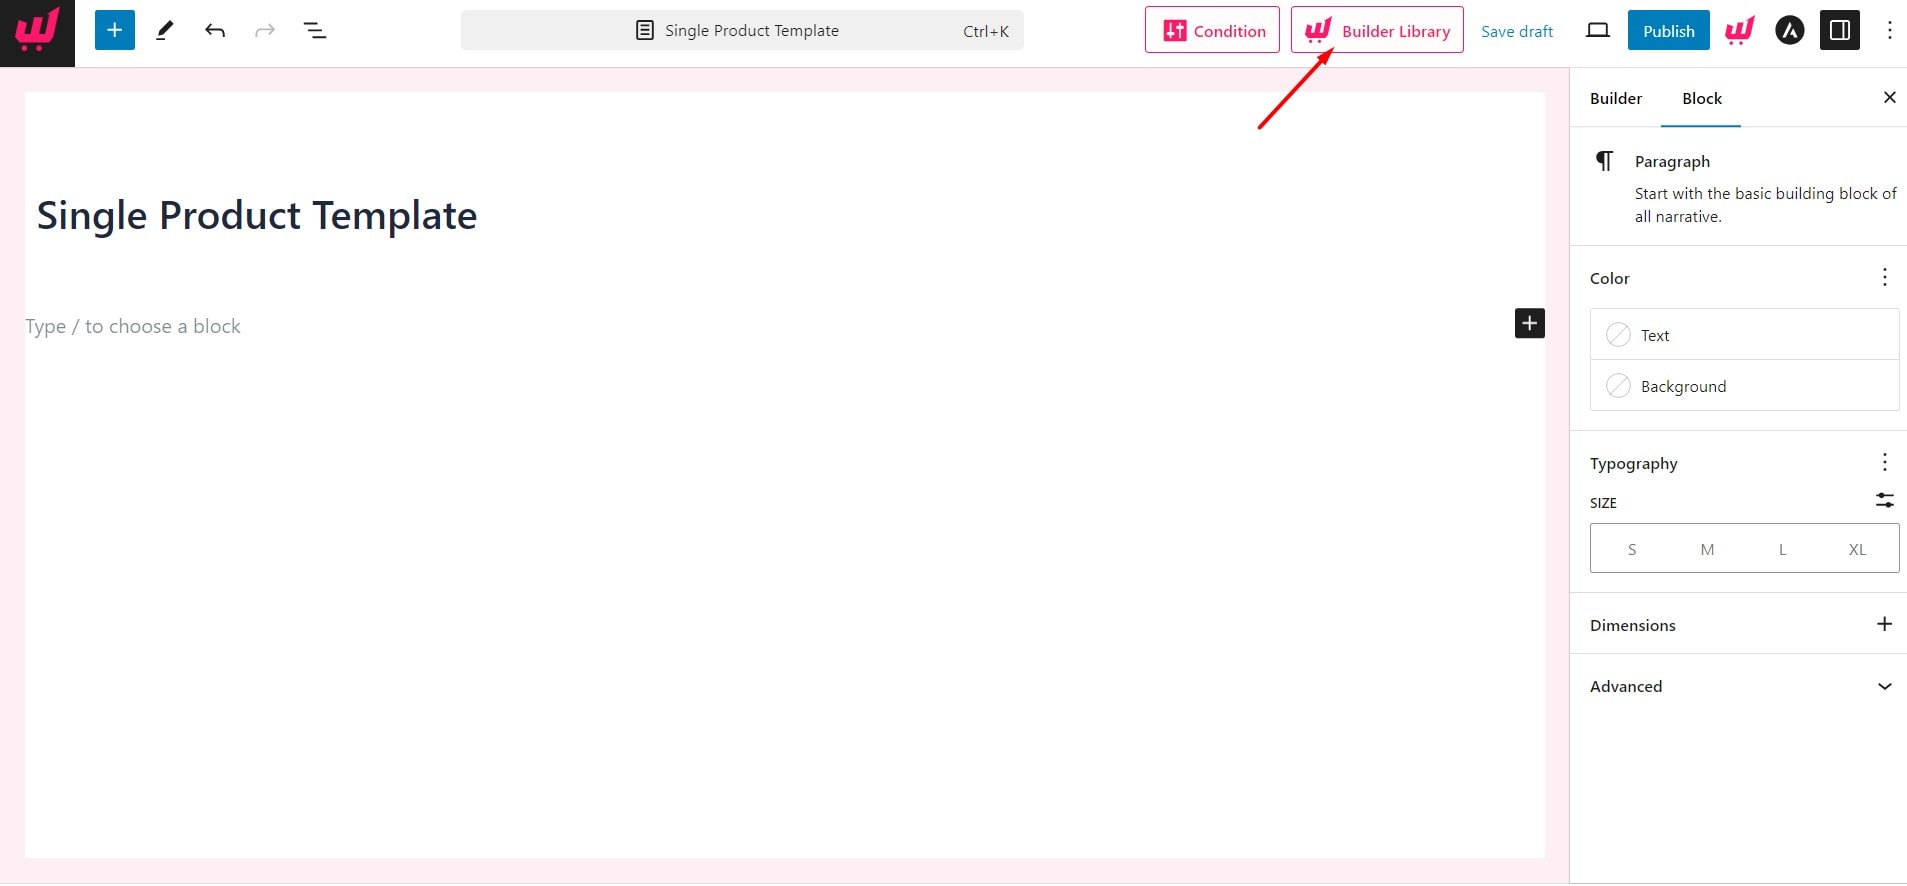
Then, click on the Builder Libray button to import a new template. Explore the available options and import our desired one. At last, we need to click on the update button and the previously published template will be replaced with the new one.
How to Create & Customize WooCommerce Product Page Template From Scratch
WowStore also helps you to create a product page template from scratch if you have a customized design or just want to create it with full freedom. For that, you need to click on Start from Scratch while creating a new template.
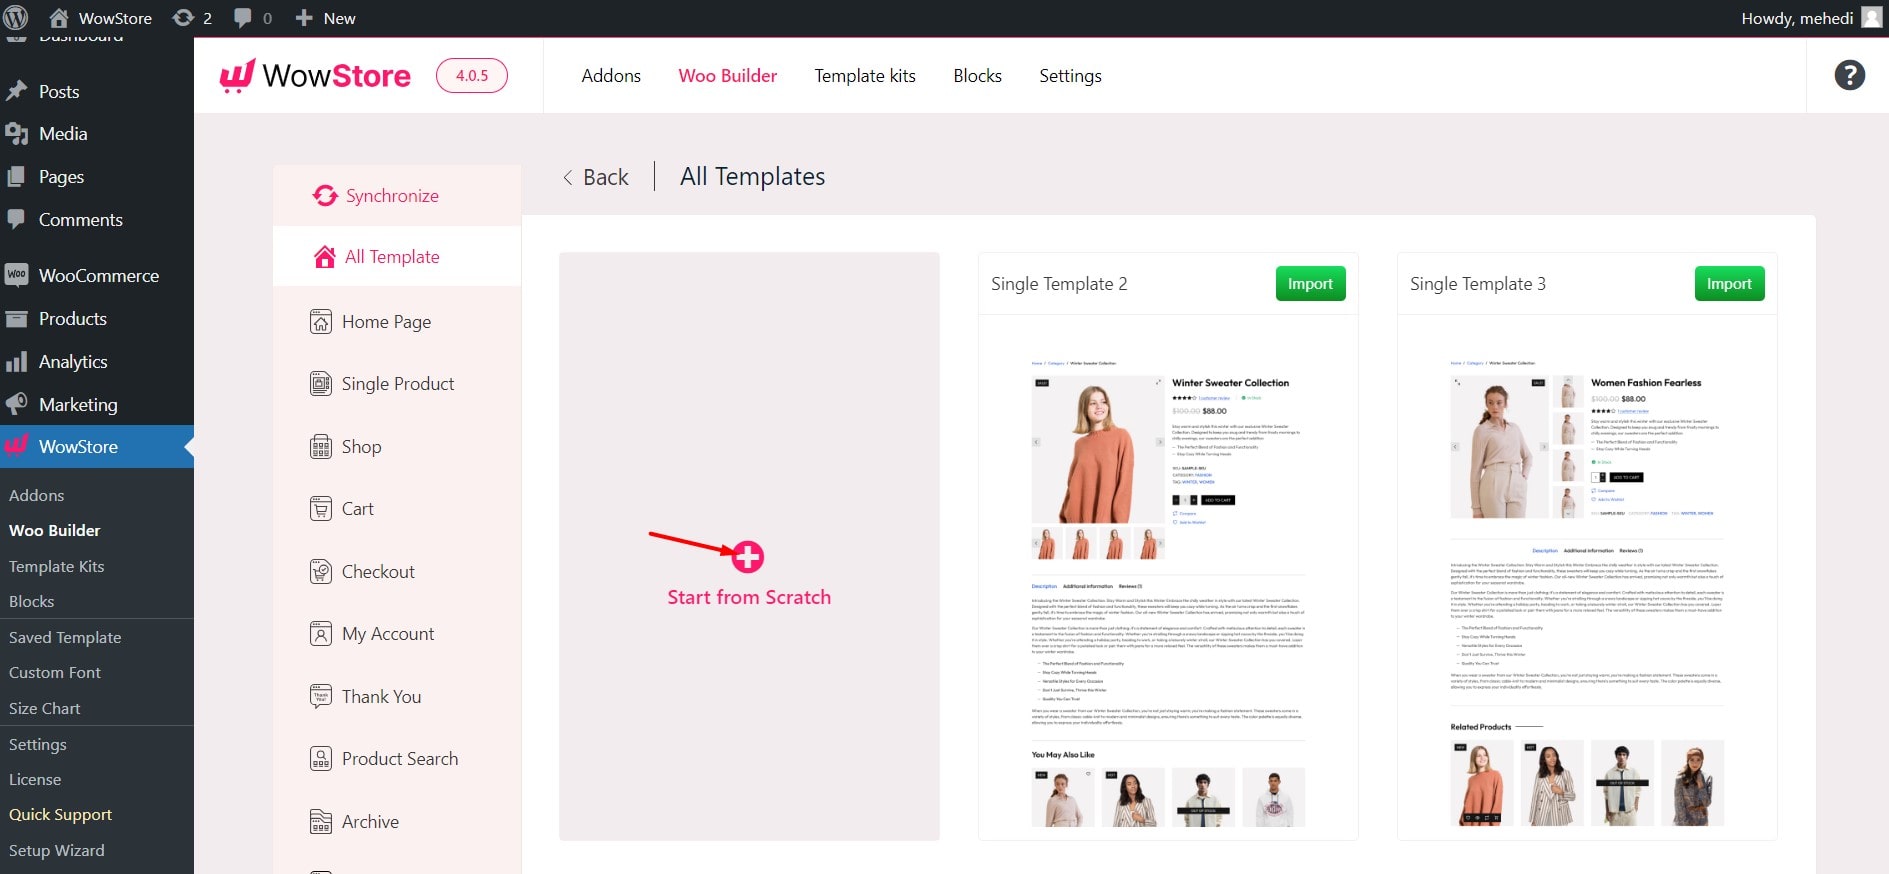
Then, you will need to choose a condition and click on the save button. Now you can see the editor is empty. WowStore has 14+ blocks to build customizable product page templates. You can get the blocks by clicking on the plus icon located on the left side.
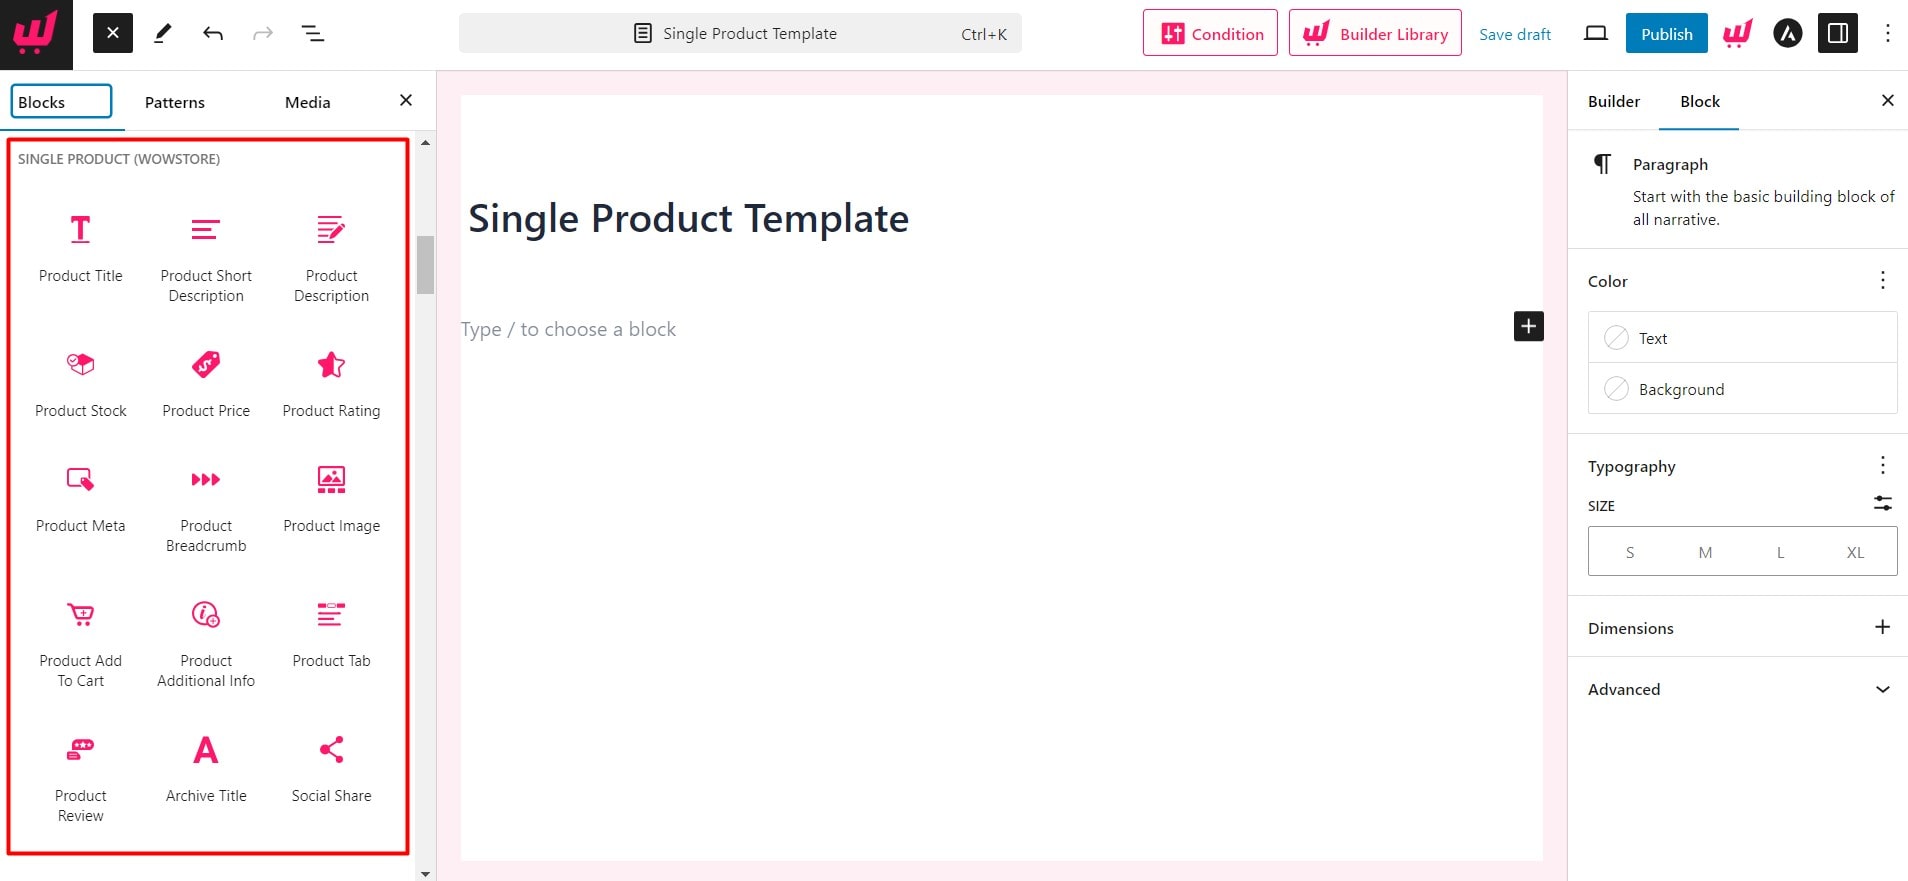
Now, you just need to the blocks to your desired position and customize them to make the product page exactly how you want.
Let’s add the blocks one by one and explore the customization options.
Add and Customize Product Breadcrumb
Add indication to the current product page location with navigational options.
It allows users to understand the current location and navigate through different pages of your site. To add this block you need to click on the plus icon and select the desired block (this is true for all other blocks we will add to customize WooCommerce product page).
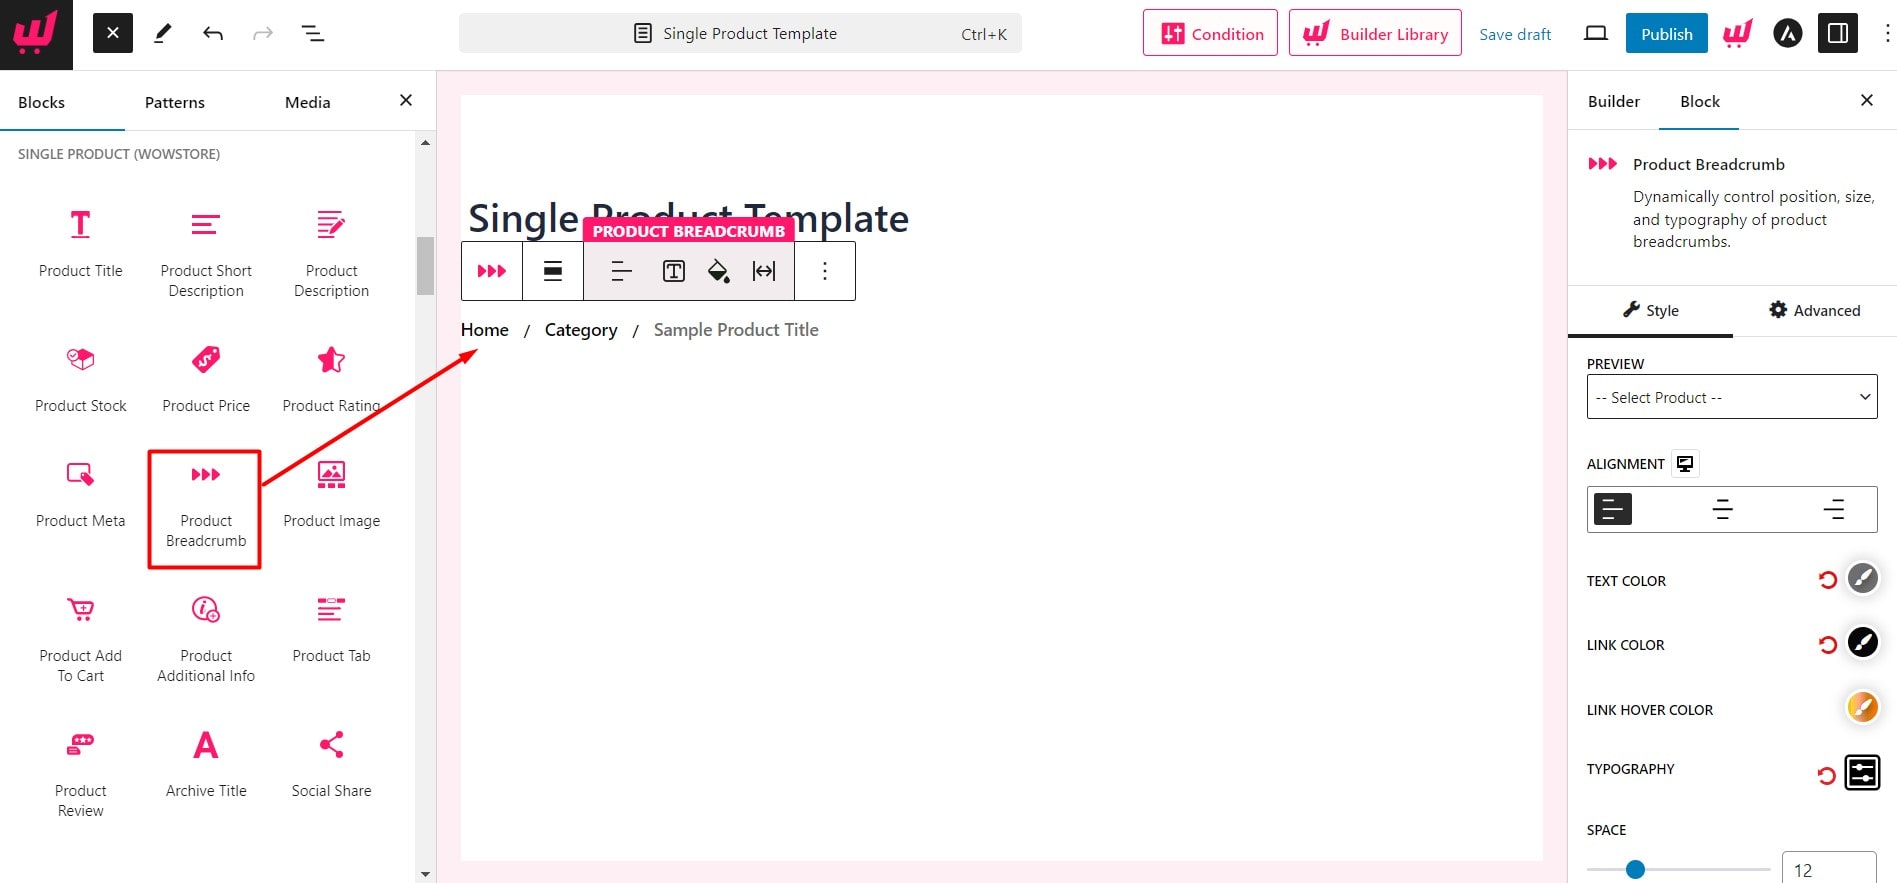
After adding the block you will get the following customization options:
- Change the colors of Text, Link, and Link Hover
- Typography control of Breadcrumb
- Adjust the Spacing of the breadcrumb items
- Adjust the size of the Separator
- Change the color of the Separator
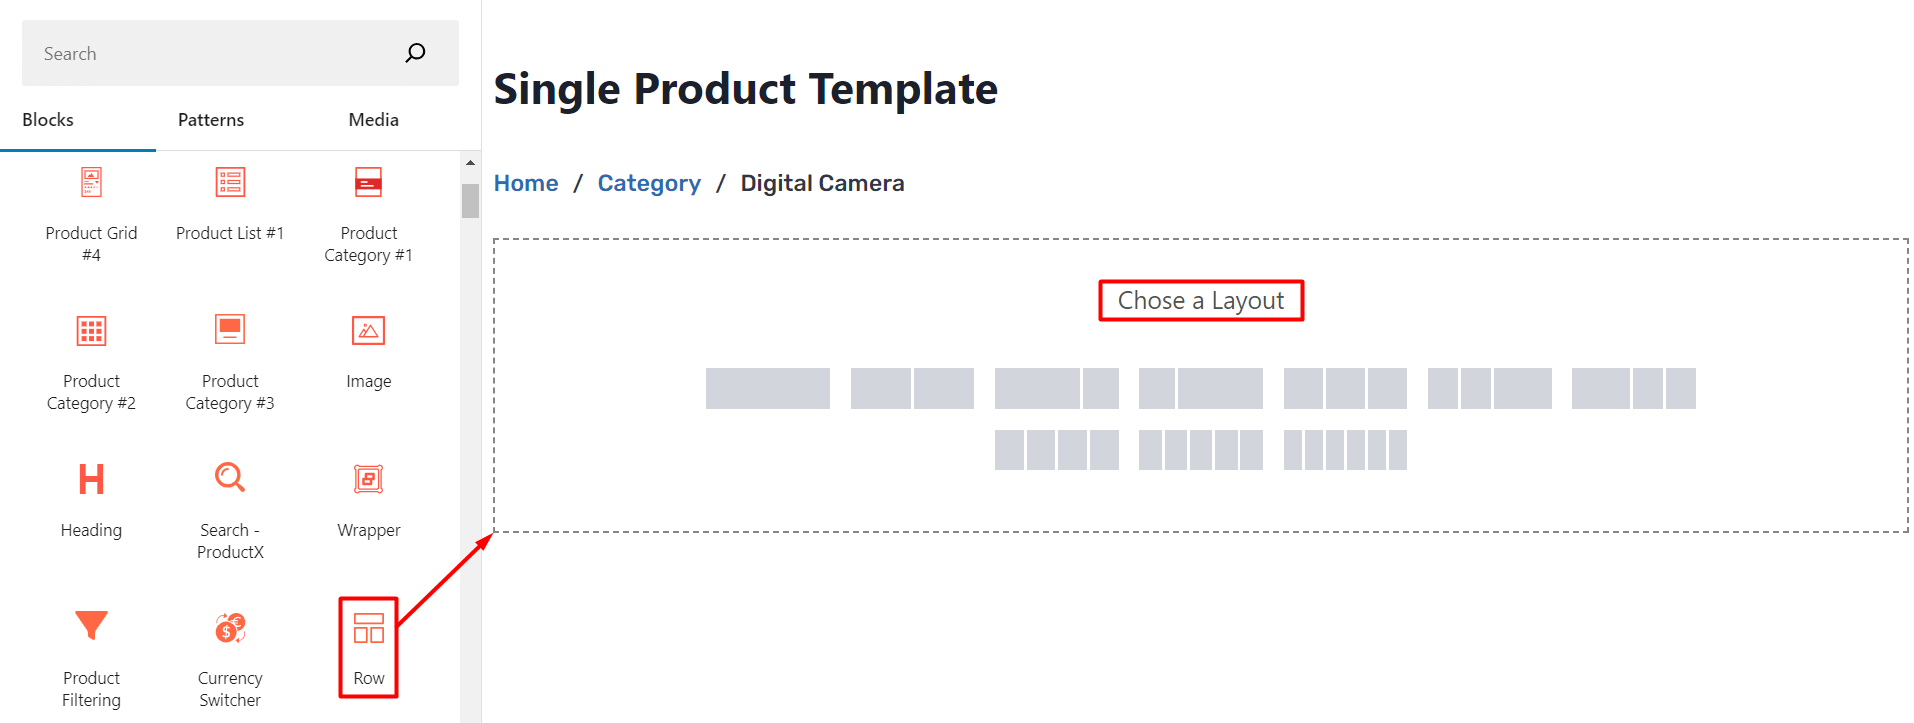
Add the WowStore Custom Column Block to Structure the Single Product Page Layout
Click on the plus icon and add the WowStore row block with a 50-50 ratio. You can add a product image on the left and other essential blocks to the right side.
Add and Customized Product Image Block
Now that, you have added the column, click on the plus icon on the left side and add the product image block. Then you can play with the settings to customize the block.
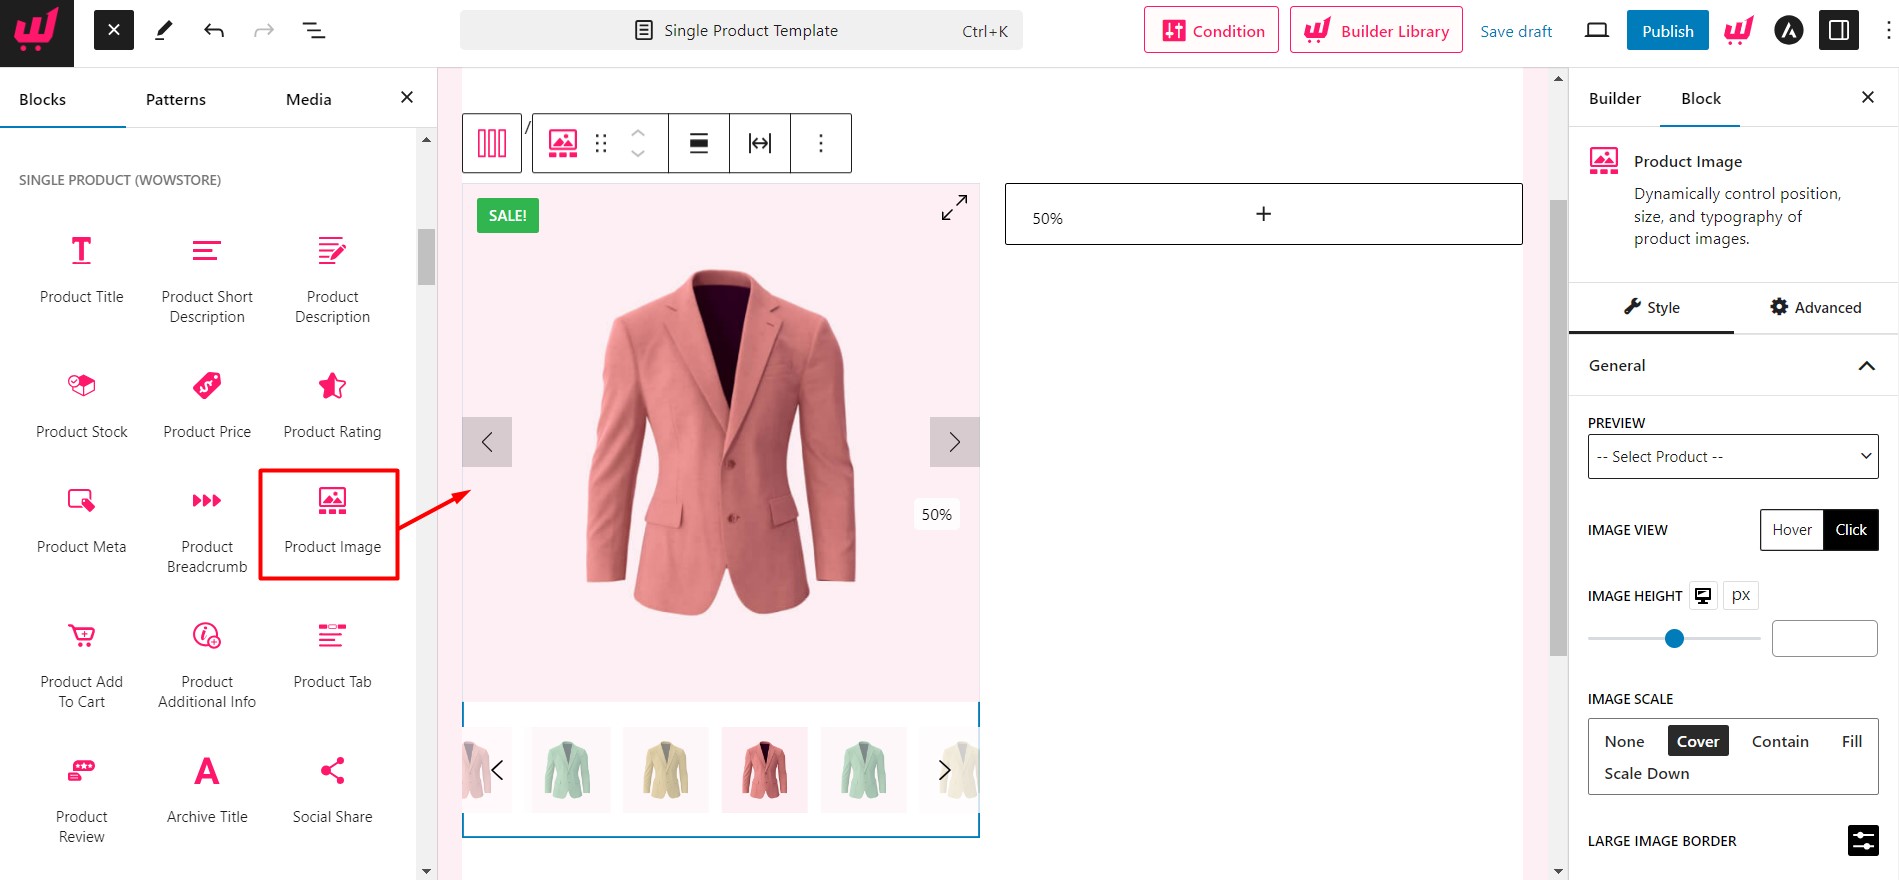
The Product Image block offers the following customization options:
- Hide or unhide Image Gallery
- Hide or unhide Image Gallery arrow
- Gallery Icon Customization
- Gallery Position Customization
Add and Customize Product Rating
The product rating block let the visitors rate and see the rating of the products of your online store. You can add this by clicking the plus icon and taking it to the specific position.
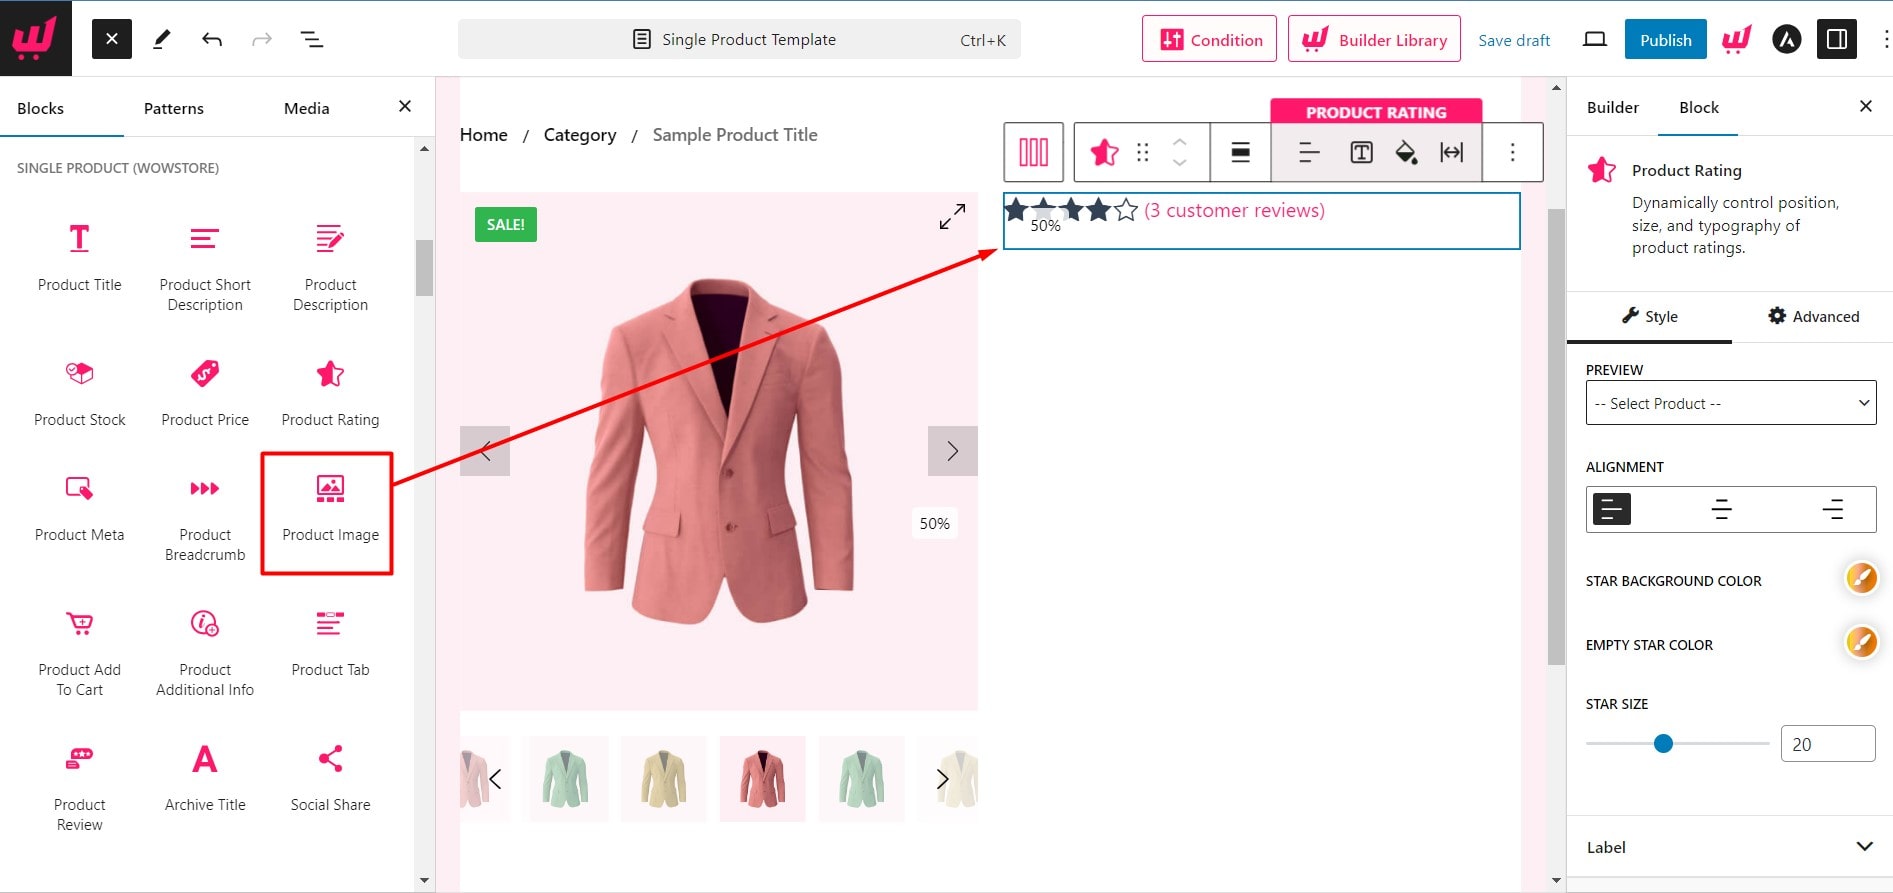
After adding the block you can customize it with the following options:
- Size Selection
- Alignment selection
- Rating star color
- Star background-color
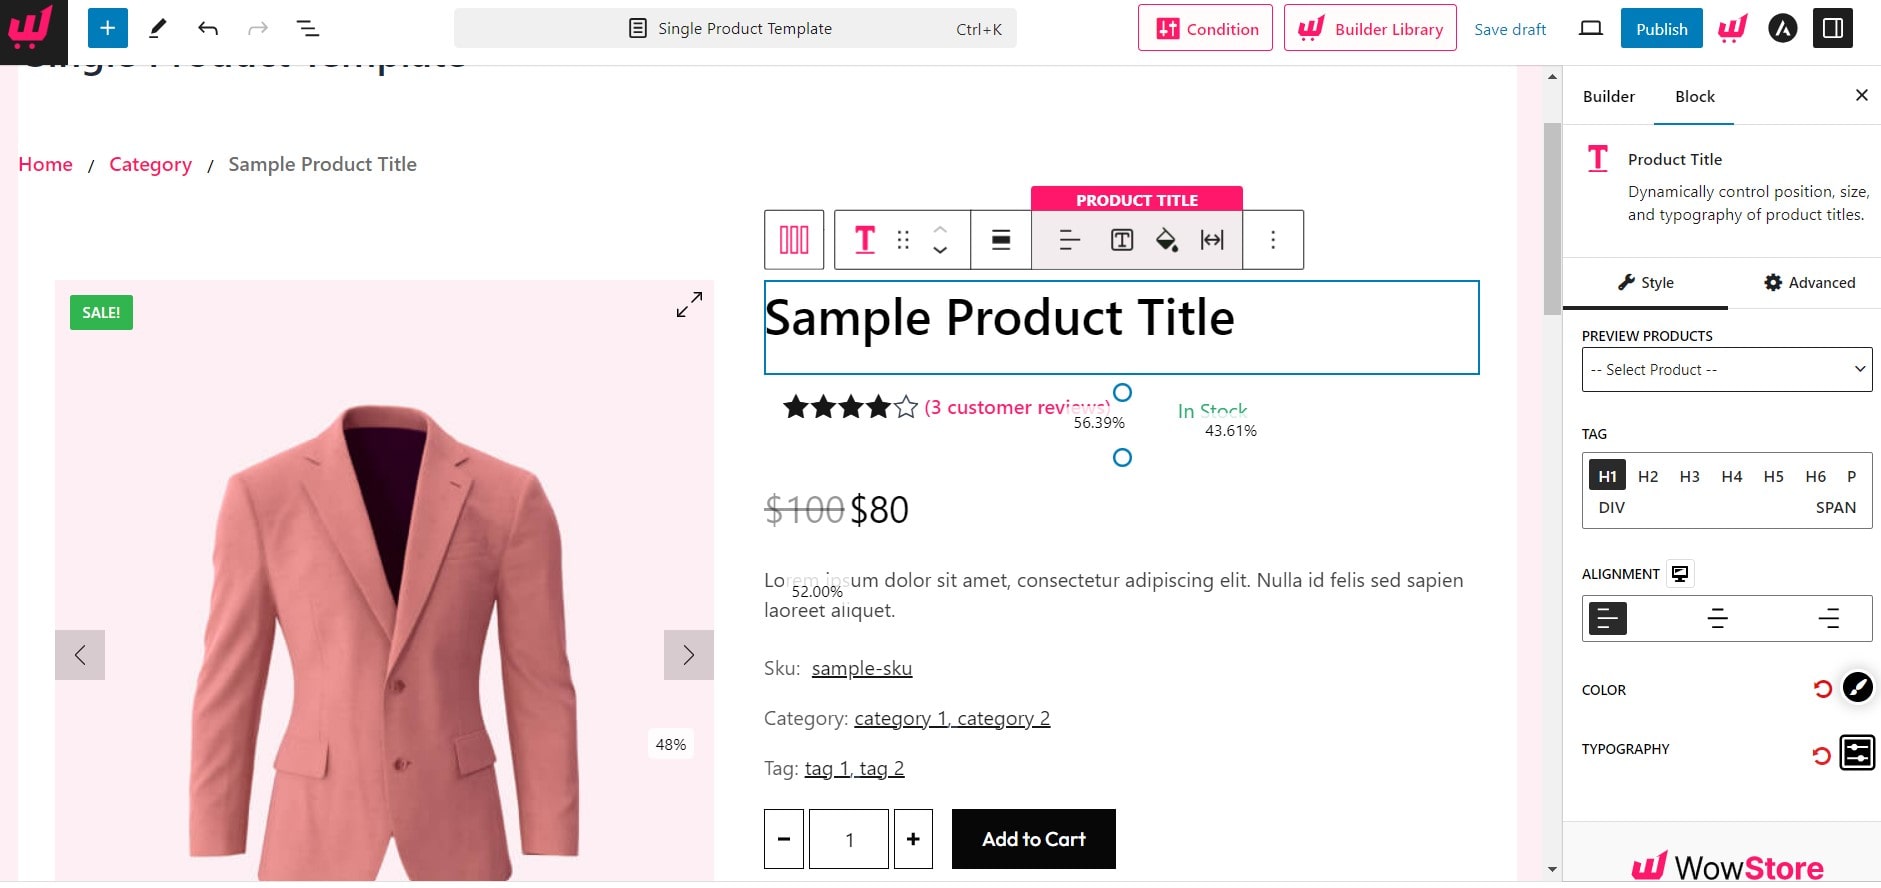
Add and Customize Product Title
Now add the Title Block to the right side by clicking on the plus Icon. The Title of the products will be automatically added to all the custom WooCommerce Product Page Template.
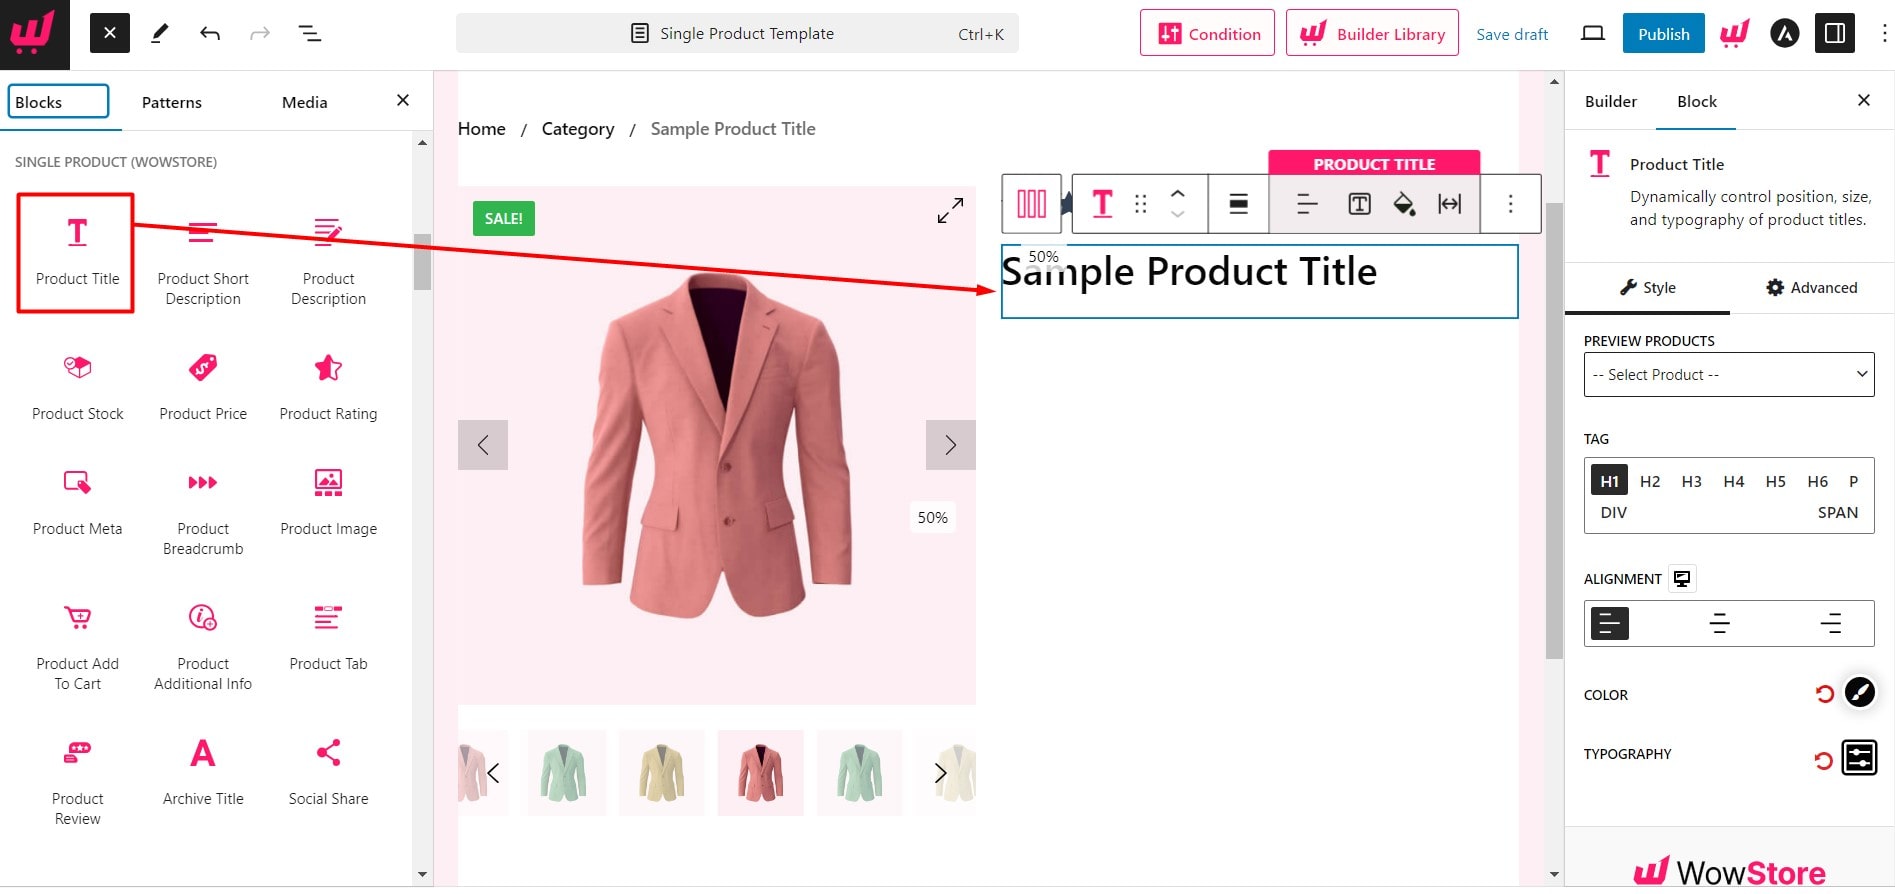
The Product Title Block of WowStore offers the below customization options:
- Size selection
- Alignment Selection
- Color Selection
- Typography control
Add Product Short Description
Add short Product descriptions to let users know about the products at a glance. For that, click on the plus icon. Then search and select the Product Short Description Block.
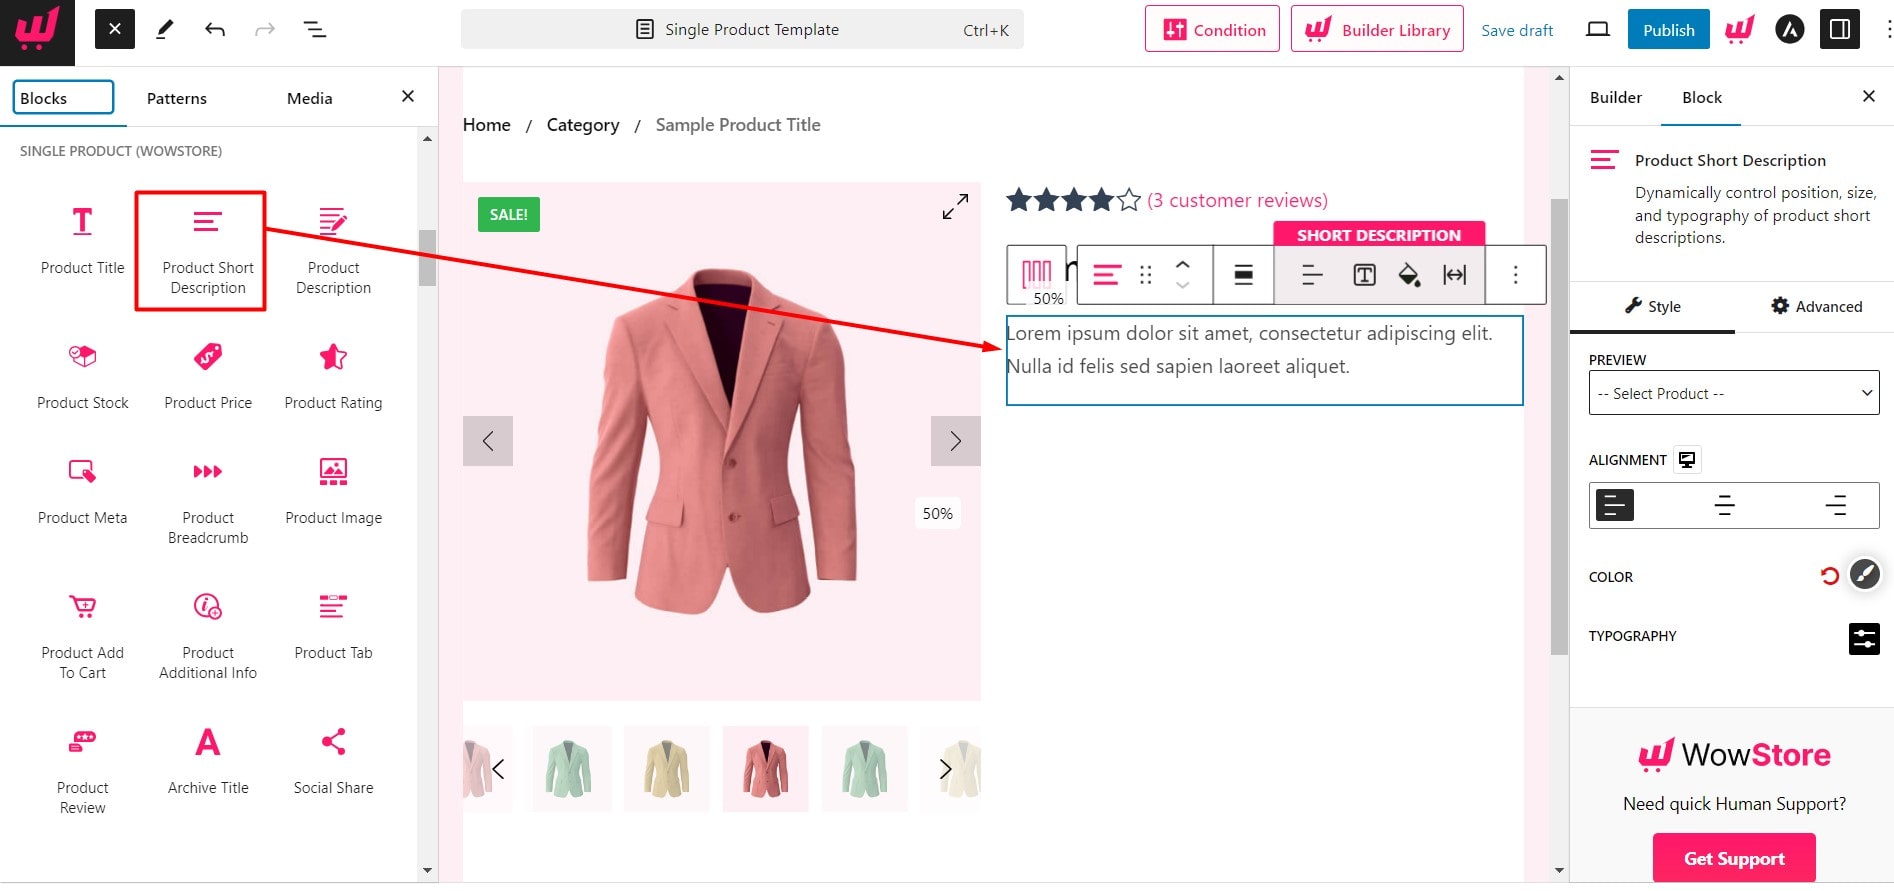
Customize the Block by using the below options:
- Choose alignment
- Change color
- Change typography
Add Customized Product Price
Select the Product price block by clicking on the “+” icon to the top left. The product prices will be visible to the selected place dynamically.
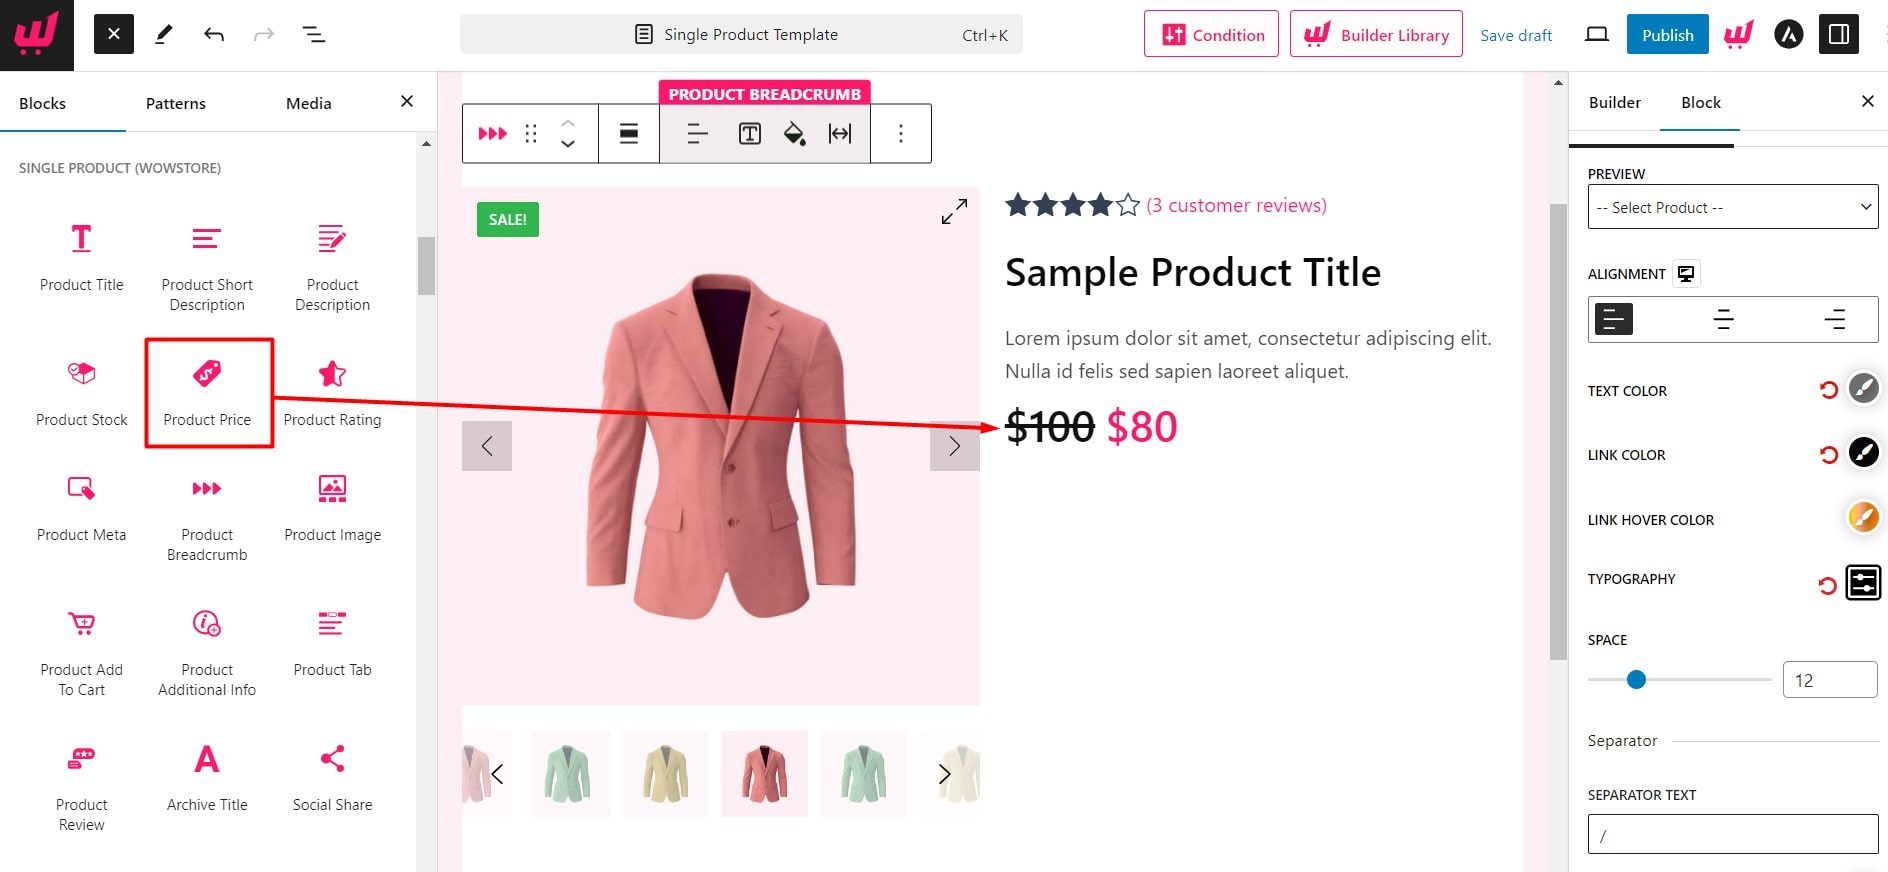
After adding the product price block you can play with the following customization options:
- Product Price alignment selection
- Hide or Unhide Discount Badge
- Sale Price Typography control
- Changing Product Price Size
- Choosing Product Price Color
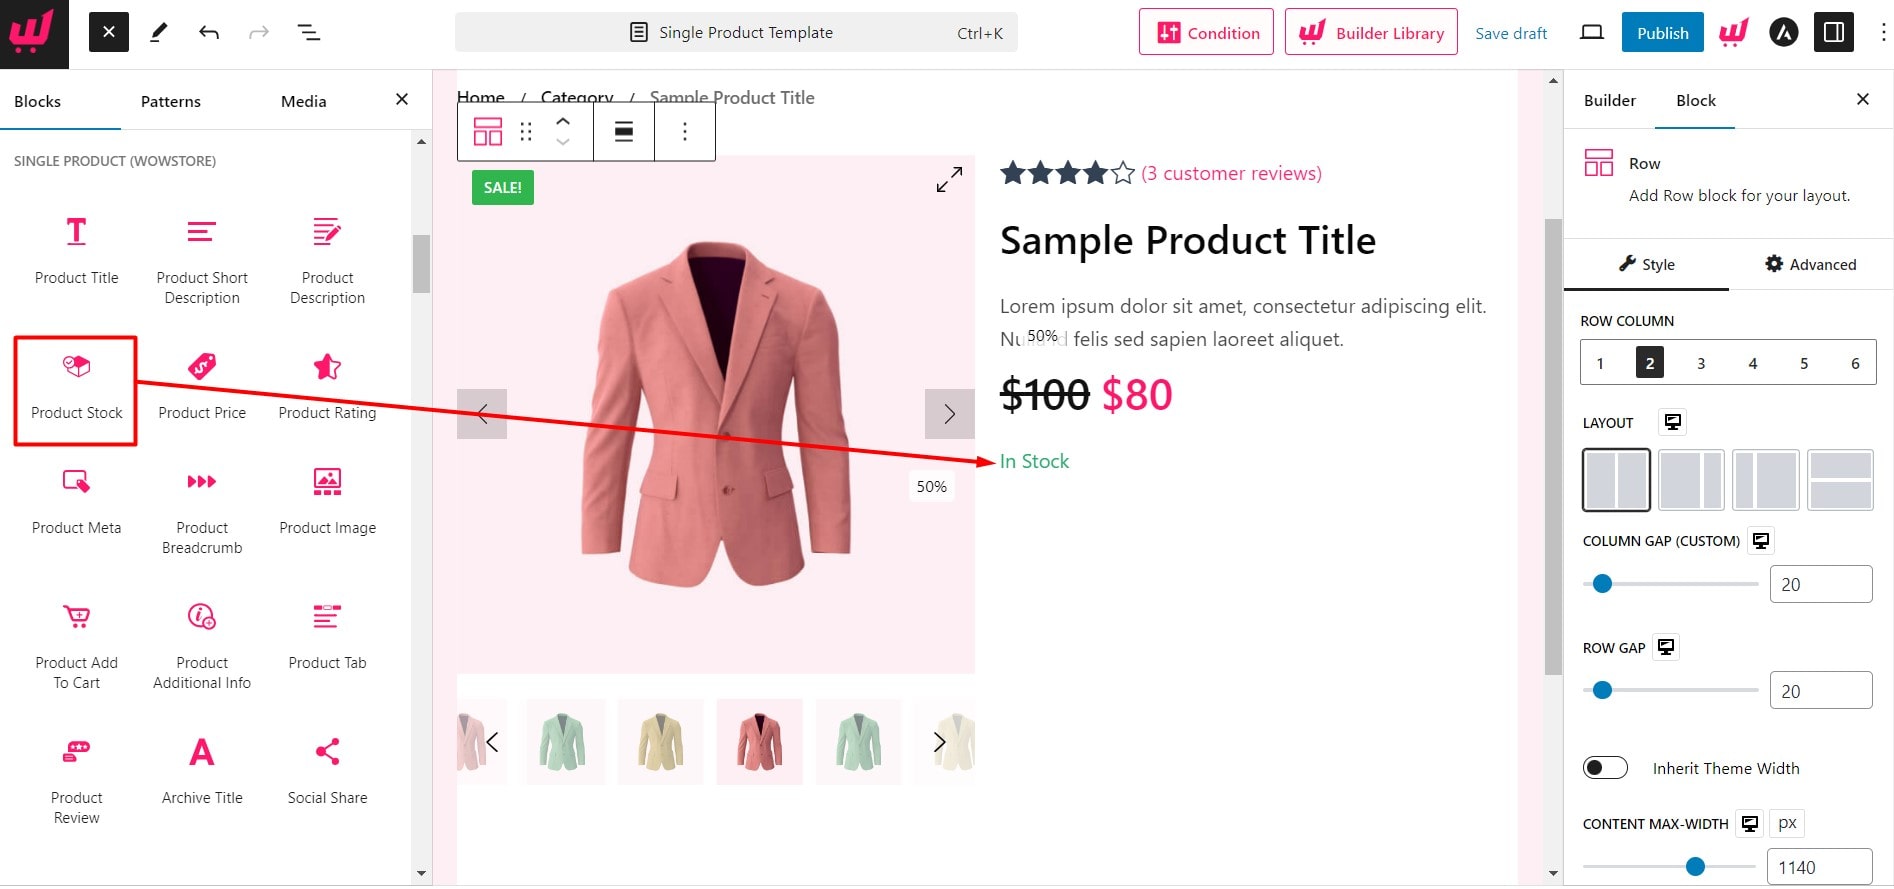
Add Customized Product Stock
Product Stock Block represents the number of specific products available to purchase. You can add the block anywhere, but it is recommended to add this before the Add to Cart block.
Product Stock Block comes with the following customization options:
- Product Stock alignment
- Product Stock Color
- Product Stock Typography control
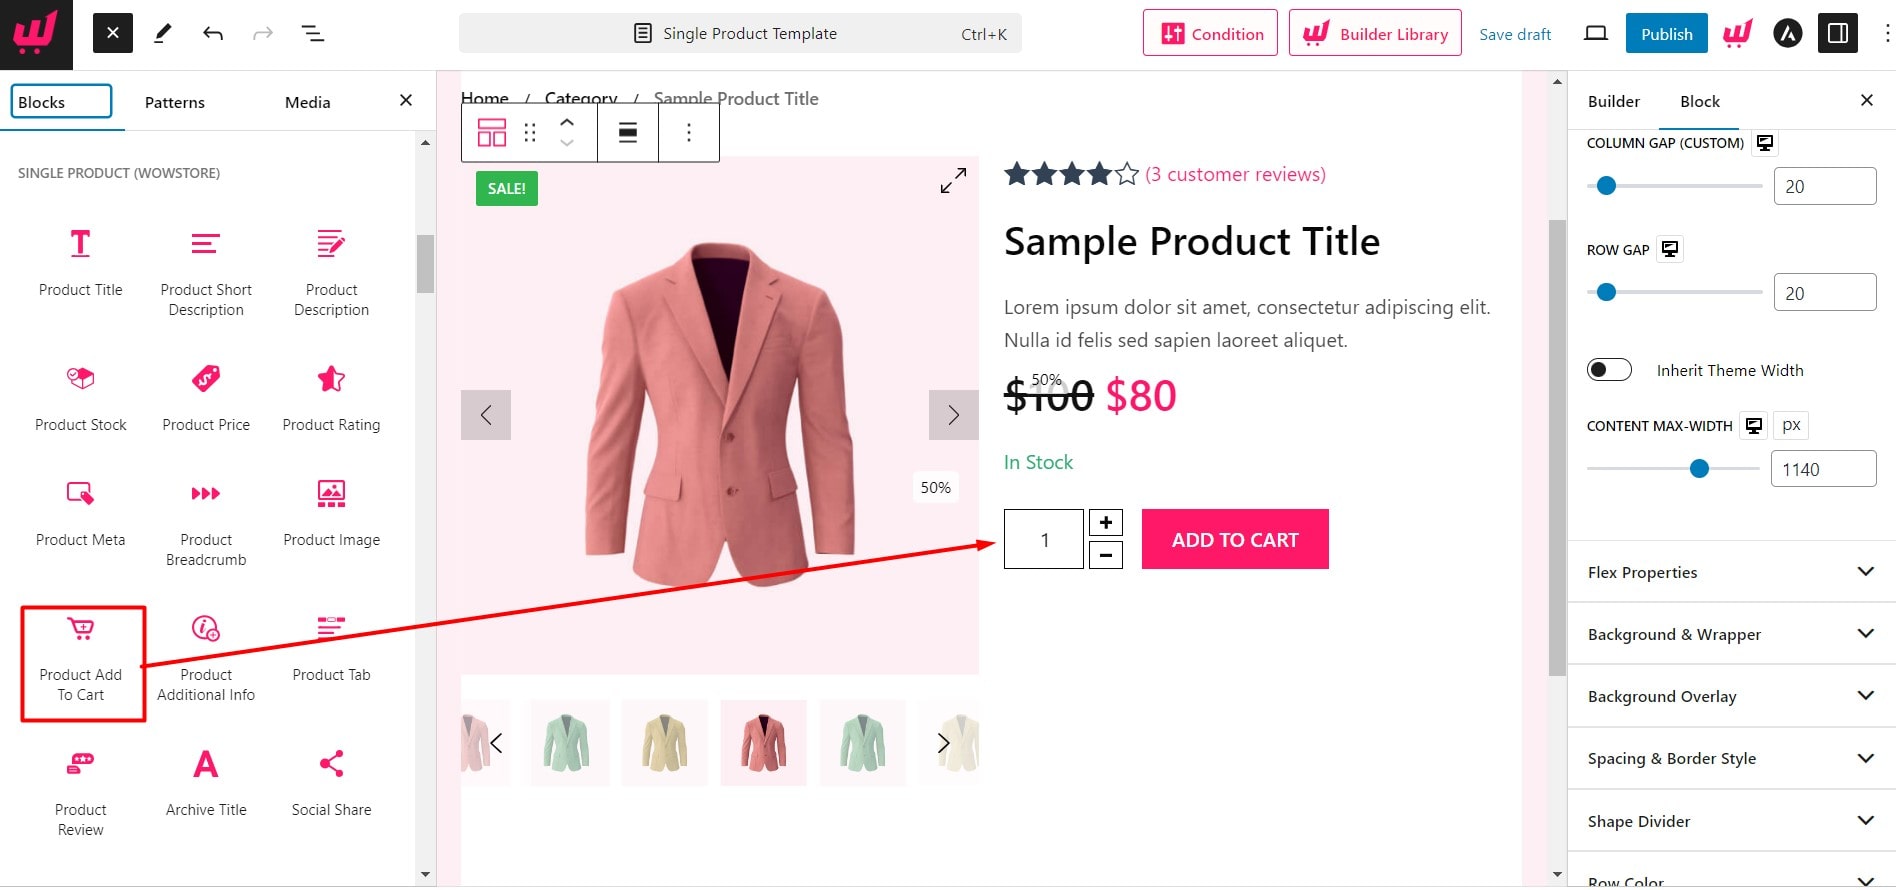
Add Customized Product Add to Cart
Product Add to Cart block helps the users to add their chosen products to the cart later they can browse and select more products and purchase all of them at once.
It offers the following options to customize the add to cart button:
- Hide or Unhide Product Quantity Selection
- Enable or Disable Product Compare and Wishlist
- Change Add to Cart Color
- Change Quantity Color
- Change Quantity Background Color
- Change the Hover color of add to cart
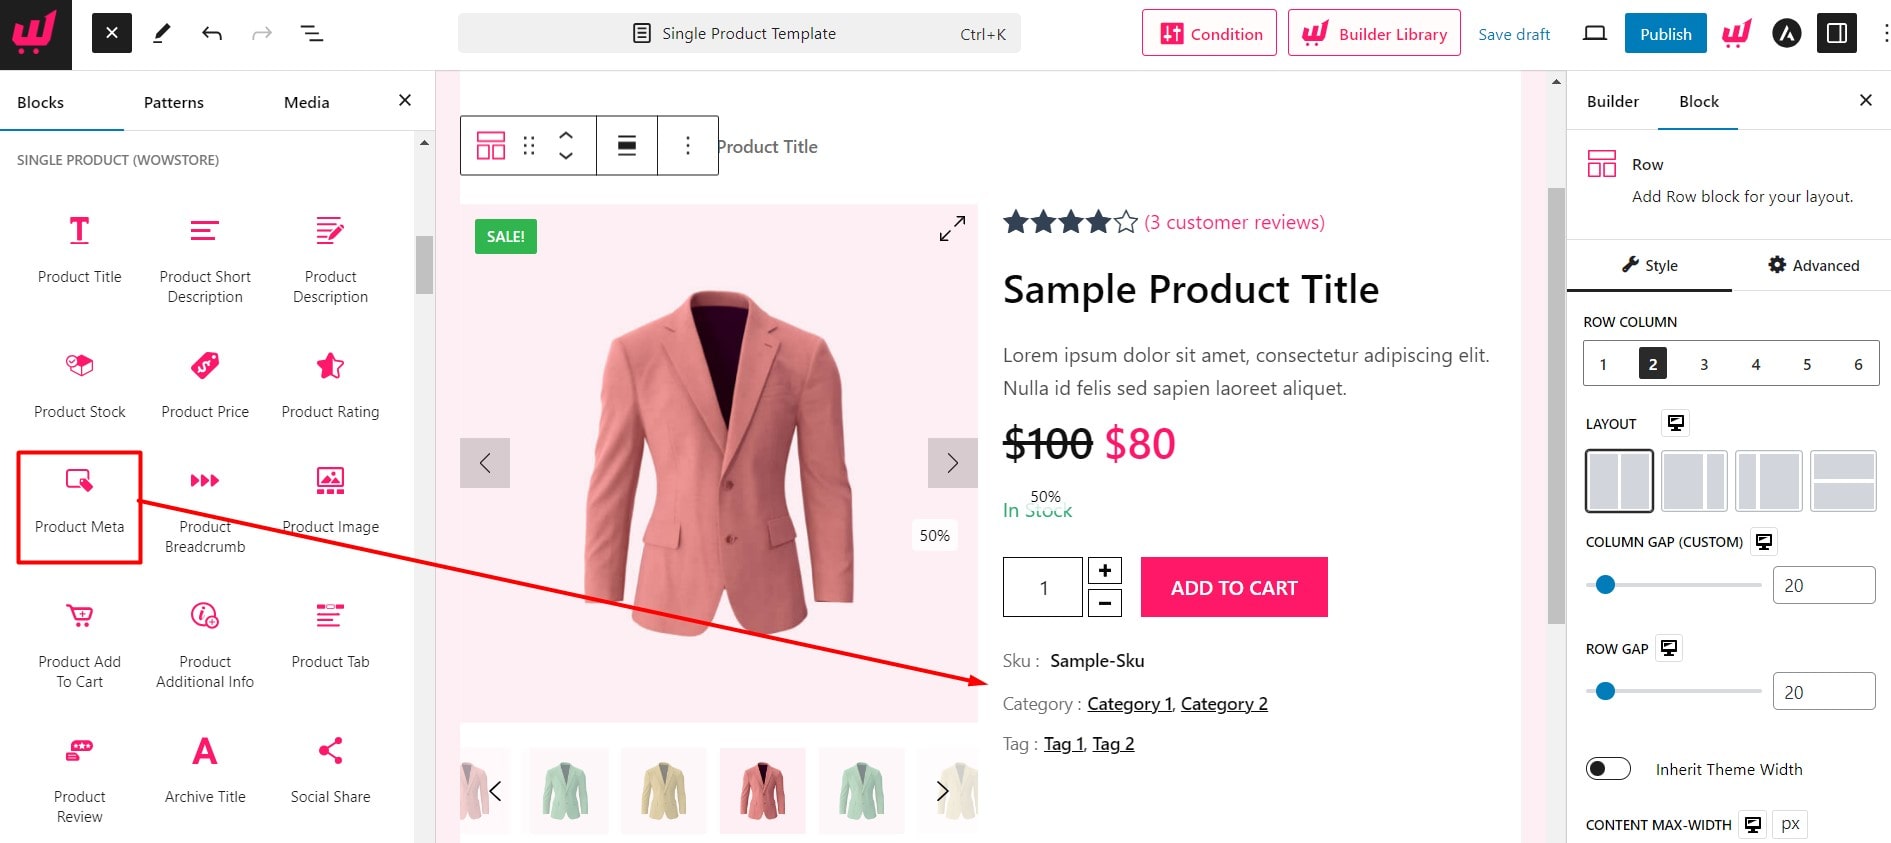
Add Customized Product Meta
Product meta includes product SKU, category, and tags. This information will automatically be added and you just need to add the Product Meta block.
To customize this block you can use the below options:
- Hide or unhide Category, Tag, and SKU
- Choose the color of Meta headings
- Choose Color of Meta values
- Full typography control
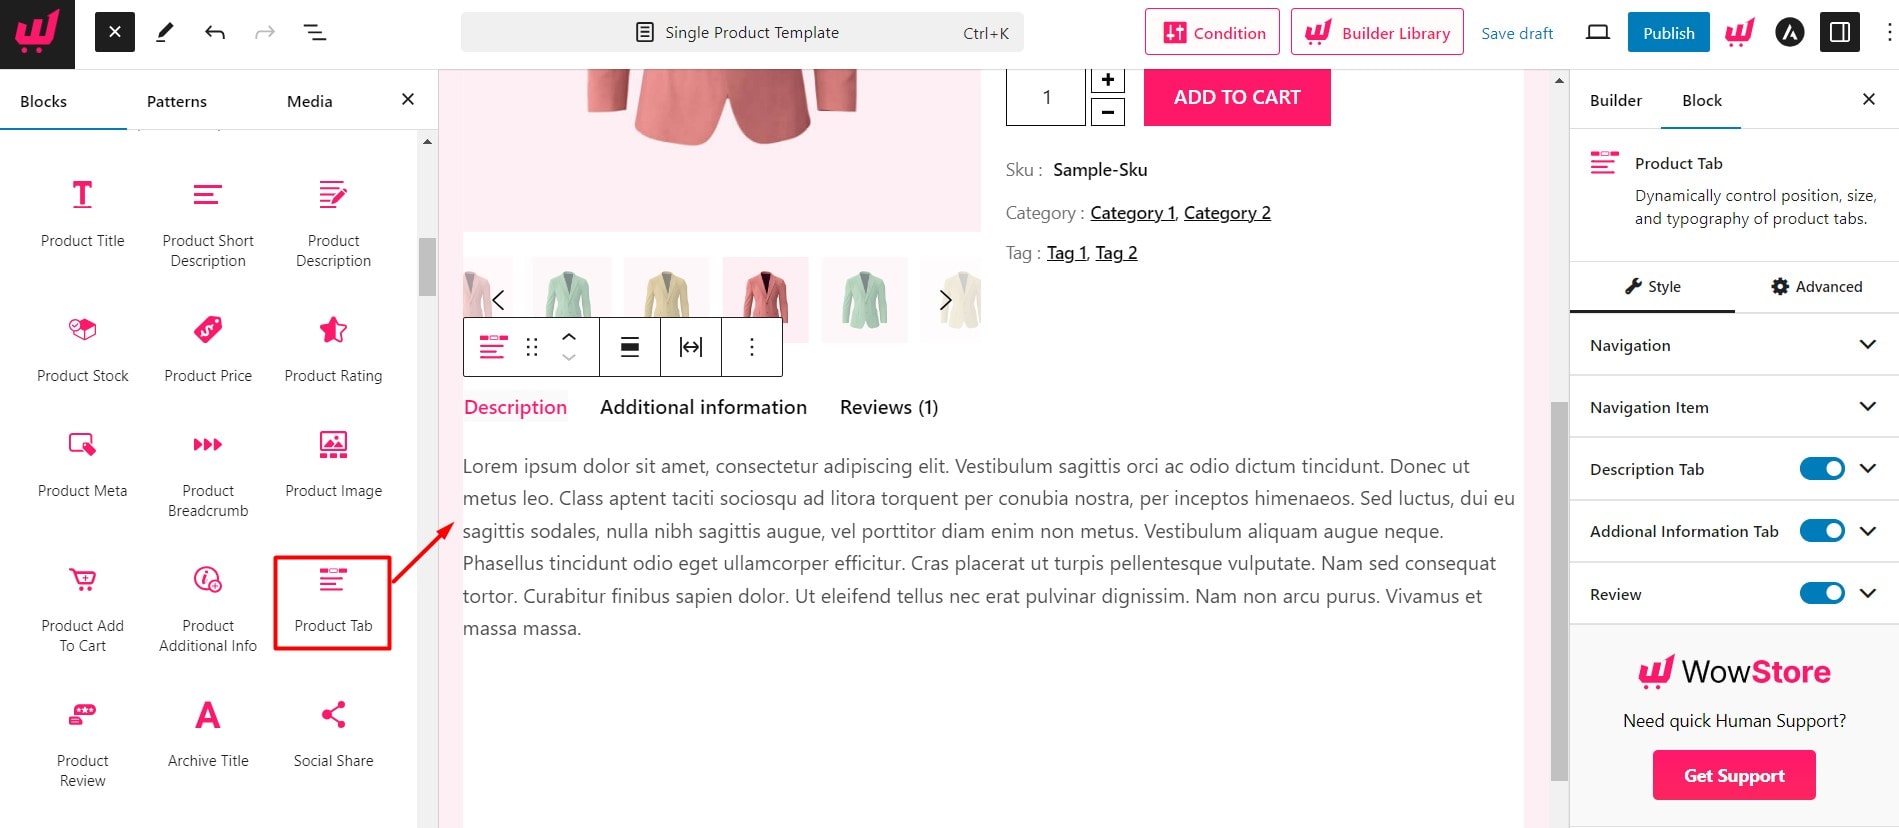
Add Customized Product Tab
Add a Product Tab to give the users more information about the products on a custom WooCommerce product page. The Product Tab block of WowStore is the combination of three blocks that include Product Description, Additional Info, and Reviews. However, You can also add these blocks separately.
You can also explore the following customization options:
- Hide or unhide any of the tabs
- Change Typography
- Change Colors of Text, Background, and Hover Background
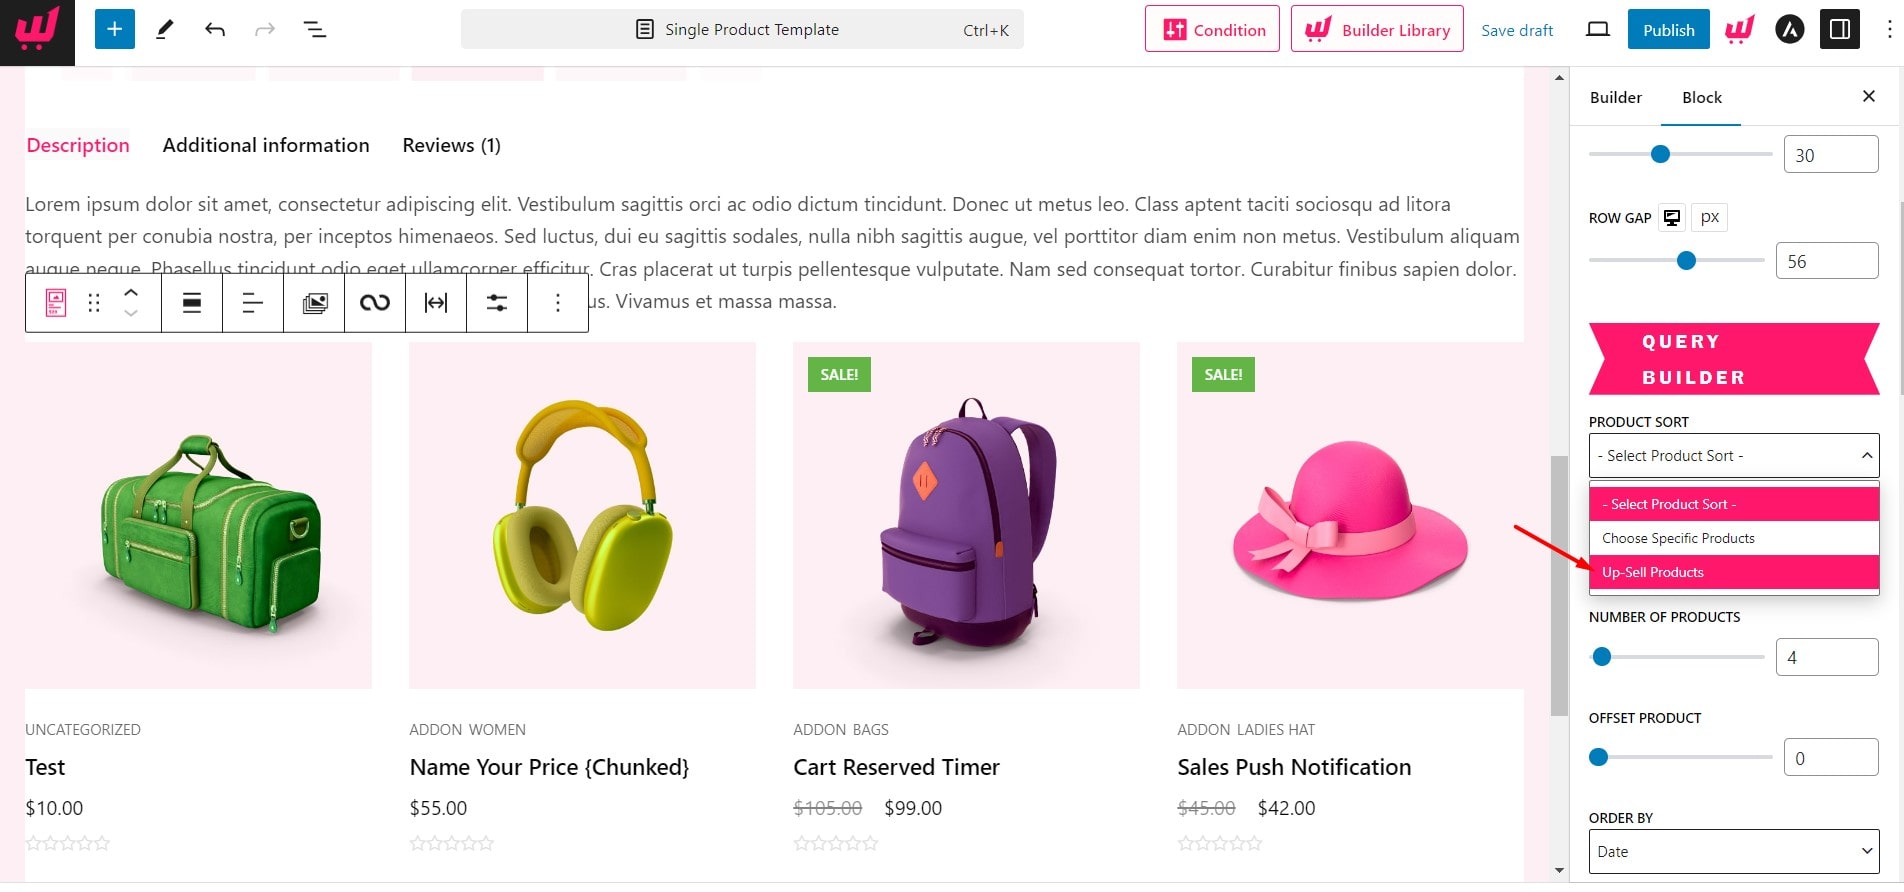
Include Related and Upsell Product
After customizing WooCommerce product page with the new product blocks you also should add related and upsell products. It will let them explore more products they may want to buy.
For adding Related and Upsell products you can add Product Grid Block and sort the products according to the categories using the Advance query Builder.
After finishing all required customization you can publish the template and check how it looks on the product pages. Because we were customizing the product template dynamically with dummy content, we will see how it looks with the static content.
On-Page Optimization Tips for WooCommerce Product Pages
Having well-designed product pages can increase your success rate in this competitive market. To gain potential buyers from search engines, you should ensure proper on-page optimizations. For that, you can use the following recommendations.
Choose the Right Keywords: Keywords are the main criteria for On-Page optimization. If you can use the right keyword 50% of your work is done. But If you are focusing on wrong or over-competitive keywords then other optimizations can not ensure a better ranking on SERP.
Choosing a keyword is not too hard for Product Pages. You can find low-competitive keywords from your competitor’s sites by using Keyword analysis tools like Semrush and Ahrefs.
If you can’t afford an SEO toll don’t worry there’s another way to find keywords. Go to Google search for the Product name and look at the suggestions. Google always shows the phrases/keywords that are mostly searched by the users. Choose the best options and use them on your single product page.
Optimize Title and Meta Description: After choosing the keyword use it to write a killer Title to increase the click rate from the Search Engine Result Page. Don’t forget about the meta description. To optimize it write a short description of the product and include the targeted keywords in the description.
Use structured data: Using product structured data can help search engines separate product pages from blog posts.
Not only that it also opens the possibility to win featured snippets.
So always use the Product and review Schema for all the single product pages of your online store. You don’t need to be an expert developer to add schemas. If you are using WordPress use the Rank Math plugin. It will help to add custom schemas for the product pages. You can also copy and use any schemas from your competitors.
Focus on Bounce Rate and Dwell time: To understand whether the on-page optimizations are working or not you can look at the data of the Bounce rate and Dwell time. If the bounce rate is higher then try to decrease it by adding Related and Upsell products.
If these are already present then you may need to change the position or design to attract visitors. Another important indication of understanding SEO efforts is the Dwell time. It is the average time the visitors are spending on your site. You have increased it to increase the SEO visibility and conversation rate.
Avoid Duplicate Content: Content Duplications are the most hated thing by Google. But still, many online stores use product descriptions from manufacturer sites. It hurts the SEO efforts.
You should avoid the practice of content duplication in order to gain organic traffic from Google. Write your own thoughts and findings on the products to avoid duplications.
Conclusion
That’s all about customizing WooCommerce single product page. Hope you can customize your Single Product pages using the WowStore Gutenberg WooCommerce Blocks plugin. If you have any other queries feel free to leave a comment below.
Get WowStore Pro to unlock all conversation-focused features and skyrocket your sales!

