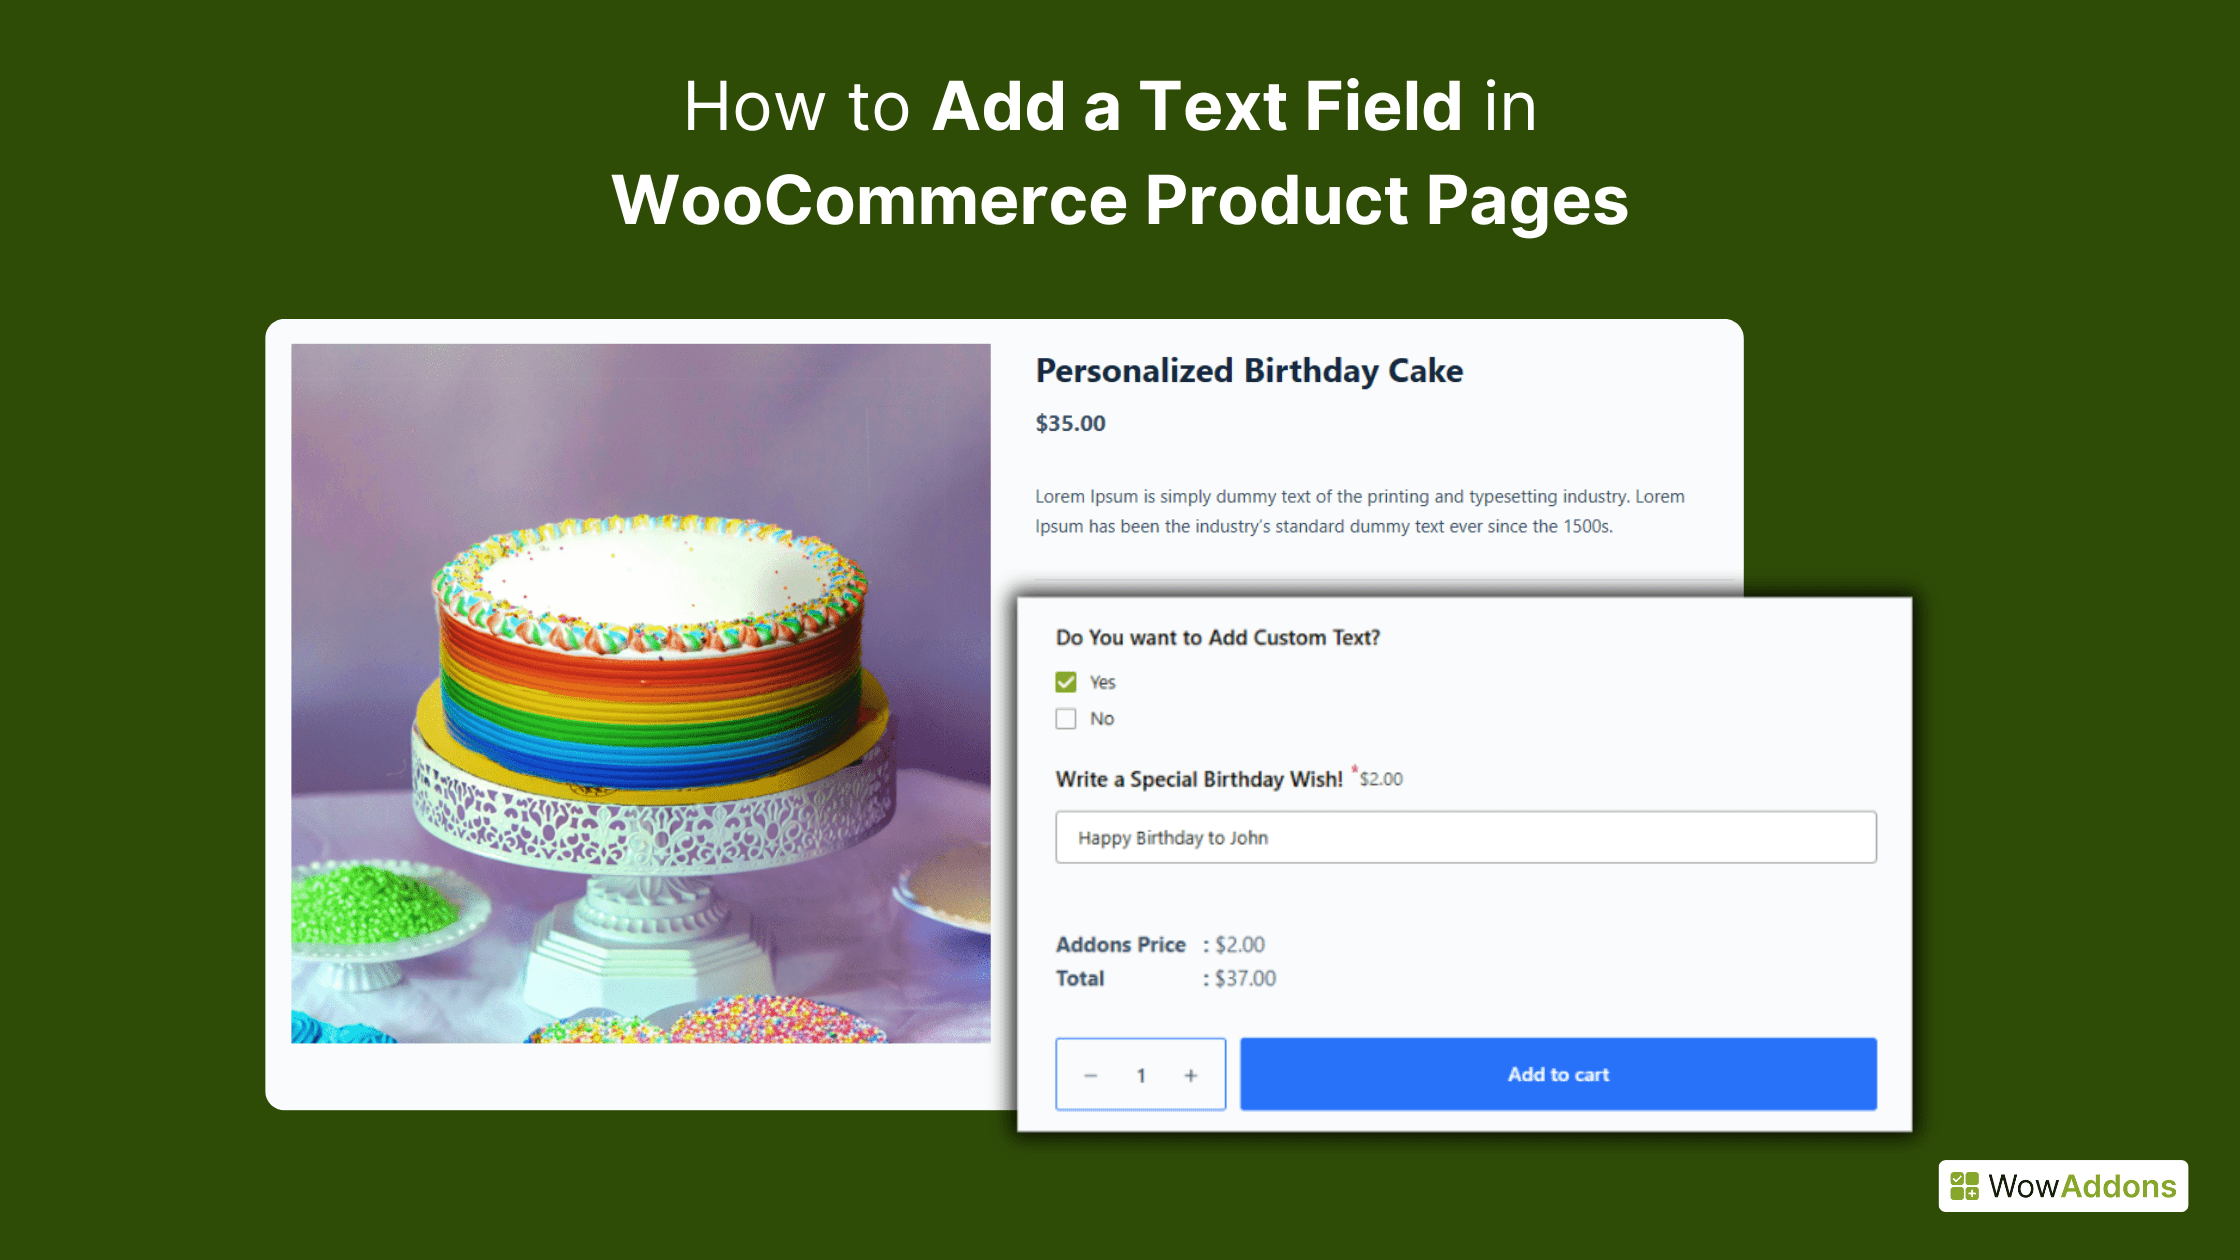
WooCommerce is a blessing for small to medium-sized eCommerce business owners. Because it helps to create and manage online stores without having any coding knowledge and without extra costs. However, WooCommerce lags behind when it comes to adding custom fields, especially text input fields, to product pages.
So, do you also want to add a custom text field to the product pages for personalizing your WooCommerce store?
Don’t worry. We have got your back. In this blog post, we will cover everything about adding custom text fields to WooCommerce product pages with or without coding.
📝 Key Takeaways
This guide shows you how to add custom text fields to WooCommerce product pages — with and without coding. Whether you want to collect personalization details, special delivery notes, or custom specifications, this tutorial covers both the manual (code-based) and plugin-based methods step-by-step.
The focus is on WowAddons Product Addons, a powerful plugin that lets you create text fields, add dynamic pricing, and apply conditional logic — all without touching a single line of code.
🧰 Tools & Methods Compared
Method 1: Add a Text Field Using Custom Code
Method 2: Add a Text Field Using the WowAddons Product Addons Plugin⚙️ Step-by-Step Overview
Step 1: Create a new addon and assign it to selected products.
Step 2: Add the Text Field element from the WowAddons builder.
Step 3: Configure the field (required status, title, placeholder, etc.).
Step 4: Set pricing — fixed, percentage, per word, or per character.
Step 5: Add sale prices to boost conversions.
Step 6: Apply conditional logic (show fields based on user input).
Step 7: Save and preview on your WooCommerce product page.💰 Final Verdict: If you want an easy, flexible, and no-code way to add custom text fields in WooCommerce, WowAddons Product Addons is the best choice in 2025.
It’s beginner-friendly, supports dynamic pricing, and integrates seamlessly with WooCommerce. Perfect for store owners who value personalization, control, and higher conversions without coding headaches.
🎥 You can watch this video first to get a quick visual overview. Once you’ve seen it, come back to this blog for a step-by-step guide that walks you through each option in detail.
Why Add Custom Text Fields to WooCommerce Products
Before going into the process, let us explain the reasons behind adding a custom text field. However, you are free to skip this section if you already have your own reason and are determined to add a text field to your product pages.
Product Personalization
The main reason offline shoppers count is higher than online is the lack of personalization options. For example, if someone wants a T-shirt with custom text, they would prefer an offline shop. But if you can ensure it online, they will consider buying from your store.
Collect Important Information
Some businesses also need to collect some additional information to fulfill customers’ needs. For example, you may want to take special delivery instructions; for this kind of scenario, custom text input fields become very effective.
Better Shopping Experience
Customers always love to have better control over their purchases. So empowering them to personalize their product while purchasing will surely impress them. As a result, your customer base will be satisfied with the shopping experience, and the brand’s reputation will be increased.
Reduce Return Rates
Product returns are a common problem for all online businesses. One of the common reasons is the delivery timing. Some shoppers get angry when the products are being delivered at an unpreferred time or day, as they might be busy at that time. This problem can be reduced by adding a custom text field where customers can put their delivery instructions.
Increase Order Value
Having a text input field not only increases customer satisfaction but also allows increasing the order value. For example, you can add additional charges to add custom text to the product. As a result, you can enjoy higher revenue with the same number of customers you usually have.
How to Add a Text Field to a WooCommerce Product Page
Adding a custom text field to your WooCommerce product page gives customers the flexibility to enter custom information, such as names, notes, or personalization details, and more. There are two main ways to do this.
- Method 1 involves adding a text field using custom code, which gives you control but requires some technical knowledge and coding skills.
- Method 2 is a much easier approach – using the WowAddons Product Addons plugin for WooCommerce, which lets you add text fields (and many other field types) to your product pages quickly without touching a single line of code.
Method 1: Add a Text Field to a Product Page Using Custom Codes
As you may already know, WooCommerce doesn’t allow us to add custom fields by default. One way to do this is by adding custom code to your theme’s function.php. But, if you don’t want to play with codes, please skip this section, as we also have a method that doesn’t require coding knowledge.
Note: Make sure to use a child theme; otherwise, you may lose the changes after updating the theme. Always have a backup before adding custom code to your theme’s file.
Step 1: Insert Custom Code into the Child Theme’s functions.php File
To add the code, go to Appearance > Theme File Editor and ensure you’ve selected the child theme. From the right-hand menu, open the functions.php file and paste the code at the bottom. Once done, save the file and check the front end to see the changes in action.
// Display custom text field on the product page with space before the Add to Cart button
function custom_product_text_field() {
echo '<div class="product-custom-field" style="margin-bottom: 20px;">' // Adds space below the field
.'<label for="custom_text_field">Enter Custom Text</label>'
.'<input type="text" id="custom_text_field" name="custom_text_field" placeholder="Enter custom text here" />'
.'</div>';
}
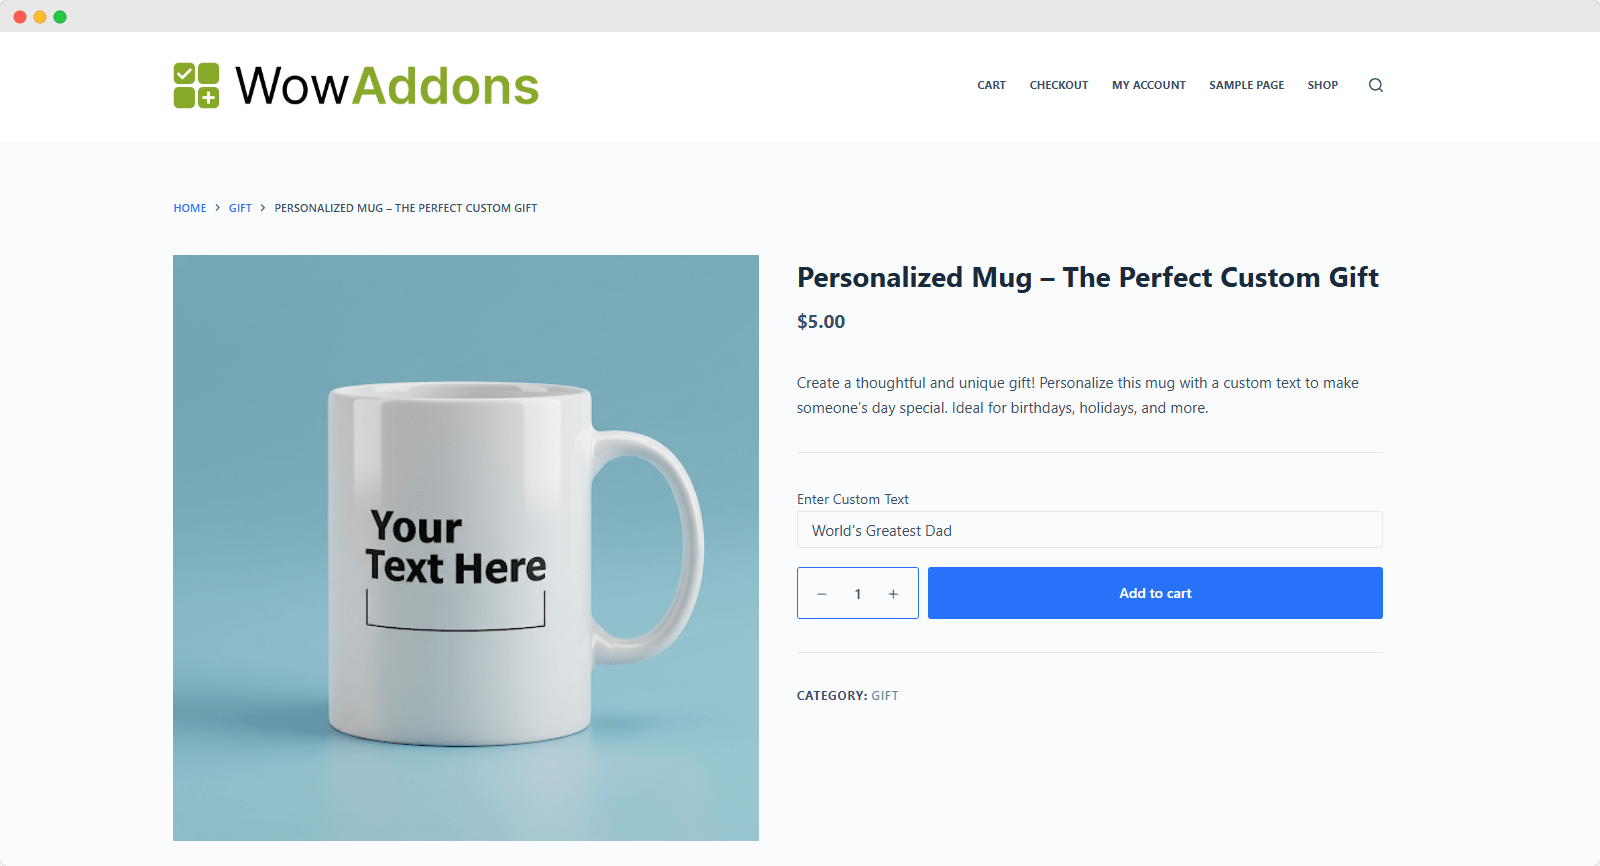
add_action('woocommerce_before_add_to_cart_button', 'custom_product_text_field');Here, you can see that a custom text field has been added to our WooCommerce product page.
Step 2: Save and Show the Field to the Cart Page
As we also want to show the text in the cart field, we need to add the following code.
// Save custom text field value to the cart
function save_custom_field_to_cart( $cart_item_data, $product_id ) {
    if ( isset($_POST['custom_text_field']) ) {
        $cart_item_data['custom_text_field'] = sanitize_text_field( $_POST['custom_text_field'] );
    }
    return $cart_item_data;
}
add_filter('woocommerce_add_cart_item_data', 'save_custom_field_to_cart', 10, 2);
// Display custom text field value in the cart
function display_custom_field_in_cart( $item_data, $cart_item ) {
    if ( isset( $cart_item['custom_text_field'] ) ) {
        $item_data[] = array(
            'key'   => 'Custom Text',
            'value' => esc_html( $cart_item['custom_text_field'] )
        );
    }
    return $item_data;
}
add_filter( 'woocommerce_get_item_data', 'display_custom_field_in_cart', 10, 2 );
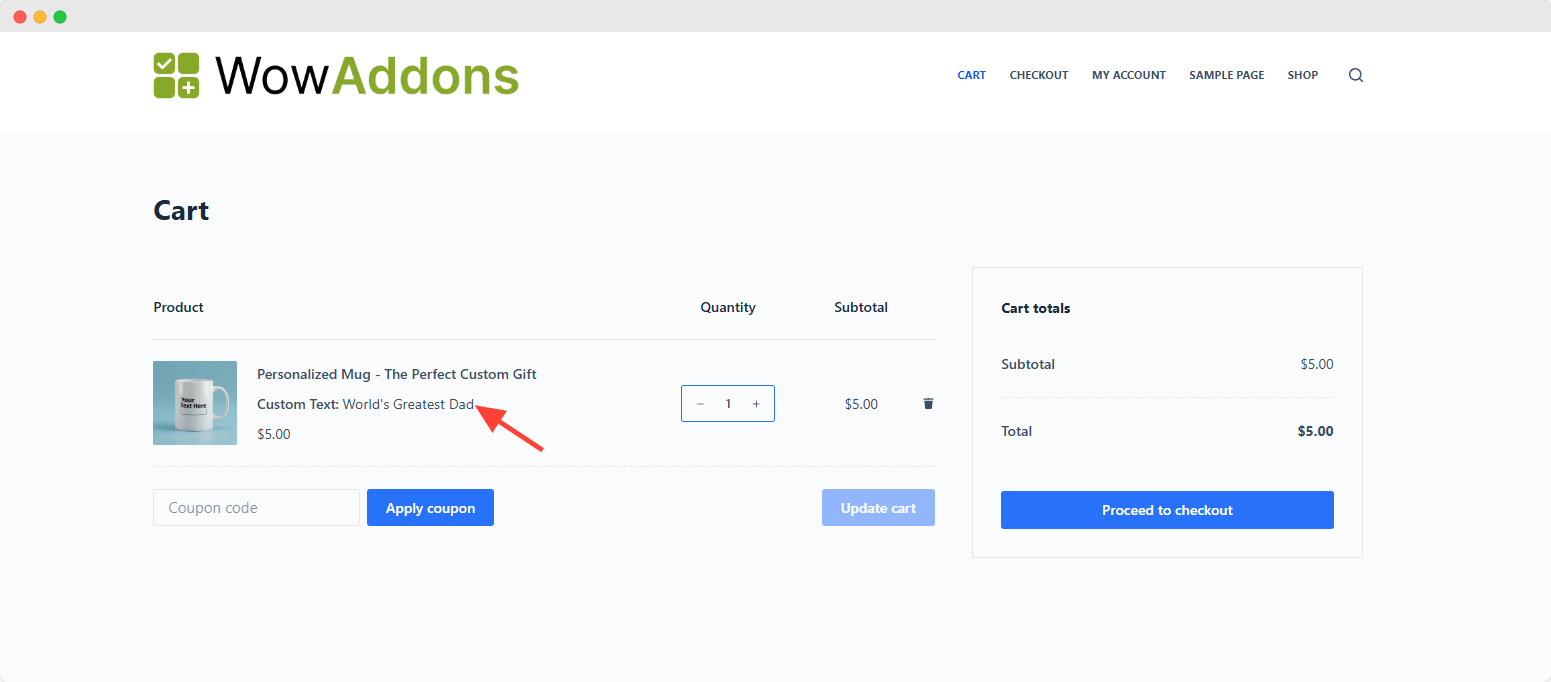
Now, if we add a product to the cart, we can see the custom text field along with other information.
Step 3: Save and Show the Field to Order Details
Last but not least, we can add the following code to show the custom fields to order details as well.
// Save custom text field to order meta
function save_custom_field_to_order( $item_id, $values, $cart_item_key ) {
    if ( isset( $values['custom_text_field'] ) ) {
        wc_add_order_item_meta( $item_id, 'Custom Text', $values['custom_text_field'] );
    }
}
add_action( 'woocommerce_add_order_item_meta', 'save_custom_field_to_order', 10, 3 );
// Display custom field in the order details
function display_custom_field_in_order( $order_id ) {
    $order = wc_get_order( $order_id );

    foreach ( $order->get_items() as $item_id => $item ) {
        if ( $custom_text = wc_get_order_item_meta( $item_id, 'Custom Text', true ) ) {
            echo '<p><strong>Custom Text:</strong> ' . esc_html( $custom_text ) . '</p>';
        }
    }
}
add_action( 'woocommerce_order_details_after_customer_details', 'display_custom_field_in_order' );
Method 2: Add a Text Field to a Product Page using WowAddons
To get full control over the custom text field or add extra charges, use the WowAddons Product Addons Plugin for WooCommerce. Just make sure it’s installed and activated first. You can check the official installation guide if needed.
Step 1: Create a New Addon and Assign to Desired Products
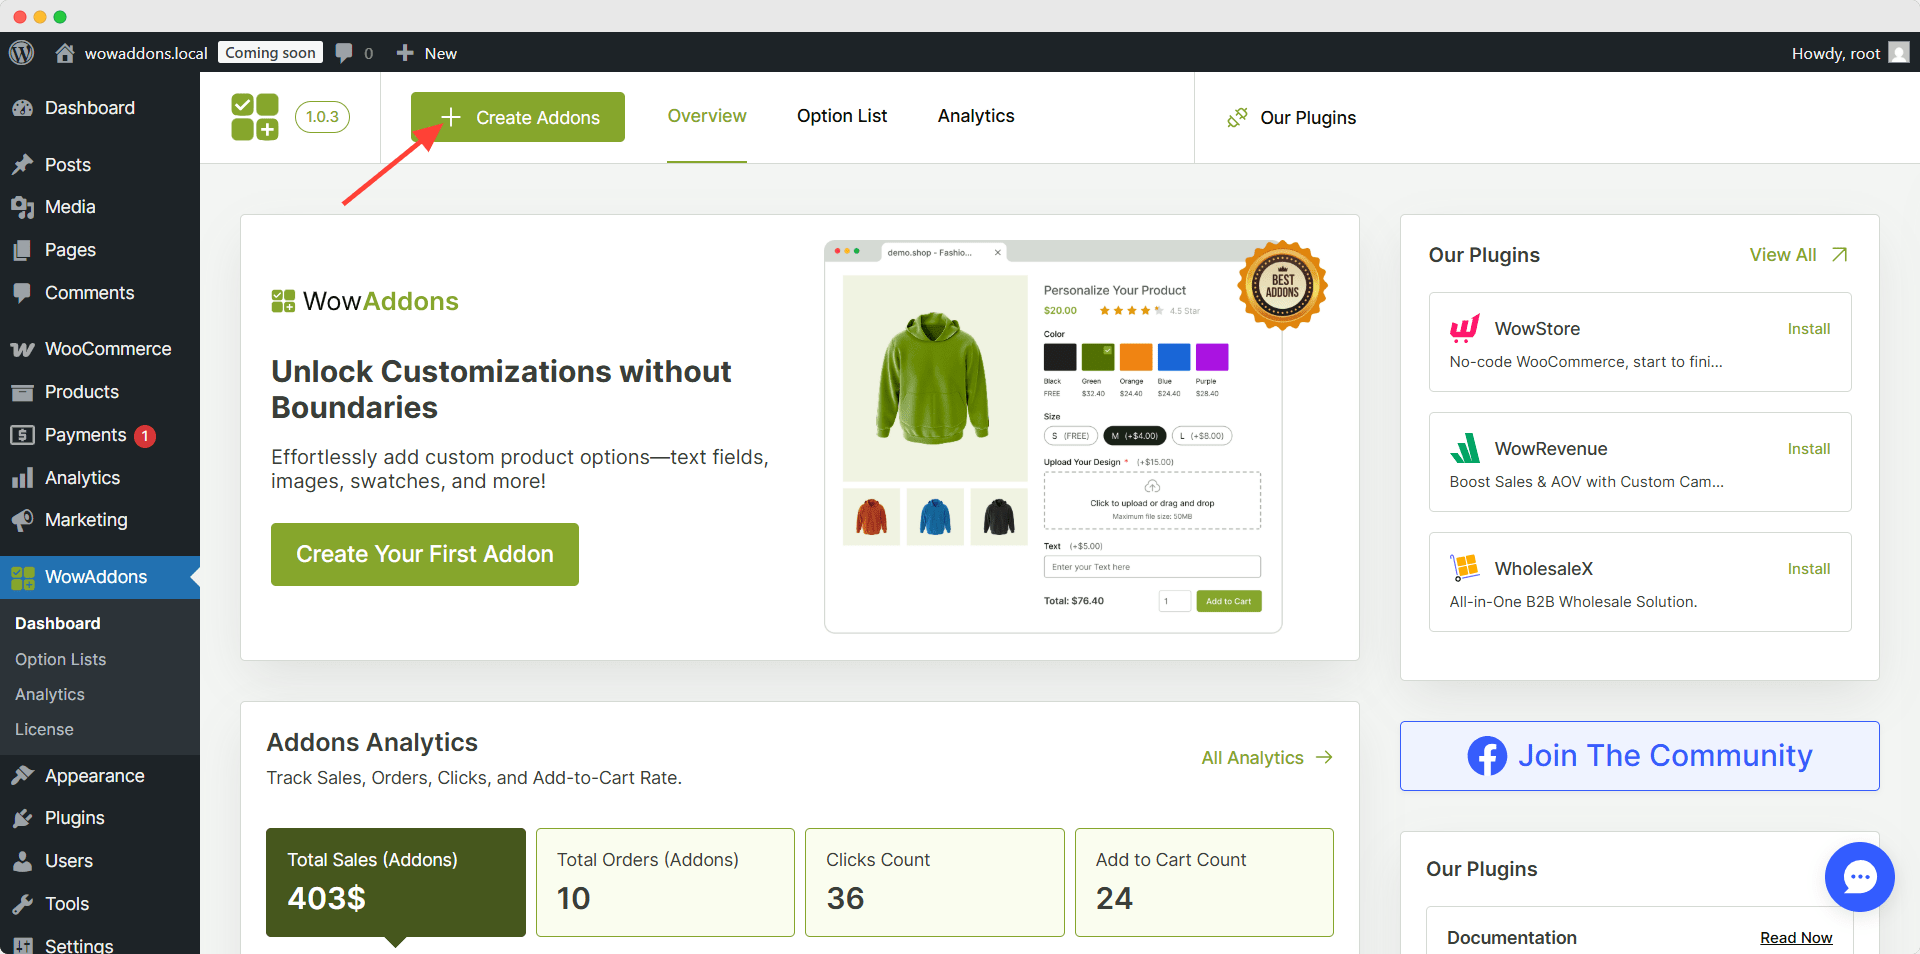
First, go to WowAddons and click “Create Options.” In the builder, give your addon a name so you can easily recognize it later among the ones you create.
Next, select the products where you want the custom text field to show. You can choose from All Products, Specific Product, Specific Category, Specific Tag, or Specific Brand. In this example, we’ll pick Specific Product, then search for and select the item.

Now, to add a custom text field to the selected product pages, click the plus (+) icon and search for the “Text Field” element. Then, simply drag and drop it—or click it—to start customizing.
Step 2: Configure the Custom Text Field
After adding the Text Field element, the settings panel will appear on the left. Here, you can adjust everything as needed. For example, if you’re adding it for a birthday cake, shoppers can type in their wishes. Initially, you can:
- Decide if the field is required (customers must fill it before adding to the cart).
- Show or hide the Title and add a title to the field.
- Choose the price position (with title or with option).
- Add a helpful placeholder so shoppers know what to write (e.g., “Happy Birthday to John”).
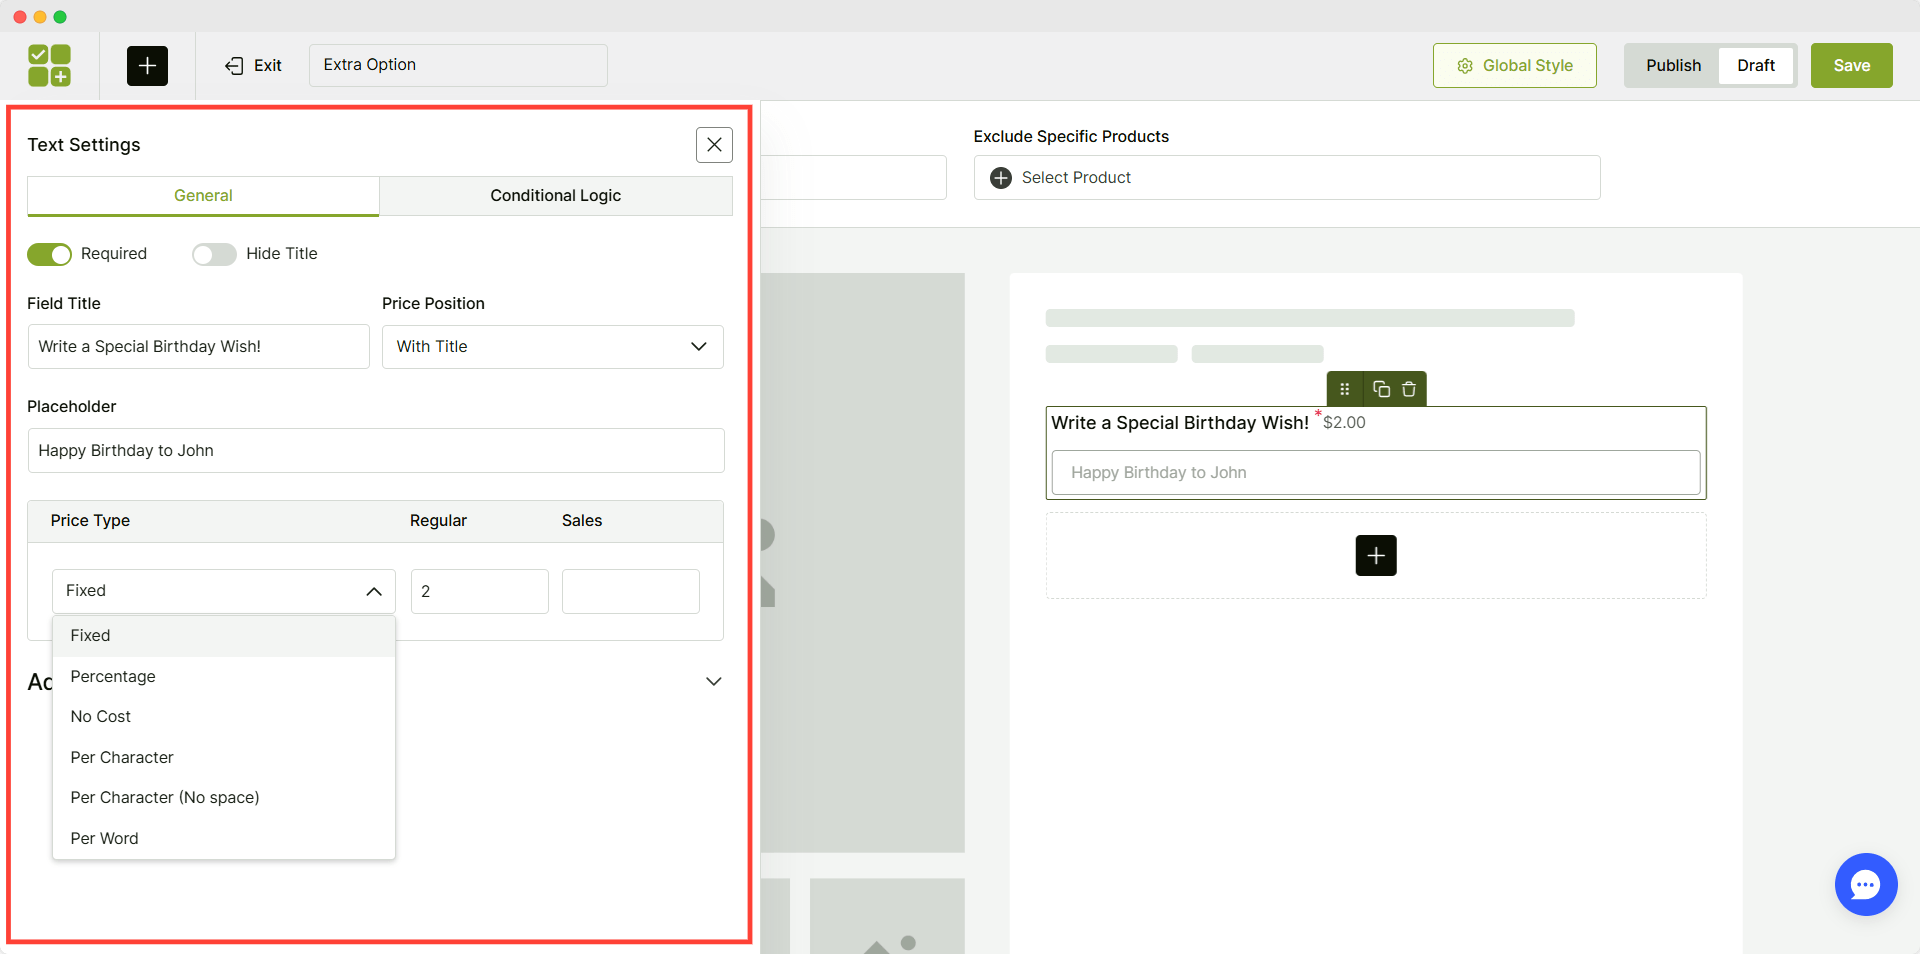
Step 3: Set Price for the Custom Text Fields
Now it’s time to decide whether to charge for the text field or keep it free. To offer it for free, simply select No Cost from the pricing dropdown. If you’d like to add a charge, you can choose from several options:
- Fixed
- Percentage
- Per Character
- Per Character (No space)
- Per Word
Let’s dive deep into each option.
Offering the Customization for Free (No Cost Pricing)
Sometimes the best way to attract customers is to offer personalization at no extra cost. Even though you don’t directly earn from the customization, it can lead to higher sales volume and repeat customers. This is especially effective if you want to:
- Add value to your product – Free customization makes your product stand out against competitors.
- Encourage more sales – Shoppers love free add-ons, which can increase conversions.
- Build customer loyalty – Offering personalization at no charge creates a more memorable shopping experience.
For example, a bakery might allow customers to add a free birthday message on a cake, or a gift shop might include free engraving.
Setting a Fixed Price for Custom Text Fields
A fixed price means you charge the same amount regardless of what the customer types in the custom text field. This option works best when you want a straightforward, predictable fee.
For example, a flat $5 extra for adding a custom message to a cake or engraving on a product. Customers like this option because it’s simple, and you benefit from consistent upsell revenue.
Setting a Percentage Price for Custom Text Fields
With the percentage price option, the extra charge is calculated based on the product’s price. For example, if you set it at 10% and the product costs $100, the custom text field will add $10.
This approach is great when customization value depends on the product’s base price, like luxury items, where personalization adds more perceived value.
Charging Per Character (Including Spaces) for Custom Text Fields
The Per Character (including spaces) option charges customers based on every character they type, including spaces. This is perfect for services like personalized invitations, engraved jewelry, or printed labels, where longer text means more work.
For example, if you charge $0.20 per character, a 25-character message (with spaces) will cost $5.
Charging Per Character (No Spaces) for Custom Text Fields
This option is similar to the one above, but spaces are excluded from the count. It ensures customers aren’t charged for blank spaces, making it feel more fair while still covering the cost of each letter or symbol.
For instance, “Happy Birthday” (no space) would count as 13 characters instead of 14. This method is especially useful if your production cost is tied directly to characters rather than formatting.
Charging Per Word for Custom Text Fields
With the Per Word pricing option, customers are charged based on the number of words they enter. This works well for services like personalized messages, greeting cards, or printed materials, where each word contributes to the overall design or effort.
For example, charging $1 per word means a 10-word message would cost $10. This method is easy for customers to understand and gives them more control over how much they spend.
Adding a Sale Price Alongside the Regular Price
You can even set a sale price alongside the regular price to encourage buyers to act quickly and to increase conversions.
For example, if the regular price is $10 and you set a sale price of $7, customers feel like they’re getting a deal. This creates urgency and can encourage them to add customization right away. It’s a powerful strategy to increase upsells without lowering your perceived value.
Step 4: Setting Up Conditional Logic for the Custom Text Field
Another powerful feature of WowAddons is the ability to show or hide fields based on conditions. For example, you can add a checkbox titled “Write a Special Birthday Message.” When the customer selects Yes, the text field will appear.
Sounds useful, right? And the best part—it’s simple to set up.
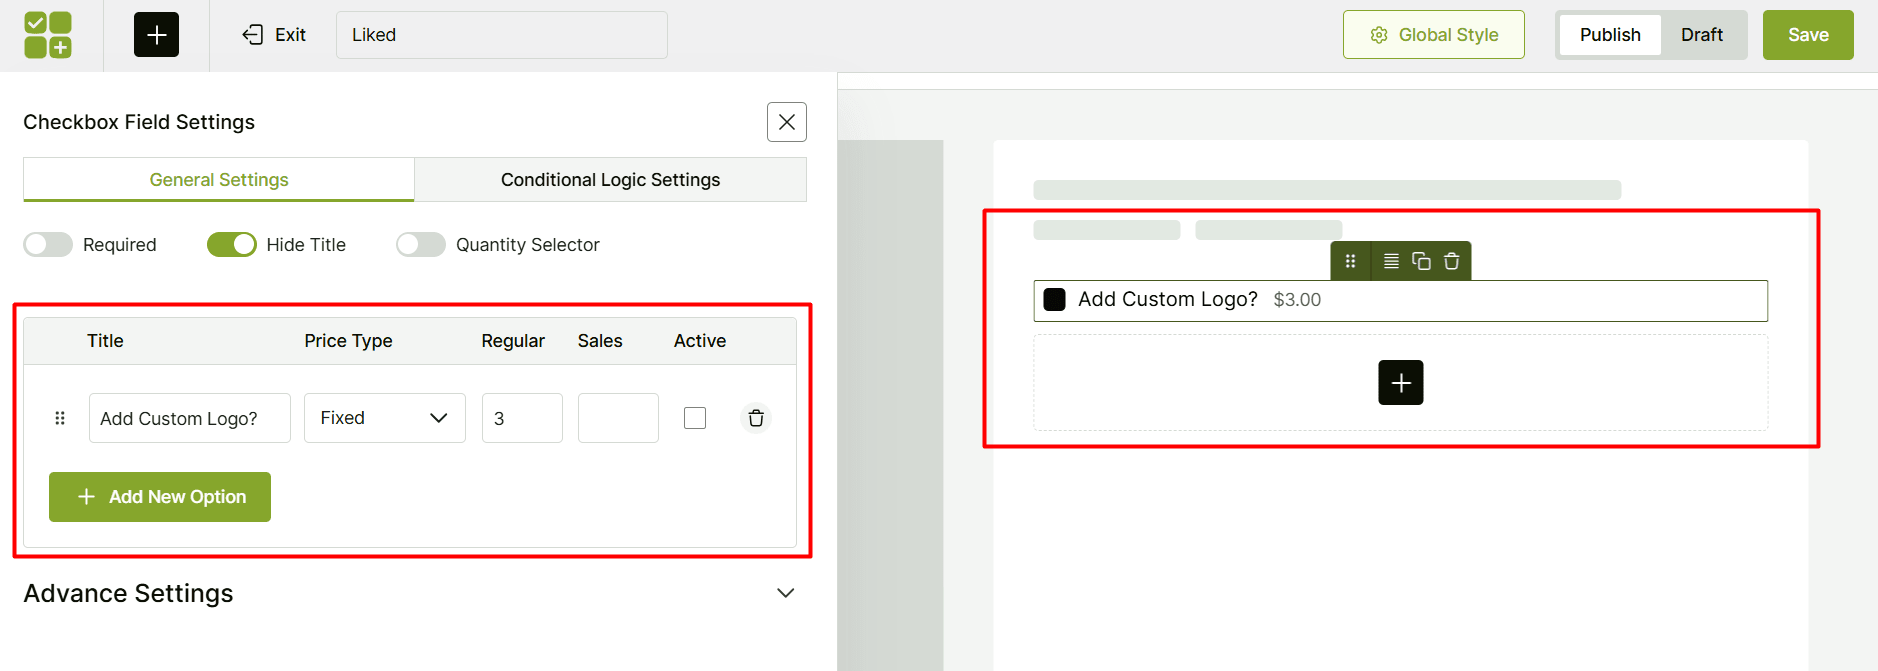
- Search for and add “Checkboxes” in the Elements menu.
- Drag it above the text field using the grab icon.
- Configure it as needed:
- Give it the title.
- Keep only one option (by default, three are created).
- Set the price option to No Cost.
You can also check out How to Add Checkboxes to a Product in WooCommerce.
That’s it! Your conditional field is ready.
Next, go to the Conditional Logic section of the Text Field (not the Checkbox—we want to control the Text Field’s visibility). Enable conditional logic here.
Now, set the visibility to “SHOW” so the Text Field appears when the condition is met. You’ll also notice options to match Any or All rules—since we’re only creating one rule, either choice works. To add the rule:
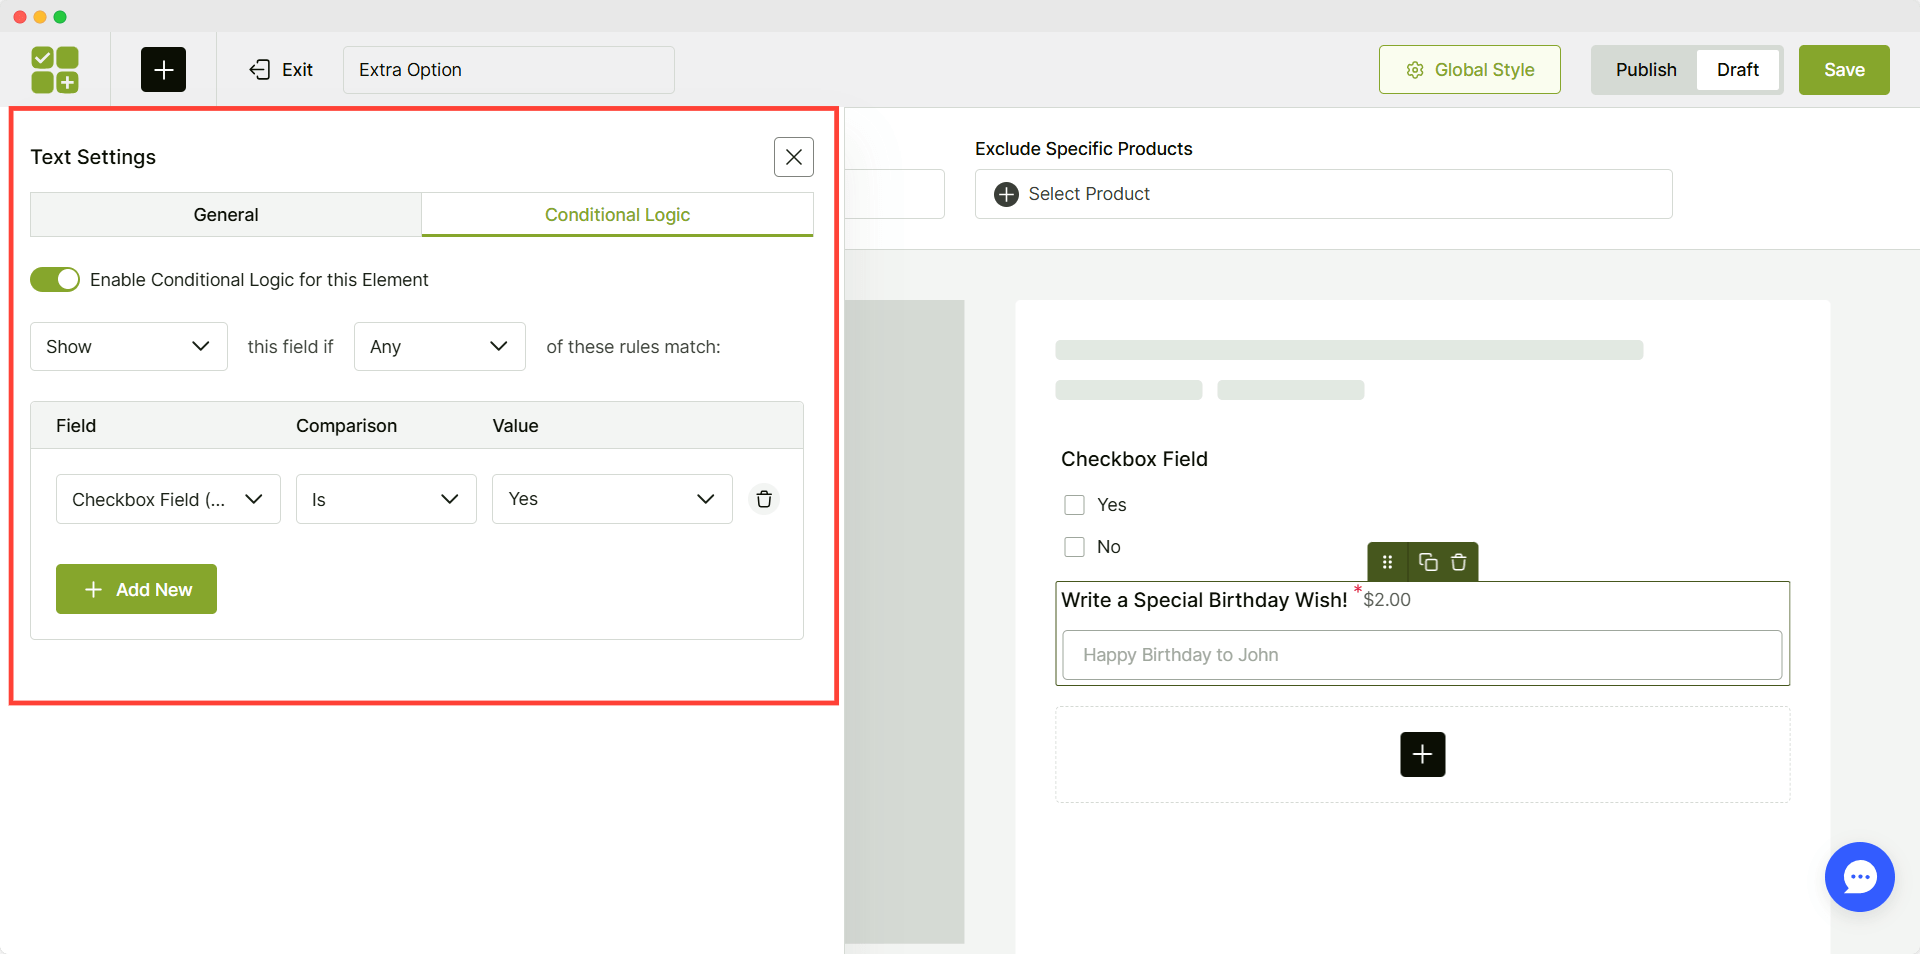
- Click Add New.
- Choose the checkbox field (using the title you set earlier).
- Set the relation to Is.
- Select the option Yes (since that’s the only option we created).
That’s it! The rule now says: When the checkbox option is Yes → Show the Text Field.
Once satisfied with the configuration, we need to publish it and see how it looks from a user’s perspective.
How Can I Show a Custom Text Field on the Cart and Checkout Page
When a customer types something into a custom text field and adds the product to their cart, that text is automatically saved. If they go ahead and place the order, the text will also be stored as part of the order details.
By default, this custom text shows up everywhere it’s needed
- In the cart
- During checkout
- In the order confirmation email
- Inside the customer’s My Account → Orders section
- And for the store admin, directly in the order details in the dashboard
There’s nothing extra you need to turn on with WowAddons WooCommerce, which handles it automatically. Once the product is added with a custom text field, the text follows the product through the entire process.
Here’s an example of how it appears in the cart and checkout:
How to Add a Custom Textarea Field in WooCommerce
Textarea fields still offer the same level of control as Text fields; you can set character limits, allow free characters, or even apply charges per character. The only difference is that Textarea provides a more user-friendly experience for entering larger amounts of text.
In short, use Text when you want something short and simple. Choose Textarea when you expect or encourage longer, multi-line input.
Why Use a Textarea Instead of a Text Field?
A Text field is designed for short, single-line inputs. It’s perfect when you only need something simple like a name, code, or a quick note. However, it becomes limiting if you expect users to provide longer or more detailed responses.
That’s where the Textarea field helps. Unlike a standard Text field, it lets users enter multiple lines of text, and it is perfect for longer messages. For example, if you sell customizable products like greeting cards, invitations, or engraved items, customers can type full messages instead of being limited to a single line.
Additional Custom Product Field You Should Look at
You’re not limited to just text fields. With WowAddons, you can enrich your product pages with a wide variety of field types – more than 22 in total. These let you collect all kinds of customer input and make your products fully customizable. Some of the most popular options include:
- Sections for grouping related fields neatly
- Radio buttons for single-choice selections
- Checkboxes for multiple selections
- Formulas for automatic price calculations
- Switches for quick on/off toggles
- Dropdowns for compact option lists
- Products for selecting items directly in the form
- File uploads for customer-submitted images or documents
- Buttons for interactive actions
- Image swatches for visual option selection
- Color swatches for predefined color choices
- Color pickers for full color flexibility
- Date pickers for selecting calendar dates
- Time pickers for scheduling times
- Range sliders for flexible value input
- URL fields for adding website links
- Email fields for capturing valid addresses
- Number fields for numeric entries only
- Telephone fields for phone number input
- Headings for clear section titles
- Shortcodes for embedding dynamic content
- Separators for dividing form elements
- Spacers for adding layout breathing room
Bonus: Pro Tips to Use WooCommerce Text Field Effectively
Empowering customers with text input is an added advantage. But using it effectively benefits both you and your customers. That’s why we have studied numerous use cases and brought the best tips and tricks for the betterment of your business.
Keep the Field Label Clear
Make sure to add clear and simplified language while explaining the purpose of the custom field. For example, only using something like “Write Your Text,” you should add “Add Text that Will Be Printed on the T-shirt.”
Set Character Limit
Don’t forget to set character limits based on the print placement size. Otherwise, you might end up getting extra characters that can’t be placed in the reserved position. These kinds of misleading things can be the reason for losing sales, and the potential customer will be disappointed.
Make the Best Use of the Placeholder
The placeholder text guides the customers on what they need to write in the custom text field. For example, if the field is for birthday wishes, you can write an example note like, “Happy Birthday to John.”
Align The Text Field with Your Brand
Make sure to place and style the custom field while aligning it with your brand identity. Otherwise, things may look broken. Don’t forget that a professional design feels trustworthy.
Validate Input Values
Last but not least, you also need to validate the inputs. You may want your customers to add only letters, but your customers might also add numbers. So, make sure to restrict these kinds of mistakes before checkout.
Practical Applications: How Businesses Use Custom Text Fields
Custom text fields in WooCommerce are not just a “nice to have” – many stores rely on them every day to enable personalization, capture special instructions, and unlock business flexibility. Below are proven scenarios where these fields are essential:
1. Personalized Gifts & Event Products
Stores that sell custom event products (e.g., banners, mugs, invitations, decor) let customers enter names, dates, quotes, or messages directly on the product page. A real-world example of custom text fields that let buyers personalize items right on the product page — e.g., ‘John & Jane, Est. 2025’ engraved on the back of a plate.
2. Dynamic Pricing by Character / Text Length
Some stores charge per character or apply variable pricing based on how much text the customer enters. Instead of charging a flat fee, the cost adjusts with the length of input, giving more flexibility.
3. Special Instructions / Packaging / Delivery Notes
Beyond engraving or personalization, many uses are practical:
- A buyer might enter “Please wrap this in blue paper” or “Add birthday card: Happy 25th”
- For fragile or custom shipments: “Deliver after 5 PM” or “Leave at back door”
- For food or gift baskets: “No nuts,” “Vegan,” “Include extra strawberries”
These text inputs allow fulfilling exactly what the customer wants without back-and-forth communication.
4. Custom Product Modifications / Specs
For items that need custom dimensions or modifications:
- “Make this frame 2 cm wider on the right side.”
- “Cut the wood 10 mm shorter.”
- “Use brushed metal finish on left side, glossy on right”
These fields let the customer supply precise instructions without having to call or email after ordering.
5. Conditional & Contextual Fields
Custom text fields can be shown only under certain conditions. For example:
- If the customer checks “Yes, I want engraving,” then the “Engraving text” field appears
- If a user selects “Custom dimensions,” then a text input shows for the exact size
- If the product is marked “gift,” a “Gift note” field appears
This keeps the product page clean and only shows relevant options.
Helpful Resources for You
Here are a few things I put together to help you out.
- Check out How to Add Range Sliders on WooCommerce Product Page
- How to Add a Color Picker Option in WooCommerce
- Set Different Prices for Different Product Sizes in WooCommerce
- For adding a date field, learn how to add a Date Picker Option to WooCommerce Products
- Within minutes, learn how to Add Color Swatches to WooCommerce Products
- Learn How to Add Custom Dropdown Options to WooCommerce Product Pages
- If you’re interested in shoes, then you can read How to Sell Shoes Online Like a Pro! (Even as a Beginner)
Add a Text Field to WooCommerce Product Today!
To add a text field to a WooCommerce product, you’ll need a plugin since WooCommerce doesn’t provide this functionality by default. With the WowAddons plugin, you can easily create a custom text field in WooCommerce and allow customers to enter personalized details while shopping.
This plugin also makes it simple to add other custom product fields, giving you more flexibility to collect exactly the information you need from your buyers.
We’ve shown you two methods—now it’s your turn to choose. If you just need a basic text field, go with the code method. But if you want advanced options like extra charges, conditional logic, or character limits, the smarter choice is the WowAddons Product Addons plugin. It gives you all the key custom product fields at a reasonable price and with no learning curve. Try it first before looking at other tools.
FAQs – Add Text Field to WooCommerce Product
Here I’ve answered some common questions on adding Custom Text Fields in WooCommerce:
Q1. Can I add custom product fields in WooCommerce?
By default, WooCommerce doesn’t offer this feature. But you can easily add custom product fields with a plugin like WowAddons.
Q2. How do I add a custom text field in WooCommerce?
You can either use custom code for a simple solution or install a plugin to add a custom text field to a WooCommerce product without technical work.
Q3. Why should I use a plugin instead of code?
A plugin lets you add custom text fields to products quickly and gives you advanced options like conditional logic, extra charges, and character limits—features that coding alone can’t provide.
Q4. What’s the easiest way to add a text field to a WooCommerce product?
The easiest way is to use a Product Addons plugin such as WowAddons. It allows you to add custom text fields to products in just a few clicks.

