A WordPress post slider is a handy block that dynamically takes content from a specific source and displays it to your website or blog visitors. Now with the latest update of WordPress, you can add Gutenberg Post Slider with a free Plugin. So how to add Gutenburg Post Slider in WordPress?
To add WordPress Slider using Gutenberg blocks, you need to follow these four simple steps:
- Install and Activate the PostX Plugin.
- Create a new page or start editing the existing page where you want to show the post slider.
- Add post slider Gutenberg block.
- Click on Publish or Update the page.
That’s all! So, without further ado, let’s get started.
Video Guide to Use Gutenberg Post Slider
Here’s an easy-to-use video guide for Gutenberg Post Slider.
In case you’re still unable to use the Gutenberg Post Slider, continue to read as we will go through the whole process step-by-step.
Easiest Way to Create Gutenberg post slider in WordPress
Not all WordPress users are expert developers. Now, the Gutenberg update has made it more difficult for new beginners. But, don’t worry if you are a beginner; I will show you the easiest way to add a WordPress post slider step by step.
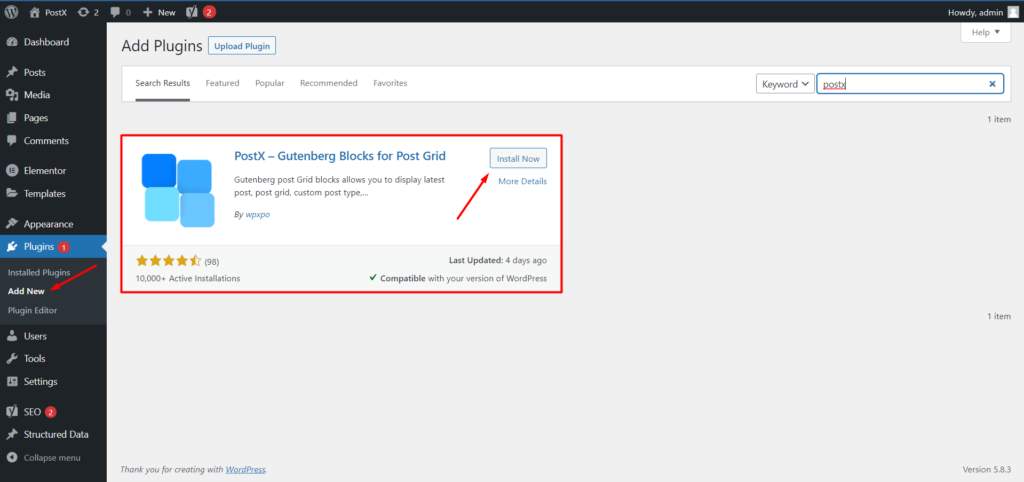
Step – 1: Install and Activate the PostX Plugin
First of all, log in to your WordPress site. Go to the plugin section and click on the “Add New” button. Type PostX on the search bar and click on “Install.” Then click on the active, and the plugin will be ready for use.
👉 Get PostX Pro to unlock all exciting features and make amazing Websites
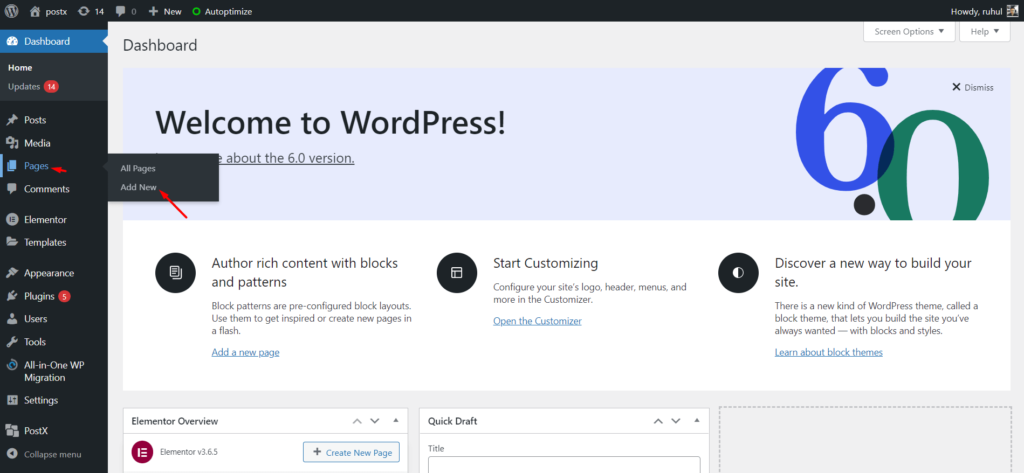
Step – 2: Create or Edit the existing page to add a slider
You can add a WordPress image slider to a new page or an existing one. For example, let’s look at the WordPress Gutenberg image slider to a new page. Go to the page section and click on add new.
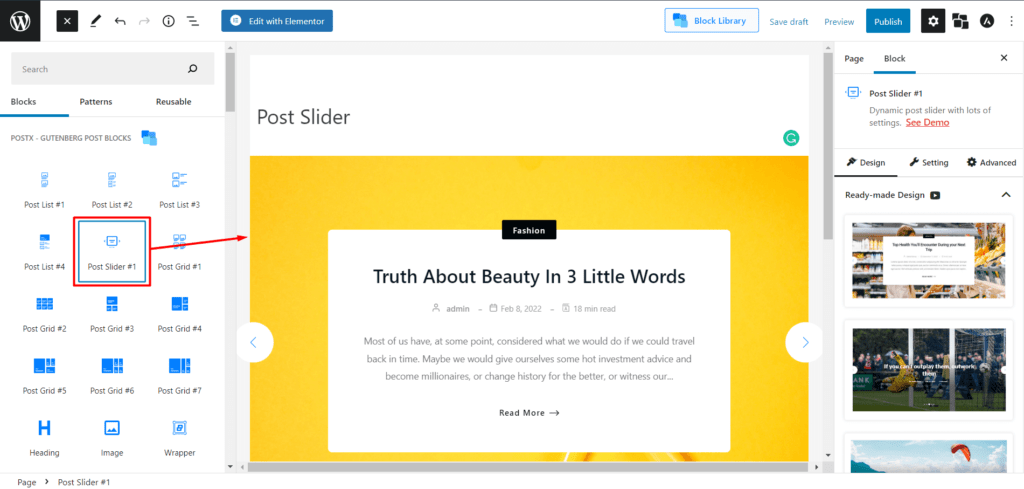
Step – 3: Add the post slider block
Click on the plus icon from the blocks editor. Then choose the post slider block. The ready-made post slider will be added to the page.
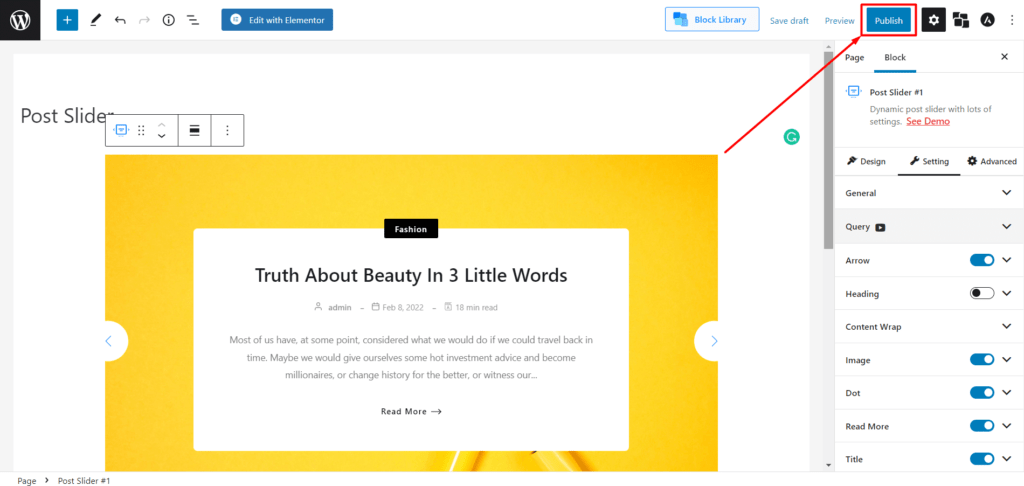
Step 4: Publish or Update the page
Now, the slider is added to the page. Click on “publish” for the new page and click on “update” for an existing page. The image slider will be visible on the page.
When talking about Post Slider, we can’t stop to notify you about another amazing Gutenberg Blocks: The Featured Slider. Adding a featured slider will make your site more and more appealing.
✨To learn all the details of Featured Slider, Click Here!✨
How to Customize WordPress post slider with Gutenberg Block
As you already know that PostX offers a ready-made dynamic slider for WordPress. But you will be happier knowing that this plugin’s free version also provides customization options.
Pre-made Blocks Designs
Content creation pressures often consume your time customizing your post blocks. But, on the other hand, a mundane-looking default design can drive your viewer away even when you have excellent content. That is why Gutenberg’s dynamic post slider comes with attractive pre-made designs.
Everything you need is already arranged. You can easily select your desirable pre-made design from the “Design” section of the block. These pre-made designs will save you time while offering a premium look to your post slider. Now you can add dynamic post sliders on the go.
👉🏼Click here to learn more about adding Pre-made Blocks Designs!
General
The number of posts can also be controlled from this section. Up to 50 posts can be added in a single post slider. You can also change the height of your post slider from here. Each post slider can be aligned in three different ways. Autoplay and animation fade can also be activated from this section. Animation fade will create a smooth transition from one slide to another.
Query
Gutenberg’s dynamic post slider comes with its own query builder. You can easily add many parameters with the use of this widget. There is no alternative to properly organizing your content for the convenience of your blog or website visitors.
This is where Gutenberg’s dynamic post slider shines. You can use Gutenberg’s post slider both as a post and a page. This can easily be changed on the “post type” bar on the query section. You can also control the total number of posts.
This widget lets you organize your content according to category or tag. You simply need to click on the respective buttons to change the parameter.
To sort your content by a certain order, you need to click on the “Order by” bar and select your method. Content from different posts can be added to your post slider using the “include post” bar. To do so, you must add the post id with a comma.
Similarly, you can also exclude the contents of different posts using the “exclude post” bar. Finally, you can change the number of offset posts by using the “offset post” bar at the end of the widget. This allows you to skip several posts before your dynamic post slider goes live.
👉🏼Click here to learn more about the amazing PostX Advanced Query Builder!
Arrow
A dynamic post slider usually has an arrow on each side of the slider to manually navigate through the content of the slider. These arrows are crucial for both the look and the function of a dynamic post slider.
You can easily customize your arrows as your content demands. Right at the top, you can choose from three different types of arrows in the “Arrow Style “section. Each design will give your post slider a distinct look.
You even change the size, width, height, and vertical position of the arrows of your post slider. All of the options have their own boxes. Each measurement can be changed accurately by giving input in their respective boxes. The original arrows, along with the hovering animation, can be customized using the options beneath them.
You can even change the color of arrows along with the background color. The border and the box shadow can also be changed according to your preferences from this section. These options are also available for the hovering animation.
Content Wrap
A content wrap summarizes and highlights the best parts of your dynamic post slider. A proper content wrap gives the visitors of your website an acute description of your post slider and promotes it. Gutenberg’s content wrap does this with excellence and gives you ample opportunity to customize.
For example, you can easily change your content wrap’s vertical and horizontal position. To do so, you only need to click on one of the three position buttons of both the vertical and horizontal options.
The height and width of the content wrap can be changed by giving input on their respective boxes. You can change the options both in the normal and the hover mode. Each mode lets you change the background color and other options to stylize your content better.
You can also change the inputs of border radius, box shadow, inner padding, and padding. Each option comes with its own set of boxes where you can give input to change the settings.
Image
Images are the soul and heart of a dynamic post slider. Proper images in the right format can engage the visitors of your website or blog like no other. Similarly, your images’ bland and uninspiring presentation can be unappealing to your visitors.
That is why Gutenberg’s dynamic post slider comes with ample options for you to tweak when it comes to images. You can even add hover animations to your images. For better customization, there are two modes with many options. In Normal mode, you can customize how your image will appear normally.
In the hover mode, you can customize your image’s appearance when you put your cursor on it. You simply need to click on their respective buttons to change from one mode to another.
For example, you can easily change the grey scale in both modes using the grayscale meter right below the mode buttons. The radius of your images can also be changed from the radius option both in normal and hover mode.
You simply need to insert your desired input into the “top,” Right,” “Bottom,” and “left” boxes to adjust the radius. A box shadow can also be added to your post slider with your desired color and size.
Lastly, you can change the overlay type of the images by changing it on the “Overlay Type” box. You can have your pick out of the five overlay types.
Dot
Every post slider comes with dots that indicate the number of slides within that post slider. It also lets your visitors know which slide they are viewing. This function lets your visitor navigate through your dynamic post slider with precision.
Without dots, visitors easily become frustrated and confused. And confused, frustrated visitors more often than not leave your website or blog, never to return. This is why many options are given to tweak within the dot widget in Gutenberg’s dynamic post slider.
Firstly, you can adequately increase or decrease the space between the dots. Then, you can change the input on the “space” box.
The vertical and horizontal positions of the dots can also be changed in the same way. Both active and inactive dots have their own options for you to tweak with. You can easily change the width and height by changing the input on their respective boxes.
Even the background color and border can be customized to your preferences. Customizable options are also available for the box shadow and the border-radius.
All you need to do is change the input on their respective boxes to customize them.
Read More
“Read more” is one of the most important parts of a dynamic post slider. It takes your visitors to a more elaborated piece of content from the one displayed in a single slide. This allows your visitors to navigate through your content more easily and comfortably.
The “read more” section attributes much to the whole look of your dynamic post slider. Even here, Gutenberg offers many options for you to tweak with. Firstly the text in your post slider doesn’t necessarily have to be “read more.”
You can change this text on the “read more” widget by typing in your desired text on the box at the top. There is usually an icon after the “read more” text.
Gutenberg’s post slider offers three stylish icons to add to your text. You can also omit the icon altogether if you feel like it. The icon size can be changed using the “icon size” bar. You can change the color, background color, border, and border radius of your “read more” text and the icon.
These can be changed both in the normal and the hovering state. For example, setting the color to black on the normal button will make the actual color of the text black.
On the other hand, setting the color to red on the hover button will turn the text red only when you put your cursor on it. Lastly, you can change the space between your “read me” text and other content on your post slider from all directions.
You only need to put your desired input on “spacing” boxes. You can change the spacing from all four directions. Similarly, the padding can also be changed.
Decided to add a load more button on the bottom of the page? Here’s an extensive guide on adding a load more button to your site using Post.
Title
In the world of websites, a title is one of the most important things to be considered. A title not only serves as an introduction to your content but also plays an important part in SEO.
A good title can go a long way with the visitors to your website. On the contrary, a poor title will not only drive away your visitors but also ruin your search engine optimization.
Here at Gutenberg, we understand this and offer you ample options to make your title excellent. For better results in SEO, you can aptly customize your title tags right at the top of the “title” widget.
To do so, you only need to change from one button to another. To change the position of your title, you need to turn on or off the “below meta” button. As it suggests, your title can be over or below the meta.
You can also change the color of your title and the hovering color. To change the colors, you only need to click on the respective boxes and choose from a wide spectrum of colors.
To change the typography of your title, you have to click on the typography section. Here you can change the font size, font type, font weight, line height, letter spacing, and much more.
Additionally, there are some decorations here for you to give your title some extra weight. Lastly, you can change the padding of your title from all directions.
Category
Categorizing your dynamic post slider is crucial for building a user-friendly website or blog. A lack of it can cause devastating confusion for your website’s visitors. Not only will this turn off your visitors, but it will also ruin the reputation of your blog or website.
Gutenberg’s Category widget lets you categorize your post slider precisely and beautifully. It offers you four different styles to categorize. You can change this on the “category style” bar at the top of this widget. The typography can also be customized according to your preferences. And you can open a pandora’s box when using the Category Addon of PostX.
All the usual options are available here for you to tweak. You can change both the color of your text and the hovering color. Customization options for background color, and the border is available for both the text and the hover animation.
Border radius, spacing, and padding can also be changed according to your preferences. To do so, you merely have to change the inputs on the four boxes of each.
Meta
A meta provides concise information about your post slider to your website or blog visitor. It is also visible to those who are searching for your content. Appropriate meta tags will keep your content SEO-friendly and accessible to visitors.
Gutenberg’s Meta widget was created with such things in mind. It offers you many features to better customize your meta tags. Firstly, you can change the position of your meta from top to bottom and vice versa. You only need to click on the respective buttons to do that.
Gutenberg offers you six distinct styles in which you can arrange your meta tags. You can easily choose the one you desire from the “style” bar. Finally, you can use six different separators on the “separator” bar to separate your tags from one another.
On the “meta” bar, you can add or omit your meta tags. The typography of the text can be changed by clicking on the icon in the typography section. You can also change the tags’ color and their hovering color.
For these separate sections, colorful boxes indicating the chosen colors are present. The spacing, margin, and padding also have separate sections you can tweak with the measurements.
Lastly, your meta tags can also add a border and a background. You can choose the color of the background. In the case of the border, you can choose from six different styles.
Excerpt
An excerpt provides the visitors of your website or blog with a summary of your post slider. This helps your visitors understand what your post slider is about.
Simultaneously, it attractively promotes your content to lure in visitors. A well-thought-out excerpt can go a long way in generating traffic for your website or blog.
But a lot more depends on the presentation of your excerpt and the actual content. Gutenberg’s dynamic post slider gives you a polished presentation. You can either show the full excerpt or only part of it.
To show the whole excerpt, you only need to turn on the sliding button at the top of this widget. However, if you choose to show only a part of it, a bar will appear below the sliding button. You can control how much of your excerpt you want to show.
You can also change the typography and color of the text. Both come with their usual options similar to the other widgets. Lastly, you can change the padding of your excerpt from all directions.
You must put your desired input on the four directional boxes to do this.
Now that we learned about Meta and Excerpt, here’s an excellent guide on replacing WordPress Excerpt with Meta Description.
Final Remarks
The dynamic post slider of PostX holds the future of WordPress inside it. It will give your website or blog a look of elegance while saving you time. Here everything is already prepared for your use. So why the delay?
Grasp the future in your hand with the help of PostX’s dynamic post slider and other post blocks. Get this amazing plugin now.
You can check out WordPress video tutorials on our YouTube Channel. Also, find us on Facebook and Twitter for regular updates!
👉 Get PostX Pro to unlock all exciting features and make amazing Websites